学习Haproxy (七)
haproxy是个高性能的tcp和http的反向代理。它就是个代理。不像nginx还做web服务器

nginx的优点和缺点
|
1
2
3
4
5
6
7
8
9
10
11
|
优点:1、web服务器,应用比较广泛,大家都会2、可以作为7层负载均衡,location设置复杂的基于HTTP的负载均衡3、性能强大,网络依赖小4、安装配置简单缺点:1、健康检查单一,不支持基于url的健康检查(可以使用第三方插件实现)2、负载均衡算法少3、不能动态管理,比如踢出某个web节点,需要reload配置4、没有集群upstream的状态页面 |
haproxy的优点和缺点
|
1
2
3
4
5
6
7
8
9
10
11
|
优点:1、专门做反向代理负载均衡2、负载均衡算法比较多,大于等于8种,比nginx丰富3、性能不低于nginx,大于等于nginx4、支持动态管理,通过和haproxy的sock进行通信,可以进行管理5、有比较丰富的Dashboard的页面,监控方便。有管理页面6、比较强大的7层反向代理功能,在7层方便,功能强大7、会话保持比nginx丰富。可以基于cookie和源IP(nginx也能做到基于IP和cookie)缺点:配置没有Nginx简单(相对熟悉) |
先杀掉原先的nginx进程,防止80端口被占用,导致haproxy无法启动
|
1
2
3
4
|
[root@linux-node1 conf]# pkill nginx[root@linux-node1 conf]# ps aux | grep nginxroot 27201 0.0 0.0 112664 972 pts/0 S+ 05:39 0:00 grep --colour=auto nginx[root@linux-node1 conf]# |
部署haproxy,这里是编译安装,版本是1.6.3,执行命令如下
|
1
2
3
4
5
6
7
8
|
cd /usr/local/src/wget http://www.haproxy.org/download/1.6/src/haproxy-1.6.3.tar.gztar xfz haproxy-1.6.3.tar.gz cd haproxy-1.6.3make TARGET=linux2628 PREFIX=/usr/local/haproxy-1.6.3make installcp /usr/local/sbin/haproxy /usr/sbin/haproxy -v |
|
1
2
3
4
5
|
[root@linux-node1 haproxy-1.6.3]# haproxy -vHA-Proxy version 1.6.3 2015/12/25Copyright 2000-2015 Willy Tarreau <willy@haproxy.org>[root@linux-node1 haproxy-1.6.3]# |
|
1
2
3
4
5
6
7
8
|
[root@linux-node1 haproxy-1.6.3]# pwd/usr/local/src/haproxy-1.6.3[root@linux-node1 haproxy-1.6.3]# cd examples/[root@linux-node1 examples]# ls haproxy.init haproxy.init[root@linux-node1 examples]# cp haproxy.init /etc/init.d/haproxy[root@linux-node1 examples]# chmod +x /etc/init.d/haproxy [root@linux-node1 examples]# |
创建haproxy用户和相关目录
useradd -r表示创建系统账号
|
1
2
3
4
5
|
[root@linux-node1 examples]# useradd -r haproxy[root@linux-node1 examples]# [root@linux-node1 examples]# mkdir /etc/haproxy -p[root@linux-node1 examples]# mkdir /var/lib/haproxy -p[root@linux-node1 examples]# |

重启rsyslog
|
1
2
3
4
5
6
|
[root@linux-node1 ~]# vim /etc/rsyslog.conf [root@linux-node1 ~]# systemctl restart rsyslog[root@linux-node1 ~]# netstat -lnup | grep 514udp 0 0 0.0.0.0:514 0.0.0.0:* 27509/rsyslogd udp6 0 0 :::514 :::* 27509/rsyslogd [root@linux-node1 ~]# |
关于mode http 你如果不写,默认继承defaults里面的
defaults默认不写好像也是http。
tcp的需要注明。
mode tcp
|
1
2
3
4
5
6
7
8
9
10
11
12
13
14
15
16
17
18
19
20
21
22
23
24
25
26
27
|
[root@linux-node1 ~]# cd /etc/haproxy/[root@linux-node1 haproxy]# vim haproxy.cfg[root@linux-node1 haproxy]# cat haproxy.cfg global chroot /var/lib/haproxy daemon group haproxy user haproxy log 127.0.0.1:514 local3 infodefaults log global #使用全局的日志配置 mode http option httplog option dontlognull #日志中不记录空连接,比如不记录健康检查的连接 timeout client 50000 timeout server 50000 timeout connect 5000frontend http_front bind *:80 stats uri /haproxy?stats default_backend http_backbackend http_back balance roundrobin server linux-node1 10.0.1.105:8080 check server linux-node2 10.0.1.106:8080 check[root@linux-node1 haproxy]# |
启动haproxy
|
1
2
3
4
5
6
7
8
|
[root@linux-node1 ~]# /etc/init.d/haproxy startReloading systemd: [ 确定 ]Starting haproxy (via systemctl): [ 确定 ][root@linux-node1 ~]# [root@linux-node1 ~]# netstat -lntp | grep 80tcp 0 0 0.0.0.0:80 0.0.0.0:* LISTEN 27556/haproxy tcp6 0 0 :::8080 :::* LISTEN 20130/httpd [root@linux-node1 ~]# |
|
1
2
3
4
5
|
[root@linux-node1 ~]# grep local3 /etc/rsyslog.conf local3.* /var/log/haproxy.log[root@linux-node1 ~]# [root@linux-node1 ~]# systemctl restart rsyslog[root@linux-node1 ~]# |

再次重启haproxy服务,就可以看到haproxy的日志文件生成了。可以看到启动过程
|
1
2
3
4
5
6
7
8
9
|
[root@linux-node1 ~]# /etc/init.d/haproxy restartRestarting haproxy (via systemctl): [ 确定 ][root@linux-node1 ~]# tail -f /var/log/haproxy.log Feb 27 06:33:43 localhost haproxy[27648]: Stopping frontend http_front in 0 ms.Feb 27 06:33:43 localhost haproxy[27648]: Stopping backend http_back in 0 ms.Feb 27 06:33:43 localhost haproxy[27648]: Proxy http_front stopped (FE: 0 conns, BE: 0 conns).Feb 27 06:33:43 localhost haproxy[27648]: Proxy http_back stopped (FE: 0 conns, BE: 0 conns).Feb 27 06:33:43 localhost haproxy[27687]: Proxy http_front started.Feb 27 06:33:43 localhost haproxy[27687]: Proxy http_back started. |
继续优化更改下配置
haproxy可以自定义健康检查的url,这是nginx不具备的
check:启用健康检测
inter:健康检测间隔
rise:检测服务可用的连续次数
fall:检测服务不可用的连续次数
|
1
2
3
4
5
6
7
8
9
10
11
12
13
14
15
16
17
18
19
20
21
22
23
24
25
26
27
28
29
|
[root@linux-node1 ~]# cd /etc/haproxy/[root@linux-node1 haproxy]# vim haproxy.cfg [root@linux-node1 haproxy]# cat haproxy.cfg global chroot /var/lib/haproxy daemon group haproxy user haproxy log 127.0.0.1:514 local3 infodefaults log global mode http option httplog option dontlognull timeout client 50000 timeout server 50000 timeout connect 5000frontend http_front mode http bind *:80 stats uri /haproxy?stats default_backend http_backbackend http_back option httpchk GET /index.html balance roundrobin server linux-node1 10.0.1.105:8080 check inter 2000 rise 3 fall 3 weight 1 server linux-node2 10.0.1.106:8080 check inter 2000 rise 3 fall 3 weight 1[root@linux-node1 haproxy]# |
重启服务
|
1
2
3
4
5
6
|
[root@linux-node1 haproxy]# /etc/init.d/haproxy restartRestarting haproxy (via systemctl): [ 确定 ][root@linux-node1 haproxy]# netstat -lntp | grep 80tcp 0 0 0.0.0.0:80 0.0.0.0:* LISTEN 27849/haproxy tcp6 0 0 :::8080 :::* LISTEN 20130/httpd [root@linux-node1 haproxy]# |
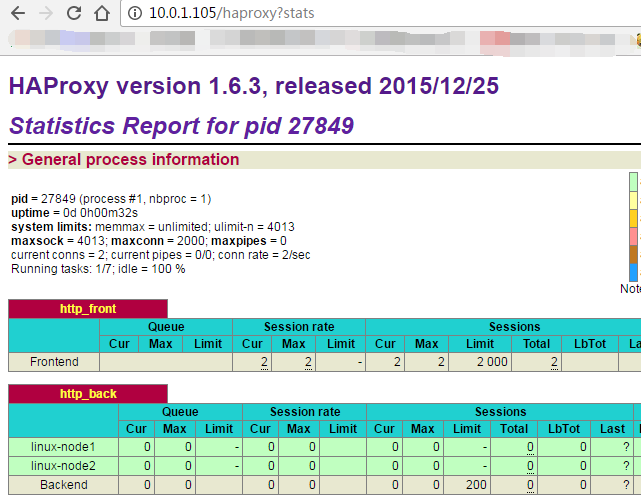
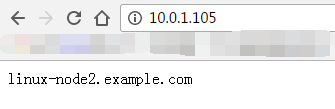
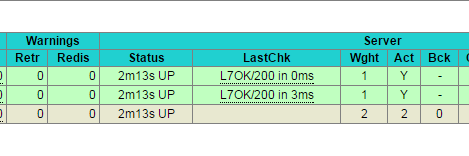
页面测试,目前也是轮询的
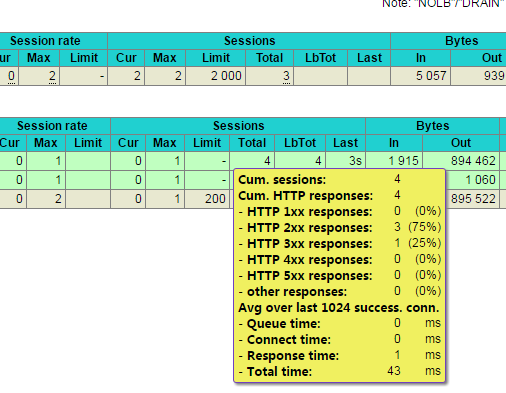
多访问几次,健康页面有新的数据变化

sessions这里可以看到有没有失败的访问
结合haproxy的acl配置反向代理功能,先备份原先配置文件
设置acl
这样能支持多个域名,让不同的域名,访问不同的backend上面去
|
1
2
|
[root@linux-node1 conf]# cp /etc/haproxy/haproxy.cfg /etc/haproxy/haproxy.cfg.ori[root@linux-node1 conf]# vim /etc/haproxy/haproxy.cfg |
修改配置文件为如下
注意,配置文件中,前端和后端不要用特殊符号以及点。它对这些敏感。推荐使用下划线
|
1
2
3
4
5
6
7
8
9
10
11
12
13
14
15
16
17
18
19
20
21
22
23
24
25
26
27
28
29
30
31
32
33
34
35
36
37
|
[root@linux-node1 conf]# vim /etc/haproxy/haproxy.cfg [root@linux-node1 conf]# cat /etc/haproxy/haproxy.cfg global chroot /var/lib/haproxy daemon group haproxy user haproxy log 127.0.0.1:514 local3 info stats socket /var/lib/haproxy/haproxy.sock mode 600 level admin stats timeout 2mdefaults log global mode http option httplog option dontlognull timeout client 50000 timeout server 50000 timeout connect 5000frontend www_nmap_com mode http bind *:80 stats uri /haproxy?stats default_backend www_nmap_com_backend acl is_other_nmap_com hdr_end(host) other.nmap-blog.com use_backend other_nmap_com_backend if is_other_nmap_combackend www_nmap_com_backend option forwardfor header X-REAL-IP option httpchk GET /index.html balance roundrobin server linux-node1 10.0.1.105:8080 check inter 2000 rise 3 fall 3 weight 1backend other_nmap_com_backend option forwardfor header X-REAL-IP option httpchk GET /index.html balance roundrobin server linux-node2 10.0.1.106:8080 check inter 2000 rise 3 fall 3 weight 1[root@linux-node1 conf]# |
重启haproxy
|
1
2
|
[root@linux-node1 conf]# /etc/init.d/haproxy restartRestarting haproxy (via systemctl): [ 确定 ] |
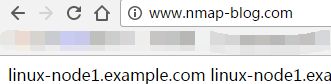
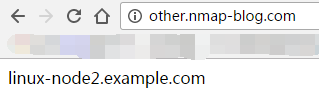
windows客户端配置host文件
|
1
|
10.0.1.105 www.nmap-blog.com other.nmap-blog.com |
这样也实现了haproxy的多域名反向代理
haproxy的acl,也可以根据正则,和后缀设置,下面2种方法。推荐第一种,正则方式匹配
|
1
2
|
acl is_static_reg url_reg /*.(css|jpg|png|js|jpeg|gif)$acl is_static_path path_end .gif .png .js |
修改配置文件做基于正则的acl
|
1
2
3
4
5
6
7
8
9
10
11
12
13
14
15
16
17
18
19
20
21
22
23
24
25
26
27
28
29
30
31
32
33
34
35
36
37
38
39
40
41
|
[root@linux-node1 conf]# cp /etc/haproxy/haproxy.cfg /etc/haproxy/haproxy.cfg.2[root@linux-node1 conf]# vim /etc/haproxy/haproxy.cfg[root@linux-node1 conf]# cat /etc/haproxy/haproxy.cfgglobal chroot /var/lib/haproxy daemon group haproxy user haproxy log 127.0.0.1:514 local3 info stats socket /var/lib/haproxy/haproxy.sock mode 600 level admin stats timeout 2mdefaults log global mode http option httplog option dontlognull timeout client 50000 timeout server 50000 timeout connect 5000frontend www_nmap_com mode http bind *:80 stats uri /haproxy?stats default_backend www_nmap_com_backend acl is_static_reg url_reg /*.(css|jpg|png|js|jpeg|gif)$ use_backend other_nmap_com_backend if is_static_reg #acl is_static_path path_end .gif .png .js #acl is_other_nmap_com hdr_end(host) other.nmap-blog.com #use_backend other_nmap_com_backend if is_other_nmap_combackend www_nmap_com_backend option forwardfor header X-REAL-IP option httpchk GET /index.html balance roundrobin server linux-node1 10.0.1.105:8080 check inter 2000 rise 3 fall 3 weight 1backend other_nmap_com_backend option forwardfor header X-REAL-IP option httpchk GET /index.html balance roundrobin server linux-node2 10.0.1.106:8080 check inter 2000 rise 3 fall 3 weight 1[root@linux-node1 conf]# |
重启服务
|
1
2
3
4
5
6
|
[root@linux-node1 conf]# /etc/init.d/haproxy restartRestarting haproxy (via systemctl): [ 确定 ][root@linux-node1 conf]# lsof -i:80COMMAND PID USER FD TYPE DEVICE SIZE/OFF NODE NAMEhaproxy 48521 haproxy 5u IPv4 1371377 0t0 TCP *:http (LISTEN)[root@linux-node1 conf]# |
因为匹配后会连接到node2,这里就在node2上设置一个js文件,node1不做任何设置。
|
1
2
|
[root@linux-node2 ~]# echo 'test111' >/var/www/html/test.js[root@linux-node2 ~]# |
测试成功

关于后端web节点记录检查日志的问题,因为我设置检查check inter 2000 ,也就是2秒发一次检查包。后端节点日志这里也能看到
|
1
2
3
4
5
6
7
8
9
10
11
12
13
|
[root@linux-node2 ~]# tail -f /var/log/httpd/access_log 10.0.1.105 - - [04/Mar/2017:00:35:46 +0800] "GET /index.html HTTP/1.0" 200 24 "-" "-"10.0.1.105 - - [04/Mar/2017:00:35:48 +0800] "GET /index.html HTTP/1.0" 200 24 "-" "-"10.0.1.105 - - [04/Mar/2017:00:35:50 +0800] "GET /index.html HTTP/1.0" 200 24 "-" "-"10.0.1.105 - - [04/Mar/2017:00:35:52 +0800] "GET /index.html HTTP/1.0" 200 24 "-" "-"10.0.1.105 - - [04/Mar/2017:00:35:54 +0800] "GET /index.html HTTP/1.0" 200 24 "-" "-"10.0.1.105 - - [04/Mar/2017:00:35:56 +0800] "GET /index.html HTTP/1.0" 200 24 "-" "-"10.0.1.105 - - [04/Mar/2017:00:35:58 +0800] "GET /index.html HTTP/1.0" 200 24 "-" "-"10.0.1.105 - - [04/Mar/2017:00:36:00 +0800] "GET /index.html HTTP/1.0" 200 24 "-" "-"10.0.1.105 - - [04/Mar/2017:00:36:02 +0800] "GET /index.html HTTP/1.0" 200 24 "-" "-"10.0.1.105 - - [04/Mar/2017:00:36:04 +0800] "GET /index.html HTTP/1.0" 200 24 "-" "-"10.0.1.105 - - [04/Mar/2017:00:36:06 +0800] "GET /index.html HTTP/1.0" 200 24 "-" "-"10.0.1.105 - - [04/Mar/2017:00:36:08 +0800] "GET /index.html HTTP/1.0" 200 24 "-" "-" |
关于怎么让后端apache不记录健康检查日志,以及如何记录真正的客户端IP,这里不做实验。
学习Haproxy (七)的更多相关文章
- C语言学习 第七次作业总结
C语言学习 第七次作业总结 数组可以分为数组和多下标数组(在传统的国内C语言书本中,将其称为二/多维数组). 数组名称 在之前的课程中,大家应该都有印象,对于int a这样的定义,会为变量 a 声明一 ...
- 前端学习 第七弹: Javascript实现图片的延迟加载
前端学习 第七弹: Javascript实现图片的延迟加载 为了实现图片进入视野范围才开始加载首先: <img src="" x-src="/acsascas ...
- MyBatis学习总结(七)——Mybatis缓存(转载)
孤傲苍狼 只为成功找方法,不为失败找借口! MyBatis学习总结(七)--Mybatis缓存 一.MyBatis缓存介绍 正如大多数持久层框架一样,MyBatis 同样提供了一级缓存和二级缓存的 ...
- 八、Android学习第七天——XML文件解析方法(转)
(转自:http://wenku.baidu.com/view/af39b3164431b90d6c85c72f.html) 八.Android学习第七天——XML文件解析方法 XML文件:exten ...
- (转)Qt Model/View 学习笔记 (七)——Delegate类
Qt Model/View 学习笔记 (七) Delegate 类 概念 与MVC模式不同,model/view结构没有用于与用户交互的完全独立的组件.一般来讲, view负责把数据展示 给用户,也 ...
- 【转】MyBatis学习总结(七)——Mybatis缓存
[转]MyBatis学习总结(七)——Mybatis缓存 一.MyBatis缓存介绍 正如大多数持久层框架一样,MyBatis 同样提供了一级缓存和二级缓存的支持 一级缓存: 基于PerpetualC ...
- Learning ROS for Robotics Programming Second Edition学习笔记(七) indigo PCL xtion pro live
中文译著已经出版,详情请参考:http://blog.csdn.net/ZhangRelay/article/category/6506865 Learning ROS forRobotics Pro ...
- python学习第七讲,python中的数据类型,列表,元祖,字典,之元祖使用与介绍
目录 python学习第七讲,python中的数据类型,列表,元祖,字典,之元祖使用与介绍 一丶元祖 1.元祖简介 2.元祖变量的定义 3.元祖变量的常用操作. 4.元祖的遍历 5.元祖的应用场景 p ...
- Python学习第七课
Python学习第七课 'Alex' "Alex"print('hello'*5) #重复输出字符串 print('hellowold'[2:]) #类似于切片操作:会取出 llo ...
- Typescript 学习笔记七:泛型
中文网:https://www.tslang.cn/ 官网:http://www.typescriptlang.org/ 目录: Typescript 学习笔记一:介绍.安装.编译 Typescrip ...
随机推荐
- weblogic补丁安装失败
转至:https://www.cnblogs.com/lsdb/p/7234989.html weblogic补丁安装失败(Patch B25A is mutually exclusive and c ...
- 安装Android studio 并成功运行
之前是在idea上弄得发现有些问题就下载了Android studio教程(4条消息) Android Studio安装及环境配置教程_xuw_xy的博客-CSDN博客_androidstudio安装 ...
- Qt:QDir
0.说明 QDir提供了访问目录及目录下内容的类. QDir既可以用于访问文件系统,也可以用于访问Qt 资源系统(Qt's resource system.). Qt用 "/" 作 ...
- SVN库文件上传操作步骤
SVN库文件上传步骤: 1,sv st 或 svn status 查看本地库与远程库的差别(M代表文件有修改,?代表目录中有文件本地新增加) 2,根据1步骤中的查看结果:svn diff 差异文 ...
- Go代码规范梳理
Go代码规范(Code Review) 总结几个开发过程中经常会犯的代码规范错误 参考链接:https://learnku.com/go/wikis/48375 注释语句 // Request 表示运 ...
- python 编辑器提示 do not use bare except
在捕获异常时,应该尽可能指定特定的异常,而不是只使用 except 语句. 比如说,except 语句会捕获 KeyboardInterrupt 和 SystemExit 异常,但 KeyboardI ...
- 测评 | 矩池云上架 RTX 2080 Ti 八卡机开箱
大家好,福利君今天给给大家带来的是一则消息.矩池云将上架了超微八卡GPU服务器,全新的机器组合,可靠的服务品质. 产品性能 在这里引用Lambda Labs基于FP32对多GPU扩展训练性能评测的数据 ...
- 【SQL登录问题】
essay from:http://www.jb51.net/article/59352.htm 在与 SQL Server 建立连接时出现与网络相关的或特定于实例的错误.未找到或无法访问服务器 今早 ...
- PointNet: Deep Learning on Point Sets for 3D Classification and Segmentation
摘要 点云是一种重要的几何数据结构类型.由于其不规则的格式,大多数研究人员将此类数据转化为常规的三维体素网格或图像集合.然而,这使数据变得不必要的庞大,并导致问题.在本文中,我们设计了一种新型的直接处 ...
- Linux详解 --- 进程管理
镜像下载.域名解析.时间同步请点击 阿里云开源镜像站 进程管理一览 接下来的几篇博客,我将主要按照这个思维导图的划分去进行讲解. 管理 在理解什么是进程管理之前,我想我们可以先理解一下什么是管理! 问 ...