
分布式任务调度ScheduleMaster
1.什么是ScheduleMaster
ScheduleMaster是分布式任务调度系统。简称:集中任务调度系统,最简单的理解ScheduleMaster,就是对不同的系统里面的调度任务做统一管理的框架。
例如我们现在有多个系统,每个系统针对自己处理不同的业务场景。衍生出自己的调度任务,想象一下,如果每个系统人为去维护,那随着调度任务越来越多,人是崩溃的吧,可见维护和技术成本是巨大的,这时我们需要选择分布式任务系统框架做统一的管理
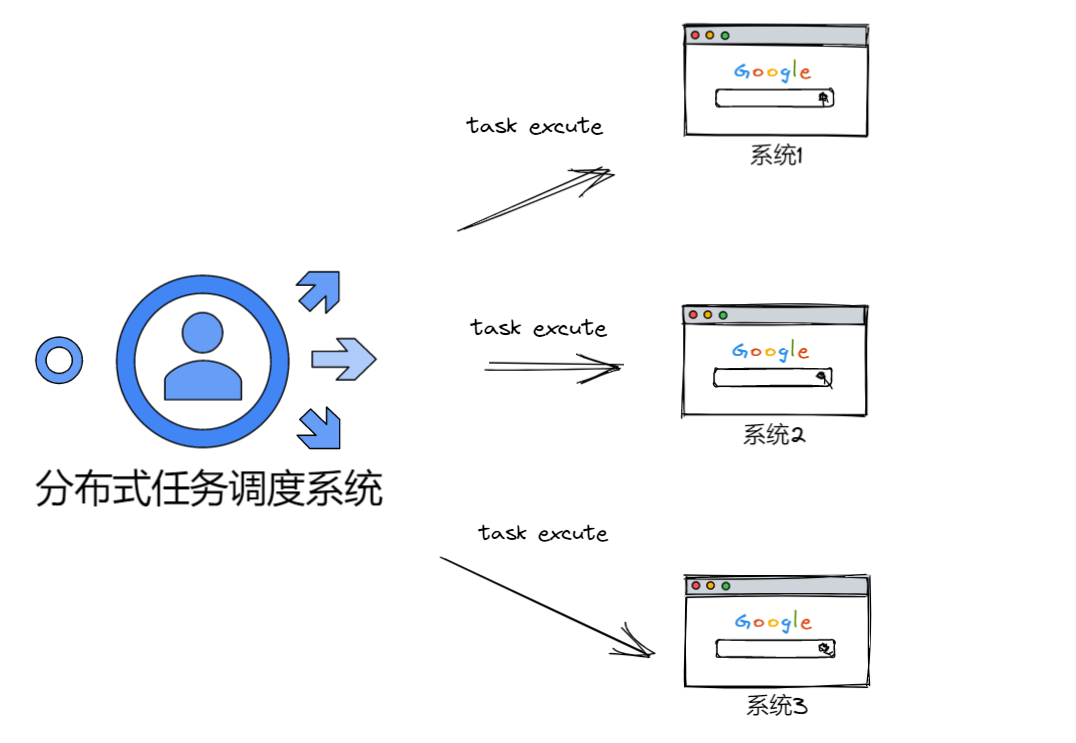
当然有目前有很多相对优秀分布式任务系统框架,我们主要学习 ScheduleMaster
2.使用ScheduleMaster
1.首先我们需要使用NET Core web Api创建几个模拟的微服务,分别为 考勤、算薪、邮件、短信
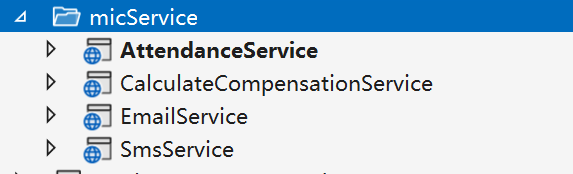
2.下载开源的ScheduleMaster,并且使用ScheduleMaster调度我们的微服务接口
- sqlserver:"Persist Security Info = False; User ID =sa; Password =123456; Initial Catalog =schedule_master; Server =."

- postgresql:"Server=localhost;Port=5432;Database=schedule_master;User Id=postgres;Password=123456;Pooling=true;MaxPoolSize=20;"

- mysql:"Data Source=localhost;Database=schedule_master;User ID=root;Password=123456;pooling=true;CharSet=utf8mb4;port=3306;sslmode=none;TreatTinyAsBoolean=true"
修改Host的配置文件和支持的数据库,框架默认使用Mysql
修改Web的配置文件和支持的数据库,框架默认使用Mysql

3.进入Hos.ScheduleMaster.Web项目的发布目录,dotnet Hos.ScheduleMaster.Web.dll启动项目 ,此时会生成数据库
登录账号:admin
密码:111111
4.进入Hos.ScheduleMaster.QuartzHost项目的发布目录,执行命令,启动项目
dotnet Hos.ScheduleMaster.QuartzHost.dll --urls http://*:30003
1.配置Http调度任务
5.准备就绪后,使用后台查看节点管理,可以看到web主节点30000和任务调度的接口30002已经在运行

6.使用任务列表菜单,创建定时调度任务,配置基础信息和元数据配置,然后点击保存就开始执行任务

2.配置程序集调度任务
1.创建一个类库,安装ScheduleMaster库, 创建一个类继承TaskBase,实现抽象方法,然后编译程序集
namespace TaskExcuteService

{

    class AssemblyTask : TaskBase

    {

        public override void Run(TaskContext context)

        {

            context.WriteLog("程序集任务");

        }

    }

}
2.找到debug目录,去掉Base程序集,然后添加为压缩文件
3.在web界面找到任务配置,选择程序集进行基本配置,配置元数据,输入程序集名称,然后输入类,并将程序集上传,保存就可以运行了
3.使用Api接入任务
为了方便业务系统更好的接入调度系统,ScheduleMaster创建任务不仅可以在控制台中实现,系统也提供了WebAPI供业务系统使用代码接入,这种方式对延时任务来说尤其重要。
1.API Server 对接流程
在控制台中创建好专用的API对接用户账号。
使用对接账号的用户名设置为http header中的
ms_auth_user值。使用经过哈希运算过的秘钥设置为http header中的
ms_auth_secret值,计算规则:按{用户名}{hash(密码)}{用户名}的格式拼接得到字符串str,然后再对str做一次hash运算即得到最终秘钥,hash函数是小写的32位MD5算法。使用form格式发起http调用,如果非法用户会返回401-Unauthorized。
HttpClient client = new HttpClient();

client.DefaultRequestHeaders.Add("ms_auth_user", "admin");

client.DefaultRequestHeaders.Add("ms_auth_secret", SecurityHelper.MD5($"admin{SecurityHelper.MD5("111111")}}admin"));
所有接口采用统一的返回格式,字段如下:
| 参数名称 | 参数类型 | 说明 |
|---|---|---|
| Success | bool | 是否成功 |
| Status | int | 结果状态,0-请求失败 1-请求成功 2-登录失败 3-参数异常 4-数据异常 |
| Message | string | 返回的消息 |
| Data | object | 返回的数据 |
2.创建程序集任务
使用API创建任务的方式不支持上传程序包,所以在任务需要启动时要确保程序包已通过其他方式上传,否则会启动失败。
接口地址:
http://yourip:30000/api/task/create请求类型:
POST参数格式:
application/x-www-form-urlencoded返回结果:创建成功返回任务id
参数列表:
| 参数名称 | 参数类型 | 是否必填 | 说明 |
|---|---|---|---|
| MetaType | int | 是 | 任务类型,这里固定是1 |
| Title | string | 是 | 任务名称 |
| RunLoop | bool | 是 | 是否按周期执行 |
| CronExpression | string | 否 | cron表达式,如果RunLoop为true则必填 |
| AssemblyName | string | 是 | 程序集名称 |
| ClassName | string | 是 | 执行类名称,包含完整命名空间 |
| StartDate | DateTime | 是 | 任务开始时间 |
| EndDate | DateTime | 否 | 任务停止时间,为空表示不限停止时间 |
| Remark | string | 否 | 任务描述说明 |
| Keepers | List<int> | 否 | 监护人id |
| Nexts | List<guid> | 否 | 子级任务id |
| Executors | List<string> | 否 | 执行节点名称 |
| RunNow | bool | 否 | 创建成功是否立即启动 |
| Params | List<ScheduleParam> | 否 | 自定义参数列表,也可以通过CustomParamsJson字段直接传json格式字符串 |
ScheduleParam:
| 参数名称 | 参数类型 | 是否必填 | 说明 |
|---|---|---|---|
| ParamKey | string | 是 | 参数名称 |
| ParamValue | string | 是 | 参数值 |
| ParamRemark | string | 否 | 参数说明 |
HttpClient client = new HttpClient();

List<KeyValuePair<string, string>> args = new List<KeyValuePair<string, string>>();

args.Add(new KeyValuePair<string, string>("MetaType", "1"));

args.Add(new KeyValuePair<string, string>("RunLoop", "true"));

args.Add(new KeyValuePair<string, string>("CronExpression", "33 0/8 * * * ?"));

args.Add(new KeyValuePair<string, string>("Remark", "By Xunit Tester Created"));

args.Add(new KeyValuePair<string, string>("StartDate", DateTime.Today.ToString("yyyy-MM-dd HH:mm:ss")));

args.Add(new KeyValuePair<string, string>("Title", "程序集接口测试任务"));

args.Add(new KeyValuePair<string, string>("AssemblyName", "Hos.ScheduleMaster.Demo"));

args.Add(new KeyValuePair<string, string>("ClassName", "Hos.ScheduleMaster.Demo.Simple"));

args.Add(new KeyValuePair<string, string>("CustomParamsJson", "[{\"ParamKey\":\"k1\",\"ParamValue\":\"1111\",\"ParamRemark\":\"r1\"},{\"ParamKey\":\"k2\",\"ParamValue\":\"2222\",\"ParamRemark\":\"r2\"}]"));

args.Add(new KeyValuePair<string, string>("Keepers", "1"));

args.Add(new KeyValuePair<string, string>("Keepers", "2"));

//args.Add(new KeyValuePair<string, string>("Nexts", ""));

//args.Add(new KeyValuePair<string, string>("Executors", ""));

HttpContent reqContent = new FormUrlEncodedContent(args);

var response = await client.PostAsync("http://localhost:30000/api/Task/Create", reqContent);

var content = await response.Content.ReadAsStringAsync();

Debug.WriteLine(content);
3.创建HTTP任务
接口地址:
http://yourip:30000/api/task/create请求类型:
POST参数格式:
application/x-www-form-urlencoded返回结果:创建成功返回任务id
参数列表:
| 参数名称 | 参数类型 | 是否必填 | 说明 |
|---|---|---|---|
| MetaType | int | 是 | 任务类型,这里固定是2 |
| Title | string | 是 | 任务名称 |
| RunLoop | bool | 是 | 是否按周期执行 |
| CronExpression | string | 否 | cron表达式,如果RunLoop为true则必填 |
| StartDate | DateTime | 是 | 任务开始时间 |
| EndDate | DateTime | 否 | 任务停止时间,为空表示不限停止时间 |
| Remark | string | 否 | 任务描述说明 |
| HttpRequestUrl | string | 是 | 请求地址 |
| HttpMethod | string | 是 | 请求方式,仅支持GET\POST\PUT\DELETE |
| HttpContentType | string | 是 | 参数格式,仅支持application/json和application/x-www-form-urlencoded |
| HttpHeaders | string | 否 | 自定义请求头,ScheduleParam列表的json字符串 |
| HttpBody | string | 是 | 如果是json格式参数,则是对应参数的json字符串;如果是form格式参数,则是对应ScheduleParam列表的json字符串。 |
| Keepers | List<int> | 否 | 监护人id |
| Nexts | List<guid> | 否 | 子级任务id |
| Executors | List<string> | 否 | 执行节点名称 |
| RunNow | bool | 否 | 创建成功是否立即启动 |
HttpClient client = new HttpClient();

List<KeyValuePair<string, string>> args = new List<KeyValuePair<string, string>>();

args.Add(new KeyValuePair<string, string>("MetaType", "2"));

args.Add(new KeyValuePair<string, string>("RunLoop", "true"));

args.Add(new KeyValuePair<string, string>("CronExpression", "22 0/8 * * * ?"));

args.Add(new KeyValuePair<string, string>("Remark", "By Xunit Tester Created"));

args.Add(new KeyValuePair<string, string>("StartDate", DateTime.Today.ToString("yyyy-MM-dd HH:mm:ss")));

args.Add(new KeyValuePair<string, string>("Title", "Http接口测试任务"));

args.Add(new KeyValuePair<string, string>("HttpRequestUrl", "http://localhost:56655/api/1.0/value/jsonpost"));

args.Add(new KeyValuePair<string, string>("HttpMethod", "POST"));

args.Add(new KeyValuePair<string, string>("HttpContentType", "application/json"));

args.Add(new KeyValuePair<string, string>("HttpHeaders", "[]"));

args.Add(new KeyValuePair<string, string>("HttpBody", "{ \"Posts\": [{ \"PostId\": 666, \"Title\": \"tester\", \"Content\":\"testtesttest\" }], \"BlogId\": 111, \"Url\":\"qweqrrttryrtyrtrtrt\" }"));

HttpContent reqContent = new FormUrlEncodedContent(args);

var response = await client.PostAsync("http://localhost:30000/api/Task/Create", reqContent);

var content = await response.Content.ReadAsStringAsync();

Debug.WriteLine(content);
4.创建延时任务
接口地址:
http://yourip:30000/api/delaytask/create请求类型:
POST参数格式:
application/x-www-form-urlencoded返回结果:创建成功返回任务id
参数列表:
| 参数名称 | 参数类型 | 是否必填 | 说明 |
|---|---|---|---|
| SourceApp | string | 是 | 来源 |
| Topic | string | 是 | 主题 |
| ContentKey | string | 是 | 业务关键字 |
| DelayTimeSpan | int | 是 | 延迟相对时间 |
| DelayAbsoluteTime | DateTime | 是 | 延迟绝对时间 |
| NotifyUrl | string | 是 | 回调地址 |
| NotifyDataType | string | 是 | 回调参数格式,仅支持application/json和application/x-www-form-urlencoded |
| NotifyBody | string | 是 | 回调参数,json格式字符串 |
for (int i = 0; i < 5; i++)

{

    int rndNum = new Random().Next(20, 500);

    List<KeyValuePair<string, string>> args = new List<KeyValuePair<string, string>>();

    args.Add(new KeyValuePair<string, string>("SourceApp", "TestApp"));

    args.Add(new KeyValuePair<string, string>("Topic", "TestApp.Trade.TimeoutCancel"));

    args.Add(new KeyValuePair<string, string>("ContentKey", i.ToString()));

    args.Add(new KeyValuePair<string, string>("DelayTimeSpan", rndNum.ToString()));

    args.Add(new KeyValuePair<string, string>("DelayAbsoluteTime", DateTime.Now.AddSeconds(rndNum).ToString("yyyy-MM-dd HH:mm:ss")));

    args.Add(new KeyValuePair<string, string>("NotifyUrl", "http://localhost:56655/api/1.0/value/delaypost"));

    args.Add(new KeyValuePair<string, string>("NotifyDataType", "application/json"));

    args.Add(new KeyValuePair<string, string>("NotifyBody", "{ \"Posts\": [{ \"PostId\": 666, \"Title\": \"tester\", \"Content\":\"testtesttest\" }], \"BlogId\": 111, \"Url\":\"qweqrrttryrtyrtrtrt\" }"));

    HttpContent reqContent = new FormUrlEncodedContent(args);

    var response = await client.PostAsync("http://localhost:30000/api/DelayTask/Create", reqContent);

    var content = await response.Content.ReadAsStringAsync();

    Debug.WriteLine(content);

}
4.框架简单分析
1.全局设计
根据官网的设计图,以及操作的流程,简单总结一下任务全局流程为客户端—–>master——>work—–>执行任务。从大的架构方向的思想就是,将原有单个服务中业务和任务调度混合的方式做一些改变,使业务和调度分离,专门把任务调度部分剥离出来,作为一个独立的进程,来统一调用和管理任务,而原有服务只做业务处理。

####### 2.Master和Work分析
我们主要从主节点,从节点,数据表这几个方面来简单分析,整个业务的时序流程,从本质来看并不复杂master和Work之间的关系是相互配合的,可能乍一看下面整个图有点混乱,下面来解释一下,其实Master节点将任务添加到数据中,然后work节点,去从对应的数据表中取出任务数据,然后根据任务对应的配置,生成配置信息,调用Quartz执行任务,这就是我们整个框架中最核心的业务。

当然master和work除了主要承载了整个管理系统的UI可视化、后台业务操作、任务执行之外,如果从细节以及实现方式来说主要做了以下事情:
Master
- 1.分配任务执行和选择节点
- 2.对work节点进行健康检查,对任务进行故障转移
Work
- 1.取出任务配置信息
- 2.使用Quartz根据配置运行任务
- 3.使用反射调用程序集
- 4.使用httpclient调用http 接口
分布式任务调度ScheduleMaster的更多相关文章
- Uncode-Schedule首页、文档和下载 - 分布式任务调度组件 - 开源中国社区
Uncode-Schedule首页.文档和下载 - 分布式任务调度组件 - 开源中国社区 分布式任务调度组件 Uncode-Schedule
- 新一代分布式任务调度框架:当当elastic-job开源项目的10项特性
作者简介: 张亮,当当网架构师.当当技术委员会成员.消息中间件组负责人.对架构设计.分布式.优雅代码等领域兴趣浓厚.目前主导当当应用框架ddframe研发,并负责推广及撰写技术白皮书. 一.为什么 ...
- 转载《分布式任务调度平台XXL-JOB》
<分布式任务调度平台XXL-JOB> 博文转自 https://www.cnblogs.com/xuxueli/p/5021979.html 一.简介 1.1 概述 XXL-J ...
- 分布式任务调度平台XXL-JOB
<分布式任务调度平台XXL-JOB> 一.简介 1.1 概述 XXL-JOB是一个轻量级分布式任务调度框架,其核心设计目标是开发迅速.学习简单.轻量级.易扩展.现已开放源代码并 ...
- Python 基于Python及zookeeper实现简单分布式任务调度系统设计思路及核心代码实现
基于Python及zookeeper实现简单分布式任务调度系统设计思路及核心代码实现 by:授客 QQ:1033553122 测试环境 功能需求 实现思路 代码实践(关键技术点实现) 代码模块组织 ...
- 分布式任务调度平台XXL-JOB搭建教程
关于分布式任务调度平台XXL-JOB,其实作者 许雪里 在其发布的中文教程中已经介绍的很清楚了,这里我就不做过多的介绍了,关于其搭建教程,本人依照其文档搭建起来基本上也没遇到啥问题,这里通过博客的形式 ...
- 基于nginx+xxl-job+springboot高可用分布式任务调度系统
技术.原理讲解: <分布式任务调度平台XXL-JOB--源码解析一:项目介绍> <分布式任务调度平台XXL-JOB--源码解析二:基于docker搭建admin调度中心和execut ...
- 《分布式任务调度平台XXL-JOB》
一.简介 1.1 概述 XXL-JOB是一个轻量级分布式任务调度框架,其核心设计目标是开发迅速.学习简单.轻量级.易扩展.现已开放源代码并接入多家公司线上产品线,开箱即用. 1.2 特性 1.简单:支 ...
- 分布式任务调度系统xxl-job搭建(基于docker)
一.简介 XXL-JOB是一个轻量级分布式任务调度平台,其核心设计目标是开发迅速.学习简单.轻量级.易扩展.现已开放源代码并接入多家公司线上产品线,开箱即用. 更多介绍,请访问官网: http://w ...
随机推荐
- 让子弹飞,零成本让你的网站更快一点,boxopened http/3 (QUIC) 协议实战
最近HTTP-over-QUIC 协议被正式命名为 HTTP/3,协议带来的最大改变是协议底层将采用UDP协议,而不再是TCP协议,这样的好处吗,就是更低时延,更好的拥塞控制,更精确的RTT时间,更高 ...
- 每日所学之自学习大数据的Linux环境的配置
今天开始配置环境,因为下载镜像文件需要很长时间,加上训练,所以Linux环境之配置了一半 VMware下载及安装教程(Window) 在安装虚拟机时需要下载镜像文件 下面是我下载的镜像文件的地址 Ce ...
- mysql各个集群方案的优劣
集群的好处 高可用性:故障检测及迁移,多节点备份. 可伸缩性:新增数据库节点便利,方便扩容. 负载均衡:切换某服务访问某节点,分摊单个节点的数据库压力. 集群要考虑的风险 网络分裂:群集还可能由于网络 ...
- error: failed to push some refs to 'git@gitee.com:xxxx'
出现错误的主要原因是向上仓库的一些文件(README.md,LICENSE等文件)不在本地代码目录中 git pull --rebase origin master 通过这行命令, 可以解决 注释福利 ...
- redis从0-1学习记录(完结)
1. NoSQL(not only sql):不仅仅是数据库,非关系型数据库,关系型数据库是以表格的行列进行存储的,而非关系型数据库是以键值对进行存储,不需要固定的格式.非关系型数据库的特点,方便扩展 ...
- Struts2-获取值栈对象与结构
1.获取值栈对象有多种方式 (1)使用ActionContext类里面的方法获取值栈对象 @Override public String execute(){ //1.获取ActionContext类 ...
- LC-242
利用ASCII码构成哈希表来映射 和这题类似: https://leetcode-cn.com/problems/minimum-window-substring/solution/li-yong-a ...
- ASMCMD-8102: no connection to Oracle ASM
通过ASMCMD命令连接ASM,Connected to an idle instance [root@shdb02 ~]# su - oracle [oracle@shdb02 ~]$ asmcmd ...
- 鲜为人知帝国CMS内容页调用上一篇和下一篇的精华方法汇总
<span style="float:left">上一篇:[!--info.pre--]</span><span style="float: ...
- 攻防世界 favorite_number
favorite_number 进入环境得到源码 <?php //php5.5.9 $stuff = $_POST["stuff"]; $array = ['admin', ...