Use Dapper ORM With ASP.NET Core
Dapper.NET is not just another ORM tool, it’s considered as the king of ORM. Because it’s fast, easy to integrate, requires fewer lines of code, supports bulk data insertion and supports static and dynamic object binding. And Dapper ORM can be used with .NET. So in this post, let’s find out how to use Dapper ORM with ASP.NET Core for CRUD operations.
Use Dapper ORM With ASP.NET Core
For this post, we will be using SQL Server as a database with Dapper ORM. So let’s first create the database. Open SQL Server Management Studio and create a new database called “DapperDemo” or you can name it anything of your choice. And create a table named “Products”.
|
1
2
3
4
5
6
7
8
9
10
11
12
|
CREATE TABLE [dbo].[Products]( [ProductID] [int] IDENTITY(1,1) NOT NULL, [Name] [nvarchar](max) NULL, [Quantity] [int] NULL, [Price] [float] NULL, CONSTRAINT [PK_Products] PRIMARY KEY CLUSTERED ( [ProductID] ASC)WITH (PAD_INDEX = OFF, STATISTICS_NORECOMPUTE = OFF, IGNORE_DUP_KEY = OFF, ALLOW_ROW_LOCKS = ON, ALLOW_PAGE_LOCKS = ON) ON [PRIMARY]) ON [PRIMARY] TEXTIMAGE_ON [PRIMARY]GO |
Okay. Let’s create an ASP.NET Core Web API project. The default Web API template comes with a controller named “Value”. We don’t need this for demo, so I deleted it. To use Dapper ORM, we need to install following nuget package.
- “Dapper”: “1.50.2”
To test our WEB API, also add Swagger. If you don’t know about using Swagger then read how to add swagger to the ASP.NET Core WEB API
So your project.json should look like this,
|
1
2
3
4
5
6
7
8
9
10
11
12
13
14
15
16
17
18
19
|
"dependencies": { "Microsoft.NETCore.App": { "version": "1.0.0", "type": "platform" }, "Microsoft.ApplicationInsights.AspNetCore": "1.0.0", "Microsoft.AspNetCore.Mvc": "1.0.0", "Microsoft.AspNetCore.Server.IISIntegration": "1.0.0", "Microsoft.AspNetCore.Server.Kestrel": "1.0.0", "Microsoft.Extensions.Configuration.EnvironmentVariables": "1.0.0", "Microsoft.Extensions.Configuration.FileExtensions": "1.0.0", "Microsoft.Extensions.Configuration.Json": "1.0.0", "Microsoft.Extensions.Logging": "1.0.0", "Microsoft.Extensions.Logging.Console": "1.0.0", "Microsoft.Extensions.Logging.Debug": "1.0.0", "Microsoft.Extensions.Options.ConfigurationExtensions": "1.0.0", "Swashbuckle": "6.0.0-beta901", "Dapper": "1.50.2"}, |
Now, we need to add Product entity model. So create a folder named “Model” and create a new class “Product.cs” as follows,
|
1
2
3
4
5
6
7
8
|
public class Product{ [Key] public int ProductId { get; set; } public string Name { get; set; } public int Quantity { get; set; } public double Price { get; set; }} |
Setting up Dapper is very easy process and similarly using it is also very simple and straightforward. You need to follow 3 simple steps to use it.
- Create an
IDBConnectionobject with a connection string. - Form your raw SQL query.
- Pass the query to Dapper and it’s done.
So let’s create ProductRepository for all database calls. Create a folder named “Repository” and create a new class “ProductRepository.cs” as follows,
|
1
2
3
4
5
6
7
8
9
10
11
12
13
14
15
16
17
18
19
20
21
22
23
24
25
26
27
28
29
30
31
32
33
34
35
36
37
38
39
40
41
42
43
44
45
46
47
48
49
50
51
52
53
54
55
56
57
58
59
60
61
62
63
64
65
66
67
68
69
|
public class ProductRepository{ private string connectionString; public ProductRepository() { connectionString = @"Server=localhost;Database=DapperDemo;Trusted_Connection=true;"; } public IDbConnection Connection { get { return new SqlConnection(connectionString); } } public void Add(Product prod) { using (IDbConnection dbConnection = Connection) { string sQuery = "INSERT INTO Products (Name, Quantity, Price)" + " VALUES(@Name, @Quantity, @Price)"; dbConnection.Open(); dbConnection.Execute(sQuery, prod); } } public IEnumerable<Product> GetAll() { using (IDbConnection dbConnection = Connection) { dbConnection.Open(); return dbConnection.Query<Product>("SELECT * FROM Products"); } } public Product GetByID(int id) { using (IDbConnection dbConnection = Connection) { string sQuery = "SELECT * FROM Products" + " WHERE ProductId = @Id"; dbConnection.Open(); return dbConnection.Query<Product>(sQuery, new { Id = id }).FirstOrDefault(); } } public void Delete(int id) { using (IDbConnection dbConnection = Connection) { string sQuery = "DELETE FROM Products" + " WHERE ProductId = @Id"; dbConnection.Open(); dbConnection.Execute(sQuery, new { Id = id }); } } public void Update(Product prod) { using (IDbConnection dbConnection = Connection) { string sQuery = "UPDATE Products SET Name = @Name," + " Quantity = @Quantity, Price= @Price" + " WHERE ProductId = @ProductId"; dbConnection.Open(); dbConnection.Query(sQuery, prod); } }} |
There are CRUD methods defined using raw SQL queries for all DB operations. As mentioned earlier, in every method
- Create IDbConnection object.
- Form the Query.
- Open the connection and execute the query.
Now, lets create a new controller “ProductController.cs” as follows,
|
1
2
3
4
5
6
7
8
9
10
11
12
13
14
15
16
17
18
19
20
21
22
23
24
25
26
27
28
29
30
31
32
33
34
35
36
37
38
39
40
41
42
43
44
45
46
|
[Route("api/[controller]")]public class ProductController : Controller{ private readonly ProductRepository productRepository; public ProductController() { productRepository = new ProductRepository(); } // GET: api/values [HttpGet] public IEnumerable<Product> Get() { return productRepository.GetAll(); } // GET api/values/5 [HttpGet("{id}")] public Product Get(int id) { return productRepository.GetByID(id); } // POST api/values [HttpPost] public void Post([FromBody]Product prod) { if (ModelState.IsValid) productRepository.Add(prod); } // PUT api/values/5 [HttpPut("{id}")] public void Put(int id, [FromBody]Product prod) { prod.ProductId = id; if (ModelState.IsValid) productRepository.Update(prod); } // DELETE api/values/5 [HttpDelete("{id}")] public void Delete(int id) { productRepository.Delete(id); }} |
This controller has methods for GET, POST, PUT and DELETE. That’s all to code. Now, let’s just run the application and execute the GET API. Since the table is empty, so you should see following.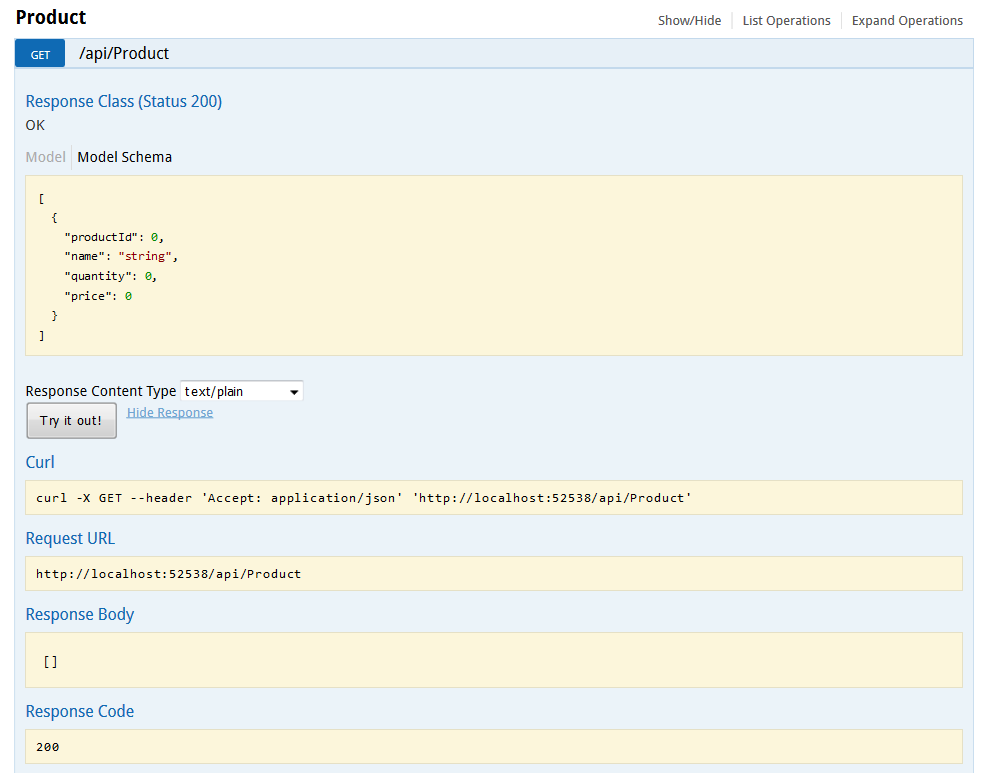
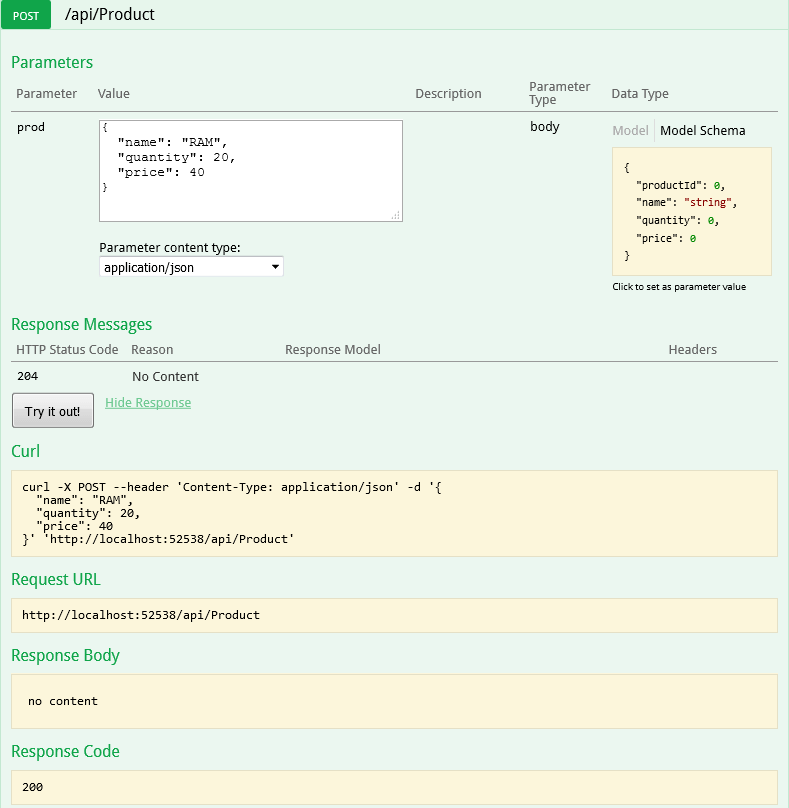
Now, let’s add a product via Post API.
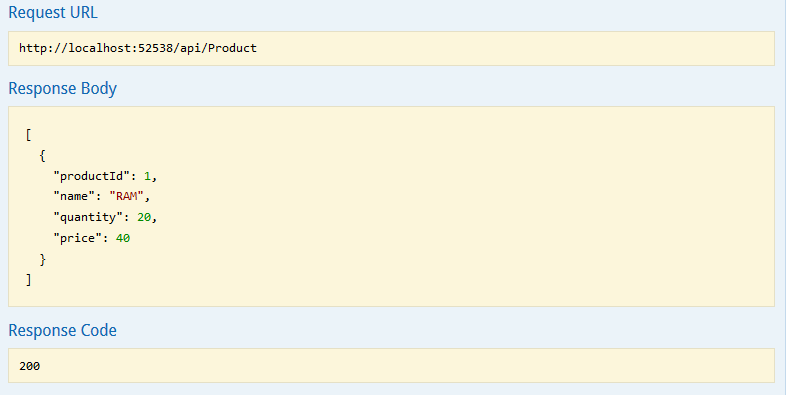
And now call the GET Product API again and you should see that product you just added is returned.
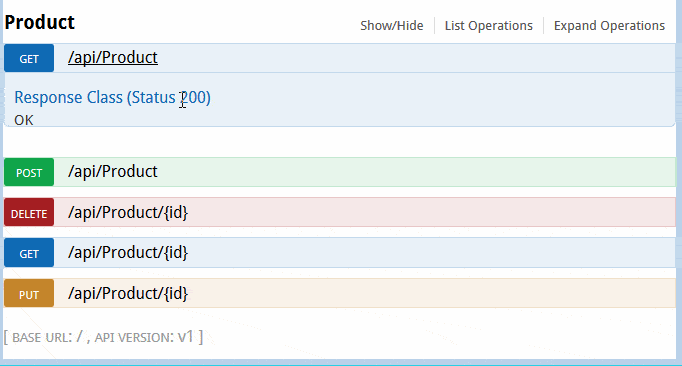
Here is the gif version of all 5 methods.
That’s it. Dapper.NET ORM is considered to be the fastest ORM as it directly executes the RAW SQL without any additional overhead. We saw how easy it was to integrate and use it with ASP.NET Core. If you want to support any other database providers like SQLite, then you need to change in public IDbConnection Connection property.
|
1
2
3
4
5
6
7
|
public IDbConnection Connection{ get { return new SqliteConnection(connectionString); }} |
You will also need to include the SQLite nuget package "Microsoft.Data.Sqlite": "1.0.0" in your project.json. Of course, based on database provider the SQL query syntax may differ. Hope you liked it. Just for your information Project.json for ASP.NET Core is going away.
If you are interested in Entity Framework Core, then read my posts about EF Core.
Thank you for reading. Keep visiting this blog and share this in your network. Please put your thoughts and feedback in the comments section.
Use Dapper ORM With ASP.NET Core的更多相关文章
- ASP.NET Core 1.0 使用 Dapper 操作 MySql(包含事务)
操作 MySql 数据库使用MySql.Data程序包(MySql 开发,其他第三方可能会有些问题). project.json 代码: { "version": "1. ...
- [译]ASP.NET Core Web API 中使用Oracle数据库和Dapper看这篇就够了
[译]ASP.NET Core Web API 中使用Oracle数据库和Dapper看这篇就够了 本文首发自:博客园 文章地址: https://www.cnblogs.com/yilezhu/p/ ...
- C#实现多级子目录Zip压缩解压实例 NET4.6下的UTC时间转换 [译]ASP.NET Core Web API 中使用Oracle数据库和Dapper看这篇就够了 asp.Net Core免费开源分布式异常日志收集框架Exceptionless安装配置以及简单使用图文教程 asp.net core异步进行新增操作并且需要判断某些字段是否重复的三种解决方案 .NET Core开发日志
C#实现多级子目录Zip压缩解压实例 参考 https://blog.csdn.net/lki_suidongdong/article/details/20942977 重点: 实现多级子目录的压缩, ...
- ASP .NET Core 基本知识点示例 目录
ASP.NET Core 的 运行机制 文章 ASP.NET Core 中的 配置 文章 源代码 ASP.NET Core 中的 依赖注入 文章 源代码 ASP.NET Core 中的 日志 文章 源 ...
- 极简版ASP.NET Core学习路径及教程
绝承认这是一个七天速成教程,即使有这个效果,我也不愿意接受这个名字.嗯. 这个路径分为两块: 实践入门 理论延伸 有了ASP.NET以及C#的知识以及项目经验,我们几乎可以不再需要了解任何新的知识就开 ...
- ASP .Net Core 使用 Dapper 轻型ORM框架
一:优势 1,Dapper是一个轻型的ORM类.代码就一个SqlMapper.cs文件,编译后就40K的一个很小的Dll. 2,Dapper很快.Dapper的速度接近与IDataReader,取列表 ...
- Asp.net Core 系列之--2.ORM初探:Dapper实现MySql数据库各类操作
ChuanGoing 2019-09-10 距离上一篇近一个月时间,断断续续才把本篇码完,后面将加快进度,争取年度内把本系列基本介绍完成,同时督促本人持续学习. 本篇学习曲线: 1.初识Dapper ...
- Ubuntu Server 16.04下ASP.NET Core Web Api + MySql + Dapper在 Jexus、nginx 下的简单测试
一.环境及工具 1.服务器 VirtualBox5.1.4 安装 Ubuntu Server 16.04 amd64 MySql Ver 14.14 Distrib 5.6.21 Jexus 5.8. ...
- ASP.NET Core:使用Dapper和SwaggerUI来丰富你的系统框架
一.概述 1.用VS2017创建如下图的几个.NET Standard类库,默认版本为1.4,你可以通过项目属性进行修改,最高支持到1.6,大概五月份左右会更新至2.0,API会翻倍,很期待! 排名分 ...
随机推荐
- javascript-建造者模式
建造者模式笔记 1.工厂模式主要是为了创建对象实例或者类簇(抽象工厂),关心的是最终产出(创建)的是什么,不关心你创建的整个过程,仅仅需要知道你最终创建的结果 2.建造者模式目的也是为了创建对象,但是 ...
- react native windows开发环境搭建(一)
ReactNative分为服务器端和手机端loader程序,Android版有3种代码:js代码,java代码和c++代码,主要是编写的是js代码,如果框架功能不足就需要编写原生的java代码来扩展, ...
- sql server 2005导出数据到oracle
一. 在sql server下处理需要导出的数据库 1. 执行以下sql,查出所有'float'类型的字段名,手动将float类型改为decimal(18,4). select 表名=d.name,字 ...
- x01.os.15: 看上去很美
张碧晨在韩国学的不是技巧,而是基本功:气息!声音由气息托着,似真声而不是真声,似假声又不是假声,所以才能在动听的地方唱得更动听.编程也是一样,基本功很重要:内存!所谓的黑客高手,攻击的一大手段,便是利 ...
- Elasticsearch 安装中文分词
github地址:https://github.com/medcl/elasticsearch-analysis-ik 注意版本要对应,否则编译完成后elasticsearch不能正常启动 下载文件, ...
- C++ 笔记(二) —— 不要在构造和析构函数中调用虚函数
ilocker:关注 Android 安全(新手) QQ: 2597294287 class Transaction { //所有交易的 base class public: Transaction( ...
- PADS_AD_Cadence转换
PADS_AD_Cadence转换 软件版本:PADS的版本是PADS9.5,Altium designer的版本是Altium designer winter 09 PADS和AD的转换 PADS的 ...
- Django初体验(一):自定义表单提交
注:本人使用的Django1.8.3版本进行测试 除了使用Django内置表单,有时往往我们需要自定义表单.对于自定义表单Post方式提交往往会带来由CSRF(跨站请求伪造)产生的错误"CS ...
- ITer的七夕节,你的情人在哪里(2015-08-19)
自写<一个程序猿的生命周期>连载以来,迎来第一个七夕节,打算写篇文章纪念一下.我主张过中国自己的节日的,也不反对过其他国家的节日,但是要搞清楚其他国家节日的由来,不要把别人的鬼节当成我们的 ...
- DPM检测模型 VoC-release 5 linux 下编译运行
(转载请注明作者和出处 楼燚(yì)航的blog :http://www.cnblogs.com/louyihang-loves-baiyan/ 未经允许请勿用于商业用途) DPM目前使非神经网络方法 ...