
iOS简易柱状图(带动画)--新手入门篇
叨逼叨
好久没更新博客了,才几个月,发生了好多事情,处理了好多事情。不变的是写代码依然在继续。
做点啥子
看看objective-c的书,学着写了个柱状图,只是练习的demo而已,iOS上的图表控件已经有非常好的解决方案了。
PNChart:https://github.com/kevinzhow/PNChart
这个控件是是挺不错了,喜欢的朋友可以看看,本文很多地方借鉴了PNChart,就当学习源码也可以

动手动手
先上图先上图,配色直接用PNChart的了,还蛮喜欢这种配色风格,一直不太喜欢把手机横过来,所以做了个竖版的,还有很多不完善,学的时间也短,大家别见笑哈~
ps:附带赠送双色球号码一注,大家可以去买,万一中了呢,由于女朋友老爹热爱福利事业,就写一个给他老人家玩玩,具体实现有人需要在贴吧,哈哈,我就是这么骗回复的


相关知识点
毕竟是新手入门的东西,列一下相关的知识点,如果后面有时间再一个个展开吧
OC语法方面:
NSArray,NSString,@interface,@property,@nonatomic,@implementation,id,alloc等
iOS方面:
UIView,CAShapeLayer,UIBezierPath,CATextLayer,UIColor,CABasicAnimation
撸代码
言归正传,看看代码实现部分
首先需要定义LZBar.h,包含了基本的声明,当然还缺少了X轴的文字说明,大家可以自己扩展下:
 #import <UIKit/UIKit.h>

 #import <QuartzCore/QuartzCore.h>

 @interface LZBar : UIView{

     CAShapeLayer *backgroundLayer; //背景层

     UIBezierPath *backgroundPath; //背景赛贝尔路径

     CAShapeLayer *barLayer; //柱状层

     UIBezierPath *barPath; //柱状赛贝尔路径

     CATextLayer *textLayer; //数值文字显示层

     CATextLayer *tittleLayer; //标题文字说明层

 }

 @property (nonatomic) UIColor *backgroundColor;//背景色

 @property (nonatomic) UIColor *barColor;//柱的颜色

 @property (nonatomic) float barProgress;//柱子长度 0-1之间

 @property (nonatomic) float barWidth;//柱子宽度

 @property (nonatomic) NSString *barText;//数值

 @property (nonatomic) NSString *barTittle;//标题

 @end
 #import "LZBar.h"

 @implementation LZBar

 //初始化

 - (id)initWithFrame:(CGRect)frame

 {

     self = [super initWithFrame:frame];

     if (self)

     {

         backgroundLayer = [CAShapeLayer new];

         [self.layer addSublayer:backgroundLayer];

         backgroundLayer.strokeColor = LZGrey.CGColor;

         backgroundLayer.frame = self.bounds;

         barLayer = [CAShapeLayer new];

         [self.layer addSublayer:barLayer];

         barLayer.strokeColor = LZGreen.CGColor;

         barLayer.lineCap = kCALineCapButt;

         barLayer.frame = self.bounds;

         self.barWidth = self.bounds.size.width;

     }

     return self;

 }

 //设置背景

 - (void)setBackground

 {

     backgroundPath = [UIBezierPath bezierPath];

     [backgroundPath moveToPoint:CGPointMake(self.bounds.origin.x, self.bounds.origin.y+self.bounds.origin.y+self.bounds.size.height/)];

     [backgroundPath addLineToPoint:CGPointMake(self.bounds.size.width, self.bounds.origin.y+self.bounds.origin.y+self.bounds.size.height/)];

     [backgroundPath setLineWidth:_barWidth];

     [backgroundPath setLineCapStyle:kCGLineCapSquare];

     backgroundLayer.path = backgroundPath.CGPath;

 }

 //设置百分百(显示动画)

 - (void)setProgress

 {

     barPath = [UIBezierPath bezierPath];

     [barPath moveToPoint:CGPointMake(self.bounds.origin.x, self.bounds.origin.y+self.bounds.origin.y+self.bounds.size.height/)];

     [barPath addLineToPoint:CGPointMake(self.bounds.size.width*_barProgress, self.bounds.origin.y+self.bounds.origin.y+self.bounds.size.height/)];

     [barPath setLineWidth:_barWidth];

     [barPath setLineCapStyle:kCGLineCapSquare];

     CABasicAnimation *pathAnimation = [CABasicAnimation animationWithKeyPath:@"strokeEnd"];

     pathAnimation.duration = 1.0;

     pathAnimation.timingFunction = [CAMediaTimingFunction functionWithName:kCAMediaTimingFunctionEaseInEaseOut];

     pathAnimation.fromValue = @0.0f;

     pathAnimation.toValue = @1.0f;

     [barLayer addAnimation:pathAnimation forKey:nil];

     barLayer.strokeEnd = 1.0;

     barLayer.path = barPath.CGPath;

 }

 //设置柱子的宽度

 - (void)setBarWidth:(float)progressWidth

 {

     _barWidth = progressWidth;

     backgroundLayer.lineWidth = _barWidth;

     barLayer.lineWidth = _barWidth;

     [self setBackground];

     [self setProgress];

 }

 //设置背景色

 - (void)setBackgroundColor:(UIColor *)backgroundColor

 {

     backgroundLayer.strokeColor = backgroundColor.CGColor;

 }

 //设置柱子颜色

 - (void)setBarColor:(UIColor *)barColor

 {

     barLayer.strokeColor = barColor.CGColor;

 }

 //设置柱子进度

 - (void)setBarProgress:(float)progress

 {

     _barProgress = progress;

     [self setProgress];

 }

 //设置数值

 - (void)setBarText:(NSString*)text{

     textLayer = [CATextLayer layer];

     textLayer.string = text;

     textLayer.foregroundColor = [[UIColor blackColor] CGColor];

     textLayer.fontSize = ;

     textLayer.alignmentMode = kCAAlignmentLeft;

     textLayer.bounds = barLayer.bounds;

     textLayer.position = CGPointMake(self.bounds.size.width*/ +  , self.bounds.size.height/);

     CABasicAnimation *fade = [self fadeAnimation];

     [textLayer addAnimation:fade forKey:nil];

     [self.layer addSublayer:textLayer];

 }

 //设置标题

 - (void)setBarTittle:(NSString*)tittle{

     tittleLayer = [CATextLayer layer];

     tittleLayer.string = tittle;

     tittleLayer.foregroundColor = [[UIColor blackColor] CGColor];

     tittleLayer.fontSize = ;

     tittleLayer.alignmentMode = kCAAlignmentRight;

     tittleLayer.bounds = barLayer.bounds;

     tittleLayer.position = CGPointMake(-self.bounds.size.width/ -  , self.bounds.size.height/);

     CABasicAnimation *fade = [self fadeAnimation];

     [tittleLayer addAnimation:fade forKey:nil];

     [self.layer addSublayer:tittleLayer];

 }

 //渐变动画

 -(CABasicAnimation*)fadeAnimation

 {

     CABasicAnimation* fadeAnimation = [CABasicAnimation animationWithKeyPath:@"opacity"];

     fadeAnimation.fromValue = [NSNumber numberWithFloat:0.0];

     fadeAnimation.toValue = [NSNumber numberWithFloat:1.0];

     fadeAnimation.duration = 2.0;

     return fadeAnimation;

 }

 @end
有了Bar之后问题就变的简单的多了,我们可以在构建一个Chart,方便我们直接使用,防止内容过长,看起来累,代码我就折叠了~
 #import <UIKit/UIKit.h>

 @interface LZChart : UIView{

     CGSize size;//图表大小

 }

 @property (nonatomic)NSArray *numLabels;//值

 @property (nonatomic)NSArray *nameLabels;//名称

 @property (nonatomic)float maxNum;//最大值

 @property (nonatomic)NSInteger barSpacing;//两根柱状图的间距

 @property (nonatomic) CGFloat chartMarginLeft;

 @property (nonatomic) CGFloat chartMarginRight;

 @property (nonatomic) CGFloat chartMarginTop;

 @property (nonatomic) CGFloat chartMarginBottom;

 - (void)show;//现实图标

 @end
LZChart.h
 #import "LZChart.h"

 #import "LZBar.h"

 @implementation LZChart

 -(id)initWithFrame:(CGRect)frame{

     self = [super initWithFrame:frame];

     if (self) {

         size = frame.size;

         _chartMarginTop = 30.0;

         _chartMarginBottom = 30.0;

         _chartMarginLeft = 30.0;

         _chartMarginRight = 30.0;

         _barSpacing = ;

     }

     return self;

 }

 -(void)show{

     [self setMaxNum];

     float barCount = [_numLabels count];

     float barMaxWidth = size.width - _chartMarginLeft - _chartMarginRight ;

     float barHeight = (size.height - _chartMarginTop - _chartMarginBottom) / barCount - _barSpacing;

     //防止柱状图太粗

     if(barHeight > ){

         barHeight = ;

     }

     float barWidth = ;

     for(int i = ;i<barCount;i++){

         LZBar *bar = [[LZBar alloc] initWithFrame:CGRectMake(_chartMarginLeft, _chartMarginTop + i*(barHeight + _barSpacing), barMaxWidth, barHeight)];

         barWidth = [_numLabels[i] floatValue];

         bar.barProgress = barWidth/_maxNum;

         bar.barWidth = barHeight;

         bar.barText = [NSString stringWithFormat:@"%.1f",barWidth];

         bar.barTittle = [NSString stringWithFormat:@"%@",_nameLabels[i]];

         [self addSubview:bar];

     }

 }

 -(void)setMaxNum{

     _maxNum = ;

     for (id num in _numLabels) {

         if ([num floatValue] > _maxNum) {

             _maxNum = [num floatValue] ;

         }

     }

 }

 @end
LZChart.m
然后在需要添加的UIView直接调用,是不是很容易呢
     LZChart *chart = [[LZChart alloc] initWithFrame:CGRectMake(, , , )];

     chart.numLabels = [NSArray arrayWithObjects:@,@,@,@, nil];

     chart.nameLabels = [NSArray arrayWithObjects:@"第一",@"第二",@"第三",@"第四", nil];

     [self.view addSubview:chart];

     [chart show];
最终效果:
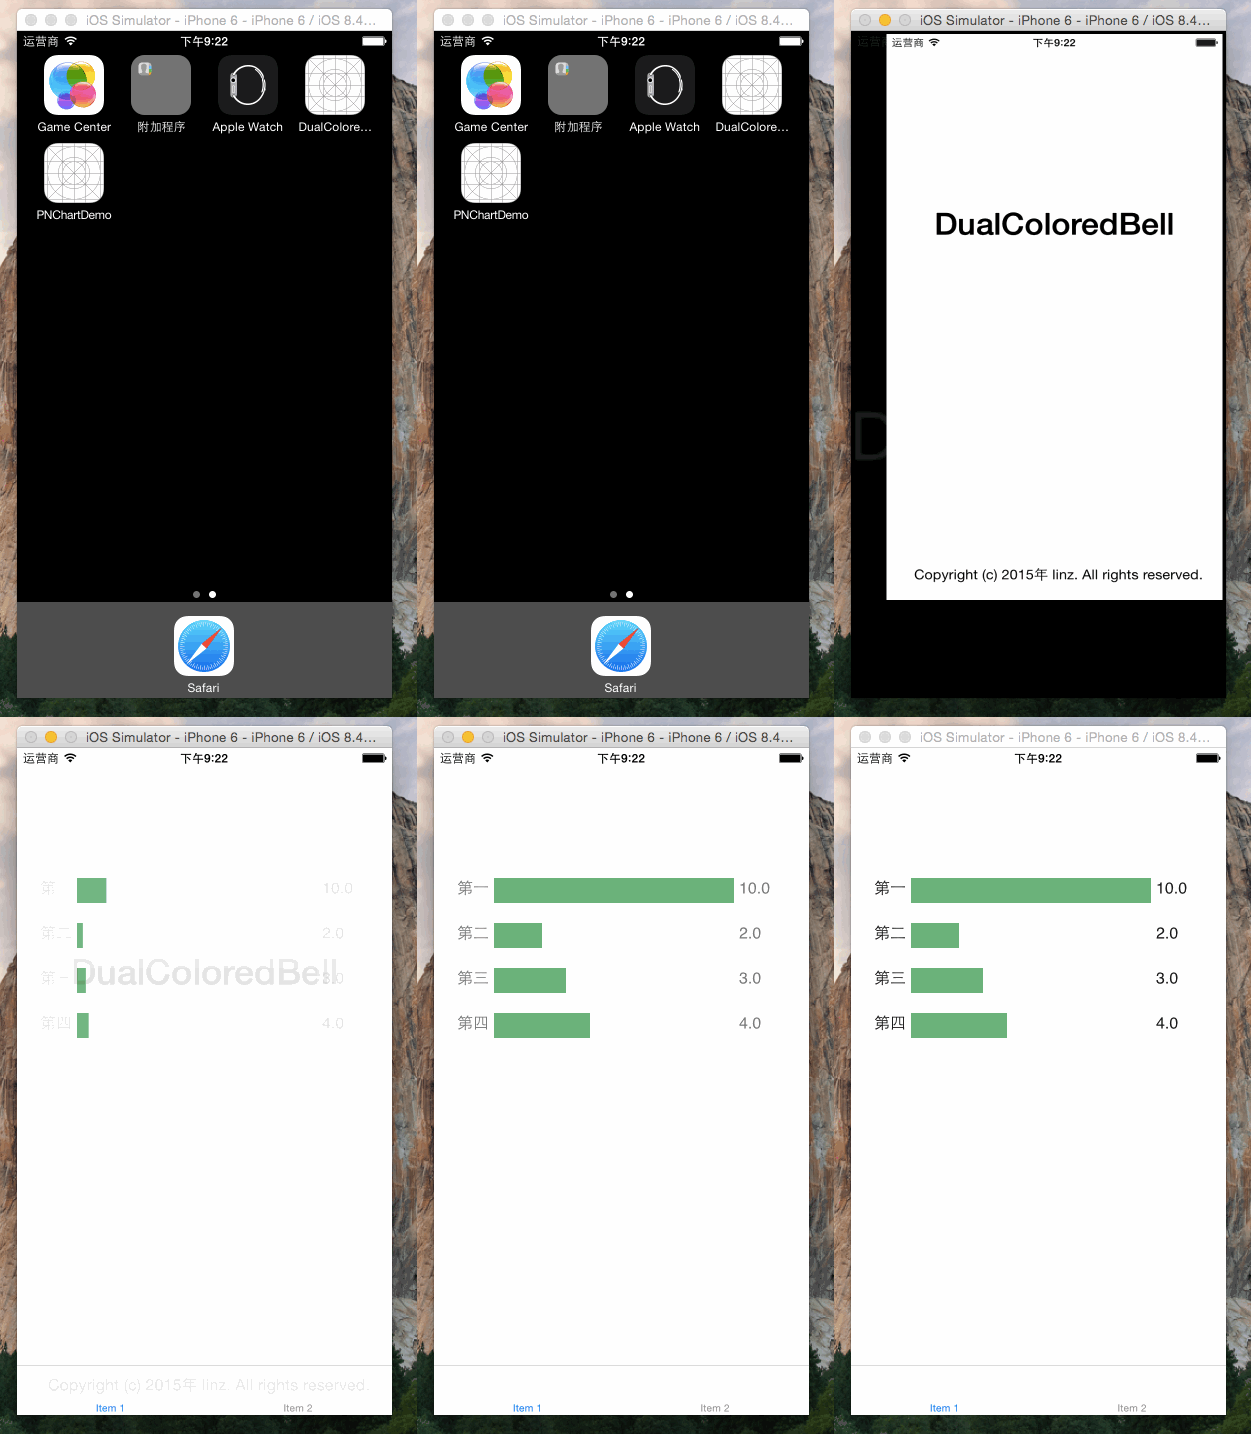
希望大家喜欢~
博客地址: http://www.cnblogs.com/nightcat/
博客版权: 本文以学习、研究和分享为主,欢迎转载,但必须在文章页面明显位置给出原文连接。
如文中有不妥或者错误的地方还望高手的指出,以免误人子弟。如果觉得本文对您有所帮助请【推荐】一下!如果你有更好的建议,不妨留言一起讨论,共同进步! 再次感谢您耐心的读完本篇文章。
iOS简易柱状图(带动画)--新手入门篇的更多相关文章
- 基于Rebound制造绚丽的动画效果-入门篇
基于Rebound制造绚丽的动画效果-入门篇 Rebound是什么? Rebound是一个来自 Facebook 公司的 Java物理和动画库.Rebound spring 模型可用于创建动画,让你感 ...
- Grunt新手入门篇
今天看到一篇通俗易懂的Grunt入门文章,博主写得很用心,原文请戳:http://yujiangshui.com/grunt-basic-tutorial/ 当时学习 Grunt 的时候,真是很头疼. ...
- entity framework 新手入门篇(4)-entity framework扩展之 entityframework.extended
对于EF的操作,我们已经有了大概的了解了,但对于实战来说,似乎还欠缺着一些常用的功能,那就是批量的删除,更新数据. 承接上面的部分,我们有一个叫做House的数据库,其中包含house表和seller ...
- entity framework 新手入门篇(1)-建立模型
entity framework是微软官方免费提供给大家的一套ORM(Object Relational Mapping对象关系映射)解决方案.它不仅可以帮助我们解决数据缓存的问题,还能在最小的开销下 ...
- IOS的一个带动画的多项选择的控件(一)
先上效果图: 这个程序分2个层次,一个是顶部的带UITextField的bar,一个是下拉选择的view,下拉选择的view带有4个自己定义的UIView 我们先定义一个UIViewControlle ...
- MYSQL新手入门篇
一.数据库的简介 什么是数据库? 数据的仓库,如:在atm的实例中我们创建一个db目录称之为数据库 什么是 MySQL.Oracle.SQLite.Access.MS SQL Server等 ? 他们 ...
- entity framework 新手入门篇(3)-entity framework实现orderby,count,groupby,like,in,分页等
前面我们已经学习了entityframework的基本的增删改查,今天,我们将在EF中实现一些更加贴近于实际功能的SQL方法. 承接上面的部分,我们有一个叫做House的数据库,其中包含house表和 ...
- entity framework 新手入门篇(2)-entity framework基本的增删改查
经过前两节的简单描述,终于可以进入entity framework的使用部分了.本节将对entity framework原生的增删改查进行讲解. 承接上面的部分,我们有一个叫做House的数据库,其中 ...
- entity framework 新手入门篇(1.5)-lambda表达式与linq
在建立好了EF模型之后,先不着急使用它,在使用它之前,你还需要了解两个相关的技术,lambda表达式与linq. 作为微软C#语言中重要的语法糖-lambda表达式与LINQ,本质都是一个方法,以la ...
随机推荐
- 安装SQL Server2008,要重启机器,解决办法
安装SQL Server2008时,总提示有挂起,要重启机器:重启之后还是有相应的提示,该怎么办呢? 其实只要删除一个注册表项就可以了: 1. 打开注册表编辑器 开始菜单—>运行->re ...
- javascript 特效实现(3)—— 鼠标滑过显示二级菜单效果
1. 关键代码:使用 switch 或 if 判断语句,改变对应的二级菜单显示方式为 block 或 none function selectTabMenu(i){ switch(i){ case 7 ...
- ASP.NET中常用的几个李天平开源公共类LTP.Common,Maticsoft.DBUtility,LtpPageControl (转)
ASP.NET中常用的几个开源公共类: LTP.Common.dll: 通用函数类库 源码下载Maticsoft.DBUtility.dll 数据访问类库组件 源码下载LtpPageC ...
- USACO section1.2 Miking cows
/* ID: vincent63 LANG: C TASK: milk2 */ #include <stdio.h> #include<stdlib.h> #include&l ...
- 【读书笔记《Android游戏编程之从零开始》】7.Android 游戏开发常用的系统控件(Dialog)
在Android应用开发中,Dialog(对话框)创建简单且易于管理因而经常用到,对话框默认样式类似创建样式的Activity.首先介绍android.app.AlertDialog下的Builder ...
- [ubuntu]中文用户目录路径改英文
ubuntu中文版home文件夹里用目录的"桌面"."图片"."视频"虽然对于中文使用者看起来舒适直观,但是对于bash使用来说简直是障碍. ...
- 实习小记-python 内置函数__eq__函数引发的探索
乱写__eq__会发生啥?请看代码.. >>> class A: ... def __eq__(self, other): # 不论发生什么,只要有==做比较,就返回True ... ...
- 关于 app测试工具
1. 腾讯的GT 2. testin 云测 3. monkey的自动化测试 4. 纯手工的功能测试.
- 转载 ---> UITableViewCell的分割线
在iOS7中,表格中经常看到的一个情况是如下所示, 解决方法: 1,手写代码控制 1 self.tableView.separatorInset = UIEdgeInsetsMake(0, 0, ...
- .Net 项目代码风格要求小结
代码风格没有正确与否,重要的是整齐划一,这是我拟的一份<.Net 项目代码风格要求>,供大家参考. 1. C# 代码风格要求1.1注释 类型.属性.事件.方法.方法参数,根据需要添加注释. ...