WPF 2D纹理的准确映射
TextureCoordinates定义了如何将一副2D纹理映射到所建立的3D网格上,TextureCoordinates为Positions集合中的每一个3D顶点提供了一个2D顶点。
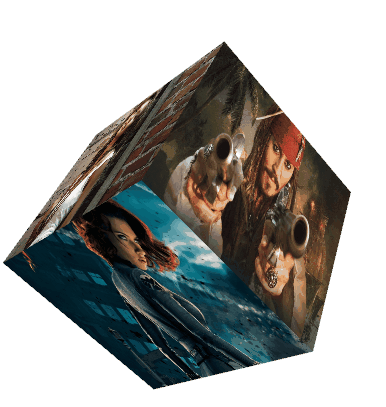
映射时方向确定比较麻烦,需要3D每个面映射都为正确的方向,在baidu上找了很多,映射基本是乱的。
通过归纳测试,有了准确的参数,需要的可参考使用,不必再费劲计算。
里面注销掉的部分,可以恢复并注销调自动转动部分,为手动点击对象转动。
通过VisualBrush写入的 image可以换为UserControl等组件。
代码不长,就100多行,仅供参考,如有错误,自行修正。
MainWindow.xaml
<Window x:Class="Test3.MainWindow"

        xmlns="http://schemas.microsoft.com/winfx/2006/xaml/presentation"

        xmlns:x="http://schemas.microsoft.com/winfx/2006/xaml"

        xmlns:d="http://schemas.microsoft.com/expression/blend/2008"

        xmlns:mc="http://schemas.openxmlformats.org/markup-compatibility/2006"

        mc:Ignorable="d"

        Title="MainWindow" Height="768" Width="1024">

    <Grid x:Name="main">

        <Button Content="纵向" HorizontalAlignment="Left" Margin="10,10,0,0" VerticalAlignment="Top" Width="75" Click="Button_Click"/>

        <Button Content="横向" HorizontalAlignment="Left" Margin="10,48,0,0" VerticalAlignment="Top" Width="75" Click="Button_Click_1"/>

        <Button Content="纵横" HorizontalAlignment="Left" Margin="10,85.74,0,0" VerticalAlignment="Top" Width="75" Click="Button_Click_2"/>

        <Button Content="横纵" HorizontalAlignment="Left" Margin="10,124.5,0,0" VerticalAlignment="Top" Width="75" Click="Button_Click_3"/>

    </Grid>

</Window>
MainWindow.xaml.cs
using System;

using System.Windows;

using System.Windows.Controls;

using System.Windows.Input;

using System.Windows.Media;

using System.Windows.Media.Animation;

using System.Windows.Media.Imaging;

using System.Windows.Media.Media3D;

namespace Test3

{

    public partial class MainWindow : Window

    {

        private AxisAngleRotation3D axisAngleRotation3D;

        public MainWindow()

        {

            InitializeComponent();

            main.MouseDown += Main_MouseDown;

            init_draw();

        }

        public void init_draw()

        {

            Point3DCollection[] positions = new Point3DCollection[6]

            {

                new Point3DCollection(new Point3D[] {

                    new Point3D(0.5, 0.5, -0.5), new Point3D(- 0.5, 0.5, -0.5), new Point3D(- 0.5, 0.5, 0.5),

                    new Point3D(- 0.5, 0.5, 0.5),new Point3D(0.5, 0.5, 0.5), new Point3D(0.5, 0.5, -0.5)

                }),

                new Point3DCollection(new Point3D[] {

                    new Point3D(-0.5,0.5,-0.5),new Point3D(-0.5,-0.5,-0.5), new Point3D(-0.5,-0.5,0.5),

                    new Point3D(-0.5,-0.5,0.5),new Point3D(-0.5,0.5,0.5),new Point3D(-0.5,0.5,-0.5)

                }),

                new Point3DCollection(new Point3D[] {

                    new Point3D(-0.5,-0.5,0.5),new Point3D(0.5,-0.5,0.5),new Point3D(0.5,0.5,0.5),

                    new Point3D(0.5,0.5,0.5),new Point3D(-0.5,0.5,0.5), new Point3D(-0.5,-0.5,0.5)

                }),

                new Point3DCollection( new Point3D[] {

                    new Point3D(-0.5,-0.5,-0.5),new Point3D(-0.5,0.5,-0.5),new Point3D(0.5,0.5,-0.5),

                    new Point3D(0.5,0.5,-0.5), new Point3D(0.5,-0.5,-0.5),new Point3D(-0.5,-0.5,-0.5)

                }),

                new Point3DCollection( new Point3D[] {

                    new Point3D(-0.5,-0.5,-0.5), new Point3D(0.5,-0.5,-0.5), new Point3D(0.5,-0.5,0.5),

                    new Point3D(0.5,-0.5,0.5),new Point3D(-0.5,-0.5,0.5), new Point3D(-0.5,-0.5,-0.5)

                }),

                new Point3DCollection( new Point3D[] {

                    new Point3D(0.5,-0.5,-0.5),new Point3D(0.5,0.5,-0.5),new Point3D(0.5,0.5,0.5),

                    new Point3D(0.5,0.5,0.5), new Point3D(0.5,-0.5,0.5), new Point3D(0.5,-0.5,-0.5)

                })

            };

            PointCollection[] texturepoints = new PointCollection[6]

            {

                new PointCollection {new Point(1,0), new Point(0,0), new Point(0,1), new Point(0,1), new Point(1,1),new Point(1,0) },

                new PointCollection { new Point(0,0),new Point(0,1),new Point(1,1),  new Point(1,1),new Point(1,0),new Point(0,0) },

                new PointCollection { new Point(0,1), new Point(1,1),new Point(1,0), new Point(1,0),new Point(0,0),new Point(0,1) },

                new PointCollection { new Point(1,1), new Point(1,0),new Point(0,0), new Point(0,0), new Point(0,1), new Point(1,1) },

                new PointCollection { new Point(0,1), new Point(1,1), new Point(1,0),new Point(1,0), new Point(0,0), new Point(0,1)},

                new PointCollection{ new Point(1,1), new Point(1,0),new Point(0,0),new Point(0,0), new Point(0,1),new Point(1,1)}

            };

            string[] filename = new string[6] //430251

            {

                "pack://application:,,,/Images/4.jpg",

                "pack://application:,,,/Images/3.jpg",

                "pack://application:,,,/Images/0.jpg",

                "pack://application:,,,/Images/2.jpg",

                "pack://application:,,,/Images/5.jpg",

                "pack://application:,,,/Images/1.jpg"

            };

            Viewport3D viewport3D = new Viewport3D();

            PerspectiveCamera perspectiveCamera = new PerspectiveCamera()

            {

                Position = new Point3D(0, 0, 3),

                LookDirection = new Vector3D(0, 0, -3),

                FieldOfView = 50,

                UpDirection = new Vector3D(0, 1, 0),

                FarPlaneDistance = 20,

                NearPlaneDistance = 0,

            };

            viewport3D.Camera = perspectiveCamera;

            ModelVisual3D modelVisual3D = new ModelVisual3D();

            Model3DGroup model3DGroup = new Model3DGroup();

            for (int i = 0; i < 6; i++)

            {

                GeometryModel3D geometryModel3D = new GeometryModel3D();

                DiffuseMaterial diffuse = new DiffuseMaterial();

                VisualBrush visualBrush = new VisualBrush();

                Image image = new Image();

                image.Source = new BitmapImage(new Uri(filename[i]));

                visualBrush.Visual = image;

                diffuse.Brush = visualBrush;

                geometryModel3D.Material = diffuse;

                MeshGeometry3D meshGeometry3D = new MeshGeometry3D()

                {

                    Positions = positions[i],

                    TextureCoordinates = texturepoints[i],

                };

                geometryModel3D.Geometry = meshGeometry3D;

                model3DGroup.Children.Add(geometryModel3D);

            }

            AmbientLight ambientLight = new AmbientLight();

            model3DGroup.Children.Add(ambientLight);

            modelVisual3D.Content = model3DGroup;

            viewport3D.Children.Add(modelVisual3D);

            main.Children.Add(viewport3D);

            /*

            axisAngleRotation3D = new AxisAngleRotation3D(new Vector3D(1, 1, 0), 0);

            RotateTransform3D rotateTransform3D = new RotateTransform3D(axisAngleRotation3D);

            rotateTransform3D.Rotation = axisAngleRotation3D;

            modelVisual3D.Transform = rotateTransform3D;

            */

            // 如恢复上面,以下可以注销

            axisAngleRotation3D = new AxisAngleRotation3D(new Vector3D(0, 1, 0), 0);

            RotateTransform3D rotate = new RotateTransform3D(axisAngleRotation3D);

            modelVisual3D.Transform = rotate;

            DoubleAnimation animation = new DoubleAnimation();

            animation.From = 0;

            animation.To = 360;

            animation.Duration = new Duration(TimeSpan.FromSeconds(10.0));

            animation.RepeatBehavior = RepeatBehavior.Forever;

            NameScope.SetNameScope(main, new NameScope());

            main.RegisterName("cubeaxis", axisAngleRotation3D);

            Storyboard.SetTargetName(animation, "cubeaxis");

            Storyboard.SetTargetProperty(animation, new PropertyPath(AxisAngleRotation3D.AngleProperty));

            Storyboard RotCube = new Storyboard();

            RotCube.Children.Add(animation);

            RotCube.Begin(main);

        }

        double tmp = 0;

        private void Main_MouseDown(object sender, MouseButtonEventArgs e)

        {

            // 点击对象手动转动

            /*

            tmp = axisAngleRotation3D.Angle;

            if (e.LeftButton == MouseButtonState.Pressed)

            {

                tmp -= 5;

            }

            if (e.RightButton == MouseButtonState.Pressed)

            {

                tmp += 5;

            }

            axisAngleRotation3D.Angle = tmp;

            */

        }

        private void Button_Click(object sender, RoutedEventArgs e)

        {

            axisAngleRotation3D.Axis = new Vector3D(1,0,0);

            axisAngleRotation3D.Angle = 0;

        }

        private void Button_Click_1(object sender, RoutedEventArgs e)

        {

            axisAngleRotation3D.Axis = new Vector3D(0,1,0);

            axisAngleRotation3D.Angle = 0;

        }

        private void Button_Click_2(object sender, RoutedEventArgs e)

        {

            axisAngleRotation3D.Axis = new Vector3D(1, 1, 0);

            axisAngleRotation3D.Angle = 0;

        }

        private void Button_Click_3(object sender, RoutedEventArgs e)

        {

            axisAngleRotation3D.Axis = new Vector3D(0, 1, 1);

            axisAngleRotation3D.Angle = 0;

        }

    }

}
下载:https://pan.baidu.com/s/1yJGS1_jJPL68nPX28NTl4g
WPF 2D纹理的准确映射的更多相关文章
- DirectX11--深入理解与使用2D纹理资源
前言 写教程到现在,我发现有关纹理资源的一些解说和应用都写的太过分散,导致连我自己找起来都不方便.现在决定把这部分的内容整合起来,尽可能做到一篇搞定所有2D纹理相关的内容,其中包括: DDSTextu ...
- Unity牛逼的2D纹理功能
[Unity牛逼的2D纹理功能] 1.可直接将贴图生成成为Cubemap. 2.自动生成Mipmap. 3.查看纹理被当前场景哪些对象引用.在Project窗口中,右击图像,选择 参考:file:// ...
- Cg入门21:Fragment shader - 2D纹理採样
体纹理:是啥? tex2D 曾经仅仅能在Fragment程序中纹理採样 UV坐标系:事实上点为左下角,范围为[0,1].U为x轴,V为y轴 watermark/2/text/aHR0cDovL2Jsb ...
- WPF属性与特性的映射(TypeConverter)
1,定义一个类 public class Human { public string Name { get; set; } public Human Child { get; set; } } 2在X ...
- WPF 2D图形 Shape入门(一)--Shape
本文是篇WPF Shape的入门文章 Shape 首先看看shape的继承链关系: 一个Shape具有哪些重要属性: 属性 说明 DefiningGeometry 默认的几何形状 RenderedGe ...
- WPF 2D 碰撞检测
var intersectionDetail = path1.Data.FillContainsWithDetail(path2.Data); if (intersectionDetail ! ...
- 从位图图像中读取2D纹理(C ++,OpenGL)
一共有2个.cpp文件和1个.h头文件 步骤: 需要安装GLUT,因为GLUT是第三方库,即它不是OpenGL的一部分.因此,它不是Windows系统API的一部分,因此不属于标准Windows SD ...
- 在CG/HLSL中访问着色器属性(Properties)
在CG/HLSL中访问着色器属性 Shader在Properties块中访问材质属性.如果你想在一个着色程序中访问一些属性,你需要声明一个Cg/HLSL具有相同的名称和一个匹配的类型的变量. Prop ...
- WebGL高级编程:开发Web3D图形 PDF(中文版带书签)
WebGL高级编程:开发Web3D图形 目录 WebGL简介11.1 WebGL基础11.2 浏览器3D图形吸引人的原因21.3 设计一个图形API31.3.1 即时模式API31.3.2 保留模式A ...
随机推荐
- Python实现海贼王的歌词组成词云图
前言 本文的文字及图片来源于网络,仅供学习.交流使用,不具有任何商业用途,版权归原作者所有,如有问题请及时联系我们以作处理. 作者:一粒米饭 喜欢的朋友欢迎关注小编,除了分享技术文章之外还有很多福利, ...
- 并发编程之sun.misc.Unsafe类
1.Unsafe知识点整理 2.代码: package com.javabasic.unsafe; import java.lang.reflect.Field; import sun.misc.Un ...
- 实验五 shell脚本编程
项目 内容 这个作业属于哪个课程 课程链接 这个作业的要求在哪里 作业要求 学号-姓名 17041428-朱槐健 作业学习目标 1. 了解shell脚本的概念及使用 2.掌握shell脚本语言的基本语 ...
- 详解CurrentHashMap之预习篇
CurrentHashMap的出现时为了解决HashMap的高并发导致OOM的缺陷,并且能够保证高性能读取.那么解读CurrentHashMap需要具备哪些知识的呢? HashMap 解读 Java ...
- TensorFlow从0到1之TensorFlow多层感知机函数逼近过程(23)
Hornik 等人的工作(http://www.cs.cmu.edu/~bhiksha/courses/deeplearning/Fall.2016/notes/Sonia_Hornik.pdf)证明 ...
- (二)JavaMail创建包含内嵌图片的邮件
链接:https://blog.csdn.net/qq_41151659/article/details/96475739 代码如下: import com.sun.mail.util.MailSSL ...
- 附015.Kubernetes其他技巧
一 优化镜像源 1.1 国内镜像源 global proxy in China format example dockerhub (docker.io) dockerhub.azk8s.cn dock ...
- 重学 Java 设计模式:实战代理模式「模拟mybatis-spring中定义DAO接口,使用代理类方式操作数据库原理实现场景」
作者:小傅哥 博客:https://bugstack.cn 沉淀.分享.成长,让自己和他人都能有所收获! 一.前言 难以跨越的瓶颈期,把你拿捏滴死死的! 编程开发学习过程中遇到的瓶颈期,往往是由于看不 ...
- rust 学习之旅二,关键字和保留字
当前,以下关键字具有所描述的功能. as-执行原始类型转换,消除包含项目的特定特征的歧义,或在useand extern crate语句中重命名项目async-返回a Future而不是阻塞当前线程a ...
- Eplan如何调用经常使用的自绘部件?
Eplan如何调用经常使用的自绘部件?采用宏的简单应用,即可. 参考文档:https://blog.csdn.net/txwtech/article/details/90510106