
路由器配置——PAP与CHAP认证
一、实验目的:掌握PAP与CHAP认证配置
二、拓扑图:
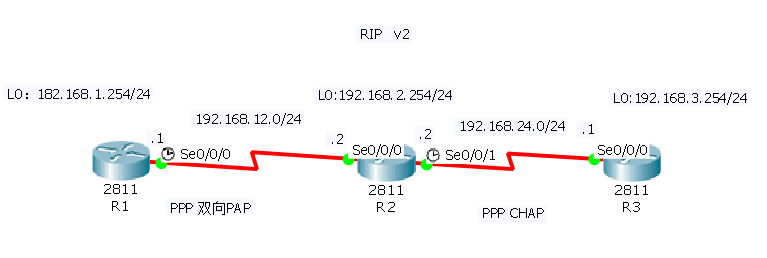
三、具体步骤配置:
(1)R1路由器配置:
Router>enable --进入特权模式
Router#configure terminal --进入全局配置模式
Enter configuration commands, one per line. End with CNTL/Z.
Router(config)#hostname R1 --修改路由器名为R1
R1(config)#interface l0 --进入回环端口
R1(config-if)#ip address 192.168.1.254 255.255.255.0 --配置ip地址
R1(config-if)#no shutdown --激活端口
R1(config-if)#exit --返回上一级
R1(config)#interface s0/0/0 --进入端口
R1(config-if)#ip address 192.168.12.1 255.255.255.0 --为端口配置ip地址
R1(config-if)#clock rate 64000 --设置时钟同步速率
R1(config-if)#no shutdown --激活端口
%LINK-5-CHANGED: Interface Serial0/0/0, changed state to down
R1(config-if)#exit --返回上一级
R1(config)#route rip --开启rip服务
R1(config-router)#version 2 --版本2
R1(config-router)#no auto-summary --关闭路由自动汇总
R1(config-router)#network 192.168.1.0 --添加直连网段到rip
R1(config-router)#network 192.168.12.0
R1(config-router)#exit --返回上一级
R1(config)#username abc1 password 456 --在中心路由器R1上为远程路由器R2设置用户名和密码
R1(config)#interface s0/0/0 --进入端口
R1(config-if)#encapsulation ppp --封装端口为ppp
R1(config-if)#ppp authentication pap --在R1上,配置PAP 验证
R1(config-if)#ppp pap sent-username abc password 123 --在中心路由器R1上为远程路由器R2设置用户名和密码
R1(config-if)#end --返回特权模式
%LINK-5-CHANGED: Interface Loopback0, changed state to up
%LINEPROTO-5-UPDOWN: Line protocol on Interface Loopback0, changed state to up
R1#
%SYS-5-CONFIG_I: Configured from console by console
%LINK-5-CHANGED: Interface Serial0/0/0, changed state to up
%LINEPROTO-5-UPDOWN: Line protocol on Interface Serial0/0/0, changed state to up
(2)R2路由器配置:
Router>enable --进入特权模式
Router#configure terminal --进入全局配置模式
Enter configuration commands, one per line. End with CNTL/Z.
Router(config)#hostname R2 --修改路由器名为R2
R2(config)#interface l0 --进入回环端口
R2(config-if)#ip address 192.168.2.254 255.255.255.0 --配置ip地址
R2(config-if)#no shutdown --激活端口
R2(config-if)#exit --返回上一级
R2(config)#interface s0/0/0 --进入端口
R2(config-if)#ip address 192.168.12.2 255.255.255.0 --为端口配置ip地址
R2(config-if)#no shutdown --激活端口
R2(config-if)#interface s0/0/1 --进入端口
R2(config-if)#ip address 192.168.24.2 255.255.255.0 --为端口配置ip地址
R2(config-if)#clock rate 64000 --设置时钟同步速率
R2(config-if)#no shutdown --激活端口
%LINK-5-CHANGED: Interface Serial0/0/1, changed state to down
R2(config-if)#exit --返回上一级
R2(config)#route rip --开启rip协议
R2(config-router)#version 2 --版本2
R2(config-router)#no auto-summary --关闭路由自动汇总
R2(config-router)#network 192.168.2.0 --添加直连网段到rip
R2(config-router)#network 192.168.12.0
R2(config-router)#network 192.168.24.0
R2(config-router)#exit --返回上一级
R2(config)#username abc password 123 --在R2上为R1设置用户名和密码
R2(config)#username R3 password cisco --在R2上为R3设置用户名和密码(注意两端密码要相同)
R2(config)#interface s0/0/0 --进入端口
R2(config-if)#encapsulation ppp --封装端口为PPP协议
R2(config-if)#ppp authentication pap --配置PAP验证
R2(config-if)#ppp pap sent-username abc1 password 456 --在R2上为R1设置用户名和密码
R2(config-if)#interface s0/0/1 --进入端口
R2(config-if)#encapsulation ppp --封装端口为ppp协议
R2(config-if)#ppp authentication chap --配置chap验证
R2(config-if)#end --返回特权模式
R2#
%LINK-5-CHANGED: Interface Loopback0, changed state to up
%LINEPROTO-5-UPDOWN: Line protocol on Interface Loopback0, changed state to up
%LINK-5-CHANGED: Interface Serial0/0/0, changed state to up
%SYS-5-CONFIG_I: Configured from console by console
%LINEPROTO-5-UPDOWN: Line protocol on Interface Serial0/0/0, changed state to up
R2#
%LINK-5-CHANGED: Interface Serial0/0/1, changed state to up
%LINEPROTO-5-UPDOWN: Line protocol on Interface Serial0/0/1, changed state to up
(3)R3路由器配置:
Router>enable --进特权模式
Router#configure terminal --进入全局配置模式
Enter configuration commands, one per line. End with CNTL/Z.
Router(config)#hostname R3 --修改路由器名为R3
R3(config)#interface l0 --进入回环端口
R3(config-if)#ip address 192.168.3.254 255.255.255.0 --为端口配置ip地址
R3(config-if)#no shutdown --激活端口
R3(config-if)#exit --返回上一级
R3(config)#interface S0/0/0 --进入端口
R3(config-if)#ip address 192.168.24.1 255.255.255.0 --为端口配置ip地址
R3(config-if)#no shutdown --激活端口
R3(config-if)#exit --返回上一级
R3(config)#route rip --开启rip协议
R3(config-router)#version 2 --版本2
R3(config-router)#no auto-summary --关闭路由自动汇总
R3(config-router)#network 192.168.3.0 --添加直连网段到rip
R3(config-router)#network 192.168.24.0
R3(config-router)#exit --返回上一级
R3(config)#username R2 password cisco --在R3上为R2设置用户名和密码
R3(config)#interface s0/0/0 --进入端口
R3(config-if)#encapsulation ppp --封装端口为ppp协议
R3(config-if)#ppp authentication chap --配置chap验证
R3(config-if)#end --返回特权模式
%LINK-5-CHANGED: Interface Loopback0, changed state to up
%LINEPROTO-5-UPDOWN: Line protocol on Interface Loopback0, changed state to up
%LINK-5-CHANGED: Interface Serial0/0/0, changed state to up
%LINEPROTO-5-UPDOWN: Line protocol on Interface Serial0/0/0, changed state to up
R3#
%SYS-5-CONFIG_I: Configured from console by console
四、验证测试:
1、测试是否开启ppp认证
(1)R1:

(2)R2:

(3)R3:

2、查看R1的S0/0/0端口信息

如图,红色标记处表示是PPP认证
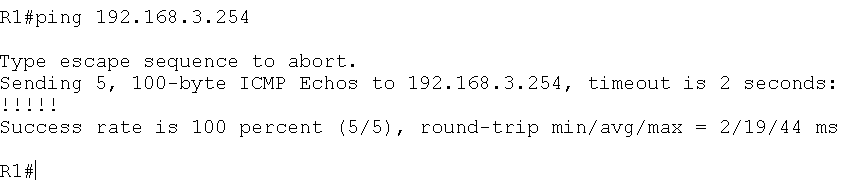
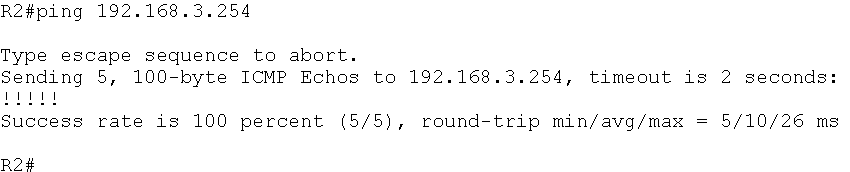
3、测试全网是否互通:
(1)R1与R2
(2)R2与R3
(3)R3与R1

结果:全网互通成功!!!
路由器配置——PAP与CHAP认证的更多相关文章
- 路由器配置PPP协议 CHAP验证 PAP验证
路由器配置PPP协议 CHAP验证 PAP验证 来源 https://www.cnblogs.com/tcheng/p/5967485.html PAP是两次握手,明文传输用户密码进行认证:CHAP是 ...
- 路由器基础配置之ppp封装下的pap,chap认证
我们将以上面的拓扑图完成本次实验,路由器的默认封装为HDLC,要求为把路由器全被更改为ppp封装,并在router3与router4之间用pap认证,在router4与router5之间用chap认证 ...
- 路由器配置深入浅出—路由器接口PPP协议封装及PAP和CHAP验证配置
知识域: 是针对点对点专线连接的接口的二层封装协议配置 PPP的PAP和CHAP验证,cpt支持,不一定要在gns3上做实验. 路由器出厂默认是hdlc封装,修改为ppp封装后,可以采用pap验证或者 ...
- 详解eNSP下的PPP之MP、PAP/CHAP认证实验配置
一.PPP MP实验(用虚拟模板配置) 1.拓扑图
- 路由器配置——基于链路的OSPF简单口令认证
一.实验目的:掌握基于链路的OSPF简单口令认证 二.拓扑图: 三.具体步骤配置: (1)R1路由器配置 Router>enable Router#configure terminal Ente ...
- 路由器配置——基于区域的OSPF,MD5认证
一.实验目的:掌握OSPF基于区域的MD5认证 二.拓扑图: 三.具体步骤配置 (1)R1路由器配置 Router>enable Router#configure terminal Enter ...
- 路由器配置——基于区域的OSPF简单认证
一.实验目的:掌握区域的OSPF简单认证 二.拓扑图: 三.具体步骤配置: (1)R1路由器配置 Router>enable Router#configure terminal Enter co ...
- 神州数码广域网PPP封装CHAP认证配置
实验要求:掌握PPP封装协议下的CHAP认证 拓扑如下 R1 enable 进入特权模式 config 进入全局模式 hostname R1 修改名称 interface s0/1 进入端口 ip a ...
- CHAP认证原理
整个过程就是PPP协商过程,分三步:LCP.认证.NCP. 一 协议概述 PPP包含以下两个层次的协议: ·链路控制协议(LCP):负责建立.配置和测试数据链路连接 ·网络控制协议(NCP):负责建立 ...
随机推荐
- 1264: 祈雨(Java)
WUSTOJ 1264: 祈雨 Description 在持续了X天的干旱之后,ACM俱乐部决定由LCM去请求雨大师XH祈雨,CMS则准备工具收集雨水,由于ACM俱乐部中有一个逆天的存在,BobLee ...
- odoo——日历的一对多与多对一
# model文件 # -*- coding: utf-8 -*- from odoo import api, fields, models class TodoTestYear(models.Mod ...
- linux运维工程师常用命令
1.ls [选项] [目录名 | 列出相关目录下的所有目录和文件 -a 列出包括.a开头的隐藏文件的所有文件-A 通-a,但不列出"."和".."-l 列 ...
- PAT-1015 Reversible Primes (20 分) 进制转换+质数
A reversible prime in any number system is a prime whose "reverse" in that number system i ...
- (一)JMS简介
一.简介 JMS即Java消息服务(Java Message Service)应用程序接口,是一个Java平台中关于面向消息中间件(MOM)的API,用于在两个应用程序之间,或分布式系统中发送消息,进 ...
- 日志(log4j)
log4j测试代码如下: package com.learn.test; import org.apache.log4j.Logger; public class Test { public stat ...
- JDBC 学习复习6 学习与编写数据库连接池
之前的工具类DBUtil暴露的问题 用户每次请求都需要向数据库获得链接,而数据库创建连接通常需要消耗相对较大的资源,创建时间也较长.假设网站一天10万访问量,数据库服务器就需要创建10万次连接,极大的 ...
- JDBC 复习4 批量执行SQL
1使用jdbc进行批量执行SQL在实际的项目开发中,有时候需要向数据库发送一批SQL语句执行,这时应避免向数据库一条条的发送执行,而应采用JDBC的批处理机制,以提升执行效率. package dbe ...
- POJ2729 Robocode(离散化与模拟-----提醒曾经爱玩游戏的自己没做出这个
题目链接 :http://poj.org/problem?id=2729 题目很长,有不少也是废话.类似小时候玩的坦克大战.每个坦克速度为10,炮弹速度为20.子弹出界就消失,坦克出不了界限.相向的子 ...
- For... in 及 For… of 及 forEach
For... in 及 For… of let arr = ["a","b"]; for (let a in arr) { console.log(a) // ...