
【ASP.NET Web API教程】2.3.2 创建域模型
原文:【ASP.NET Web API教程】2.3.2 创建域模型
Part 2: Creating the Domain Models
第2部分:创建域模型
本文引自:http://www.asp.net/web-api/overview/creating-web-apis/using-web-api-with-entity-fram
ework/using-web-api-with-entity-framework,-part-2
Add Models
添加模型
There are three ways to approach Entity Framework:
有三种方式使用实体框架:
- Database-first: You start with a database, and Entity Framework generates the code.
Database-first(数据库先行):从一个数据库开始,然后实体框架生成相应代码。 - Model-first: You start with a visual model, and Entity Framework generates both the database and code.
Model-first(模型先行):先从一个可视化模型开始,然后实体框架生成数据库和代码。 - Code-first: You start with code, and Entity Framework generates the database.
Code-first(代码先行):先从代码开始,然后实体框架生成数据库。
We are using the code-first approach, so we start by defining our domain objects as POCOs (plain-old CLR objects). With the code-first approach, domain objects don't need any extra code to support the database layer, such as transactions or persistence. (Specifically, they do not need to inherit from the EntityObject class.) You can still use data annotations to control how Entity Framework creates the database schema.
我们打算使用code-first方法,因此,首先把域对象定义成POCO(plain-old CLR objects — 旧式无格式公共语言运行时(CLR)对象。很多人不太理解POCO对象,其实这种对象就像文本文件一样,是一种最简单、最原始、不带任何格式的对象。因此,在各种环境中最容易对这类对象进行处理,包括用各类语言进行处理 — 译者注)。利用code-first方法,域对象不需要任何附加代码去支持数据库层,如事务处理、持久化等。(特别是它们不需要继承于EntityObject类。)你仍可以使用数据注解(data annotation)对实体框架如何创建数据库方案进行控制。
Because POCOs do not carry any extra properties that describe database state, they can easily be serialized to JSON or XML. However, that does not mean you should always expose your Entity Framework models directly to clients, as we'll see later in the tutorial.
由于POCO不带描述数据库状态的任何附加属性,它们可以很容易地被序列化成JSON或XML。然而,这并不意味着你应当总是把实体框架模型直接暴露给客户端,就像我们稍后在本教程所看到的那样。
We will create the following POCOs:
我们将创建以下POCO:
- Product
- Order
- OrderDetail
To create each class, right-click the Models folder in Solution Explorer. From the context menu, select Add and then select Class.
要创建每个类,在“解决方案资源管理器”中右击Models文件夹。从上下文菜单选择“添加”,然后选择“类”(如图2-14所示)。
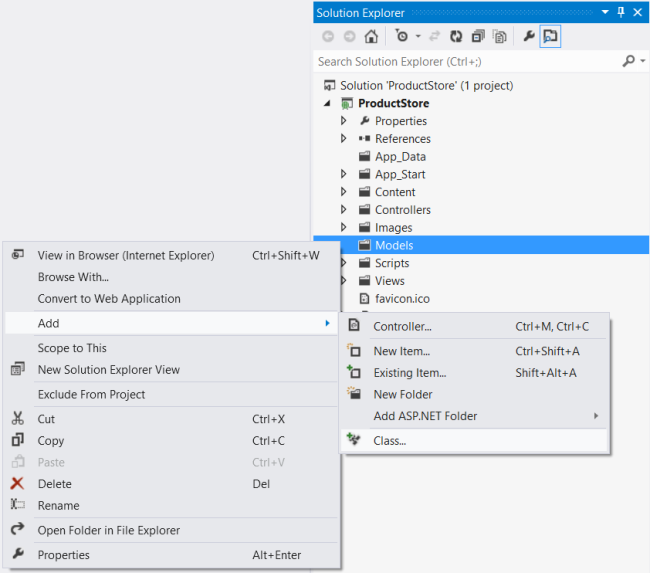
图2-14. 创建POCO类
Add a Product class with the following implementation:
用以下实现添加一个Product类(产品类):
namespace ProductStore.Models


{

    using System.ComponentModel.DataAnnotations;


    public class Product

    {

        [ScaffoldColumn(false)]

        public int Id { get; set; }

        [Required]

        public string Name { get; set; }

        public decimal Price { get; set; }

        public decimal ActualCost { get; set; }

    }

}
By convention, Entity Framework uses the Id property as the primary key and maps it to an identity column in the database table. When you create a new Product instance, you won’t set a value for Id, because the database generates the value.
根据约定,实体框架用Id属性作为主键,并把它映射成数据库表中的标识列。当创建一个新的Product实例时,不必为Id设置值,因为数据库会生成它。
The ScaffoldColumn attribute tells ASP.NET MVC to skip the Id property when generating an editor form. The Required attribute is used to validate the model. It specifies that the Name property must be a non-empty string.
ScaffoldColumn(支架列)注解属性是告诉ASP.NET MVC,在生成编辑表单时,跳过这个Id属性。Required注解属性用于对模型进行验证。它指定Name属性必须是一个非空字符串。
注:本文把ScaffoldConlumn、Required等这一类英文中叫做Annotation Attribute的属性(Attribute)译为注解属性(Annotation Attribute),以便与类中的那些属性加以区别 — 译者注
Add the Order class:
添加Order类(订单类):
namespace ProductStore.Models

{

    using System.Collections.Generic;

    using System.ComponentModel.DataAnnotations;


    public class Order

    {

        public int Id { get; set; }

        [Required]

        public string Customer { get; set; }


        // Navigation property

        // 导航属性

        public ICollection<OrderDetail> OrderDetails { get; set; }

    }

}
Add the OrderDetail class:
添加OrderDetail类(订单细节类,或订单详情类):
namespace ProductStore.Models

{

    public class OrderDetail

    {

        public int Id { get; set; }

        public int Quantity { get; set; }

        public int OrderId { get; set; }

        public int ProductId { get; set; }


        // Navigation properties

        // 导航属性

        public Product Product { get; set; }

        public Order Order { get; set; }

    }

}
Foreign Key Relations
外键关系
An order contains many order details, and each order detail refers to a single product. To represent these relations, the OrderDetail class defines properties named OrderId and ProductId. Entity Framework will infer that these properties represent foreign keys, and will add foreign-key constraints to the database.
一份订单包含很多订单细节,而每个订单细节指向一个单一的产品。为了表示这些关系,OrderDetail类定义了名称为OrderId和ProductId的属性。实体框架将会推断出这些属性表示的是外键,并会把外键约束添加到数据库(见图2-15)。
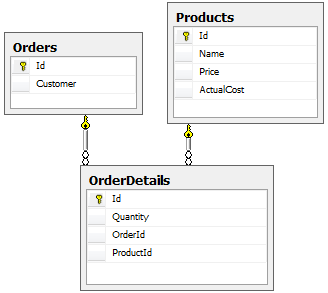
图2-15. 外键关系
The Order and OrderDetail classes also include “navigation” properties, which contain references to the related objects. Given an order, you can navigate to the products in the order by following the navigation properties.
Order和OrderDetail类也包含了“导航(navigation)”属性,导航属性包含了对相关对象的引用。对于一份给定的订单,可以根据导航属性导航到这份订单的产品。
Compile the project now. Entity Framework uses reflection to discover the properties of the models, so it requires a compiled assembly to create the database schema.
现在,编译这个项目。实体框架会使用反射来发现这些模型的属性,因此它需要编译后的程序集来创建相应的数据库方案(这里的数据库方案意指数据库、表结构以及关系等数据库方面的定义 — 译者注)。
Configure the Media-Type Formatters
配置Media-Type格式化器
A media-type formatter is an object that serializes your data when Web API writes the HTTP response body. The built-in formatters support JSON and XML output. By default, both of these formatters serialize all objects by value.
media-type(媒体类型)格式化器是Web API书写HTTP响应体时对数据进行序列化的一个对象。内建的格式化器支持JSON和XML输出。默认地,这两种格式化都会按值序列化所有对象。
Serialization by value creates a problem if an object graph contains circular references. That's exactly the case with the Order and OrderDetail classes, because each holds a reference to the other. The formatter will follow the references, writing each object by value, and go in circles. Therefore, we need to change the default behavior.
如果对象图含有循环引用,按值序列化会出现问题。这恰好是Order类和OrderDetail类的情况,因为每一个都含有对另一个的引用。格式化器会遵循这些引用,按值写出每一个对象,于是会引起循环。因此,我们需要修改这种默认行为。
In Solution Explorer, expand the App_Start folder and open the file named WebApiConfig.cs. Add the following code to the WebApiConfig class:
在“解决方案资源管理器”中,展开App_Start文件夹,并打开名为WebApiConfig.cs的文件。将以下代码添加到这个WebApiConfig.cs类中(以下代码中的“新代码” — 译者注):
public static class WebApiConfig

{

    public static void Register(HttpConfiguration config)

    {

        config.Routes.MapHttpRoute(

            name: "DefaultApi",

            routeTemplate: "api/{controller}/{id}",

            defaults: new { id = RouteParameter.Optional }

        );


        // New code:

        // 新代码:

        var json = config.Formatters.JsonFormatter;

        json.SerializerSettings.PreserveReferencesHandling =

            Newtonsoft.Json.PreserveReferencesHandling.Objects;


        config.Formatters.Remove(config.Formatters.XmlFormatter);

    }

}
This code sets the JSON formatter to preserve object references, and removes the XML formatter from the pipeline entirely. (You can configure the XML formatter to preserve object references, but it's a little more work, and we only need JSON for this application. For more information, see Handling Circular Object References.)
这段代码把JSON格式化器设置为防止对象引用(“新代码”第二行的作用 — 译者注),并把XML格式化器从管线(指HTTP的请求处理管线 — 译者注)中完全删除(“新代码”最后一行的作用 — 译者注)。(你也可以把XML格式化器配置成防止对象引用,但这还要做一点工作,而对于这个应用程序,我们只需要JSON。更多信息参阅“处理循环对象引用”(本教程的第6部分 — 译者注)。
【ASP.NET Web API教程】2.3.2 创建域模型的更多相关文章
- 【ASP.NET Web API教程】2.4 创建Web API的帮助页面
原文:[ASP.NET Web API教程]2.4 创建Web API的帮助页面 注:本文是[ASP.NET Web API系列教程]的一部分,如果您是第一次看本博客文章,请先看前面的内容. 2.4 ...
- 【ASP.NET Web API教程】2.1 创建支持CRUD操作的Web API
原文 [ASP.NET Web API教程]2.1 创建支持CRUD操作的Web API 2.1 Creating a Web API that Supports CRUD Operations2.1 ...
- 【ASP.NET Web API教程】2.4 创建Web API的帮助页面[转]
注:本文是[ASP.NET Web API系列教程]的一部分,如果您是第一次看本博客文章,请先看前面的内容. 2.4 Creating a Help Page for a Web API2.4 创建W ...
- 【ASP.NET Web API教程】3.2 通过.NET客户端调用Web API(C#)
原文:[ASP.NET Web API教程]3.2 通过.NET客户端调用Web API(C#) 注:本文是[ASP.NET Web API系列教程]的一部分,如果您是第一次看本博客文章,请先看前面的 ...
- 【ASP.NET Web API教程】3 Web API客户端
原文:[ASP.NET Web API教程]3 Web API客户端 Chapter 3: Web API Clients 第3章 Web API客户端 本文引自:http://www.asp.net ...
- 【ASP.NET Web API教程】2.3.7 创建首页
原文:[ASP.NET Web API教程]2.3.7 创建首页 注:本文是[ASP.NET Web API系列教程]的一部分,如果您是第一次看本博客文章,请先看前面的内容. Part 7: Crea ...
- 【ASP.NET Web API教程】2.3.6 创建产品和订单控制器
原文:[ASP.NET Web API教程]2.3.6 创建产品和订单控制器 注:本文是[ASP.NET Web API系列教程]的一部分,如果您是第一次看本博客文章,请先看前面的内容. Part 6 ...
- 【ASP.NET Web API教程】2.3.5 用Knockout.js创建动态UI
原文:[ASP.NET Web API教程]2.3.5 用Knockout.js创建动态UI 注:本文是[ASP.NET Web API系列教程]的一部分,如果您是第一次看本博客文章,请先看前面的内容 ...
- 【ASP.NET Web API教程】2.3.4 创建Admin视图
原文:[ASP.NET Web API教程]2.3.4 创建Admin视图 注:本文是[ASP.NET Web API系列教程]的一部分,如果您是第一次看本博客文章,请先看前面的内容. Part 4: ...
- 【ASP.NET Web API教程】2.3.3 创建Admin控制器
原文:[ASP.NET Web API教程]2.3.3 创建Admin控制器 注:本文是[ASP.NET Web API系列教程]的一部分,如果您是第一次看本博客文章,请先看前面的内容. Part 3 ...
随机推荐
- HBase的Snapshots功能介绍
HBase的Snapshots功能介绍 hbase的snapshot功能还是挺有用的,本文翻译自cloudera的一篇博客,希望对想了解snapshot 的朋友有点作用,如果翻译得不好的地方,请查看原 ...
- main函数的参数问题 (转载)
void main(int arg ,char *arv[]){} arg -- 命令行参数总个数arv[0] -- 参数1,程序名 arv[1] -- 参数2,字符串 arv[2] -- 参数3,字 ...
- POJ 2187 旋转卡壳 + 水平序 Graham 扫描算法 + 运算符重载
水平序 Graham 扫描算法: 计算二维凸包的时候可以用到,Graham 扫描算法有水平序和极角序两种. 极角序算法能一次确定整个凸包, 但是计算极角需要用到三角函数,速度较慢,精度较差,特殊情况较 ...
- 180China丨the Agency for Brand Engagement and Experience
180China丨the Agency for Brand Engagement and Experience Welcome to 180. Welcome to Creativity. Thank ...
- sequence1(暴力)
sequence1 Time Limit: 2000/1000 MS (Java/Others) Memory Limit: 65536/65536 K (Java/Others) Total ...
- java高级project师须要掌握的技术
1.你须要精通面向对象分析与设计(OOA/OOD).涉及模式(GOF,J2EEDP)以及综合模式.你应该十分了解UML,尤其是class,object,interaction以及statediagra ...
- mac忘记登陆密码解决
重新启动苹果电脑,开机时按住“command”键+“S”键,(普通键盘按住win+s)会进入单用户模式, 出现像DOS一样的提示符 #root>依次输入如下三个命令:(注意空格 注意大小写) f ...
- Quartz中文文档使用
Quartz中文使用说明文档,内容相当详细,有需要的码友们可以看看!! 好东西要分享!! 下面是文档的内容目录,附上下载的地址:点击打开链接,下载文档 中文版目录总汇及内容提要 第一章. 企业应用中的 ...
- UVALive 6584 Escape (Regionals 2013 >> Europe - Central)
题目 给出一棵树,每个节点有一个怪物或血药,遇到怪物必须打,打完后扣掉一定的血量. 一开始英雄的血量为\(0\),当血量小于\(0\)时就挂了. 给出英雄的起点和终点,问能否成功到达终点. 算法 这题 ...
- servlet 与缓存(4)
1.设置缓存的两种情况: 第一种:对于不常常变化的数据,在servlet中能够为其设置合理的缓存时间值,以避免浏览器频繁向server发送请求,提升server的性能. 另外一种:假设要实现一种高级功 ...