【Android】7.3 GridLayout(网格布局)
分类:C#、Android、VS2015;
创建日期:2016-02-10
一、简介
Android 4.0(API 14)开始提供的GridLayout布局使用虚细线将布局划分为行、列和单元格,也支持一个控件在行、列上都有交错排列。
GridLayout使用与LinearLayout类似的API,只不过是修改了一下相关的标签而已。
1、默认布局方式—先行后列
GridLayout默认按先行后列的方式依次显示,子元素默认按照wrap_content的方式显示。如果不希望子元素显式指定其所在的行列位置,此时只需要在GridLayout中仅指定列数(columnCount)即可,不需要指定所占的行数。
2、将布局改为先列后行
如果需要改变子元素默认的布局方式,比如改为先列后行,此时应该在GridLayout的开始标记内指定,而不是在子元素中指定。
要按先列后行的方式显示,且子元素也不需要指定其所在的行列位置,此时只需要在GridLayout中仅指定行数(rowCount)即可,不需要指定所占的列数。
3、平均分布各行内的单元格
如果希望平均分布各行内的单元格,而且希望其占满该行屏幕,只需要在每一行嵌入一个LinearLayout即可。
4、平均分布各行内的单元格且单元格之间分隔一定的外边距
设置子元素的margin即可。
5、Space、rowSpan、columnSpan
如果需要设置某控件跨越多行或多列,只需将该子控件的android:layout_rowSpan或者layout_columnSpan属性设置为数值,再设置其layout_gravity属性即可,前一个设置表明该控件跨越的行数或列数,后一个设置表明该控件填满所跨越的整行或整列。
要让子元素占据空白的单元格(比如以后再填充它),此时可以使用称为Space的子元素。
Space的另一个用途是用它指定行间距或者列间距。比如,对于一个4行3列的网格布局,如果希望第0行和第1行之间的间距是20dp,此时不需要对每个子元素都添加间距,只需要添加一个Space,将其columnSpan设置为3,然后一次性指定间距即可。
6、子元素显式指定其所在的单元格位置
如果希望某控件显示在固定的行或列,只需设置该控件的android:layout_row和android:layout_column属性即可,注意:行、列序号都是从0开始。
例如:
<GridLayout

        android:layout_width="wrap_content"

        android:layout_height="wrap_content"

        android:rowCount="2"

        android:columnCount="3"

        android:useDefaultMargins="true"

        android:background="#FFE4C4">

        <TextView

            android:text="元素0"

            android:layout_row="0"

            android:layout_column="0"

            android:textSize="20dp" />

        <TextView

            android:text="元素1"

            android:layout_row="0"

            android:layout_column="1"

            android:textSize="20dp" />

        <TextView

            android:text="元素2"

            android:layout_row="0"

            android:layout_column="2"

            android:textSize="20dp" />

        <TextView

            android:text="元素3"

            android:layout_row="1"

            android:layout_column="0"

            android:textSize="20dp" />

        <TextView

            android:text="元素4"

            android:layout_row="1"

            android:layout_column="1"

            android:textSize="20dp" />

        <TextView

            android:text="元素5"

            android:layout_row="1"

            android:layout_column="2"

            android:textSize="20dp" />

    </GridLayout>
二、示例—Demo02GridLayout
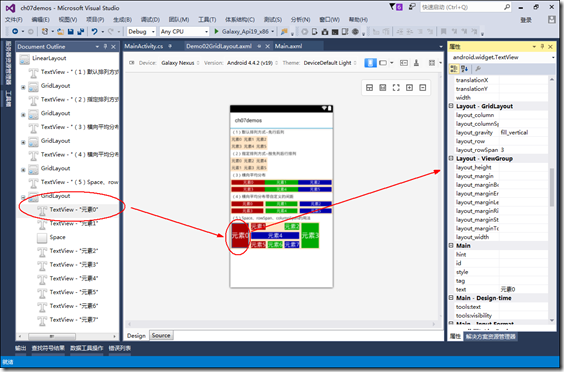
1、设计界面
再次提醒一下,当控件太多时,或者对控件的属性不熟悉时,利用文档大纲选择某个控件,然后通过【属性】窗口设置其属性,是最简单和方便的办法。这种方式的最大优点就是能让你立即看到所选控件的属性设置的效果。
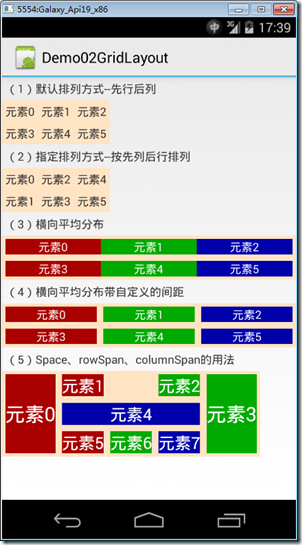
2、运行效果
3、添加Demo02GridLayout.axml文件
在layout文件夹下添加该文件。
<?xml version="1.0" encoding="utf-8"?>

<LinearLayout xmlns:android="http://schemas.android.com/apk/res/android"

    android:orientation="vertical"

    android:layout_width="fill_parent"

    android:layout_height="fill_parent">

  <TextView

      android:layout_width="wrap_content"

      android:layout_height="wrap_content"

      android:text="(1)默认排列方式--先行后列"

      android:layout_margin="5dp" />

  <GridLayout

      android:layout_width="wrap_content"

      android:layout_height="wrap_content"

      android:columnCount="3"

      android:useDefaultMargins="true"

      android:background="#FFE4C4">

    <TextView

        android:text="元素0" />

    <TextView

        android:text="元素1" />

    <TextView

        android:text="元素2" />

    <TextView

        android:text="元素3" />

    <TextView

        android:text="元素4" />

    <TextView

        android:text="元素5" />

  </GridLayout>

  <TextView

      android:layout_width="wrap_content"

      android:layout_height="wrap_content"

      android:text="(2)指定排列方式--按先列后行排列"

      android:layout_margin="5dp" />

  <GridLayout

      android:layout_width="wrap_content"

      android:layout_height="wrap_content"

      android:orientation="vertical"

      android:useDefaultMargins="true"

      android:rowCount="2"

      android:background="#FFE4C4">

    <TextView

        android:text="元素0" />

    <TextView

        android:text="元素1" />

    <TextView

        android:text="元素2" />

    <TextView

        android:text="元素3" />

    <TextView

        android:text="元素4" />

    <TextView

        android:text="元素5" />

  </GridLayout>

  <TextView

      android:layout_width="wrap_content"

      android:layout_height="wrap_content"

      android:text="(3)横向平均分布"

      android:layout_margin="5dp" />

  <GridLayout

      android:layout_width="match_parent"

      android:layout_height="wrap_content"

      android:columnCount="1"

      android:background="#FFE4C4"

      android:useDefaultMargins="true">

    <LinearLayout

        android:orientation="horizontal"

        android:layout_width="fill_parent"

        android:layout_height="fill_parent"

        android:layout_weight="1">

      <TextView

          android:text="元素0"

          android:gravity="center_horizontal"

          android:background="#aa0000"

          android:layout_width="wrap_content"

          android:layout_height="fill_parent"

          android:layout_weight="1"

          android:textColor="#ffffff" />

      <TextView

          android:text="元素1"

          android:gravity="center_horizontal"

          android:background="#00aa00"

          android:layout_width="wrap_content"

          android:layout_height="fill_parent"

          android:layout_weight="1"

          android:textColor="#ffffff" />

      <TextView

          android:text="元素2"

          android:gravity="center_horizontal"

          android:background="#0000aa"

          android:layout_width="wrap_content"

          android:layout_height="fill_parent"

          android:layout_weight="1"

          android:textColor="#ffffff" />

    </LinearLayout>

    <LinearLayout

        android:orientation="horizontal"

        android:layout_width="fill_parent"

        android:layout_height="fill_parent"

        android:layout_weight="1">

      <TextView

          android:text="元素3"

          android:gravity="center_horizontal"

          android:background="#aa0000"

          android:layout_width="wrap_content"

          android:layout_height="fill_parent"

          android:layout_weight="1"

          android:textColor="#ffffff" />

      <TextView

          android:text="元素4"

          android:gravity="center_horizontal"

          android:background="#00aa00"

          android:layout_width="wrap_content"

          android:layout_height="fill_parent"

          android:layout_weight="1"

          android:textColor="#ffffff" />

      <TextView

          android:text="元素5"

          android:gravity="center_horizontal"

          android:background="#0000aa"

          android:layout_width="wrap_content"

          android:layout_height="fill_parent"

          android:layout_weight="1"

          android:textColor="#ffffff" />

    </LinearLayout>

  </GridLayout>

  <TextView

      android:layout_width="wrap_content"

      android:layout_height="wrap_content"

      android:text="(4)横向平均分布带自定义的间距"

      android:layout_margin="5dp" />

  <GridLayout

      android:layout_width="match_parent"

      android:layout_height="wrap_content"

      android:columnCount="1"

      android:background="#FFE4C4"

      android:useDefaultMargins="true">

    <LinearLayout

        android:orientation="horizontal"

        android:layout_width="fill_parent"

        android:layout_height="fill_parent"

        android:layout_weight="1">

      <TextView

          android:text="元素0"

          android:gravity="center_horizontal"

          android:background="#aa0000"

          android:layout_width="wrap_content"

          android:layout_height="fill_parent"

          android:layout_weight="1"

          android:textColor="#ffffff"

          android:layout_marginRight="8dp" />

      <TextView

          android:text="元素1"

          android:gravity="center_horizontal"

          android:background="#00aa00"

          android:layout_width="wrap_content"

          android:layout_height="fill_parent"

          android:layout_weight="1"

          android:textColor="#ffffff"

          android:layout_marginRight="8dp" />

      <TextView

          android:text="元素2"

          android:gravity="center_horizontal"

          android:background="#0000aa"

          android:layout_width="wrap_content"

          android:layout_height="fill_parent"

          android:layout_weight="1"

          android:textColor="#ffffff" />

    </LinearLayout>

    <LinearLayout

        android:orientation="horizontal"

        android:layout_width="fill_parent"

        android:layout_height="fill_parent"

        android:layout_weight="1">

      <TextView

          android:text="元素3"

          android:gravity="center_horizontal"

          android:background="#aa0000"

          android:layout_width="wrap_content"

          android:layout_height="fill_parent"

          android:layout_weight="1"

          android:textColor="#ffffff"

          android:layout_marginRight="8dp" />

      <TextView

          android:text="元素4"

          android:gravity="center_horizontal"

          android:background="#00aa00"

          android:layout_width="wrap_content"

          android:layout_height="fill_parent"

          android:layout_weight="1"

          android:textColor="#ffffff"

          android:layout_marginRight="8dp" />

      <TextView

          android:text="元素5"

          android:gravity="center_horizontal"

          android:background="#0000aa"

          android:layout_width="wrap_content"

          android:layout_height="fill_parent"

          android:layout_weight="1"

          android:textColor="#ffffff" />

    </LinearLayout>

  </GridLayout>

  <TextView

      android:layout_width="wrap_content"

      android:layout_height="wrap_content"

      android:text="(5)Space、rowSpan、columnSpan的用法"

      android:layout_margin="5dp" />

  <GridLayout

      android:layout_width="wrap_content"

      android:layout_height="wrap_content"

      android:columnCount="5"

      android:background="#FFE4C4"

      android:useDefaultMargins="true">

    <TextView

        android:text="元素0"

        android:layout_rowSpan="3"

        android:background="#aa0000"

        android:textColor="#ffffff"

        android:gravity="fill_vertical"

        android:layout_gravity="fill_vertical"

        android:textSize="24dp" />

    <TextView

        android:text="元素1"

        android:background="#aa0000"

        android:textColor="#ffffff"

        android:textSize="20dp" />

    <Space />

    <TextView

        android:text="元素2"

        android:background="#00aa00"

        android:textColor="#ffffff"

        android:textSize="20dp" />

    <TextView

        android:text="元素3"

        android:layout_rowSpan="3"

        android:background="#00aa00"

        android:textColor="#ffffff"

        android:gravity="fill_vertical"

        android:layout_gravity="fill_vertical"

        android:textSize="24dp" />

    <TextView

        android:text="元素4"

        android:layout_columnSpan="3"

        android:background="#0000aa"

        android:textColor="#ffffff"

        android:layout_gravity="fill_horizontal"

        android:gravity="center_horizontal"

        android:textSize="20dp" />

    <TextView

        android:text="元素5"

        android:background="#aa0000"

        android:textColor="#ffffff"

        android:textSize="20dp" />

    <TextView

        android:text="元素6"

        android:background="#00aa00"

        android:textColor="#ffffff"

        android:textSize="20dp" />

    <TextView

        android:text="元素7"

        android:background="#0000aa"

        android:textColor="#ffffff"

        android:textSize="20dp" />

  </GridLayout>

</LinearLayout>
4、添加Demo02GridLayout.cs文件
在SrcDemos文件夹下添加该文件。
using Android.App;

using Android.OS;

namespace ch07demos.SrcDemos

{

    [Activity(Label = "Demo02GridLayout")]

    public class Demo02GridLayout : Activity

    {

        protected override void OnCreate(Bundle savedInstanceState)

        {

            base.OnCreate(savedInstanceState);

            SetContentView(Resource.Layout.Demo02GridLayout);

        }

    }

}
运行观察效果。
【Android】7.3 GridLayout(网格布局)的更多相关文章
- Android精通:TableLayout布局,GridLayout网格布局,FrameLayout帧布局,AbsoluteLayout绝对布局,RelativeLayout相对布局
在Android中提供了几个常用布局: LinearLayout线性布局 RelativeLayout相对布局 FrameLayout帧布局 AbsoluteLayout绝对布局 TableLayou ...
- Android零基础入门第32节:新推出的GridLayout网格布局
原文:Android零基础入门第32节:新推出的GridLayout网格布局 本期主要学习的是网格布局是Android 4.0新增的布局,和前面所学的TableLayout表格布局 有点类似,不过他有 ...
- Android之GridLayout网格布局
1.相关属性 GridLayout网格布局是4.0之后引入的布局方式! android:columnCount="4" //设置列数(4列) android:rowCount=&q ...
- GridLayout(网格布局)
常用属性: 排列对齐: ①设置组件的排列方式: android:orientation="" vertical(竖直,默认)或者horizontal(水平) ②设置组件的 ...
- android的布局-----GridLayout(网格布局)
学习导图 (一)简介 网格布局由GridLayout所代表,在android4.0之后新增加的布局管理器,因此需要android4.0之后的版本中使用,如果在更早的平台使用该布局管理器,则需要导入相应 ...
- GridLayout网格布局
网格布局特点: l 使容器中的各组件呈M行×N列的网格状分布. l 网格每列宽度相同,等于容器的宽度除以网格的列数. l 网格每行高度相同,等于容器的高度除以网格的行数. l 各组件的排列方式 ...
- Android——gridLayout(网格布局)
<?xml version="1.0" encoding="utf-8"?> <GridLayout xmlns:android=" ...
- java 图形化小工具Abstract Window Toolit ;布局管理器FlowLayout流式布局;BorderLayout边界布局;GridLayout网格布局;CardLayou重叠卡片布局;BoxLayout方框布局;绝对定位
1.FlowLayout流式布局管理器: FlowLayout布局管理器中,组件像水流一样向某方向流动(排列),遇到障碍(边界)就折回,重头开始排列 .在默认情况下,FlowLayout局管理器从左向 ...
- 浅谈GridLayout(网格布局)
Android 4.0 布局-->GridLayout 网格布局 以行列单元格的形式展示内部控件排列,可以实现类似计算机键盘效果 ,也可以实现可自动变行的标签群效果 使用GridLayout , ...
- Android学习笔记④——页面的布局方式
FrameLayout(帧布局) 这个布局的特点是简单的默认把每一个视图组件都放在边框内且放在左上角,即使添加多个视图组件,他们也都是重叠在左上角,新的视图会遮挡住旧的视图.可以根据gravity来改 ...
随机推荐
- JDBC四(web基础学习笔记十)
一.增加 .修改.删除.查询 将功能整合在一个类中 package pb.base; import java.sql.Connection; import java.sql.DriverManager ...
- taro 在components文件夹中 新建组件时,组件支持自定义命名,但是不能大写开头
在components文件夹中 新建组件时,组件支持自定义命名,但是不能大写开头.否则会报错 错误写法: // 真实路径 import MinaMask from '../../components/ ...
- jquery插件开发通用框架
2017-07-24 更新:增加单例模式. jquery插件开发框架代码: /* * 插件编写说明: * 1.插件命名:jquery.[插件名].js,如jquery.plugin.js * 2.对象 ...
- Oracle查询备注信息
查询表的备注信息: SELECT TABLE_NAME, TABLE_TYPE, COMMENTS FROM USER_TAB_COMMENTS WHERE TABLE_NAME = 'MR_DEPT ...
- exception Access restriction: The type 'BASE64Encoder' is not API
Created by Marydon on 1.情景展示 在eclipse中切换jdk版本后,报错信息为:exception Access restriction: The type 'BASE6 ...
- idea 免费激活(破解)
1.将补丁(JetbrainsCrack-2.7-release-str.jar)拷贝到idea的安装目录/bin下 下载破解补丁 从IntelliJ IDEA 注册码网站:http://idea ...
- 〖Linux〗Ubuntu13.10 安装qt开发环境
sudo apt-get install qtcreator libqt4-dev libqt4-dbg libqt4-gui libqt4-sql qt4-dev-tools qt4-doc qt4 ...
- svn,git,scp,rsync,rake,ssh,wget,axel,aria2,nohup,grep,tail,siege,mitmproxy,ulimit,netstat,lsof
scp 把本地文件上传到server上 scp -P 1234 config/cert/dev/client.pem dev@xx.xxx.xxx:/srv/rorapps/fgcc/config/c ...
- [Done]mysql in (#{list}) 只能查询/删除第一条的问题
数据如下(注意age是int类型): sql如下(注意是#不是$): java代码: Mybatis日志(只返回一笔记录): 直接在mysql中执行(age是int类型,注意参数带引号,确认jdbc是 ...
- java SequenceInputStream类(序列输入流)的用法示例
public class SequenceInputStreamextends InputStream SequenceInputStream 表示其他输入流的逻辑串联.它从输入流的有序集合开始,并从 ...