
SpringBoot集成Spring Security(2)——自动登录
在上一章:SpringBoot集成Spring Security(1)——入门程序中,我们实现了入门程序,本篇为该程序加上自动登录的功能。
文章目录
一、修改login.html
二、两种实现方式
2.1 Cookie 存储
2.2 数据库存储
2.2.1 基本原理
2.2.2 代码实现
三、运行程序
源码地址:https://github.com/jitwxs/blog_sample
一、修改login.html
在登陆页添加自动登录的选项,注意自动登录字段的 name 必须是 remember-me :
<!DOCTYPE html>

<html lang="en">

<head>

    <meta charset="UTF-8">

    <title>登陆</title>

</head>

<body>

<h1>登陆</h1>

<form method="post" action="/login">

    <div>

        用户名:<input type="text" name="username">

    </div>

    <div>

        密码:<input type="password" name="password">

    </div>

    <div>

        <label><input type="checkbox" name="remember-me"/>自动登录</label>

        <button type="submit">立即登陆</button>

    </div>

</form>

</body>

</html>
二、两种实现方式
2.1 Cookie 存储
这种方式十分简单,只要在 WebSecurityConfig 中的 configure() 方法添加一个 rememberMe() 即可,如下所示:
@Override

protected void configure(HttpSecurity http) throws Exception {

    http.authorizeRequests()

            // 如果有允许匿名的url,填在下面

//                .antMatchers().permitAll()

            .anyRequest().authenticated()

            .and()

            // 设置登陆页

            .formLogin().loginPage("/login")

            // 设置登陆成功页

            .defaultSuccessUrl("/").permitAll()

            // 自定义登陆用户名和密码参数,默认为username和password

//                .usernameParameter("username")

//                .passwordParameter("password")

            .and()

            .logout().permitAll()

            // 自动登录

            .and().rememberMe();

    // 关闭CSRF跨域

    http.csrf().disable();

}
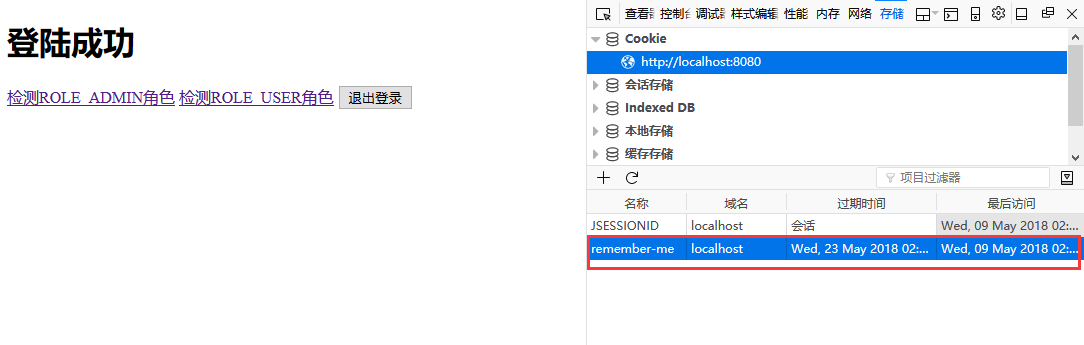
当我们登陆时勾选自动登录时,会自动在 Cookie 中保存一个名为 remember-me 的cookie,默认有效期为2周,其值是一个加密字符串:
2.2 数据库存储
使用 Cookie 存储虽然很方便,但是大家都知道 Cookie 毕竟是保存在客户端的,而且 Cookie 的值还与用户名、密码这些敏感数据相关,虽然加密了,但是将敏感信息存在客户端,毕竟不太安全。
Spring security 还提供了另一种相对更安全的实现机制:在客户端的 Cookie 中,仅保存一个无意义的加密串(与用户名、密码等敏感数据无关),然后在数据库中保存该加密串-用户信息的对应关系,自动登录时,用 Cookie 中的加密串,到数据库中验证,如果通过,自动登录才算通过。
2.2.1 基本原理
当浏览器发起表单登录请求时,当通过 UsernamePasswordAuthenticationFilter 认证成功后,会经过 RememberMeService,在其中有个 TokenRepository,它会生成一个 token,首先将 token 写入到浏览器的 Cookie 中,然后将 token、认证成功的用户名写入到数据库中。
当浏览器下次请求时,会经过 RememberMeAuthenticationFilter,它会读取 Cookie 中的 token,交给 RememberMeService 从数据库中查询记录。如果存在记录,会读取用户名并去调用 UserDetailsService,获取用户信息,并将用户信息放入Spring Security 中,实现自动登陆。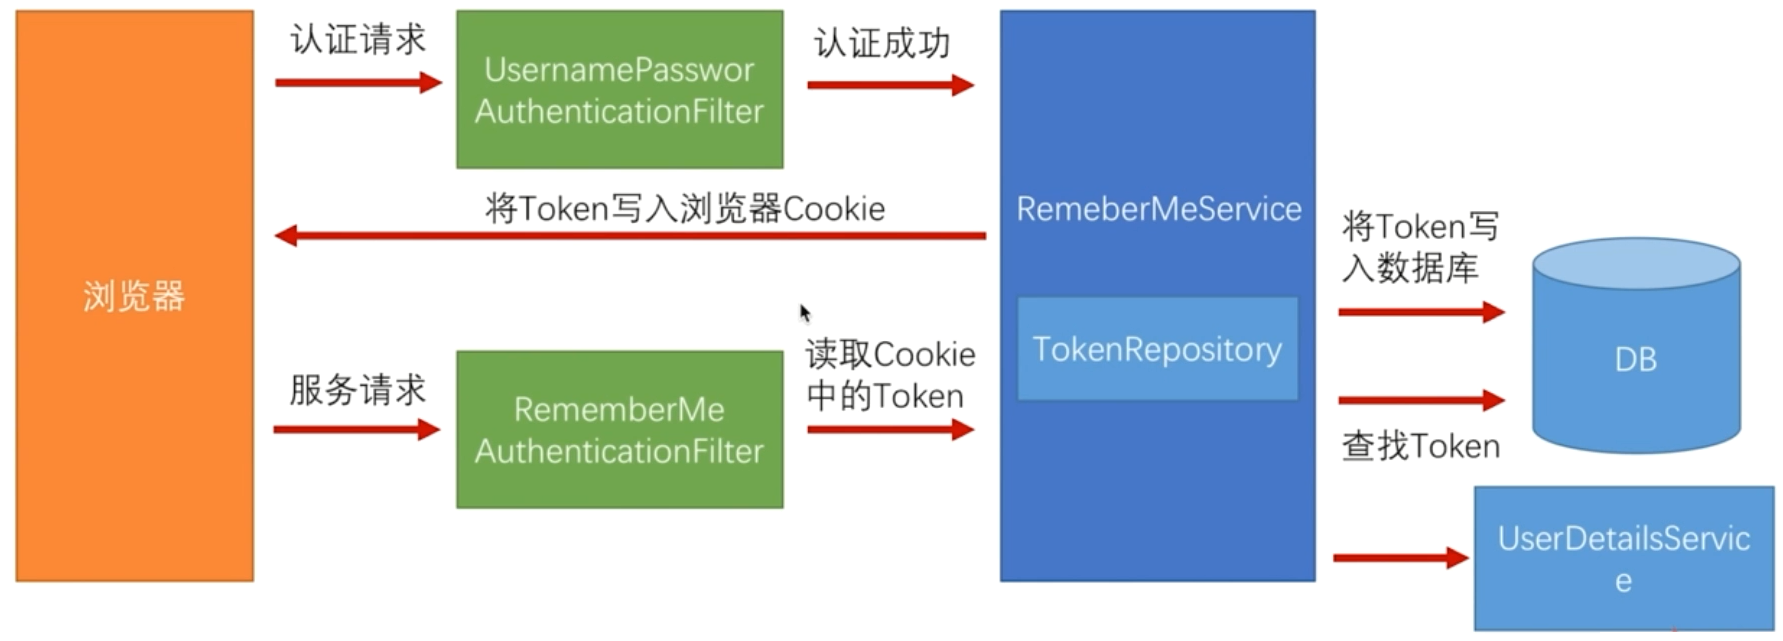
RememberMeAuthenticationFilter 在整个过滤器链中是比较靠后的位置,也就是说在传统登录方式都无法登录的情况下才会使用自动登陆。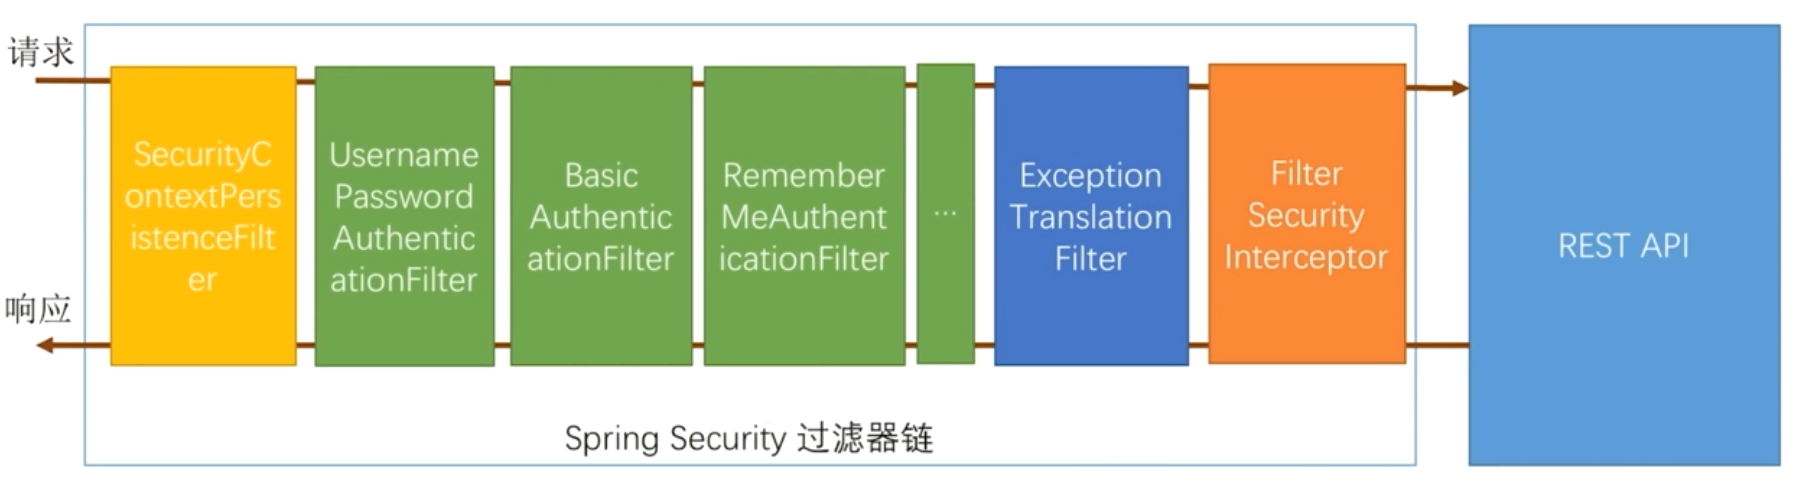
2.2.2 代码实现
首先需要创建一张表来存储 token 信息:
CREATE TABLE `persistent_logins` (

  `username` varchar(64) NOT NULL,

  `series` varchar(64) NOT NULL,

  `token` varchar(64) NOT NULL,

  `last_used` timestamp NOT NULL DEFAULT CURRENT_TIMESTAMP ON UPDATE CURRENT_TIMESTAMP,

  PRIMARY KEY (`series`)

) ENGINE=InnoDB DEFAULT CHARSET=utf8;
在 WebSecurityConfig 中注入 dataSource ,创建一个 PersistentTokenRepository 的Bean:
@Autowired

private DataSource dataSource;

 @Bean

 public PersistentTokenRepository persistentTokenRepository(){

     JdbcTokenRepositoryImpl tokenRepository = new JdbcTokenRepositoryImpl();

     tokenRepository.setDataSource(dataSource);

     // 如果token表不存在,使用下面语句可以初始化该表;若存在,请注释掉这条语句,否则会报错。

//        tokenRepository.setCreateTableOnStartup(true);

     return tokenRepository;

 }
在 config() 中按如下所示配置自动登陆:
@Override

protected void configure(HttpSecurity http) throws Exception {

    http.authorizeRequests()

            // 如果有允许匿名的url,填在下面

//                .antMatchers().permitAll()

            .anyRequest().authenticated()

            .and()

            // 设置登陆页

            .formLogin().loginPage("/login")

            // 设置登陆成功页

            .defaultSuccessUrl("/").permitAll()

            // 自定义登陆用户名和密码参数,默认为username和password

//                .usernameParameter("username")

//                .passwordParameter("password")

            .and()

            .logout().permitAll()

            // 自动登录

            .and().rememberMe()

                .tokenRepository(persistentTokenRepository())

                // 有效时间:单位s

                .tokenValiditySeconds(60)

                .userDetailsService(userDetailsService);

    // 关闭CSRF跨域

    http.csrf().disable();

}
三、运行程序
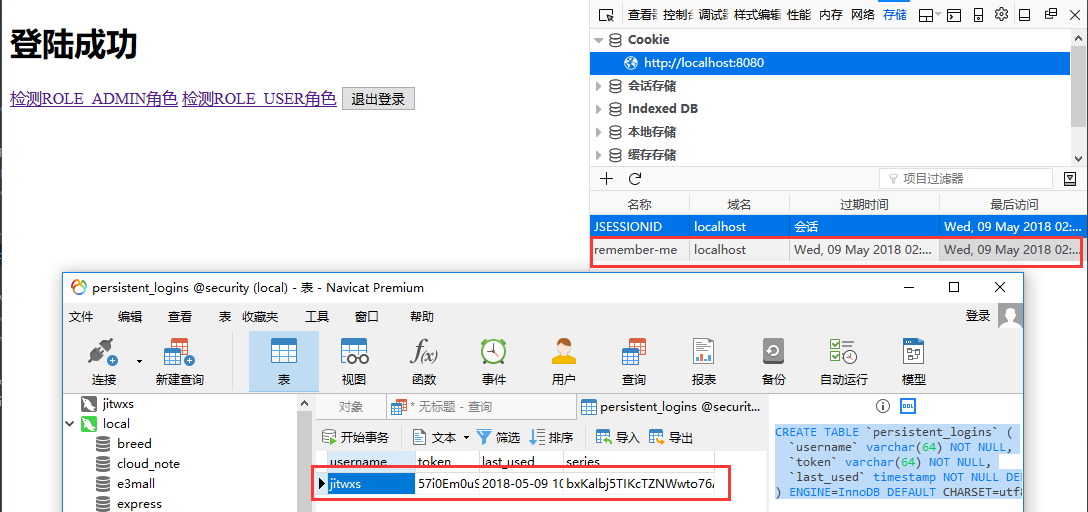
勾选自动登录后,Cookie 和数据库中均存储了 token 信息:
---------------------
作者:Jitwxs
来源:CSDN
原文:https://blog.csdn.net/yuanlaijike/article/details/80249869
SpringBoot集成Spring Security(2)——自动登录的更多相关文章
- SpringBoot集成Spring Security(6)——登录管理
文章目录 一.自定义认证成功.失败处理 1.1 CustomAuthenticationSuccessHandler 1.2 CustomAuthenticationFailureHandler 1. ...
- SpringBoot集成Spring Security(4)——自定义表单登录
通过前面三篇文章,你应该大致了解了 Spring Security 的流程.你应该发现了,真正的 login 请求是由 Spring Security 帮我们处理的,那么我们如何实现自定义表单登录呢, ...
- SpringBoot集成Spring Security(7)——认证流程
文章目录 一.认证流程 二.多个请求共享认证信息 三.获取用户认证信息 在前面的六章中,介绍了 Spring Security 的基础使用,在继续深入向下的学习前,有必要理解清楚 Spring Sec ...
- SpringBoot集成Spring Security入门体验
一.前言 Spring Security 和 Apache Shiro 都是安全框架,为Java应用程序提供身份认证和授权. 二者区别 Spring Security:重量级安全框架 Apache S ...
- SpringBoot集成Spring Security(5)——权限控制
在第一篇中,我们说过,用户<–>角色<–>权限三层中,暂时不考虑权限,在这一篇,是时候把它完成了. 为了方便演示,这里的权限只是对角色赋予权限,也就是说同一个角色的用户,权限是 ...
- SpringBoot集成Spring Security
1.Spring Security介绍 Spring security,是一个强大的和高度可定制的身份验证和访问控制框架.它是确保基于Spring的应用程序的标准 --来自官方参考手册 Spring ...
- SpringBoot 集成Spring security
Spring security作为一种安全框架,使用简单,能够很轻松的集成到springboot项目中,下面讲一下如何在SpringBoot中集成Spring Security.使用gradle项目管 ...
- springboot集成spring security实现登录和注销
文章目录 一.导入坐标 二.Users实体类及其数据库表的创建 三.controller,service,mapper层的实现 四.核心–编写配置文件 五.页面的实现 运行结果 一.导入坐标 < ...
- SpringBoot集成Spring Security(授权与认证)
⒈添加starter依赖 <dependency> <groupId>org.springframework.boot</groupId> <artifact ...
随机推荐
- 【LOJ#3144】[APIO2019]奇怪装置(数论)
[LOJ#3144][APIO2019]奇怪装置(数论) 题面 LOJ 题解 突然发现\(LOJ\)上有\(APIO\)的题啦,赶快来做一做. 这题是窝考场上切了的题嗷.写完暴力之后再推了推就推出正解 ...
- Mysql综述--数据是如何读存的?(2)
页的结构 页是一种InnoDB管理存储空间的基本单位,它一般大小在16kb左右.实际上存在着许多不同类型的页,我们这次主要介绍的页是用来存储数据的,也叫做索引页. 接下来看看索引页的结构图: 比较重要 ...
- ElasticSearch简介(一)——基础
基本概念 1. Node 与 Cluster Elastic 本质上是一个分布式数据库,允许多台服务器协同工作,每台服务器可以运行多个 Elastic 实例. 单个 Elastic 实例称为一个节点 ...
- C# - MD5验证
前言 本篇主要记录:VS2019 WinFrm桌面应用程序实现字符串和文件的Md5转换功能.后续系统用户登录密码保护,可采用MD5加密保存到后台数据库. 准备工作 搭建WinFrm前台界面 如下图 核 ...
- 尝试在iOS上使用gRPC
简介 gRPC,google的远程过程调用框架,传输协议使用 HTTP2, 序列化协议使用 protobuf.gRPC 使用 HTTP2 传输协议传输 protobuf 序列化的二进制数据,有极高的效 ...
- wpf 代码设置图片路径(后台和xamll)
项目中经常使用背景图片,当一个小组共通开发时,路径的选择应该是在项目运行的固定文件夹下 此时,可用代码实现:pack://SiteOfOrigin:,,,/Images/Icons/HomePageB ...
- ssh关闭服务关闭 nohup
默认输出 # nohup cmd & 指定输出路径 # nohup cmd > mylog.out 2>&1 &
- QLineEdit默认提示 setPlaceholderText
Setting this property makes the line edit display a grayed-out placeholder text as long as the text( ...
- 微信支付H5支付开发文档
参考文档如下:https://pay.weixin.qq.com/wiki/doc/api/H5.php?chapter=4_2
- 百度云人脸识别API人脸对比
from urllib import request import base64 import requests import re import json import urllib import ...