网络爬虫基本概念与Scrapy工具包使用
Scrapy网络爬虫


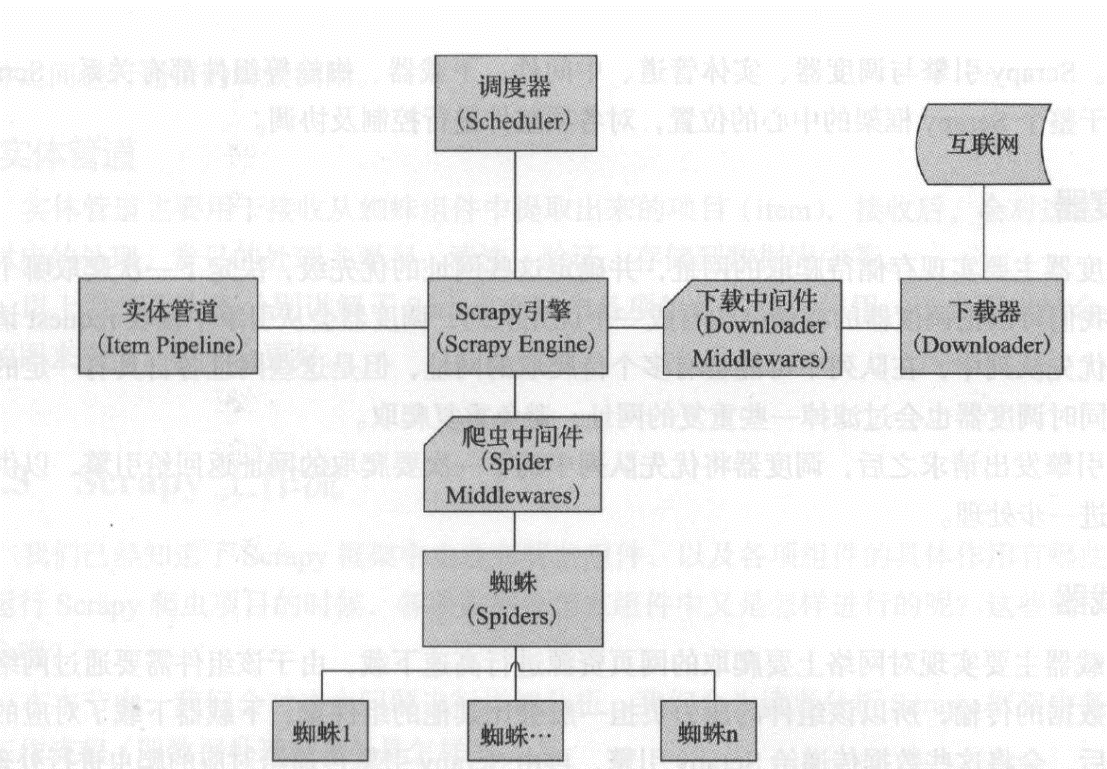
Scrapy结构图:
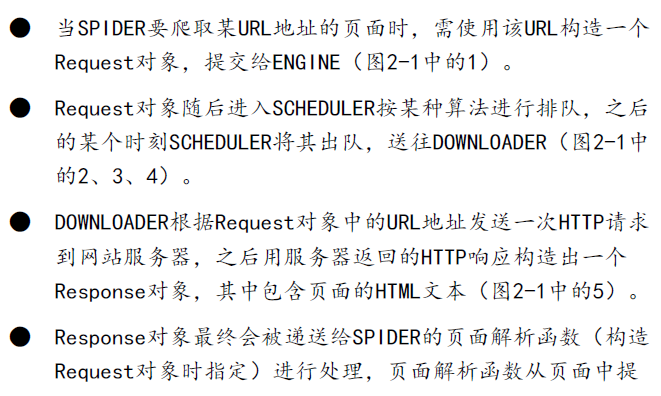
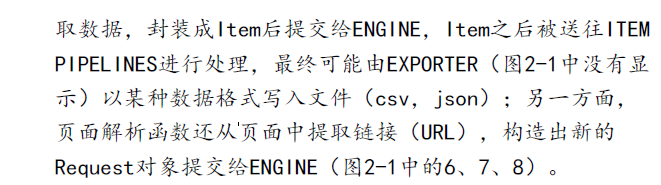
Scrapy流动图
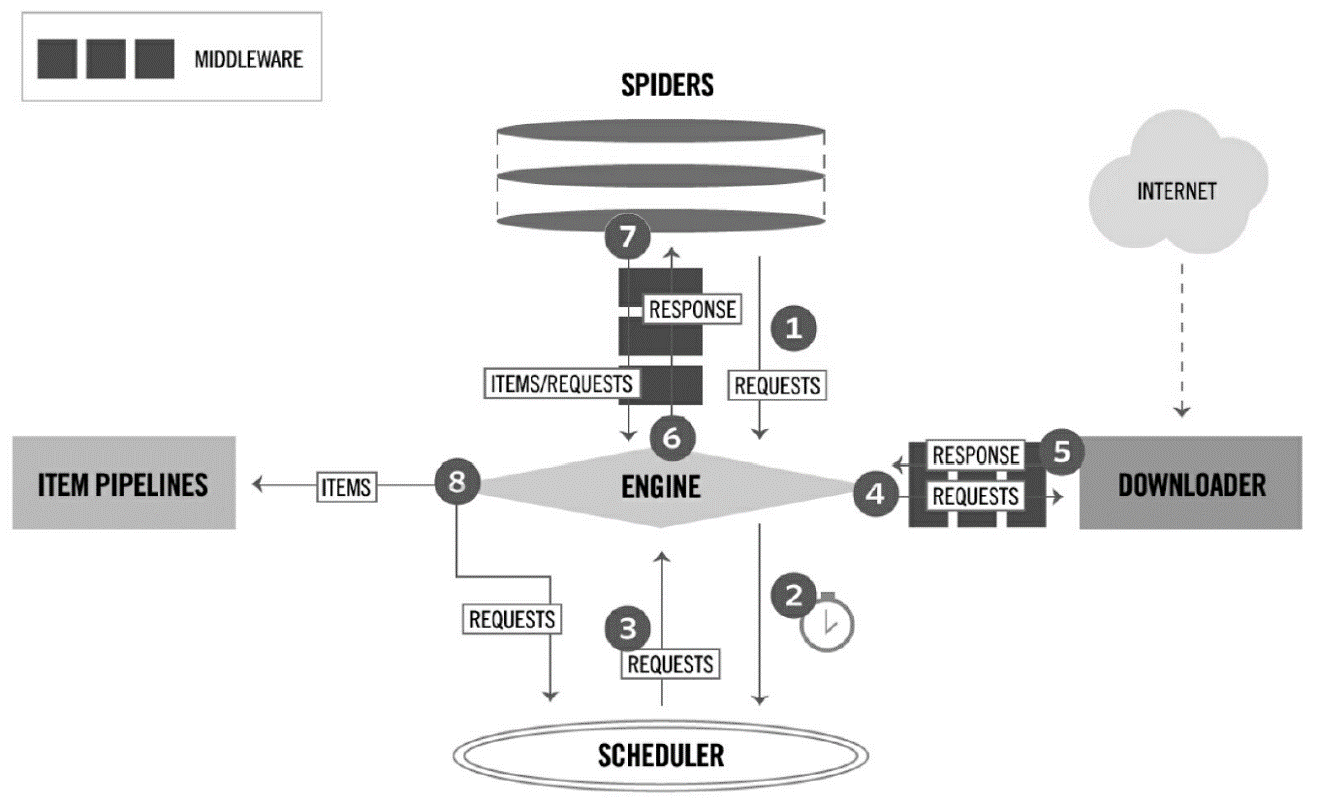
图 2-1


1、在D:\Workspace下新建ScrapyTest文件夹,即D:\Workspace\ScrapyTest
2、cd D:\Workspace\ScrapyTest
3、查看Scrapy版本:scrapy version
4、创建项目 scrapy startproject scrapy_project:
scrapy startproject weibo
5、这将创建一个名为project_name的项目目录,接下来,进入新创建的项目:cd scrapy_project
================project_name工程目录结构===============
通过命令行执行,D:\Workspace\ScrapyTest\weibo>tree /F
卷 DATA1 的文件夹 PATH 列表
卷序列号为 3A2E-EB05
D:.
│ scrapy.cfg
│
│ items.py
│ middlewares.py
│ pipelines.py
│ settings.py
│ __init__.py
│
├─spiders
│ │ __init__.py
│ │
│ └─__pycache__
└─__pycache__
====================工程目录结构=======================
scrapy.cfg(项目配置文件):
# Automatically created by: scrapy startproject
#
# For more information about the [deploy] section see:
# https://scrapyd.readthedocs.io/en/latest/deploy.html
[settings]
default = weibo.settings
[deploy]
#url = http://localhost:6800/
project = weibo
items.py(项目items文件):
# -*- coding: utf-8 -*-
# Define here the models for your scraped items
#
# See documentation in:
# https://doc.scrapy.org/en/latest/topics/items.html
import scrapy
class WeiboItem(scrapy.Item):
# define the fields for your item here like:
# name = scrapy.Field()
pass
middlewares.py(项目中间件文件)
# -*- coding: utf-8 -*-
# Define here the models for your spider middleware
#
# See documentation in:
# https://doc.scrapy.org/en/latest/topics/spider-middleware.html
from scrapy import signals
class WeiboSpiderMiddleware(object):
# Not all methods need to be defined. If a method is not defined,
# scrapy acts as if the spider middleware does not modify the
# passed objects.
@classmethod
def from_crawler(cls, crawler):
# This method is used by Scrapy to create your spiders.
s = cls()
crawler.signals.connect(s.spider_opened, signal=signals.spider_opened)
return s
def process_spider_input(self, response, spider):
# Called for each response that goes through the spider
# middleware and into the spider.
# Should return None or raise an exception.
return None
def process_spider_output(self, response, result, spider):
# Called with the results returned from the Spider, after
# it has processed the response.
# Must return an iterable of Request, dict or Item objects.
for i in result:
yield i
def process_spider_exception(self, response, exception, spider):
# Called when a spider or process_spider_input() method
# (from other spider middleware) raises an exception.
# Should return either None or an iterable of Response, dict
# or Item objects.
pass
def process_start_requests(self, start_requests, spider):
# Called with the start requests of the spider, and works
# similarly to the process_spider_output() method, except
# that it doesn’t have a response associated.
# Must return only requests (not items).
for r in start_requests:
yield r
def spider_opened(self, spider):
spider.logger.info('Spider opened: %s' % spider.name)
class WeiboDownloaderMiddleware(object):
# Not all methods need to be defined. If a method is not defined,
# scrapy acts as if the downloader middleware does not modify the
# passed objects.
@classmethod
def from_crawler(cls, crawler):
# This method is used by Scrapy to create your spiders.
s = cls()
crawler.signals.connect(s.spider_opened, signal=signals.spider_opened)
return s
def process_request(self, request, spider):
# Called for each request that goes through the downloader
# middleware.
# Must either:
# - return None: continue processing this request
# - or return a Response object
# - or return a Request object
# - or raise IgnoreRequest: process_exception() methods of
# installed downloader middleware will be called
return None
def process_response(self, request, response, spider):
# Called with the response returned from the downloader.
# Must either;
# - return a Response object
# - return a Request object
# - or raise IgnoreRequest
return response
def process_exception(self, request, exception, spider):
# Called when a download handler or a process_request()
# (from other downloader middleware) raises an exception.
# Must either:
# - return None: continue processing this exception
# - return a Response object: stops process_exception() chain
# - return a Request object: stops process_exception() chain
pass
def spider_opened(self, spider):
spider.logger.info('Spider opened: %s' % spider.name)
pipelines.py(项目管道文件)
# -*- coding: utf-8 -*-
# Define your item pipelines here
#
# Don't forget to add your pipeline to the ITEM_PIPELINES setting
# See: https://doc.scrapy.org/en/latest/topics/item-pipeline.html
class WeiboPipeline(object):
def process_item(self, item, spider):
return item
settings.py(项目配置文件)
# -*- coding: utf-8 -*-
# Scrapy settings for weibo project
#
# For simplicity, this file contains only settings considered important or
# commonly used. You can find more settings consulting the documentation:
#
# https://doc.scrapy.org/en/latest/topics/settings.html
# https://doc.scrapy.org/en/latest/topics/downloader-middleware.html
# https://doc.scrapy.org/en/latest/topics/spider-middleware.html
BOT_NAME = 'weibo'
SPIDER_MODULES = ['weibo.spiders']
NEWSPIDER_MODULE = 'weibo.spiders'
# Crawl responsibly by identifying yourself (and your website) on the user-agent
#USER_AGENT = 'weibo (+http://www.yourdomain.com)'
# Obey robots.txt rules
ROBOTSTXT_OBEY = True
# Configure maximum concurrent requests performed by Scrapy (default: 16)
#CONCURRENT_REQUESTS = 32
# Configure a delay for requests for the same website (default: 0)
# See https://doc.scrapy.org/en/latest/topics/settings.html#download-delay
# See also autothrottle settings and docs
#DOWNLOAD_DELAY = 3
# The download delay setting will honor only one of:
#CONCURRENT_REQUESTS_PER_DOMAIN = 16
#CONCURRENT_REQUESTS_PER_IP = 16
# Disable cookies (enabled by default)
#COOKIES_ENABLED = False
# Disable Telnet Console (enabled by default)
#TELNETCONSOLE_ENABLED = False
# Override the default request headers:
#DEFAULT_REQUEST_HEADERS = {
# 'Accept': 'text/html,application/xhtml+xml,application/xml;q=0.9,*/*;q=0.8',
# 'Accept-Language': 'en',
#}
# Enable or disable spider middlewares
# See https://doc.scrapy.org/en/latest/topics/spider-middleware.html
#SPIDER_MIDDLEWARES = {
# 'weibo.middlewares.WeiboSpiderMiddleware': 543,
#}
# Enable or disable downloader middlewares
# See https://doc.scrapy.org/en/latest/topics/downloader-middleware.html
#DOWNLOADER_MIDDLEWARES = {
# 'weibo.middlewares.WeiboDownloaderMiddleware': 543,
#}
# Enable or disable extensions
# See https://doc.scrapy.org/en/latest/topics/extensions.html
#EXTENSIONS = {
# 'scrapy.extensions.telnet.TelnetConsole': None,
#}
# Configure item pipelines
# See https://doc.scrapy.org/en/latest/topics/item-pipeline.html
#ITEM_PIPELINES = {
# 'weibo.pipelines.WeiboPipeline': 300,
#}
# Enable and configure the AutoThrottle extension (disabled by default)
# See https://doc.scrapy.org/en/latest/topics/autothrottle.html
#AUTOTHROTTLE_ENABLED = True
# The initial download delay
#AUTOTHROTTLE_START_DELAY = 5
# The maximum download delay to be set in case of high latencies
#AUTOTHROTTLE_MAX_DELAY = 60
# The average number of requests Scrapy should be sending in parallel to
# each remote server
#AUTOTHROTTLE_TARGET_CONCURRENCY = 1.0
# Enable showing throttling stats for every response received:
#AUTOTHROTTLE_DEBUG = False
# Enable and configure HTTP caching (disabled by default)
# See https://doc.scrapy.org/en/latest/topics/downloader-middleware.html#httpcache-middleware-settings
#HTTPCACHE_ENABLED = True
#HTTPCACHE_EXPIRATION_SECS = 0
#HTTPCACHE_DIR = 'httpcache'
#HTTPCACHE_IGNORE_HTTP_CODES = []
#HTTPCACHE_STORAGE = 'scrapy.extensions.httpcache.FilesystemCacheStorage'
6、cd weibo
=================================================================
示例…………
================================================================
1、 (base) D:\Workspace\ScrapyTest\example>scrapy shell http://books.toscrape.com/catalogue/a-light-in-the-attic_1000/index.html
进入python shell
………………
[s] Available Scrapy objects:
[s] scrapy scrapy module (contains scrapy.Request, scrapy.Selector, etc)
[s] crawler <scrapy.crawler.Crawler object at 0x000002367A9A7B38>
[s] item {}
[s] request <GET http://books.toscrape.com/catalogue/a-light-in-the-attic_1000/index.html>
[s] response <200 http://books.toscrape.com/catalogue/a-light-in-the-attic_1000/index.html>
[s] settings <scrapy.settings.Settings object at 0x000002367A9A7A58>
[s] spider <DefaultSpider 'default' at 0x2367af35198>
[s] Useful shortcuts:
[s] fetch(url[, redirect=True]) Fetch URL and update local objects (by default, redirects are followed)
[s] fetch(req) Fetch a scrapy.Request and update local objects
[s] shelp() Shell help (print this help)
[s] view(response) View response in a browser
In [1]: view(response)
Out[1]: True
In [2]: sel = response.css('div.product_main')
In [3]: sel.xpath('./h1/text()').extract_first()
Out[3]: 'A Light in the Attic'
In [4]: quit()
可能在很多时候,使用view函数打开的页面和在浏览器直接输入url打开的页面看起来是一样的,但需要知道的是,前者是由Scrapy爬虫下载的页面,而后者是由浏览器下载的页面,有时它们是不同的。在进行页面分析时,使用view函数更加可靠。
2、 (base) D:\Workspace\ScrapyTest\example>scrapy startproject scrape_book
New Scrapy project 'scrape_book', using template directory 's:\\users\\jiangshan\\anaconda3\\lib\\site-packages\\scrapy\\templates\\project', created in:
D:\Workspace\ScrapyTest\scrape_book
You can start your first spider with:
cd scrape_book
scrapy genspider example example.com
3、 (base) D:\Workspace\ScrapyTest>cd scrape_book
4、 (base) D:\Workspace\ScrapyTest\scrape_book>tree /F
卷 DATA1 的文件夹 PATH 列表
卷序列号为 3A2E-EB05
D:.
│ scrapy.cfg
│
└─scrape_book
│ items.py
│ middlewares.py
│ pipelines.py
│ settings.py
│ __init__.py
│
├─spiders
│ │ __init__.py
│ │
│ └─__pycache__
└─__pycache__
5、 (base) D:\Workspace\ScrapyTest\scrape_book>scrapy genspider books books.toscrape.com
Created spider 'books' using template 'basic' in module:
scrape_book.spiders.books
6、 不需要手工创建Spider文件以及Spider类,可以使用scrapy genspider<SPIDER_NAME> <DOMAIN>命令生成(根据模板)它们,该命令的两个参数分别是Spider的名字和所要爬取的域(网站)(base) D:\Workspace\ScrapyTest\scrape_book>tree /F
卷 DATA1 的文件夹 PATH 列表
卷序列号为 3A2E-EB05
D:.
│ scrapy.cfg
│
└─scrape_book
│ items.py
│ middlewares.py
│ pipelines.py
│ settings.py
│ __init__.py
│
├─spiders
│ │ books.py
│ │ __init__.py
│ │
│ └─__pycache__
│ __init__.cpython-37.pyc
│
└─__pycache__
settings.cpython-37.pyc
__init__.cpython-37.pyc
运行后,scrapy genspider命令创建了文件toscrape_book/spiders/books.py,并在其中创建了一个BooksSpider类:
# -*- coding: utf-8 -*-
import scrapy
class BooksSpider(scrapy.Spider):
name = 'books'
allowed_domains = ['books.toscrape.com']
start_urls = ['http://books.toscrape.com/']
def parse(self, response):
pass
网络爬虫基本概念与Scrapy工具包使用的更多相关文章
- 网络爬虫之框架(Scrapy)
Scrapy爬虫框架 爬虫框架是实现爬虫功能的一个软件结构和功能组件集合. 爬虫框架是一个半成品,能够帮助用户实现专业网络爬虫. Scrapy爬虫框架结构:
- python网络爬虫(2)——scrapy框架的基础使用
这里写一下爬虫大概的步骤,主要是自己巩固一下知识,顺便复习一下. 一,网络爬虫的步骤 1,创建一个工程 scrapy startproject 工程名称 创建好工程后,目录结构大概如下: 其中: sc ...
- Python 网络爬虫基本概念篇
爬虫的概念 网络爬虫(又称为网页蜘蛛,网络机器人,在FOAF社区中间,更经常的称为网页追逐者),是一种按照一定的规则,自动地抓取万维网信息的程序或者脚本.这是百度百科对爬虫的定义,其实,说简单点,爬虫 ...
- 网络爬虫(蜘蛛)Scrapy,Python安装!
Scrapy,Python安装.使用! 1.下载安装Python2.7.6.由于Scrapy还不支持3.x版本号. Latest Python 2 Release - Python 2.7.6,安装时 ...
- 网络爬虫之scrapy爬取某招聘网手机APP发布信息
1 引言 过段时间要开始找新工作了,爬取一些岗位信息来分析一下吧.目前主流的招聘网站包括前程无忧.智联.BOSS直聘.拉勾等等.有段时间时间没爬取手机APP了,这次写一个爬虫爬取前程无忧手机APP岗位 ...
- python网络爬虫之初始网络爬虫
第一次接触到python是一个很偶然的因素,由于经常在网上看连载小说,很多小说都是上几百的连载.因此想到能不能自己做一个工具自动下载这些小说,然后copy到电脑或者手机上,这样在没有网络或者网络信号不 ...
- python网络爬虫之初识网络爬虫
第一次接触到python是一个很偶然的因素,由于经常在网上看连载小说,很多小说都是上几百的连载.因此想到能不能自己做一个工具自动下载这些小说,然后copy到电脑或者手机上,这样在没有网络或者网络信号不 ...
- 学习推荐《精通Python网络爬虫:核心技术、框架与项目实战》中文PDF+源代码
随着大数据时代的到来,我们经常需要在海量数据的互联网环境中搜集一些特定的数据并对其进行分析,我们可以使用网络爬虫对这些特定的数据进行爬取,并对一些无关的数据进行过滤,将目标数据筛选出来.对特定的数据进 ...
- 《精通Python网络爬虫》|百度网盘免费下载|Python爬虫实战
<精通Python网络爬虫>|百度网盘免费下载|Python爬虫实战 提取码:7wr5 内容简介 为什么写这本书 网络爬虫其实很早就出现了,最开始网络爬虫主要应用在各种搜索引擎中.在搜索引 ...
随机推荐
- Complete the Projects
F1. Complete the Projects (easy version) F2. Complete the Projects (hard version) 参考:Complete the Pr ...
- nginx压力测试和并发预估
一.Nginx并发预估 预估算法:{(?G)*1024-system}/请求大小 (?G):表示内存大小1024:表示内存容量标准进制system:表示系统和服务占用的额外内存和需要预留的内存请求大小 ...
- git提交报错:Updates were rejected because the tip of your current branch is behind
提交代码push时报错:上网查询了一下解决办法有很多种,1.使用强制push的方法:(上网查询说这种会使远程修改丢失,一般是不可取的,尤其是多人协作开发的时候.) git push -u origin ...
- Oracle备份的几种方式
这里使用Oracle 12C来大概演示说明一下rman的基本用法,这里不会深入讨论,因为本人也只是刚刚才接触,只是结合了网上的一些文章以及自己的实践来总结并拿出来大家学习,谢谢 目录 一.关于备份与恢 ...
- At least one JAR was scanned for TLDs yet contained no TLDs. Enable debug logging for this logger fo
一.文章前言 本文是亲测有效解决At least one JAR was scanned for TLDs yet contained no TLDs问题,绝对不是为了积分随便粘贴复制然后压根都没有用 ...
- php 将office文件(word/excel/ppt)转化为pdf(windows和linux只要安装对应组件应该就行)
一.配置环境 (1)配置php.ini 添加:extension=php_com_dotnet.dll com.allow_dcom = true // 去掉号,改为true 重启环境 (2) 安装 ...
- nginx listen 端口 443 80 https 和 wss
端口号 443 和 80 端口的区别 一般指定 443 和 80 端口都是使用域名时所需要的 当我们使用域名请求时,一般是不添加端口号的 例如:http://www.baidu.com 在不添加端口号 ...
- Mysql修改数据文件默认目录datadir
1.停止服务 service mysql stop service mysqld stopmysqladmin -uroot shutdown -p 2.创建目录 cd /data mkdir mys ...
- 京东 PC 首页 2019 改版前端总结 原创: 何Jason,EC,小屁 凹凸实验室 今天
京东 PC 首页 2019 改版前端总结 原创: 何Jason,EC,小屁 凹凸实验室 今天
- C++中函数参数传递(非引用形参和引用形参)——学习笔记
1.非引用形参-copy 指针是非引用,copy.但值也会改变. 引用形参: const相关问题: const形参可以拷贝. 不能修改,不能赋值! 可以使用const初始化非const: 指针+con ...