
Spring Cloud微服务安全实战_4-5_搭建OAuth2资源服务器
上一篇搭建了一个OAuth2认证服务器,可以生成token,这篇来改造下之前的订单微服务,使其能够认这个token令牌。
本篇针对订单服务要做三件事:
1,要让他知道自己是资源服务器,他知道这件事后,才会在前边加一个过滤器去验令牌(配置@EnableResourceServer 配置类)
2,要让他知道自己是什么资源服务器(配置资源服务器ID)
3,配置去哪里验令牌,怎么验令牌,要带什么信息去验 (配置@EnableWebSecurity 配置TokenServices,配置AuthenticationManager)
搭建资源服务器
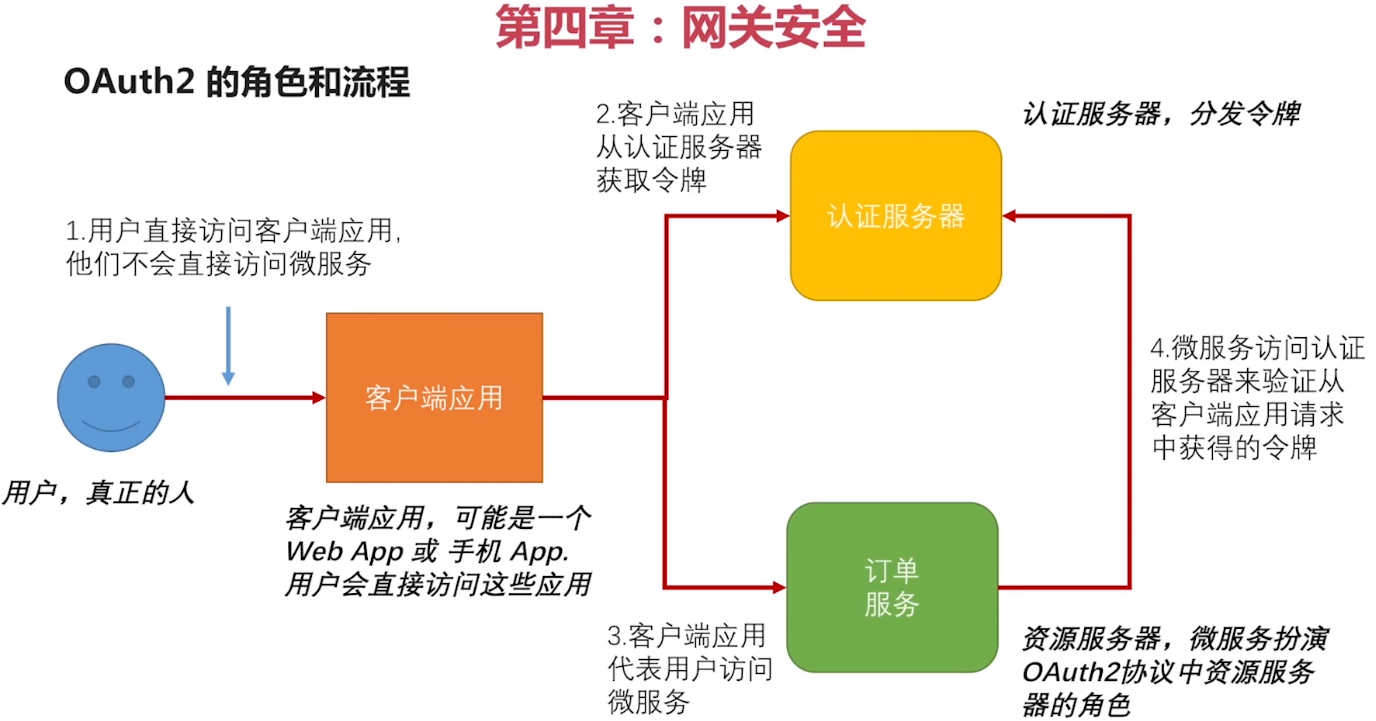
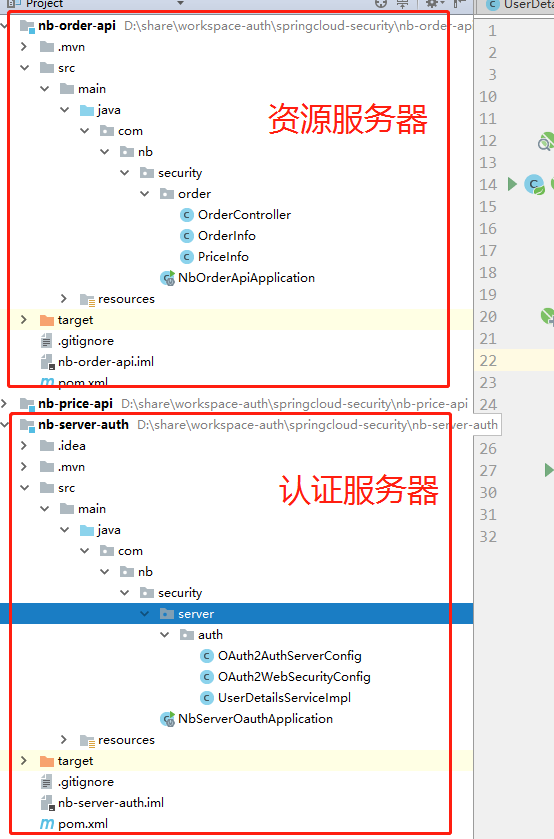
++++++++++++++++++资源服务器现有的各个类++++++++++++++++++++++++++++
pom.xml:
<?xml version="1.0" encoding="UTF-8"?>

<project xmlns="http://maven.apache.org/POM/4.0.0" xmlns:xsi="http://www.w3.org/2001/XMLSchema-instance"

    xsi:schemaLocation="http://maven.apache.org/POM/4.0.0 https://maven.apache.org/xsd/maven-4.0.0.xsd">

    <modelVersion>4.0.0</modelVersion>

    <groupId>com.nb.security</groupId>

    <artifactId>nb-order-api</artifactId>

    <version>0.0.1-SNAPSHOT</version>

    <properties>

        <java.version>1.8</java.version>

    </properties>

    <dependencyManagement>

        <dependencies>

            <dependency>

                <!-- Import dependency management from Spring Boot -->

                <groupId>org.springframework.boot</groupId>

                <artifactId>spring-boot-dependencies</artifactId>

                <version>2.1.6.RELEASE</version>

                <type>pom</type>

                <scope>import</scope>

            </dependency>

            <!--spring cloud-->

            <dependency>

                <groupId>org.springframework.cloud</groupId>

                <artifactId>spring-cloud-dependencies</artifactId>

                <version>Greenwich.SR2</version>

                <type>pom</type>

                <scope>import</scope>

            </dependency>

        </dependencies>

    </dependencyManagement>

    <dependencies>

        <dependency>

            <groupId>org.springframework.boot</groupId>

            <artifactId>spring-boot-starter-web</artifactId>

        </dependency>

        <!--OAuth2-->

        <dependency>

            <groupId>org.springframework.cloud</groupId>

            <artifactId>spring-cloud-starter-oauth2</artifactId>

        </dependency>

        <!--lombok-->

        <dependency>

            <groupId>org.projectlombok</groupId>

            <artifactId>lombok</artifactId>

        </dependency>

    </dependencies>

    <build>

        <plugins>

            <!--指定JDK编译版本 -->

            <plugin>

                <groupId>org.apache.maven.plugins</groupId>

                <artifactId>maven-compiler-plugin</artifactId>

                <configuration>

                    <source>1.8</source>

                    <target>1.8</target>

                    <encoding>UTF-8</encoding>

                </configuration>

            </plugin>

            <!-- 打包跳过测试 -->

            <plugin>

                <groupId>org.apache.maven.plugins</groupId>

                <artifactId>maven-surefire-plugin</artifactId>

                <configuration>

                    <skipTests>true</skipTests>

                </configuration>

            </plugin>

            <plugin>

                <groupId>org.springframework.boot</groupId>

                <artifactId>spring-boot-maven-plugin</artifactId>

            </plugin>

        </plugins>

    </build>

</project>
application.yml:
server:

  port: 9060
OrderInfo.java :
package com.nb.security.order;

import lombok.AllArgsConstructor;

import lombok.Data;

import lombok.NoArgsConstructor;

@Data

@NoArgsConstructor

@AllArgsConstructor

public class OrderInfo {

    private Long productId;

}
OrderController:
package com.nb.security.order;

import lombok.extern.slf4j.Slf4j;

import org.springframework.web.bind.annotation.*;

import org.springframework.web.client.RestTemplate;

@Slf4j

@RestController

@RequestMapping("/orders")

public class OrderController {

    private RestTemplate restTemplate = new RestTemplate();

    @PostMapping

    public OrderInfo create(@RequestBody OrderInfo info){

        //查询价格

//        PriceInfo price = restTemplate.getForObject("http://localhost:9080/prices/"+info.getProductId(),PriceInfo.class);

//        log.info("price is "+price.getPrice());

        return info;

    }

    @GetMapping

    public OrderInfo getInfo(@PathVariable Long id){

        log.info("getInfo: id is "+id);

        return new OrderInfo(id);

    }

}
启动类:
package com.nb.security;

import org.springframework.boot.SpringApplication;

import org.springframework.boot.autoconfigure.SpringBootApplication;

@SpringBootApplication

public class NbOrderApiApplication {

    public static void main(String[] args) {

        SpringApplication.run(NbOrderApiApplication.class, args);

    }

}
PriceInfo.java (暂时先不用):
package com.nb.security.order;

import lombok.Data;

import java.math.BigDecimal;

@Data

public class PriceInfo {

    private Long id;

    private BigDecimal price;

}
++++++++++++++++++资源服务器现有的各个类结束++++++++++++++++++++++++++++
1,在资源服务器pom哩加上 oauth2的依赖:
        <!--OAuth2-->

        <dependency>

            <groupId>org.springframework.cloud</groupId>

            <artifactId>spring-cloud-starter-oauth2</artifactId>

        </dependency>
2,新建资源服务器配置类,继承 ResourceServerConfigurerAdapter
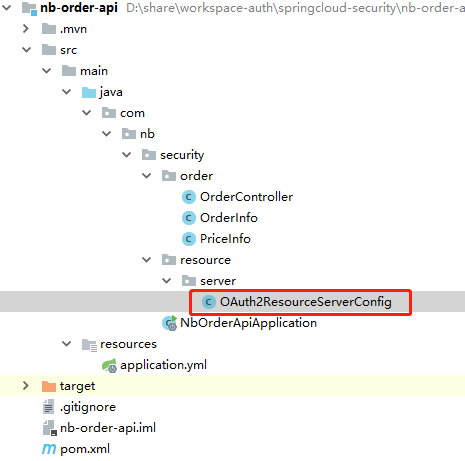
package com.nb.security.resource.server;

import org.springframework.context.annotation.Configuration;

import org.springframework.security.config.annotation.web.builders.HttpSecurity;

import org.springframework.security.oauth2.config.annotation.web.configuration.EnableResourceServer;

import org.springframework.security.oauth2.config.annotation.web.configuration.ResourceServerConfigurerAdapter;

import org.springframework.security.oauth2.config.annotation.web.configurers.ResourceServerSecurityConfigurer;

/**

 * 资源服务器

 * 配置了@EnableResourceServer ,所有发往nb-order-api的请求,都会去请求头里找token,找不到不让你过

 */

@Configuration

@EnableResourceServer//告诉nb-order-api,你就是资源服务器

public class OAuth2ResourceServerConfig extends ResourceServerConfigurerAdapter {

    @Override

    public void configure(ResourceServerSecurityConfigurer resources) throws Exception {

        //配置资源服务器的id,“现在我就是资源服务器order-server!!!”

        resources.resourceId("order-server");

    }

    @Override

    public void configure(HttpSecurity http) throws Exception {

        /**

         * 进入nb-order-api的所有请求,哪些要拦截,哪些要放过,在这里配置

         */

        http.authorizeRequests()

                .antMatchers("/hello")

                .permitAll() //放过/haha不拦截

                .anyRequest().authenticated();//其余所有请求都拦截

    }

}
ResourceServerConfigurerAdapter 有两个方法:
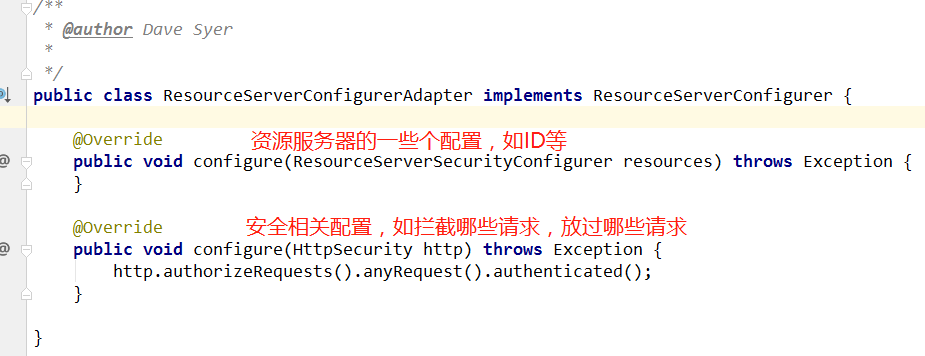
开篇说的1、2、3中的1和2已经完成了,下面做第3件事,怎么验令牌:
新建配置类:
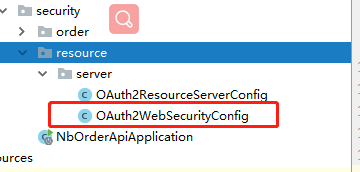
package com.nb.security.resource.server;

import org.springframework.context.annotation.Bean;

import org.springframework.context.annotation.Configuration;

import org.springframework.security.authentication.AuthenticationManager;

import org.springframework.security.config.annotation.web.configuration.EnableWebSecurity;

import org.springframework.security.config.annotation.web.configuration.WebSecurityConfigurerAdapter;

import org.springframework.security.oauth2.provider.authentication.OAuth2AuthenticationManager;

import org.springframework.security.oauth2.provider.token.RemoteTokenServices;

import org.springframework.security.oauth2.provider.token.ResourceServerTokenServices;

/**

 * 怎么验发往本服务的请求头的令牌

 * 1,自定义tokenServices ,说明去哪里去验token

 * 2,重写authenticationManagerBean()方法,将AuthenticationManager暴露为一个Bean

 *    要认证跟用户相关的信息,一般用 AuthenticationManager

 *

 * 这样配置了后,所有发往nb-order-api的请求,

 * 需要验token的时候就会发请求去http://localhost:9090/oauth/check_token验token,获取到token对应的用户信息

 */

@Configuration

@EnableWebSecurity

public class OAuth2WebSecurityConfig extends WebSecurityConfigurerAdapter{

    /**

     * 通过这个Bean,去远程调用认证服务器,验token

     * @return

     */

    @Bean

    public ResourceServerTokenServices tokenServices(){

        RemoteTokenServices tokenServices = new RemoteTokenServices();

        tokenServices.setClientId("orderService");//在认证服务器配置的,订单服务的clientId

        tokenServices.setClientSecret("123456");//在认证服务器配置的,订单服务的ClientSecret

        tokenServices.setCheckTokenEndpointUrl("http://localhost:9090/oauth/check_token");

        return tokenServices;

    }

    /**

     * 要认证跟用户相关的信息,一般用 AuthenticationManager

     * 覆盖这个方法,可以将AuthenticationManager暴露为一个Bean

     *

     * @return

     * @throws Exception

     */

    @Bean

    @Override

    public AuthenticationManager authenticationManagerBean() throws Exception {

        OAuth2AuthenticationManager authenticationManager = new OAuth2AuthenticationManager();

        authenticationManager.setTokenServices(tokenServices());//设置为自定义的TokenServices,去校验令牌

        return authenticationManager;

    }

}
认证服务器关于订单服务的配置:

启动认证服务器,
启动订单 资源服务器,
访问认证服务器获取token : localhost:9090/oauth/token
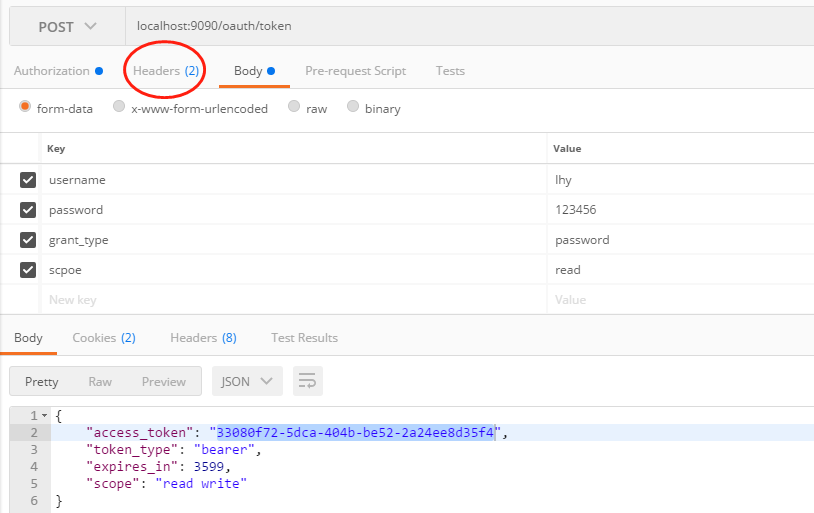

拿着 token 去资源服务器创建订单,注意,选择bearer类型的token,生成的请求头是这样的(注:Authorization的value值,postman生成的是以Bearer开头的,但是我看谷歌浏览器restclient插件生成的是bearer的B是小写):


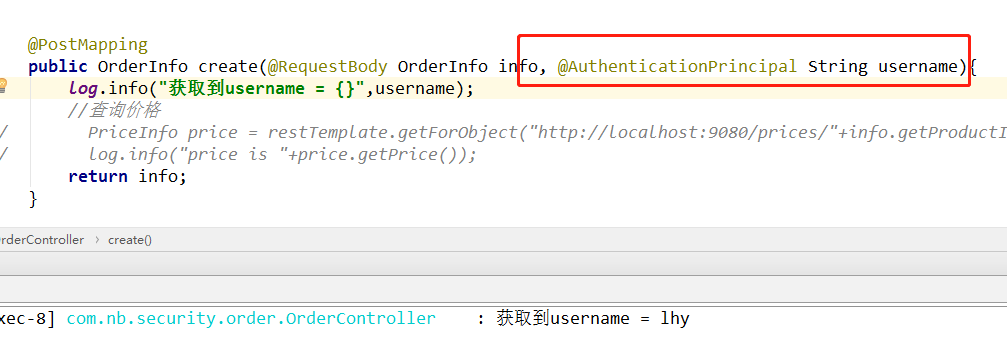
在资源服务器里,可以通过该注解获取用户名:
错误的情况:
如果把资源服务器配置的resourceId改成了order-server222,请求创建订单,会受到如下的错误

如果资源服务器检验token的cilentID获取clientSecret写错了,后台会报错:

++++++++++++++++++++++分割线++++++++++++++++++++++
小结:
接上篇的认证服务器,本篇实现了资源服务器,以及与认证服务器的交互,怎么去验令牌。
遗留疑问:
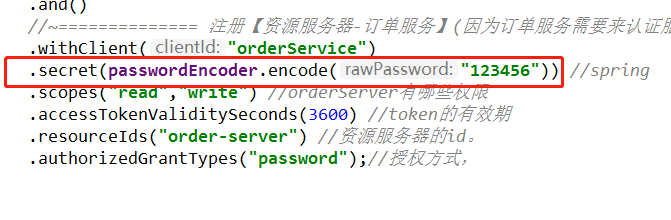
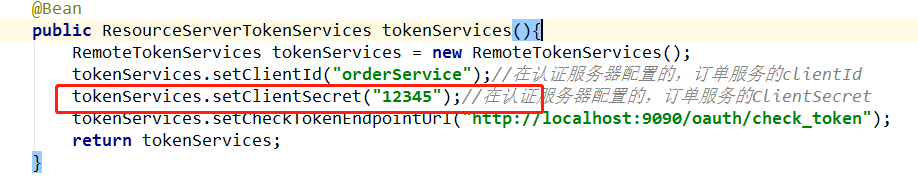
认证服务器里面,配置资源服务器secret的时候,用passwordEncoder对123456进行了加密,而在资源服务器里,clientSecret确实明文的123456,这两者不需要一致么?
认证服务器里对资源服务器ClientId、 ClientSecret配置:
资源服务器验令牌携带的ClientId、 ClientSecret:
代码github :https://github.com/lhy1234/springcloud-security/tree/chapt-4-5-resource-server
Spring Cloud微服务安全实战_4-5_搭建OAuth2资源服务器的更多相关文章
- Spring cloud微服务安全实战-7-3prometheus环境搭建
Prmetheus 主要用来做来Metrics的监控和报警,这张图是官方的架构图. 这是他的核心 它的作用是根据我们的配置去完成数据的采集.服务的发现,以及数据的存储. 这是服务的发现,通过Servi ...
- Spring cloud微服务安全实战_汇总
Spring cloud微服务安全实战 https://coding.imooc.com/class/chapter/379.html#Anchor Spring Cloud微服务安全实战-1-1 课 ...
- 《Spring Cloud微服务 入门 实战与进阶》
很少在周末发文,还是由于昨晚刚收到实体书,还是耐不住性子马上发文了. 一年前,耗时半年多的时间,写出了我的第一本书<Spring Cloud微服务-全栈技术与案例解析>. 时至今日,一年的 ...
- Spring Cloud微服务安全实战_00_前言
一.前言: 一直以来对服务安全都很感兴趣,所以就学习.这是学习immoc的 jojo老师的 <Spring Cloud微服务安全实战课程>的笔记,讲的很好. 课程简介: 二.最终形成的架 ...
- Spring cloud微服务安全实战 最新完整教程
课程资料获取链接:点击这里 采用流行的微服务架构开发,应用程序访问安全将会面临更多更复杂的挑战,尤其是开发者最关心的三大问题:认证授权.可用性.可视化.本课程从简单的API安全入手,过渡到复杂的微服务 ...
- Spring Cloud微服务安全实战_4-3_订单微服务&价格微服务
实现一个场景: 订单微服务: POM: <?xml version="1.0" encoding="UTF-8"?> <project xml ...
- Spring Cloud微服务安全实战_4-4_OAuth2协议与微服务安全
接上篇文章,在这个流程中,PostMan可以代表客户端应用,订单服务是资源服务器,唯一缺少的是 认证服务器 ,下面来搭建认证服务器 项目结构: Pom.xml : DependencyManager ...
- Spring cloud微服务安全实战-6-8sentinel限流实战
阿里2018年开源的. 简单来说就是干三件事,最终的结果就是保证你的服务可用,不会崩掉.保证服务高可用. 流控 先从最简单的场景来入手. 1.引用一个依赖, 2,声明一个资源. 3.声明一个规则 注意 ...
- Spring cloud微服务安全实战-6-4权限控制改造
授权,权限的控制 令牌里的scope包含fly就有权限访问.根据Oauth的scope来做权限控制, 要让@PreAuthorize生效,就要在启动类里面写一个注解. 里面有一个属性叫做,就是在方法的 ...
随机推荐
- C++ 基于rapidjson对json字符串的进行序列化与反序列化
json字符串的解析以封装在我们开发过程中经常见到, 尤其在socket通信上面, 在一次项目中碰到json字符串的进行解析, 而公司有没有封装好的库, 于是就自己基于开源的库进行了一次封装, 接下是 ...
- 一种单机支持 JavaWeb 容器万级并发的设想
当前的大部分 Java web 容器基于 Bio 线程模型,例如常见的 tomcat ,默认 200 线程,即 200 连接.由此带来的问题是,如果想提高并发,或者提高资源利用率,就得加大线程数. 如 ...
- Windows Terminal (Preview)治好了cmd,powershell的癌症
前言 话说n年前,我想开发一款powershell麻将游戏,但是发现命令行下无法显示麻将牌这种特殊符号. 经过研究发现,这是4字节的utf16le字符串.而powershell依赖的渲染引擎,只能渲染 ...
- js变量类型及检查
一.变量的类型 JavaScript 有六种数据类型.主要的类型有 Number.String.object 以及 Boolean 类型,其他两种类型为 null 和 undefined.var ob ...
- LinuxShell——变量
LinuxShell——变量 摘要:本文主要学习了Shell命令中的变量. 什么是变量 简单的说,变量就是让某一个特定字串代表不固定的内容. 变量是计算机内存的单元,其中存放的值可以改变.当Shell ...
- 前端vue项目js中怎么保证链式调用后台接口
在一个for循环中对同一接口调用多次,如何保证逐步执行,同步执行. html部分 <DcFileUpload v-for="(item, index) of fileLengthLis ...
- 统计代码测试覆盖率-Python
衡量Unit Test(单元测试)是否充分, 覆盖率是一个必要指标, 是检验单元测试的重要依据, 这里针对python unittest 的单元测试覆盖率coverage进行分享. 来自官方的解释: ...
- SpringBoot 整合Mybatis操作数据库
1.引入依赖: <dependency> <groupId>org.mybatis.spring.boot</groupId> <artifactId> ...
- 其他综合-Cobbler无人值守安装系统 CentOS 7
Cobbler 无人值守安装系统 CentOS 7 1.实验描述 1.1 概述 作为运维,在公司经常遇到一些机械性重复工作要做,例如:为新机器装系统,一台两台机器装系统,可以用光盘.U盘等介质安装,1 ...
- 使用Lambda解决_inbound_nodes错误
Keras出现了下面的错误: AttributeError: 'NoneType' object has no attribute '_inbound_nodes' 原因是使用了Keras backe ...