
用Canvas写桌球游戏!!!
声明:本文为原创文章,如需转载,请注明来源WAxes,谢谢!
昨天上班的时候闲着无事,就用Canvas写了个桌球游戏来玩玩。。。。所以就拿这游戏上来水一发。或许对一些刚学canvas的人有帮助。
话说这只是一个简单的DEMO。游戏性,游戏规则什么的我都没怎么考虑,如果有兴趣细化的朋友可以细化一下,比如细化一下规则,游戏开关,加个声音,细化一下进球检测,更严谨甚至可以去查下击球力度、桌面真实摩擦力等来把游戏弄的更像游戏。我只是给个编程思路哈,随便坐个DEMO而已,玩起来估计还是不会很爽快的~~
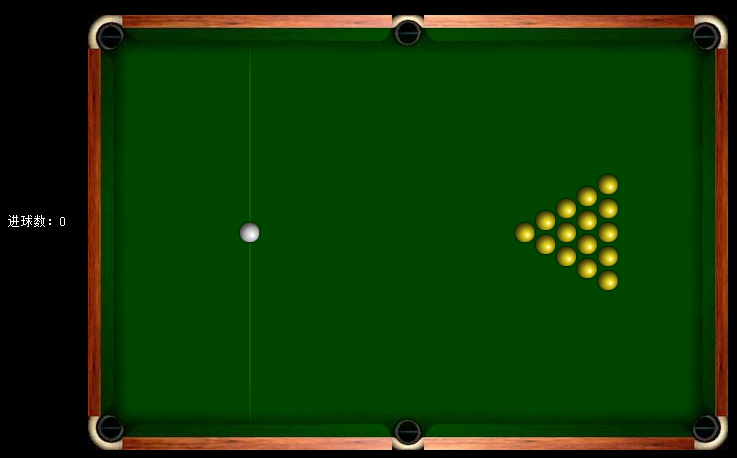
整个桌球游戏就两个类,一个是球,一个是辅助瞄准线。如果想把改游戏弄的更复杂,还可以再抽象一个形状类,用于检测球与边角的碰撞以及进球。我做的这个游戏采取了最简单的墙壁碰撞检测,所以没有进行球与不规则形状的碰撞检测,如果想玩更复杂的碰撞,可以戳 关于简单的碰撞检测 岑安大大讲的还是很好的。好,接下来就一步一步来:
【球】
先贴代码:
var Ball = function(x , y , ismine){

            this.x = x;

            this.y = y;

            this.ismine = ismine;

            this.oldx = x;

            this.oldy = y;

            this.vx = 0;

            this.vy = 0;

            this.radius = ballRadius;

            this.inhole = false;this.moving = true;

        }

        Ball.prototype = {

            constructor:Ball,

            _paint:function(){

                var b = this.ismine?document.getElementById("wb") : document.getElementById("yb")

                if(b.complete) {

                    ctx.drawImage(b , this.x-this.radius , this.y-this.radius , 2*this.radius , 2*this.radius);

                }

                else {

                    b.onload = function(){

                        ctx.drawImage(b , this.x-this.radius , this.y-this.radius , 2*this.radius , 2*this.radius);

                    }

                }

            },

            _run:function(t){

                this.oldx = this.x;

                this.oldy = this.y;

                this.vx = Math.abs(this.vx)<0.1? 0 : (this.vx>0? this.vx-mcl*t : this.vx+mcl*t);

                 this.vy = Math.abs(this.vy)<0.1? 0 : (this.vy>0? this.vy-mcl*t : this.vy+mcl*t);

                // this.vx += this.vx>0? -mcl*t : mcl*t;

                // this.vy += this.vy>0? -mcl*t : mcl*t;

                 this.x += t * this.vx * pxpm;

                 this.y += t * this.vy * pxpm;

                 if((this.x<50 && this.y<50) || (this.x>370 && this.x<430 && this.y<50) || (this.x > 758 && this.y<50) || (this.x<46 && this.y>490) || (this.x>377 && this.x<420 && this.y>490) || (this.x > 758 && this.y>490)){

                     this.inhole = true;

                     if(this.ismine){

                         var that = this;

                         setTimeout(function(){

                             that.x = 202;

                             that.y = canvas.height/2;

                             that.vx = 0;

                             that.vy = 0;

                             that.inhole = false;

                         } , 500)

                     }

                     else {

                         document.getElementById("shotNum").innerHTML = parseInt(document.getElementById("shotNum").innerHTML)+1

                     }

                 }

                 else {

                     if(this.y > canvas.height - (ballRadius+tbw) || this.y < (ballRadius+tbw)){

                         this.y = this.y < (ballRadius+tbw) ? (ballRadius+tbw) : (canvas.height - (ballRadius+tbw));

                         this.derectionY = !this.derectionY;

                         this.vy = -this.vy*0.6;

                     }

                     if(this.x > canvas.width - (ballRadius+tbw) || this.x < (ballRadius+tbw)){

                         this.x = this.x < (ballRadius+tbw) ? (ballRadius+tbw) : (canvas.width - (ballRadius+tbw));

                         this.derectionX = !this.derectionX;

                         this.vx = -this.vx*0.6;

                     }

                 }

                 this._paint();

                 if(Math.abs(this.vx)<0.1 && Math.abs(this.vy)<0.1){

                     this.moving = false;

                 }

                 else {

                     this.moving = true;

                 }

            }

        }
球类的属性:x,y球的位置,vx,vy球的水平速度以及求得垂直速度,ismine代表是白球还是其他球(不同球在_paint方法中绘制的图片不一样),oldx,oldy用于保存球的上一帧位置,不过暂时还没用上,应该有用吧。_paint方法没什么好说的,_run方法就是跟踪小球位置,根据小球每一帧的时间来算出小球的位移增量以及速度增量,mcl和pxpm都是常量,mcl是摩擦力,pxpm是大概算个像素和现实转换比例。。。。然后就是碰撞检测,这个很容易理解了,就计算小球的位置有没有超过边界,超过了就反弹。不过这种碰撞检测很不严谨,如果真要做游戏建议用更复杂一些的。还有就是根据小球的速度来让小球静止。
【辅助线】
var dotLine = function(x0,y0,x1,y1){

            this.x0 = this.x0;

            this.y0 = this.y0;

            this.x1 = this.x1;

            this.y1 = this.y1;

            this.dotlength = 3;

            this.display = false;

        }

        dotLine.prototype = {

            constructor:dotLine,

            _ready:function(){

                this.length = Math.sqrt(Math.pow(this.y1 - this.y0 , 2)+Math.pow(this.x1 - this.x0 , 2));

                this.dotNum = Math.ceil(this.length/this.dotlength);

            },

            _paint:function(){

                this._ready();

                xadd = this.dotlength*(this.x1 - this.x0)/this.length;

                yadd = this.dotlength*(this.y1 - this.y0)/this.length;

                ctx.save();

                ctx.beginPath();

                for(var i=1;i<=this.dotNum;i++){

                    if(i%2!==0){

                        ctx.moveTo(this.x0+(i-1)*xadd , this.y0+(i-1)*yadd);

                        ctx.lineTo(this.x0+i*xadd , this.y0+i*yadd);

                    }

                }

                ctx.strokeStyle = "#FFF";

                ctx.stroke();

                ctx.beginPath();

                ctx.arc(this.x1 , this.y1 , ballRadius-2 , 0 , 2*Math.PI);

                ctx.stroke();

                ctx.restore();

            }

        }
就是画虚线,这个比较简单了,获取鼠标的位置和白球位置,然后在两者之间隔一段距离画条线,然后就成虚线了。
【多球碰撞检测】
function collision(){

            for(var i=0;i<balls.length;i++){

                for(var j=0;j<balls.length;j++){

                    var b1 = balls[i],b2 = balls[j];

                    if(b1 !== b2 && !b1.inhole && !b2.inhole){

                        var rc = Math.sqrt(Math.pow(b1.x - b2.x , 2) + Math.pow(b1.y - b2.y , 2));

                        if(Math.ceil(rc) < (b1.radius + b2.radius)){

                            if(!b1.moving && !b2.moving) return;

                            //获取碰撞后的速度增量

                            var ax = ((b1.vx - b2.vx)*Math.pow((b1.x - b2.x) , 2) + (b1.vy - b2.vy)*(b1.x - b2.x)*(b1.y - b2.y))/Math.pow(rc , 2)

                            var ay = ((b1.vy - b2.vy)*Math.pow((b1.y - b2.y) , 2) + (b1.vx - b2.vx)*(b1.x - b2.x)*(b1.y - b2.y))/Math.pow(rc , 2)

                //将速度增量赋给碰撞小球

                            b1.vx = b1.vx-ax;

                            b1.vy = b1.vy-ay;

                            b2.vx = b2.vx+ax;

                            b2.vy = b2.vy+ay;

                //修正小球碰撞距离

                            var clength = ((b1.radius+b2.radius)-rc)/2;

                            var cx = clength * (b1.x-b2.x)/rc;

                            var cy = clength * (b1.y-b2.y)/rc;

                            b1.x = b1.x+cx;

                            b1.y = b1.y+cy;

                            b2.x = b2.x-cx;

                            b2.y = b2.y-cy;

                        }

                    }

                }

            }

        }
对所有小球进行遍历,计算两个小球的球心距离,如果小于两小球的半径和,则说明发生了碰撞。如果两个小球都是静止的,就不进行碰撞检测,否则进行计算碰撞后的速度增量,碰撞速度增量的求法可以直接看 小球碰撞的算法设计 ,里面讲的挺详细的,综合起来就得出了上面那一串式子了。
将速度增量赋给碰撞小球。因为两个球碰撞那一帧,两个球是有部分重叠的,所以得进行位置修正,不然小球会一直处于碰撞然后就黏在一起了,位置修正的原理也简单,算出两球的球心距离,通过勾股定理计算出两球的重叠区域的宽度,然后把宽度除于2后赋给小球新的位置,新的位置就是两个球的半径刚好等于球心距。
【鼠标动作】
canvas.addEventListener("mousedown" , function(){

            if(balls[0].moving) return;

            document.querySelector(".shotPower").style.display = "block";

            document.querySelector(".shotPower").style.top = balls[0].y-60 + "px";

            document.querySelector(".shotPower").style.left = balls[0].x-40 +"px";

            document.getElementById("pow").className = "animate";

            var x = event.clientX + document.body.scrollLeft + document.documentElement.scrollLeft - document.querySelector(".view").offsetLeft;

            var y = event.clientY + document.body.scrollTop + document.documentElement.scrollTop - document.querySelector(".view").offsetTop;

            dotline.display = true;

            dotline.x0 = balls[0].x;

            dotline.y0 = balls[0].y;

            dotline.x1 = x;

            dotline.y1 = y;

            window.addEventListener("mouseup" , muHandle , false);

            window.addEventListener("mousemove" , mmHandle , false);

            function mmHandle(){

                var x = event.clientX + document.body.scrollLeft + document.documentElement.scrollLeft - document.querySelector(".view").offsetLeft;

                var y = event.clientY + document.body.scrollTop + document.documentElement.scrollTop - document.querySelector(".view").offsetTop;

                dotline.x1 = x;

                dotline.y1 = y;

            }

            function muHandle(){

                var x = event.clientX + document.body.scrollLeft + document.documentElement.scrollLeft - document.querySelector(".view").offsetLeft;

                var y = event.clientY + document.body.scrollTop + document.documentElement.scrollTop - document.querySelector(".view").offsetTop;

                var angle = Math.atan((y - balls[0].y)/(x - balls[0].x));

                var h = document.getElementById("pow").offsetHeight/document.getElementById("powbar").offsetHeight;

                var v = 60*h;

                document.getElementById("pow").style.height = h*100+"%"

                balls[0].vx = x - balls[0].x>0 ? v*Math.abs(Math.cos(angle)) : -v*Math.abs(Math.cos(angle));

                balls[0].vy = y - balls[0].y>0 ? v*Math.abs(Math.sin(angle)) : -v*Math.abs(Math.sin(angle));

                document.getElementById("pow").className = "";

                window.removeEventListener("mouseup" , muHandle , false);

                window.removeEventListener("mousemove" , muHandle , false);

                dotline.display = false;

                document.querySelector(".shotPower").style.display = "none";

            }

        },false);
鼠标动作也比较简单,有js基础的基本上都没问题,就是鼠标按下后计算鼠标位置,然后产生辅助虚线,鼠标移动后修改辅助虚线的终点位置。鼠标按下的时候旁边产生一个力量计,我就只用用animation做动画了,然后鼠标按键抬起时通过计算力量计的大小来确定白球的速度,然后再分解成水平速度以及垂直速度赋给白球。同时取消鼠标移动以及鼠标抬起的事件绑定,把辅助虚线以及力量计隐藏。
【动画舞台】
        function animate(){

            ctx.clearRect(0,0,canvas.width,canvas.height)

             var t1 = new Date();

             var t = (t1 - t0)/1000;

             collision();

             balls.foreach(function(){

                 if(!this.inhole) this._run(t);

             });

             if(dotline.display){

                 dotline.x0 = balls[0].x;

                 dotline.y0 = balls[0].y;

                 dotline._paint();

             }

             t0 = t1;

             if(!animateStop){

                 if("requestAnimationFrame" in window){

                     requestAnimationFrame(animate);

                 }

                 else if("webkitRequestAnimationFrame" in window){

                     webkitRequestAnimationFrame(animate);

                 }

                 else if("msRequestAnimationFrame" in window){

                     msRequestAnimationFrame(animate);

                 }

                 else if("mozRequestAnimationFrame" in window){

                     mozRequestAnimationFrame(animate);

                 }

                 else {

                     setTimeout(animate , 16);

                 }

             }

        }
这个就是游戏每一帧的逻辑处理现场,如果小球进洞了,就不再进行绘制,如果辅助虚线的display属性设成false,就不进行辅助虚线的绘制,还有就是计算每一帧的时间。
【常量与初始化】
var canvas = document.getElementById("cas");

        var ctx = canvas.getContext('2d');

        var mcl = 1 , collarg = 0.8 , ballRadius = 15 , t0 = 0 , balls=[] , tbw = 32 , animateStop = true , powAnimation = false;

        var dotline;

        pxpm = canvas.width/20;

        window.onload = function(){

            var myball = new Ball(202 , canvas.height/2 , true);

            balls.push(myball);

            for(var i=0;i<6;i++){

                for(var j=0;j<i;j++){

                    var other = new Ball(520+i*(ballRadius-2)*2 , (canvas.height-i*2*ballRadius)/2+ballRadius+2*ballRadius*j , false);

                    balls.push(other);

                }

            }

            t0 = new Date();

            dotline = new dotLine(0,0,0,0);

            animateStop = false;

            animate();

        }
实例化所有小球,把小球全部按照规律摆好,然后获取当前时间,实例化辅助虚线,动画开始。
源码地址:https://github.com/whxaxes/canvas-test/tree/gh-pages/src/Game-demo/snooker
底部的那两个方法是写两条线相交的判定和交点的获取,想用来写严谨一些的碰撞检测。。。。
好吧,说完了,如果有兴趣的还可以加入声音神马的,我就懒得去做了。。。。。吃饭去咯
用Canvas写桌球游戏!!!的更多相关文章
- 尝试用canvas写小游戏
还是习惯直接开门见山,这个游戏是有一个老师抓作弊的学生,老师背身,点学生开始加分,老师会不定时回头,如果老师回头还在点学生在,就会被抓住,游戏game over. 1.写游戏首先是loading条,于 ...
- 用Canvas写一个简单的游戏--别踩白块儿
第一次写博客也不知怎么写,反正就按照我自己的想法来吧!怎么说呢?还是不要扯那些多余的话了,直接上正题吧! 第一次用canvas写游戏,所以挑个简单实现点的来干:别踩白块儿,其他那些怎么操作的那些就不用 ...
- 原生canvas写的飞机游戏
一个原生canvas写的飞机游戏,实用性不大,主要用于熟悉canvas的一些熟悉用法. 项目地址:https://github.com/BothEyes1993/canvas_game
- canvas贪吃蛇游戏
用canvas做了一个贪吃蛇小游戏 开始界面 游戏界面 结束界面 <!DOCTYPE html> <html> <head> <meta charset ...
- 简单的运动学,用canvas写弹力球
声明:本文为原创文章,如需转载,请注明来源WAxes,谢谢! 跟之前的随笔一样,因为本人仍是菜鸟一只,所以用到的技术比较简单,不适合大神观看...... 学canvas学了有一个多礼拜了,觉得canv ...
- 封装构造函数,用canvas写饼状图和柱状图
封装构造函数,用canvas写饼状图和柱状图 封装函数 // 场景 function XDLScence( options ) { this.stage = options.stage; //执行场景 ...
- HTML5 canvas 捕鱼达人游戏
在线试玩:http://hovertree.com/texiao/html5/33/ html5利用canvas写的一个js版本的捕鱼,有积分统计,鱼可以全方位移动,炮会跟着鼠标移动,第一次打开需要鼠 ...
- Javascript写俄罗斯方块游戏
俄罗斯方块这个游戏也做了移动端的兼容, 这个游戏难点是怎么翻转方块, 自己实现的方式是把方块放到一个二维数组, 然后逆时针旋转二维数组. 也有别的方法,比如直接用一个全局变量代表一个方向, 翻转的时候 ...
- 从零开始---控制台用c写俄罗斯方块游戏(1)
从零开始---控制台用c写俄罗斯方块游戏(1) 很少写博文,一来自身知识有限,二来自己知道,已经有很多这样的博文了,三就是因为懒,文笔也一般,四来刚出来工作,时间也不多 之所以写这篇博文,是因为应群里 ...
随机推荐
- NYOJ 485
A*B Problem 描述 设计一个程序求出A*B,然后将其结果每一位相加得到C,如果C的位数大于等于2,继续将C的各位数相加,直到结果是个一位数k. 例如: 6*8=48: 4+8=12: 1+2 ...
- Andorid 反编译App
转载请标明出处:http://blog.csdn.net/lmj623565791/article/details/23564065 开发的过程中,有时候可能会去使用别的app里面的图片,参考布局甚至 ...
- C++的vector对象
C++的vector使用 标签(空格分隔): C++ 标准库类型vector表示对象的集合,其中所有对象的类型都相同.集合中的每个对象都有一个与之对应的索引,索引用于访问对象,因为vector容纳着其 ...
- shell脚本仅列出当前目录下的文件及文件夹
#!/bin/bash function ergodic(){ ` # do # "/"$file ] # then # ergodic $"/"$file # ...
- C# 读取EXCEL文件的三种经典方法
1.方法一:采用OleDB读取EXCEL文件: 把EXCEL文件当做一个数据源来进行数据的读取操作,实例如下: public DataSet ExcelToDS(string Path) { stri ...
- JQUERY获取当前页面的URL信息
以前在做网站的时候,经常会遇到当前页的分类高亮显示,以便让用户了解当前处于哪个页面.之前一直是在每个不 同页面写方法.工程量大,也不便于修改.一直在想有什么简便的方法实现.后来在网上查到可以用获取当前 ...
- jS字符串大小写转换实现方式
toLocaleUpperCase 方法:将字符转换为大写 stringVar.tolocaleUpperCase( ) 必选的 stringVar 引用是一个 String 对象,值或文字. //转 ...
- [Word]中批量修改图片大小和缩放比例方法
最近小编遇到一个问题:需要将一篇厘米.打开.宏名起好了,单击"创建"进入.返回word,工具-宏-宏(或者直接按Alt+F8),再次进入宏的界面,选择刚才编辑好的宏,并单击&quo ...
- C# 如何生成一个时间戳
在程序中,常常会用到时间戳,如何生成一个时间戳呢? /// <summary> /// 获取时间戳 /// </summary> /// <returns>< ...
- Asp.Net MVC<四>:路由器
路由的核心类型基本定义于System.Web.dll中,路由机制同样可应用与Web Forms,实现请求地址和物理文件的分离. web form中使用路由器的示例 路由配置 protected voi ...