
GitLab 汉化
汉化Gitlab
Gitlab默认语言是英文,对于想加强英文的同学,建议继续使用英文,但要求使用中文,这里需要下载一个汉化包
下载最新的汉化包:
下载最新的汉化包:
[root@gitlab ~]# git clone https://gitlab.com/xhang/gitlab.git如果要下载指定版本的汉化包,需要加上版本号。
例:下载11.7.0,命令如下:
[root@gitlab ~]# git clone https://gitlab.com/xhang/gitlab.git -b v11.7.0-zh下载完成后,将下载的文件夹内容复制到gitlab目录下
复制前先停止Gitlab
[root@gitlab ~]# gitlab-ctl stop

ok: down: gitaly: 0s, normally up

ok: down: gitlab-monitor: 0s, normally up

ok: down: gitlab-workhorse: 1s, normally up

ok: down: logrotate: 0s, normally up

ok: down: nginx: 1s, normally up

ok: down: node-exporter: 0s, normally up

ok: down: postgres-exporter: 1s, normally up

ok: down: postgresql: 0s, normally up

ok: down: prometheus: 0s, normally up

ok: down: redis: 0s, normally up

ok: down: redis-exporter: 1s, normally up

ok: down: sidekiq: 0s, normally up

ok: down: unicorn: 1s, normally up

[root@gitlab ~]# cp -r -f  ./gitlab/*  /opt/gitlab/embedded/service/gitlab-rails/
复制时可能不断提示是否要覆盖,这时可能是系统每次执行cp命令时,其实是执行了cp -i命令的别名。出现这种情况可以修改~/.bashrc,在“alias cp=’cp -i’”前加#注释,再刷新文件 source ~/.bashrc
在复制过程中提示,以下信息是正常的
修改bashrc文件禁用掉cp的alias
[root@linuxzgf ~]# vi ~/.bashrc
在alias cp='cp -i'前加上"#"注释,重新登录即可实现复制不提示。
退出vi模式 Shift+zz。
复制完成后,需要重新加载配置,并启动Gitlab
[root@gitlab ~]# gitlab-ctl reconfigure

...

... ...

... ... ...

... ... ... ...

...

Running handlers:

Running handlers complete

Chef Client finished, 2/516 resources updated in 09 seconds

gitlab Reconfigured!

[root@gitlab ~]# gitlab-ctl restart

ok: run: gitaly: (pid 42828) 0s

ok: run: gitlab-monitor: (pid 42852) 0s

ok: run: gitlab-workhorse: (pid 42858) 0s

ok: run: logrotate: (pid 42867) 0s

ok: run: nginx: (pid 42874) 0s

ok: run: node-exporter: (pid 42879) 0s

ok: run: postgres-exporter: (pid 42884) 1s

ok: run: postgresql: (pid 42894) 0s

ok: run: prometheus: (pid 42897) 0s

ok: run: redis: (pid 42907) 0s

ok: run: redis-exporter: (pid 42912) 1s

ok: run: sidekiq: (pid 42997) 0s

ok: run: unicorn: (pid 43007) 0s

[root@gitlab ~]# lsof -i:80

COMMAND   PID       USER   FD   TYPE DEVICE SIZE/OFF NODE NAME

nginx   42874       root    7u  IPv4 125185      0t0  TCP *:http (LISTEN)

nginx   42875 gitlab-www    7u  IPv4 125185      0t0  TCP *:http (LISTEN)

[root@gitlab web-demo]# lsof -i:8080

COMMAND   PID USER   FD   TYPE DEVICE SIZE/OFF NODE NAME

bundle  40358  git   18u  IPv4 119105      0t0  TCP localhost:webcache (LISTEN)

bundle  40650  git   18u  IPv4 119105      0t0  TCP localhost:webcache (LISTEN)

bundle  40652  git   18u  IPv4 119105      0t0  TCP localhost:webcache (LISTEN)
再次访问web界面,显示的已经为汉化熟悉的中文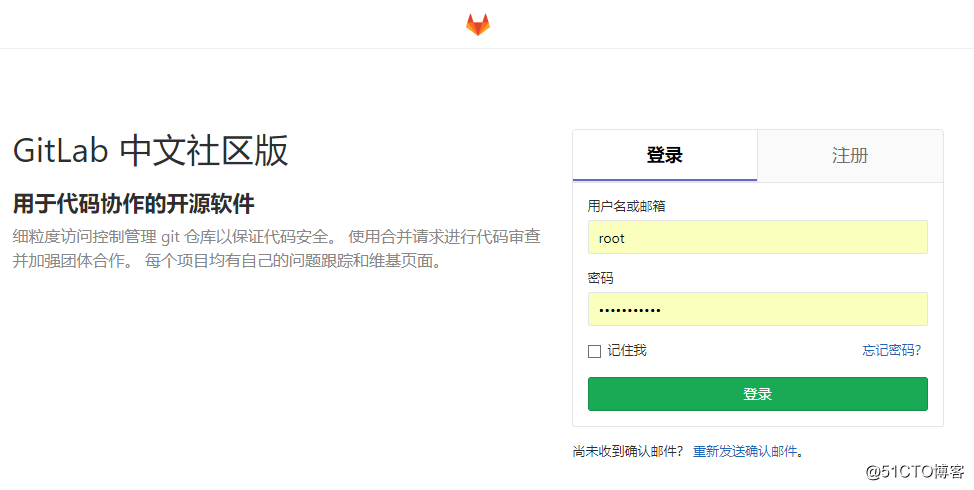
Gitlab私有仓库的使用
登陆进来Gitlab,创建一个项目,但创建项目前我们先创建一个组,让项目归属一个组里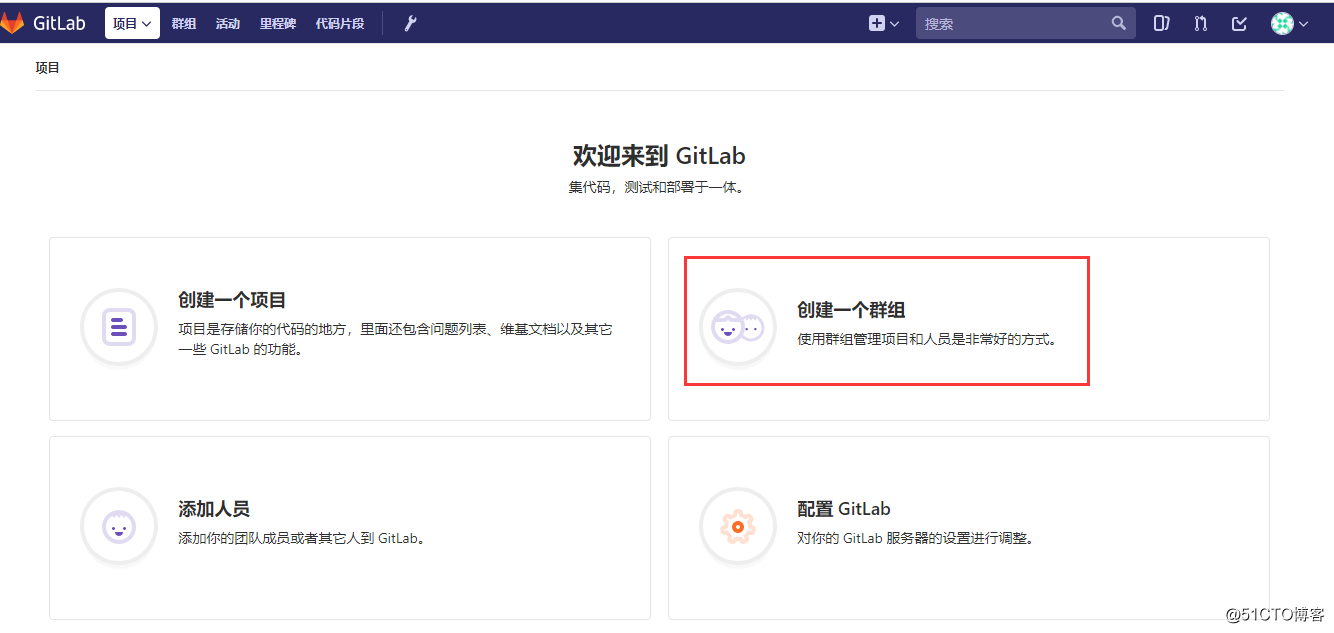
新建一个组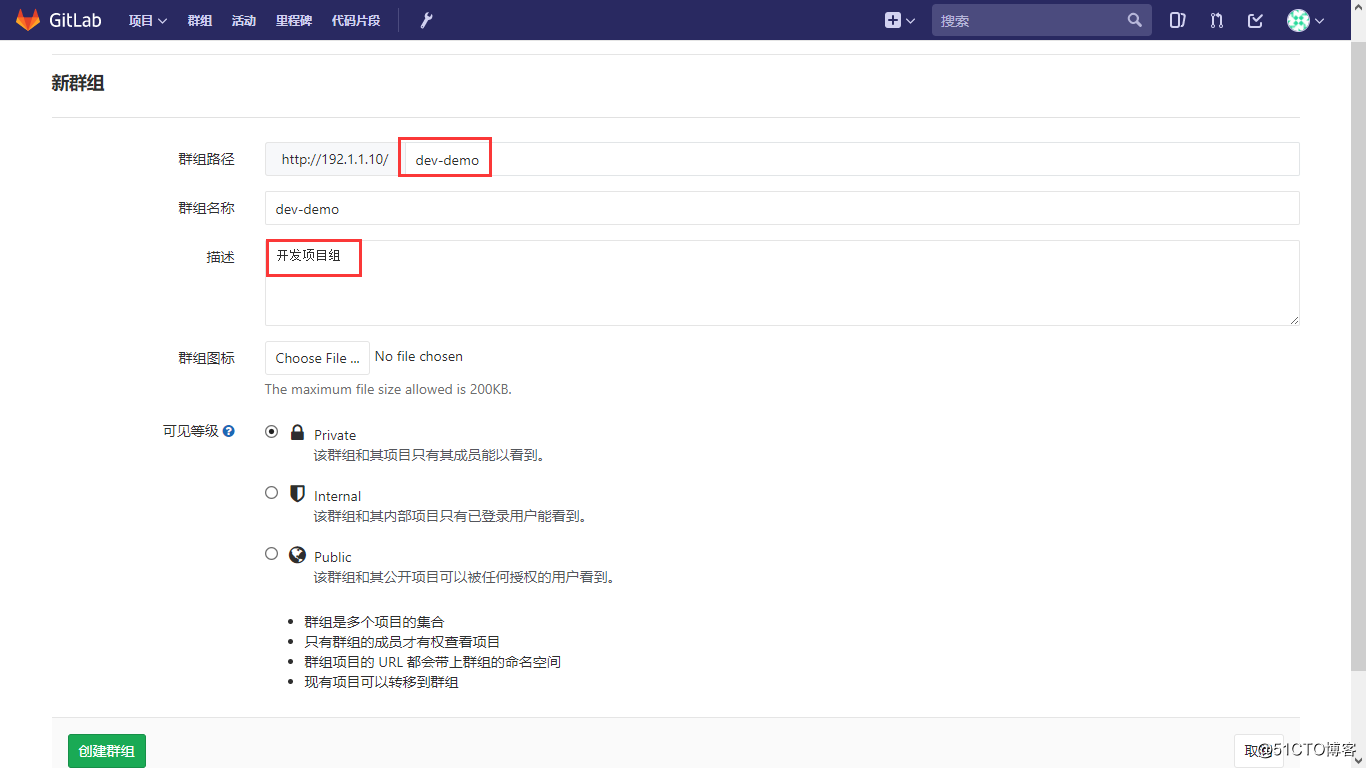
在新建的dev-demo组里,创建一个项目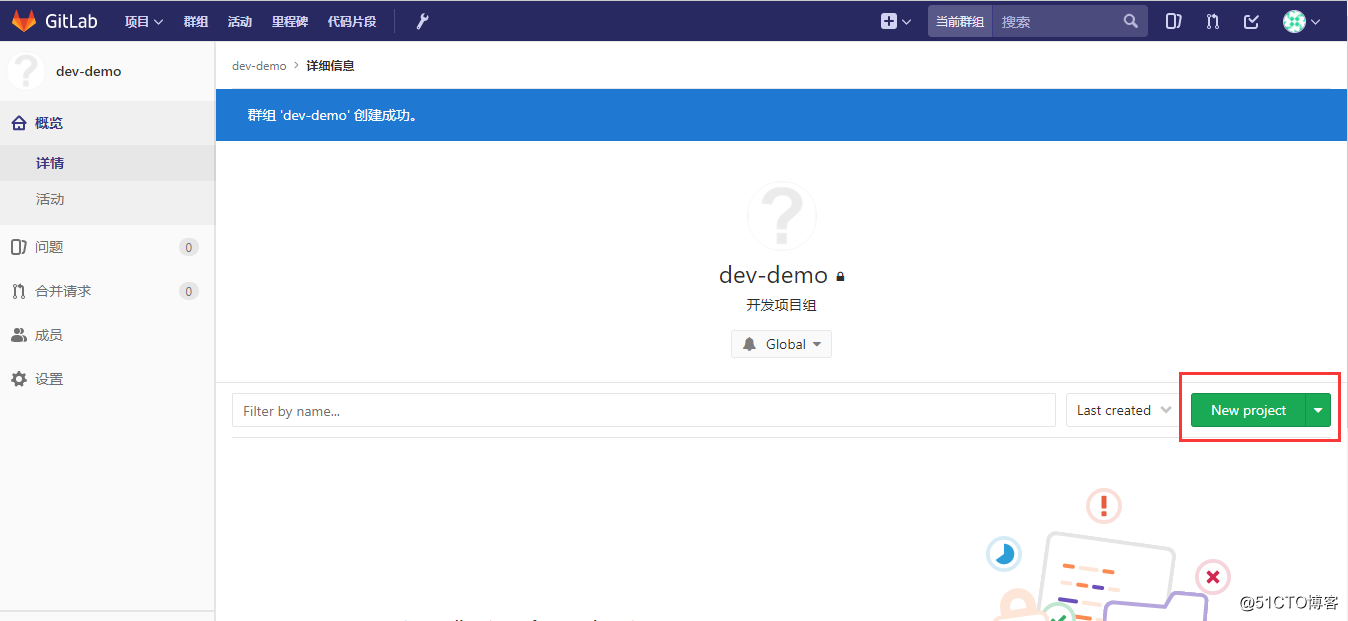
创建一个项目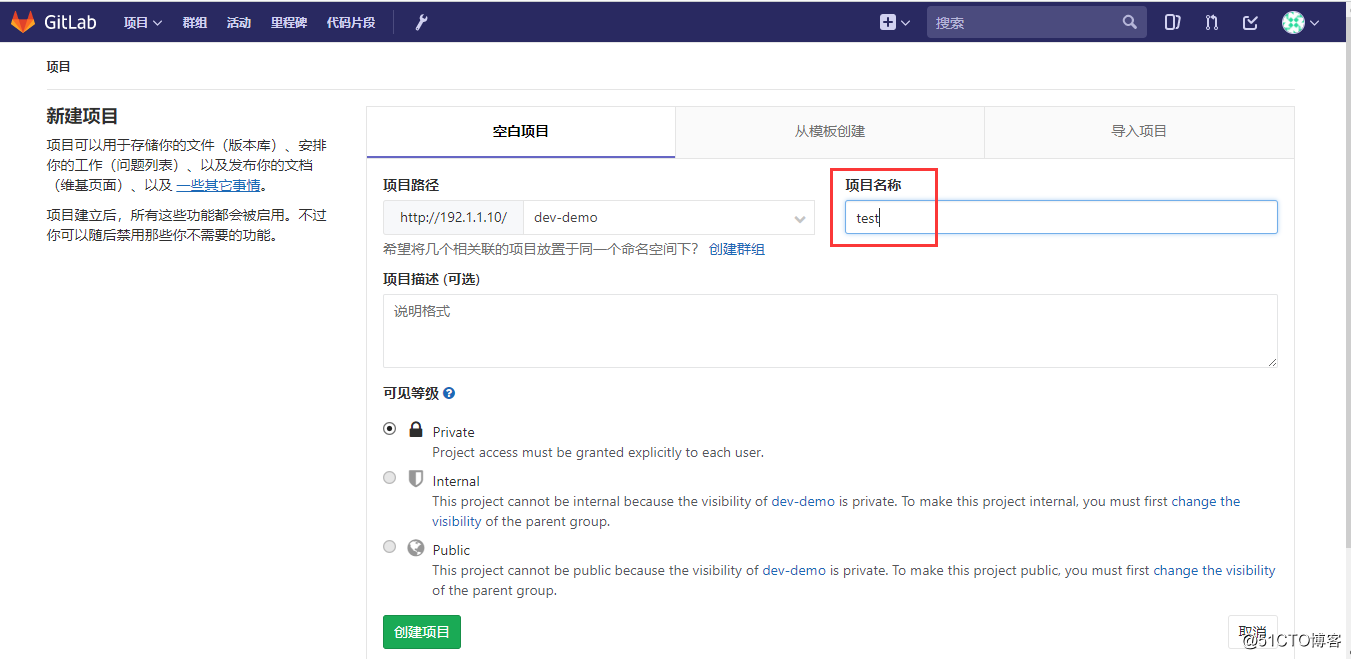
在项目里创建一个README文件,一会用于测试用
在项目创建成功后,界面有提示要建ssh-key,这里先建自述文件,后面再来建ssh-key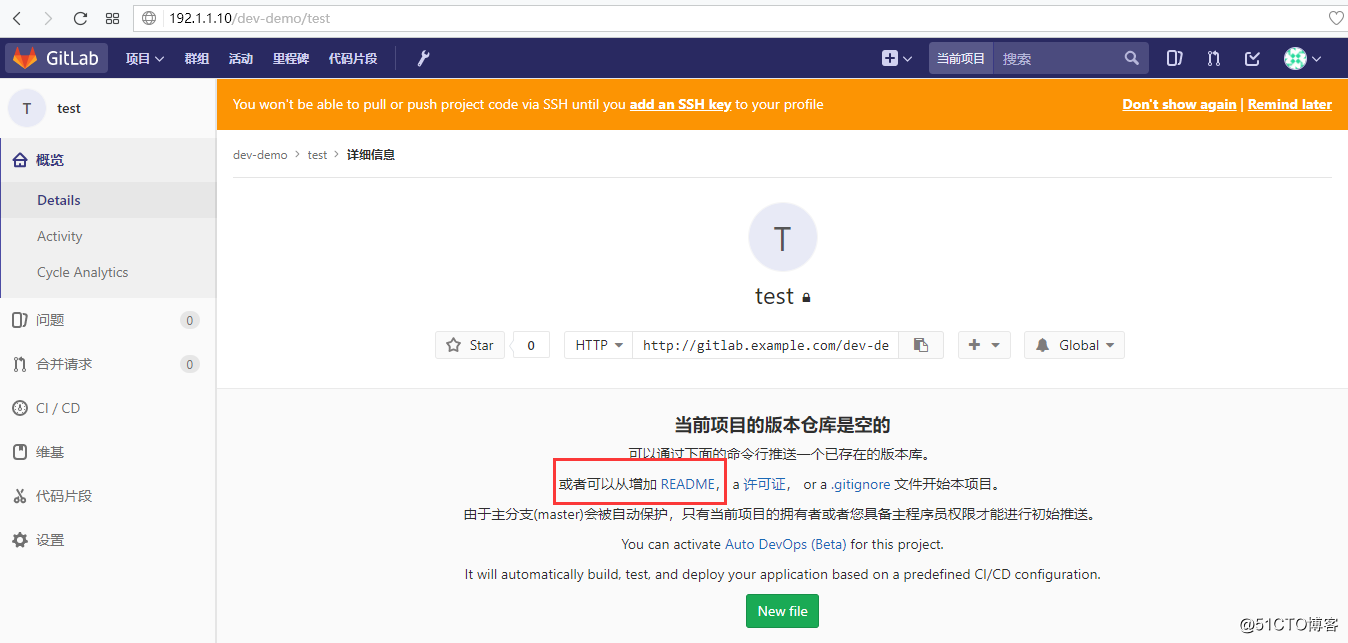
给README文件添加点内容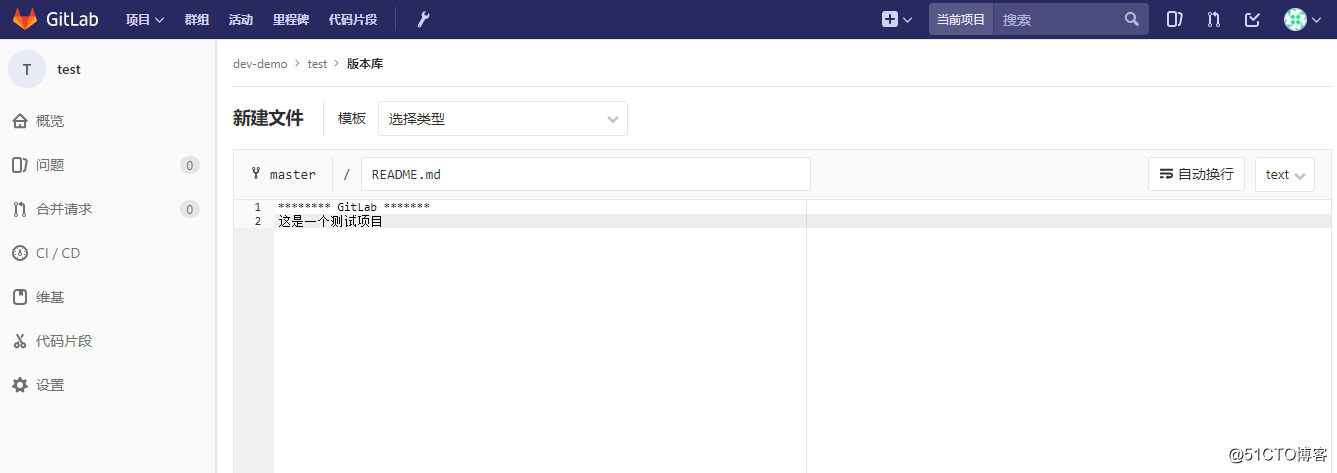
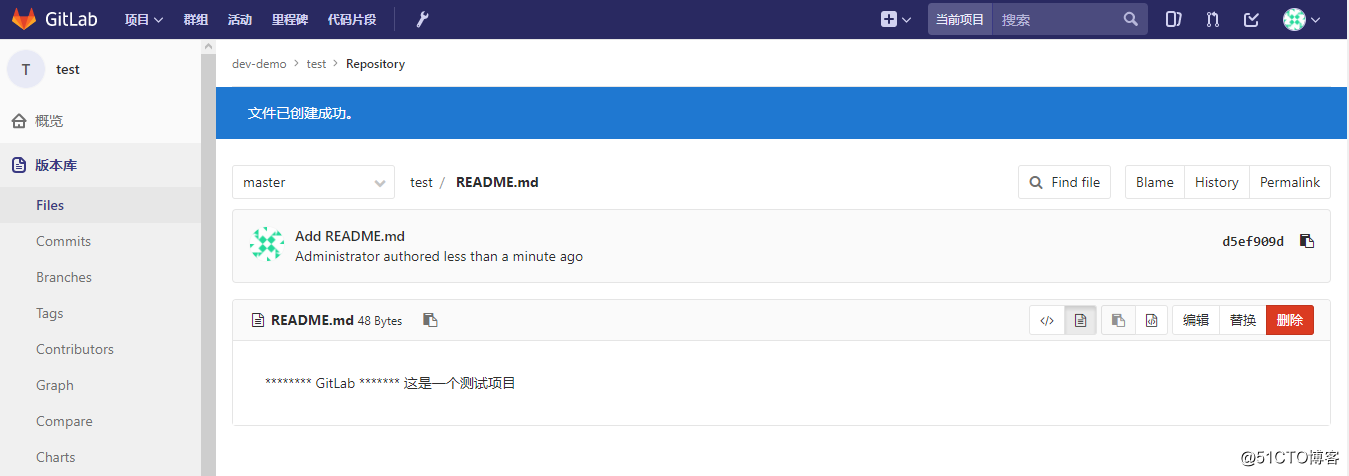
在工作区的Git服务器上创建key,再添加至Gitlab
在Git工作区机器上创建ssh-key,我这里用的是192.1.1.52机器来创建ssh-key,Gitlab是在192.1.1.10机器。
[root@agent02 ~]# ssh-keygen -t rsa -b 4096

Generating public/private rsa key pair.

Enter file in which to save the key (/root/.ssh/id_rsa):

/root/.ssh/id_rsa already exists.

Overwrite (y/n)? y

Enter passphrase (empty for no passphrase):

Enter same passphrase again:

Your identification has been saved in /root/.ssh/id_rsa.

Your public key has been saved in /root/.ssh/id_rsa.pub.

The key fingerprint is:

SHA256:/fqioPb2oKlcjiF8U+Pjw3FSNXcowo2y4qtT/TjV2TA root@agent02

The keys randomart image is:

+---[RSA 4096]----+

|      . o   .    |

|     . + = o .   |

|      o o + .    |

|   . . . E       |

|  . oo. S *      |

|.  oo+.o o o     |

|..oo+oX     .    |

| +.*+Oo+  ..     |

| .*o=++.o..o.    |

+----[SHA256]-----+

[root@agent02 ~]# cat .ssh/id_rsa.pub

ssh-rsa AAAAB3NzaC1yc2EAAAADAQABAAACAQCkgVRWoKTblJlloKNo8+YcBM3B8AA0X5QoyQGtjoNwz6L1iO2WEhVUqGqVK/ujG+i/NaOCkrVXlowc0a53mB3Wk1Bk+6INxtXmtPDqmSVHamCtuq86XGSIoGbE5j9cYaWasWs0kEx60BO5+/jqz9LWGeFJehDHQd0K32eHQpn836XCIhyXN7mWJ7XmUwYfyf6B9PjO0z/4hsM21qXuE3giQDrGDHCjqkWNoK7hwNwfQGaIo+kClgvgquq6I0d9XWb30C7/Xr+ZuXROHHSncteCJU8Chqk7uiOyUHcgMMrF5AhfEG8wyDQKOPDW3nPin3YvzSZg0jgIn3X9e1dIl4OZoyCIj1OW1gx/JZ0P9xBhjFCcWFjXSVqX34S05F7CiHdW/MIJgJBWc5qFjSTsaIVEUhwc3DzHhPcW1ZEbskqc6kBZyB5Ei3ZIvITPpa9tUV3BHPVFKPio6Leow5Vi0ne+b1Khm3KCKatGdkqRjbyZ6Me1J7+KQnAmT9FmCNo3V8IFs4PpFljDCNBxm93lbaiqAcFeAEhcm1M20BiGGmTJnVMrGGRlXcutnj9G5s0C4oOVL8ujFIS4wwcp6XWWNzkqOw1GiJp9GhFO1fXyg/vdiS+mgeMXjZNsKl4BAPZ+GYbiDOMSGdjXKVch5dmXfwDetbTl4+T/6COX5L0G6ijlVw== root@agent02
上面key已经创建好了,复制上面打印出来的密钥,放到Gitlab里面来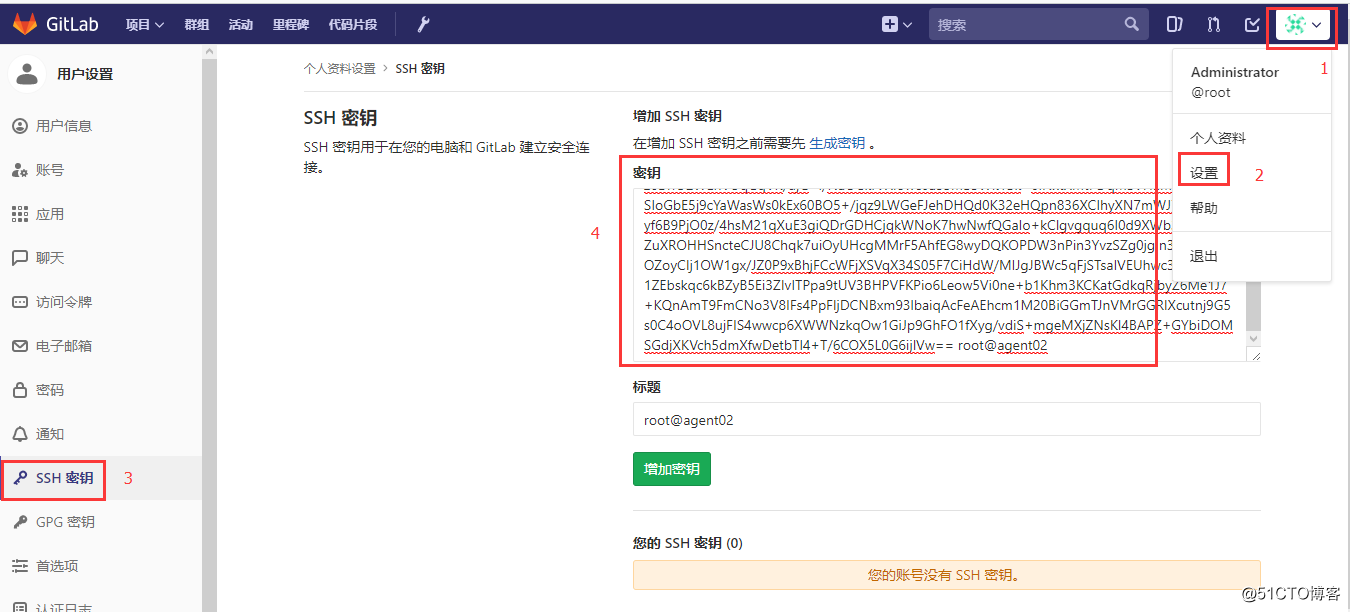
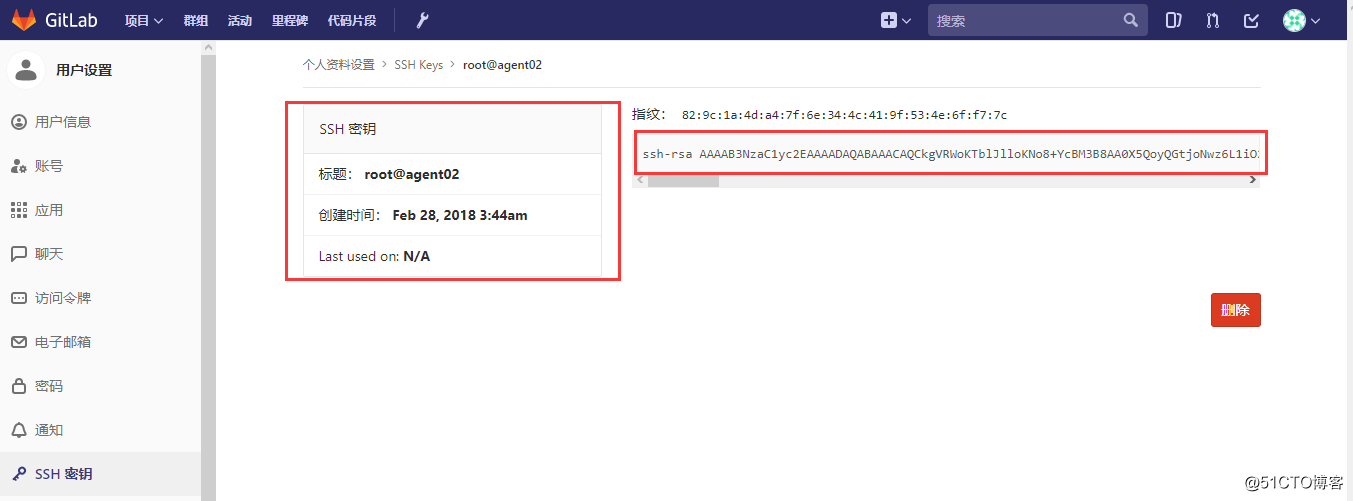
接着再回到刚才test项目里面,查看详情,这里有显示该项目的git链接地址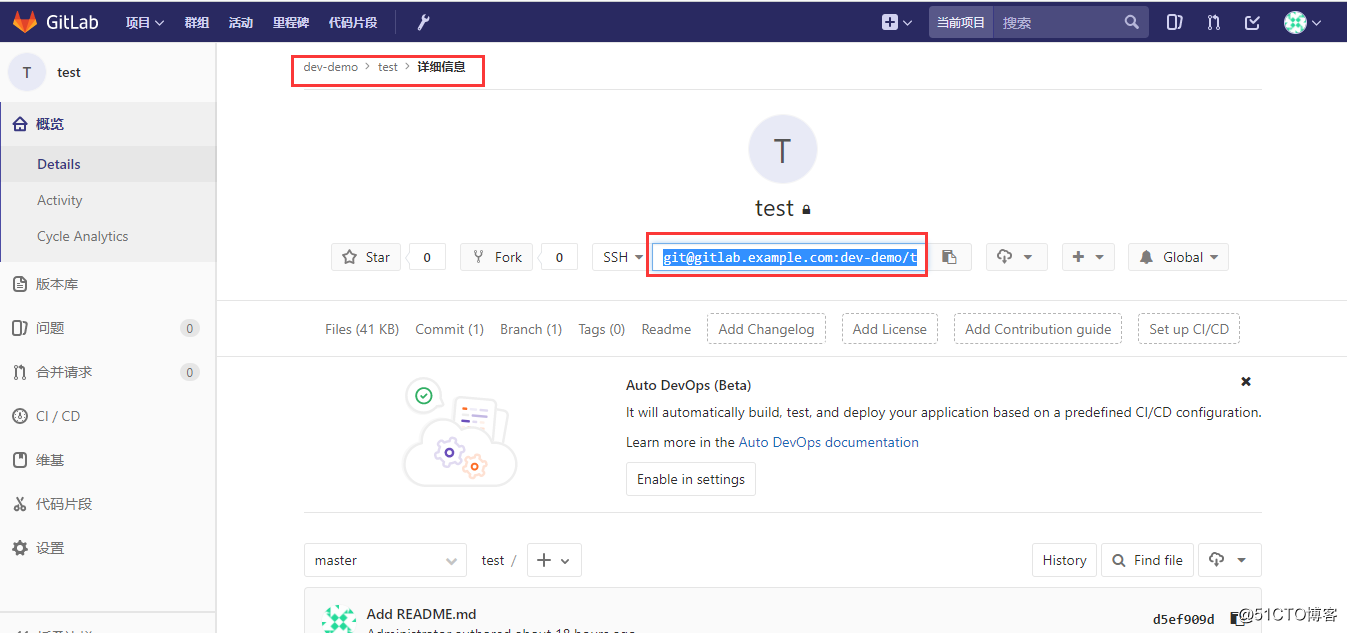
接下来,在192.1.1.52机器上,把Gitlab里面test项目克隆到本地来
[root@agent02 ]#  echo "192.1.1.10    gitlab.example.com" >> /etc/hosts         --注意一定要把Gitlab机器名和IP地址写进hosts记录里

[root@agent02 ]# mkdir /dev-demo

[root@agent02 ]# cd /dev-demo

[root@agent02 dev-demo]# git init

Reinitialized existing Git repository in /dev-demo/.git/

[root@agent02 dev-demo]# git clone git@gitlab.example.com:dev-demo/test.git

Cloning into 'test'...

The authenticity of host 'gitlab.example.com (192.1.1.10)' can't be established.

ECDSA key fingerprint is SHA256:885XnAhlZsdYbCLIzq1qh7cCt+yF9i/AtusSI7QmPcE.

ECDSA key fingerprint is MD5:e9:95:51:51:e4:ce:b9:5c:b1:d7:ce:2a:d8:7d:fe:ee.

Are you sure you want to continue connecting (yes/no)? yes

Warning: Permanently added 'gitlab.example.com,192.1.1.10' (ECDSA) to the list of known hosts.

remote: Counting objects: 3, done.

remote: Total 3 (delta 0), reused 0 (delta 0)

Receiving objects: 100% (3/3), done.

[root@agent02 dev-demo]# ls

test

[root@agent02 dev-demo]# cat test/README.md

******** GitLab *******

这是一个测试项目
在本地模拟开发过程,再和Gitlab同步
[root@agent02 dev-demo]# vi test/index.html

<h1> 我是GitLab私有服务器 </h1>

[root@agent02 dev-demo]# git config --global user.email "409216159@qq.com"

[root@agent02 dev-demo]# git config --global user.name "LX"

[root@agent02 dev-demo]#

[root@agent02 dev-demo]# git add ./*

[root@agent02 dev-demo]# git commit -m "代码提交index.html"

[master (root-commit) b348c78] 代码提交index.html

 1 file changed, 1 insertion(+)

 create mode 160000 test
代码提交完成后,我们再来到Gitlab里查看项目test里是否有刚提交的index.html文件和内容
[root@agent02 test]# vi aa.html

<h1> 测试代码 </h1>

[root@agent02 test]# git add ./*

[root@agent02 test]# git commit -m "提交代码"

[master be2c1f8] 提交代码

 2 files changed, 3 insertions(+)

 create mode 100644 index.html

[root@agent02 test]#

[root@agent02 test]# git push

warning: push.default is unset; its implicit value is changing in

Git 2.0 from 'matching' to 'simple'. To squelch this message

and maintain the current behavior after the default changes, use:

  git config --global push.default matching

To squelch this message and adopt the new behavior now, use:

  git config --global push.default simple

See 'git help config' and search for 'push.default' for further information.

(the 'simple' mode was introduced in Git 1.7.11. Use the similar mode

'current' instead of 'simple' if you sometimes use older versions of Git)

Counting objects: 5, done.

Compressing objects: 100% (2/2), done.

Writing objects: 100% (4/4), 389 bytes | 0 bytes/s, done.

Total 4 (delta 0), reused 0 (delta 0)

To git@gitlab.example.com:dev-demo/test.git

   d5ef909..be2c1f8  master -> master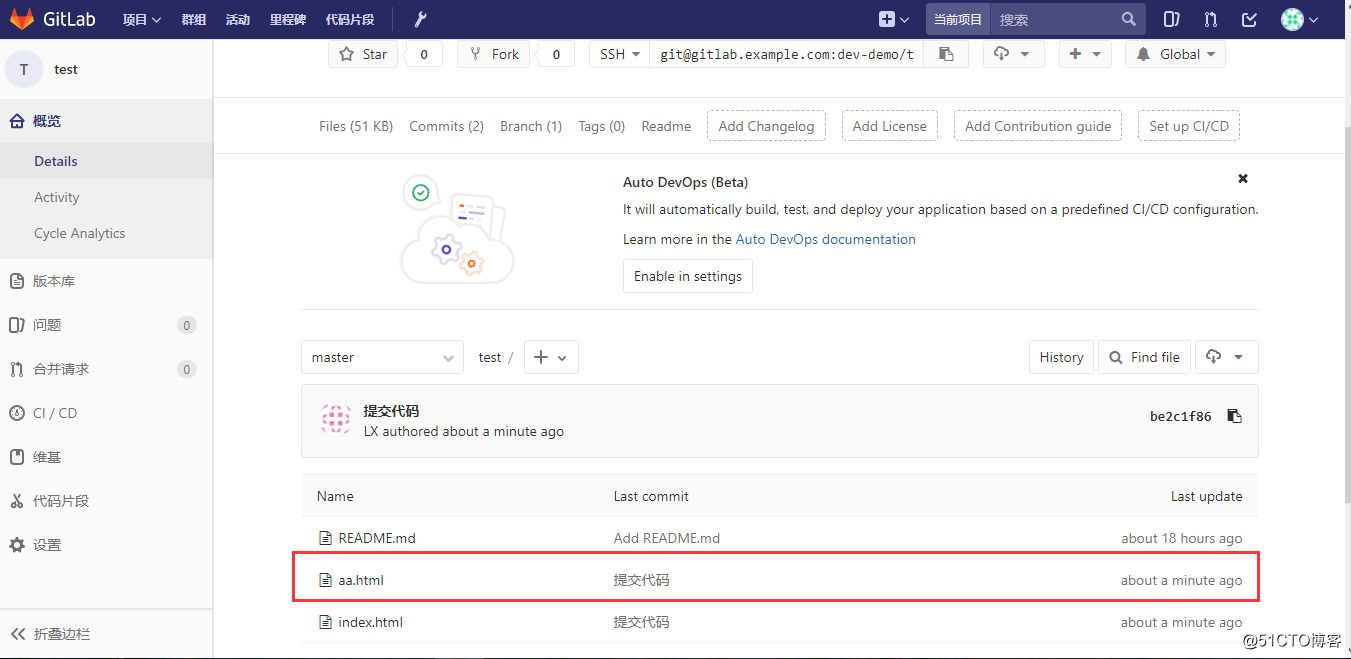
配置注册Gitlab时发邮件确认
配置在Gitlab注册用户时的邮件发送确认动作
[root@gitlab ~]# vi /etc/gitlab/gitlab.rb

    429  gitlab_rails['smtp_enable'] = true

    430  gitlab_rails['smtp_address'] = "smtp.qq.com"

    431  gitlab_rails['smtp_port'] = 465

    432  gitlab_rails['smtp_user_name'] = "409216159@qq.com"

    433  gitlab_rails['smtp_password'] = "QQ password"

    434  gitlab_rails['smtp_domain'] = "qq.com"

    435  gitlab_rails['smtp_authentication'] = "login"

    436  gitlab_rails['smtp_enable_starttls_auto'] = true

    437  gitlab_rails['smtp_tls'] = true

        438  gitlab_rails['gitlab_email_from'] = '409216159@qq.com'
配置完成后,需要重新生成gitlab参数
[root@gitlab ~]# gitlab-ctl reconfigure

[root@gitlab ~]# gitlab-ctl restart

[root@gitlab ~]# lsof -i:80

COMMAND   PID       USER   FD   TYPE DEVICE SIZE/OFF NODE NAME

nginx   40422       root    7u  IPv4 117999      0t0  TCP *:http (LISTEN)

nginx   40423 gitlab-www    7u  IPv4 117999      0t0  TCP *:http (LISTEN)

[root@gitlab ~]# lsof -i:8080

COMMAND   PID USER   FD   TYPE DEVICE SIZE/OFF NODE NAME

bundle  40358  git   18u  IPv4 119105      0t0  TCP localhost:webcache (LISTEN)

bundle  40650  git   18u  IPv4 119105      0t0  TCP localhost:webcache (LISTEN)

bundle  40652  git   18u  IPv4 119105      0t0  TCP localhost:webcache (LISTEN)
设置注册Gitlab用户时发送邮件确认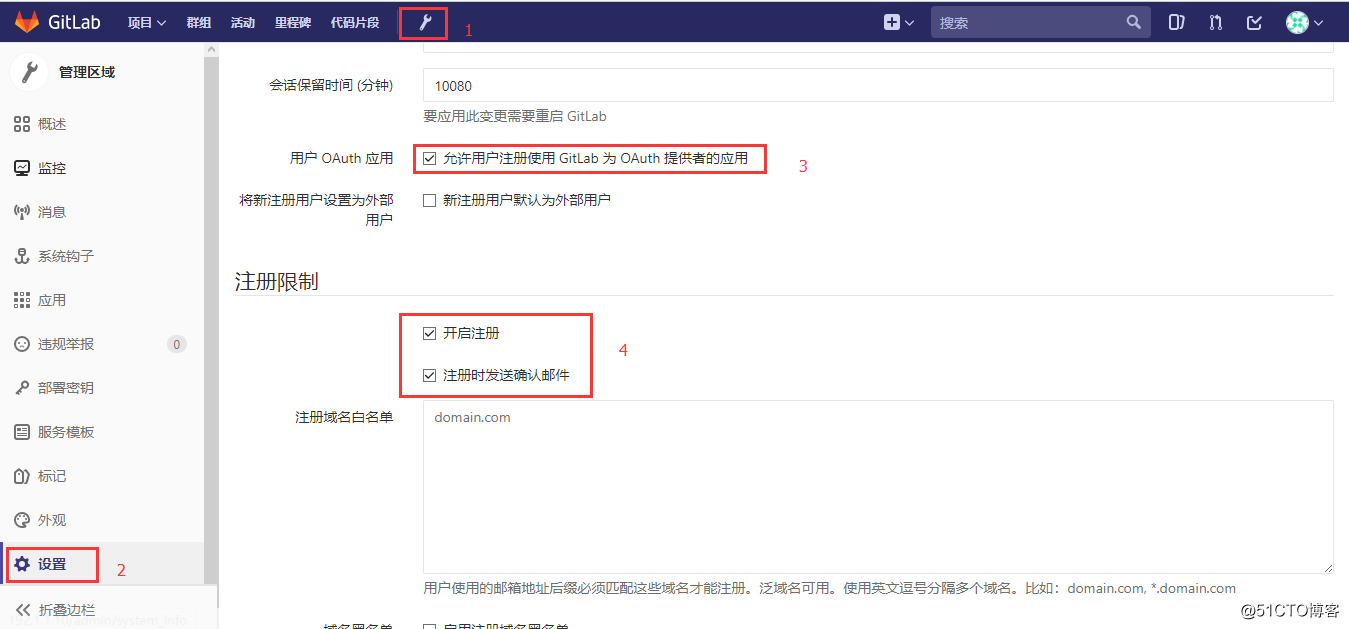
拉到最下面,点保存,再退出来,在登陆界面,注册一个新的帐号,会向你的注册时的邮箱发送一封确认的邮件
至此,GitLab私有服务器搭建完成。
GitLab 汉化的更多相关文章
- win10专业版Hyper-v下Docker挂载volume的方式使用Gitlab(汉化版)保存资料数据(使用外部redis)
目录 话题 (191) 笔记 (137) 资料区 (2) 评价 (33) 介绍 讨论区 话题 win10专业版Hyper-v下Docker挂载volume的方式使用Gitlab(汉化版)保存资料数据( ...
- gitlab汉化
是上一片,我已经介绍了,如何安装gitlab 这篇文章讲解一下如何安装使用汉化gitlab 如需要查看如何安装gitlab,请访问:https://www.cnblogs.com/ws17345067 ...
- Centos7中给gitLab汉化
第一步:安装git 下载补西,东西在清华大学开源中心 yum install –y git 第二步:下载 git clone https://gitlab.com/xhang/gitlab.git 第 ...
- 手把手教你gitlab汉化
详细教程如下: 一.在Github上 https://gitlab.com/xhang/gitlab/-/tags 下载对应的版本到服务器中 这种-zh结尾的才是汉化包,下载速度可能比较慢,有条件的可 ...
- ubuntu快速部署gitlab汉化容器
前言:gitlab的原理我就不扯了(看这个https://www.jianshu.com/p/567207ac51cd),下面直接上操作 1.前提: a.要有docker的运行环境,用service ...
- centos 7.2 安装gitlab汉化
####################你如果搜到我的这个博客,你的系统得是centos 7的 80端口没有占用. QQ:1394466404 这个博客维护1年 #### 多地方第一个是百度 ...
- Gitlab一键端的安装汉化及问题解决(2017/12/14目前版本为10.2.4)
Gitlab的安装汉化及问题解决 一.前言 Gitlab需要安装的包太TM多了,源码安装能愁死个人,一直出错,后来发现几行命令就装的真是遇到的新大陆一样... ... 装完之后感觉太简单,加了汉化补丁 ...
- centos 7 部署 汉化版 gitlab
=============================================== 2017/11/12_第6次修改 ccb_warlock 更 ...
- gitlab安装部署汉化
1.获取gitlab汉化包(要部署非汉化版,可以跳过这一块内容) 说明:gitlab中文社区版的项目,v7-v8.8是由Larry Li发起的“GitLab 中文社区版项目”(https://gitl ...
随机推荐
- vuejs实现瀑布流布局(一)
一直以来,习惯了jquery的DOM操作方式,突然间,开始学习使用vuejs,很多时候,操作DOM观念总是转换不过来,虽然也能实现各种效果,但是总有点不伦不类的. 就类似于最近在做的瀑布流布局,正常的 ...
- chattr和lsattr命令的使用(对于root用户也无法修改删除的操作问题)
1.chattr命令的用法:chattr [+-=] [ASacdistu] File/Directory 参数说明: +-= :分别为 [+ 增加] [- 减少] [= 设定] 属性的意思 A :当 ...
- CentOS7中替换安装python3.7.0
python3.7的安装包可从官网下载上传到主机,也可以用wget直接下载. [root@xxx ~]# cd /usr/local/src/[root@xxx src]# wget https:// ...
- grep与egrep的区别
grep与egrep的区别: 在linux系统环境下,我们通常使用grep命令来过滤出需要的行而egrep确很少使用,他们的区别其实很简单,grep默认不支持正则表达式,egrep默认支持正则表达式, ...
- LeetCode 6. ZigZag Conversion & 字符串
ZigZag Conversion 看了三遍题目才懂,都有点怀疑自己是不是够聪明... 就是排成这个样子啦,然后从左往右逐行读取返回. 这题看起来很简单,做起来,应该也很简单. 通过位置计算行数: P ...
- 非阻塞套接字编程, IO多路复用(epoll)
非阻塞套接字编程: server端 import socket server = socket.socket() server.setblocking(False) server.bind(('', ...
- [Unity算法]斜抛运动
斜抛运动: 1.物体以一定的初速度斜向射出去,物体所做的这类运动叫做斜抛运动. 2.斜抛运动看成是作水平方向的匀速直线运动和竖直方向的竖直上抛运动的合运动. 3.它的运动轨迹是抛物线. Oblique ...
- [UGUI]图文混排(五):添加下划线
0.下划线标签 标签格式:<material=underline c=#ffffff h=1 n=*** p=***>blablabla...</material> mater ...
- 安装JavaFX Scene Builder,并配置到Eclipse
转载自:https://www.yiibai.com/javafx/install-javafx-scene-builder-into-eclipse.html 1-JavaFX Scene Buil ...
- swfupload文件上传配置文件大小
在配置文件中加入: <system.web> <httpRuntime executionTimeout="36000" maxRequestLe ...