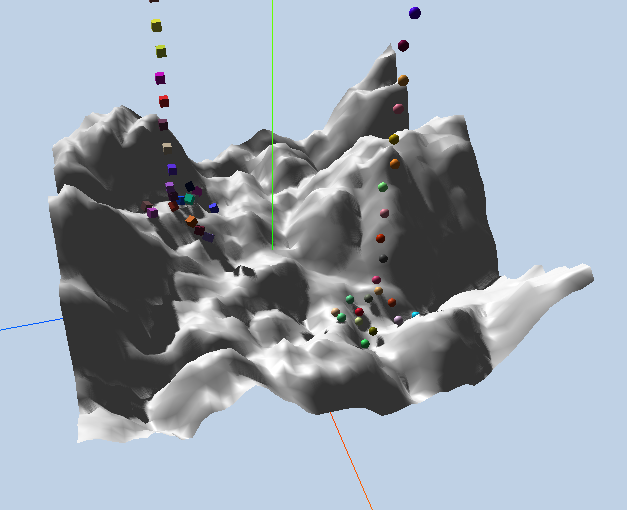
【three.js练习程序】创建简单物理地形
<!DOCTYPE html>

<html>

<head>

    <meta charset="utf-8">

    <title>ceshi</title>

    <style>

        body

        {

            margin: 0;

            overflow: hidden;

        }

    </style>

    <script src="./build/three.js"></script>

    <script src="./examples/js/libs/ammo.js"></script>

    <script src="./examples/js/controls/OrbitControls.js"></script>

    <script src="./examples/js/ImprovedNoise.js"></script>

</head>

<body>

    <div id="ThreeJs">

    </div>

    <script>

        var camera, controls, scene, renderer;

        var clock = new THREE.Clock();

        // 物理引擎相关变量

        var gravityConstant = -9.8;

        var collisionConfiguration;

        var dispatcher;

        var broadphase;

        var solver;

        var physicsWorld;

        var rigidBodies = [];

        var margin = 0.05;

        var transformAux1 = new Ammo.btTransform();

        var time = 0;

        // 高度场相关

        var terrainWidthExtents = 50;

        var terrainDepthExtents = 50;

        var terrainWidth = 50;

        var terrainDepth = 50;

        var terrainHalfWidth = terrainWidth / 2;

        var terrainHalfDepth = terrainDepth / 2;

        var terrainMaxHeight = 50;

        var terrainMinHeight = -20;

        var heightData = null;

        var ammoHeightData = null;

        init();

        animate();

        function init() {

            heightData = generateHeight(terrainWidth, terrainDepth);

            initGraphics();

            initPhysics();

            createObjects();

        }

        function initGraphics() {

            // three.js基本场景配置

            camera = new THREE.PerspectiveCamera(60, window.innerWidth / window.innerHeight, 0.1, 2000);

            camera.position.x = 50;

            camera.position.y = 50;

            camera.position.z = 50;

            controls = new THREE.OrbitControls(camera);

            controls.target.y = 2;

            renderer = new THREE.WebGLRenderer();

            renderer.setClearColor(new THREE.Color("#bfd1e5"));

            renderer.shadowMapEnabled = true;

            renderer.setSize(window.innerWidth, window.innerHeight);

            // 场景

            scene = new THREE.Scene();

            // 环境光

            var ambientLight = new THREE.AmbientLight(0x404040);

            scene.add(ambientLight);

            // 线性光

            var light = new THREE.DirectionalLight(0xffffff, 1);

            light.position.set(-20, 20, 10);

            light.castShadow = true;

            var d = 50;

            light.shadow.camera.left = -d;

            light.shadow.camera.right = d;

            light.shadow.camera.top = d;

            light.shadow.camera.bottom = -d;

            light.shadow.camera.near = 2;

            light.shadow.camera.far = 50;

            light.shadow.mapSize.x = 1024;

            light.shadow.mapSize.y = 1024;

            scene.add(light);

            var axes = new THREE.AxisHelper(50);               //创建三轴表示

            scene.add(axes);

            // 添加窗口大小变化监听

            window.addEventListener('resize', onWindowResize, false);

        }

        function onWindowResize() {

            camera.aspect = window.innerWidth / window.innerHeight;

            camera.updateProjectionMatrix();

            renderer.setSize(window.innerWidth, window.innerHeight);

        }

        function initPhysics() {

            // bullet基本场景配置

            collisionConfiguration = new Ammo.btDefaultCollisionConfiguration();

            dispatcher = new Ammo.btCollisionDispatcher(collisionConfiguration);

            broadphase = new Ammo.btDbvtBroadphase();

            solver = new Ammo.btSequentialImpulseConstraintSolver();

            physicsWorld = new Ammo.btDiscreteDynamicsWorld(dispatcher, broadphase, solver, collisionConfiguration);

            physicsWorld.setGravity(new Ammo.btVector3(0, gravityConstant, 0));

        }

        function createObjects() {

            var pos = new THREE.Vector3();

            var quat = new THREE.Quaternion();

            //创建物理地形

            var geometry = new THREE.PlaneBufferGeometry(50, 50, terrainWidth - 1, terrainDepth - 1);

            geometry.rotateX(-Math.PI / 2);

            var vertices = geometry.attributes.position.array;

            for (var i = 0, j = 0, l = vertices.length; i < l; i++, j += 3) {

                // j + 1 because it is the y component that we modify

                vertices[j + 1] = heightData[i];

            }

            geometry.computeVertexNormals();

            var groundMaterial = new THREE.MeshPhongMaterial({ color: 0xC7C7C7 });

            terrainMesh = new THREE.Mesh(geometry, groundMaterial);

            terrainMesh.receiveShadow = true;

            terrainMesh.castShadow = true;

            scene.add(terrainMesh);

            var groundShape = createTerrainShape(heightData);

            var groundTransform = new Ammo.btTransform();

            groundTransform.setIdentity();

            // 设置bullet计算时物体中心

            groundTransform.setOrigin(new Ammo.btVector3(0, (terrainMaxHeight + terrainMinHeight) / 2, 0));

            var groundMass = 0;

            var groundLocalInertia = new Ammo.btVector3(0, 0, 0);

            var groundMotionState = new Ammo.btDefaultMotionState(groundTransform);

            var groundBody = new Ammo.btRigidBody(new Ammo.btRigidBodyConstructionInfo(groundMass, groundMotionState, groundShape, groundLocalInertia));

            physicsWorld.addRigidBody(groundBody);

            //创建50个小球

            for (var i = 0; i < 50; i++) {

                var ballMass = 1.2;

                var ballRadius = 0.5;

                var ball = new THREE.Mesh(new THREE.SphereGeometry(ballRadius, 20, 20), createRendomColorObjectMeatrial());

                ball.castShadow = true;

                ball.receiveShadow = true;

                var ballShape = new Ammo.btSphereShape(ballRadius);

                ballShape.setMargin(margin);

                pos.set(Math.random() + 10, 3 * (i + 1) + 20, Math.random() - 10);

                quat.set(0, 0, 0, 1);

                createRigidBody(ball, ballShape, ballMass, pos, quat);

                ball.userData.physicsBody.setFriction(1.5);

            }

            //创建50个方块

            for (var i = 0; i < 50; i++) {

                pos.set(Math.random() - 10, 3 * (i + 1) + 20, Math.random() + 10);

                quat.set(0, 0, 0, 1);

                createParallellepiped(1, 1, 1, 1, pos, quat, createRendomColorObjectMeatrial());

            }

        }

        function createRendomColorObjectMeatrial() {

            var color = Math.floor(Math.random() * (1 << 24));

            return new THREE.MeshPhongMaterial({ color: color });

        }

        function createParallellepiped(sx, sy, sz, mass, pos, quat, material) {

            var threeObject = new THREE.Mesh(new THREE.BoxGeometry(sx, sy, sz, 1, 1, 1), material);

            threeObject.castShadow = true;

            threeObject.receiveShadow = true;

            var shape = new Ammo.btBoxShape(new Ammo.btVector3(sx * 0.5, sy * 0.5, sz * 0.5));

            shape.setMargin(margin);

            createRigidBody(threeObject, shape, mass, pos, quat);

            return threeObject;

        }

        function createRigidBody(threeObject, physicsShape, mass, pos, quat) {

            threeObject.position.copy(pos);

            threeObject.quaternion.copy(quat);

            var transform = new Ammo.btTransform();

            transform.setIdentity();

            transform.setOrigin(new Ammo.btVector3(pos.x, pos.y, pos.z));

            transform.setRotation(new Ammo.btQuaternion(quat.x, quat.y, quat.z, quat.w));

            var motionState = new Ammo.btDefaultMotionState(transform);

            var localInertia = new Ammo.btVector3(0, 0, 0);

            physicsShape.calculateLocalInertia(mass, localInertia);

            var rbInfo = new Ammo.btRigidBodyConstructionInfo(mass, motionState, physicsShape, localInertia);

            var body = new Ammo.btRigidBody(rbInfo);

            threeObject.userData.physicsBody = body;

            scene.add(threeObject);

            if (mass > 0) {

                rigidBodies.push(threeObject);

                body.setActivationState(4);

            }

            physicsWorld.addRigidBody(body);

            return body;

        }

        function animate() {

            requestAnimationFrame(animate);

            var deltaTime = clock.getDelta();

            updatePhysics(deltaTime);

            controls.update(deltaTime);

            renderer.render(scene, camera);

            time += deltaTime;

        }

        function updatePhysics(deltaTime) {

            physicsWorld.stepSimulation(deltaTime);

            // 更新物体位置

            for (var i = 0, iL = rigidBodies.length; i < iL; i++) {

                var objThree = rigidBodies[i];

                var objPhys = objThree.userData.physicsBody;

                var ms = objPhys.getMotionState();

                if (ms) {

                    ms.getWorldTransform(transformAux1);

                    var p = transformAux1.getOrigin();

                    var q = transformAux1.getRotation();

                    objThree.position.set(p.x(), p.y(), p.z());

                    objThree.quaternion.set(q.x(), q.y(), q.z(), q.w());

                }

            }

        }

        function generateHeight(width, height) {

            var size = width * height, data = new Float32Array(size),

                perlin = new ImprovedNoise(), quality = 1, z = Math.random() * 10;

            for (var j = 0; j < 4; j++) {

                for (var i = 0; i < size; i++) {

                    var x = i % width, y = ~ ~(i / width);

                    data[i] += Math.abs(perlin.noise(x / quality, y / quality, z) * quality);

                }

                quality *= 3;

            }

            return data;

        }

        // 生成物理引擎用高度场

        function createTerrainShape(heightData) {

            // This parameter is not really used, since we are using PHY_FLOAT height data type and hence it is ignored

            var heightScale = 1;

            // Up axis = 0 for X, 1 for Y, 2 for Z. Normally 1 = Y is used.

            var upAxis = 1;

            // hdt, height data type. "PHY_FLOAT" is used. Possible values are "PHY_FLOAT", "PHY_UCHAR", "PHY_SHORT"

            var hdt = "PHY_FLOAT";

            // Set this to your needs (inverts the triangles)

            var flipQuadEdges = false;

            // Creates height data buffer in Ammo heap

            ammoHeightData = Ammo._malloc(4 * terrainWidth * terrainDepth);

            // Copy the javascript height data array to the Ammo one.

            var p = 0;

            var p2 = 0;

            for (var j = 0; j < terrainDepth; j++) {

                for (var i = 0; i < terrainWidth; i++) {

                    // write 32-bit float data to memory

                    Ammo.HEAPF32[ammoHeightData + p2 >> 2] = heightData[p];

                    p++;

                    // 4 bytes/float

                    p2 += 4;

                }

            }

            // Creates the heightfield physics shape

            var heightFieldShape = new Ammo.btHeightfieldTerrainShape(

                terrainWidth,

                terrainDepth,

                ammoHeightData,

                heightScale,

                terrainMinHeight,

                terrainMaxHeight,

                upAxis,

                hdt,

                flipQuadEdges

        );

            // Set horizontal scale

            var scaleX = terrainWidthExtents / (terrainWidth - 1);

            var scaleZ = terrainDepthExtents / (terrainDepth - 1);

            heightFieldShape.setLocalScaling(new Ammo.btVector3(scaleX, 1, scaleZ));

            heightFieldShape.setMargin(0.05);

            return heightFieldShape;

        }

        document.getElementById("ThreeJs").appendChild(renderer.domElement);

    </script>

</html>
【three.js练习程序】创建简单物理地形的更多相关文章
- 【three.js练习程序】创建简单物理场景
<!DOCTYPE html> <html> <head> <meta charset="utf-8"> <title> ...
- unity3d教程动态创建简单平面地形
unity3d创建地形是不须要usingUnityEditor的.这里使用了AssetDatabase.所以需using UnityEditor; 创建三步: 1.TerrainData terrai ...
- 基于Babylon.js编写宇宙飞船模拟程序1——程序基础结构、物理引擎使用、三维罗盘
计划做一个宇宙飞船模拟程序,首先做一些技术准备. 可以访问https://ljzc002.github.io/test/Spacetest/HTML/PAGE/spacetestwp2.html查看测 ...
- node.js学习(三)简单的node程序&&模块简单使用&&commonJS规范&&深入理解模块原理
一.一个简单的node程序 1.新建一个txt文件 2.修改后缀 修改之后会弹出这个,点击"是" 3.运行test.js 源文件 使用node.js运行之后的. 如果该路径下没有该 ...
- 使用Visual Studio 2010 创建简单的Silverlight应用程序
使用Visual Studio 2010 创建简单的Silverlight应用程序 Silverlight是创建动态的引人的RIAs(Rich Internet Application)的新方法.这里 ...
- 在 Web 应用中创建 Node.js 应用程序
本分步指南将通过 Azure Web 应用帮助您启动并运行示例 Node.JS 应用程序.除 Node.JS 外,Azure Web 应用还支持其他语言,如 PHP..NET.Node.JS.Pyth ...
- 用chrome的snippets片段功能创建页面js外挂程序,从控制台创建js小脚本
用chrome的snippets片段功能创建页面js外挂程序,从控制台创建js小脚本 Chrome的snippets是小脚本,还可以创作并在Chrome DevTools的来源面板中执行.可以访问和从 ...
- 用简单的 Node.js 后台程序浅析 HTTP 请求与响应
用简单的 Node.js 后台程序浅析 HTTP 请求与响应 本文写于 2020 年 1 月 18 日 我们来看两种方式发送 HTTP 请求,一种呢,是命令行的 curl 命令:一种呢是直接在浏览器的 ...
- Socket创建简单服务器和客户端程序
使用Socket编程创建简单服务器和客户端 要知道的 Socket-AddressFamily, SocketType, ProtocolType https://blog.csdn.net/weix ...
随机推荐
- Spring Security OAuth2实现单点登录
1.概述 在本教程中,我们将讨论如何使用 Spring Security OAuth 和 Spring Boot 实现 SSO(单点登录). 本示例将使用到三个独立应用 一个授权服务器(中央认证机制) ...
- 作用域中LHS查询和RHS查询
LHS查询:赋值操作左侧的查询,LHS查询试图找到变量的容器本身,,从而对其赋值. RHS查询:赋值操作右侧的查询,可以理解为"取到某某的值" 举例: function foo(a ...
- 【IT笔试面试题整理】链表
如何准备 Linked list questions are extremely common These can range from simple (delete a node ina linke ...
- LVS专题-(3) 虚拟ip理解
1.虚拟IP是什么? 要是单讲解虚拟 IP,理解起来很困难,所以干脆把 动态 IP .固定 IP .实体 IP 与虚拟 IP都讲解一下,加深理解和知识扩展 实体 IP:在网络的世界里,为了要辨识每一部 ...
- gradle 转 maven
1. 预备 1.1. java 环境 验证 java -version 1.2. gradle 安装, 参考, 这里列举下windows下的安装 b.1 下载包:https://gradle.org/ ...
- elasticSearch6源码分析(8)RepositoriesModule模块
1.RepositoriesModule概述 Sets up classes for Snapshot/Restore 1.1 snapshot概述 A snapshot is a backup ta ...
- nodejs项目总结
前几天花了3天时间,搭建.开发了一个包含客户端.cms.server端的项目,也因着以前有php的开发经验,以及sql的设计和应用能力,倒也没遇到什么阻碍.至于项目结构搭建(架构),也是共通的,以模块 ...
- map映照容器(常用的使用方法总结)
map映照容器的数据元素是由一个键值和一个映照数据组成的,键值和映照数据之间具有一一对应的关系.map与set集合容器一样,不允许插入的元素的键值重复. /*关于C++STL中map映照容器的学习,看 ...
- Quartz2D截屏
#import "ViewController.h" @interface ViewController () @end @implementation ViewControlle ...
- [转]Centos系统中查看文件和文件夹大小
本文转自:https://blog.csdn.net/zgmu/article/details/52882868 当磁盘大小超过标准时会有报警提示,这时如果掌握df和du命令是非常明智的选择.df可以 ...