
nginx openssl升级支持http2
阿里云openssl升级,实现nginx主动推送
nginx主动推送能够有效减少不必要的报文传输,减少用户请求次数,以达到更快访问速度
现有版本检查
[root@node3 ~]# openssl version     #这个版本是无法支持http2.0主动推送功能.需要升级为2019版本.

OpenSSL 1.0.2k-fips  26 Jan 2017
安装一个nginx
如果当前版本不支持http2.0 那么请升级nginx版本,升级办法本博客有.
 #安装一个nginx 也可以自定义安装.  yum安装的nginx默认路径: /etc/nginx

 yum install -y nginx

 yum install -y pcre pcre-devel openssl openssl-devel gd-devel  zlib-devel

 #检查编译参数 , 我们需要后面重新编译来添加 openssl

 [root@node3 ~]# nginx -V

nginx version: nginx/1.16.1

built by gcc 4.8.5 20150623 (Red Hat 4.8.5-39) (GCC)

built with OpenSSL 1.0.2k-fips  26 Jan 2017

TLS SNI support enabled

configure arguments: --prefix=/usr/share/nginx --sbin-path=/usr/sbin/nginx --modules-path=/usr/lib64/nginx/modules --conf-path=/etc/nginx/nginx.conf --error-log-path=/var/log/nginx/error.log --http-log-path=/var/log/nginx/access.log --http-client-body-temp-path=/var/lib/nginx/tmp/client_body --http-proxy-temp-path=/var/lib/nginx/tmp/proxy --http-fastcgi-temp-path=/var/lib/nginx/tmp/fastcgi --http-uwsgi-temp-path=/var/lib/nginx/tmp/uwsgi --http-scgi-temp-path=/var/lib/nginx/tmp/scgi --pid-path=/run/nginx.pid --lock-path=/run/lock/subsys/nginx --user=nginx --group=nginx --with-file-aio --with-ipv6 --with-http_ssl_module --with-http_v2_module --with-http_realip_module --with-stream_ssl_preread_module --with-http_addition_module --with-http_xslt_module=dynamic --with-http_image_filter_module=dynamic --with-http_sub_module --with-http_dav_module --with-http_flv_module --with-http_mp4_module --with-http_gunzip_module --with-http_gzip_static_module --with-http_random_index_module --with-http_secure_link_module --with-http_degradation_module --with-http_slice_module --with-http_stub_status_module --with-http_perl_module=dynamic --with-http_auth_request_module --with-mail=dynamic --with-mail_ssl_module --with-pcre --with-pcre-jit --with-stream=dynamic --with-stream_ssl_module --with-google_perftools_module --with-debug --with-cc-opt='-O2 -g -pipe -Wall -Wp,-D_FORTIFY_SOURCE=2 -fexceptions -fstack-protector-strong --param=ssp-buffer-size=4 -grecord-gcc-switches -specs=/usr/lib/rpm/redhat/redhat-hardened-cc1 -m64 -mtune=generic' --with-ld-opt='-Wl,-z,relro -specs=/usr/lib/rpm/redhat/redhat-hardened-ld -Wl,-E'
升级现有openssl
升级前版本:

[root@node3 openssl-1.1.1d]# openssl version -a

OpenSSL 1.0.2k-fips  26 Jan 2017

built on: reproducible build, date unspecified

platform: linux-x86_64

options:  bn(64,64) md2(int) rc4(16x,int) des(idx,cisc,16,int) idea(int) blowfish(idx)

compiler: gcc -I. -I.. -I../include  -fPIC -DOPENSSL_PIC -DZLIB -DOPENSSL_THREADS -D_REENTRANT -DDSO_DLFCN -DHAVE_DLFCN_H -DKRB5_MIT -m64 -DL_ENDIAN -Wall -O2 -g -pipe -Wall -Wp,-D_FORTIFY_SOURCE=2 -fexceptions -fstack-protector-strong --param=ssp-buffer-size=4 -grecord-gcc-switches   -m64 -mtune=generic -Wa,--noexecstack -DPURIFY -DOPENSSL_IA32_SSE2 -DOPENSSL_BN_ASM_MONT -DOPENSSL_BN_ASM_MONT5 -DOPENSSL_BN_ASM_GF2m -DRC4_ASM -DSHA1_ASM -DSHA256_ASM -DSHA512_ASM -DMD5_ASM -DAES_ASM -DVPAES_ASM -DBSAES_ASM -DWHIRLPOOL_ASM -DGHASH_ASM -DECP_NISTZ256_ASM

OPENSSLDIR: "/etc/pki/tls"

engines:  rdrand dynamic

[root@node3 ~]# mkdir /server/tools -p

[root@node3 ~]# cd /server/tools/

[root@node3 tools]# wget https://www.openssl.org/source/openssl-1.1.1d.tar.gz

[root@node3 tools]# tar -xf openssl-1.1.1d.tar.gz

[root@node3 tools]# cd openssl-1.1.1d/

[root@node3 openssl-1.1.1d]# ./config --shared zlib    #配置

输出:

Operating system: x86_64-whatever-linux2

Configuring OpenSSL version 1.1.1d (0x1010104fL) for linux-x86_64

Using os-specific seed configuration

Creating configdata.pm

Creating Makefile

**********************************************************************

***                                                                ***

***   OpenSSL has been successfully configured                     ***

***                                                                ***

***   If you encounter a problem while building, please open an    ***

***   issue on GitHub <https://github.com/openssl/openssl/issues>  ***

***   and include the output from the following command:           ***

***                                                                ***

***       perl configdata.pm --dump                                ***

***                                                                ***

***   (If you are new to OpenSSL, you might want to consult the    ***

***   'Troubleshooting' section in the INSTALL file first)         ***

***                                                                ***

**********************************************************************

然后输入  make  进行预编译

make

make install
编译出错信息和解决办法:
compilation terminated.

make[1]: *** [crypto/comp/c_zlib.o] Error 1

make[1]: Leaving directory `/server/tools/openssl-1.1.1d'

make: *** [all] Error 2

缺少openssl开发依赖包:

yum install openssl-devel -y

安装完成后再次进行 make预编译
出现以下信息,则安装成功.:
${LDCMD:-gcc} -pthread -m64 -Wa,--noexecstack -Wall -O3 -L.   \

	-o test/x509aux test/x509aux.o \

	 test/libtestutil.a -lcrypto -lz -ldl -pthread

/usr/bin/perl "-I." -Mconfigdata "util/dofile.pl" \

    "-oMakefile" apps/CA.pl.in > "apps/CA.pl"

chmod a+x apps/CA.pl

/usr/bin/perl "-I." -Mconfigdata "util/dofile.pl" \

    "-oMakefile" apps/tsget.in > "apps/tsget.pl"

chmod a+x apps/tsget.pl

/usr/bin/perl "-I." -Mconfigdata "util/dofile.pl" \

    "-oMakefile" tools/c_rehash.in > "tools/c_rehash"

chmod a+x tools/c_rehash

/usr/bin/perl "-I." -Mconfigdata "util/dofile.pl" \

    "-oMakefile" util/shlib_wrap.sh.in > "util/shlib_wrap.sh"

chmod a+x util/shlib_wrap.sh

make[1]: Leaving directory `/server/tools/openssl-1.1.1d'

#判断编译过程是否有报错,0 为正常.

[root@node3 openssl-1.1.1d]# echo $?

0

# 没有问题 继续 make install
创建新的openssl软连接:
mv /usr/bin/openssl /usr/bin/openssl.old

mv /usr/include/openssl /usr/include/openssl.old

ln -s /usr/local/bin/openssl /usr/bin/openssl

ln -s /usr/local/include/openssl/ /usr/include/openssl

ln -s /usr/local/lib64/libssl.so.1.1 /usr/lib64/libssl.so.1.1

ln -s /usr/local/lib64/libcrypto.so.1.1 /usr/lib64/libcrypto.so.1.1
检查版本
[root@node3 openssl-1.1.1d]# openssl version -a

OpenSSL 1.1.1d  10 Sep 2019

built on: Mon Oct 21 13:07:14 2019 UTC

platform: linux-x86_64

options:  bn(64,64) rc4(16x,int) des(int) idea(int) blowfish(ptr)

compiler: gcc -fPIC -pthread -m64 -Wa,--noexecstack -Wall -O3 -DOPENSSL_USE_NODELETE -DL_ENDIAN -DOPENSSL_PIC -DOPENSSL_CPUID_OBJ -DOPENSSL_IA32_SSE2 -DOPENSSL_BN_ASM_MONT -DOPENSSL_BN_ASM_MONT5 -DOPENSSL_BN_ASM_GF2m -DSHA1_ASM -DSHA256_ASM -DSHA512_ASM -DKECCAK1600_ASM -DRC4_ASM -DMD5_ASM -DVPAES_ASM -DGHASH_ASM -DECP_NISTZ256_ASM -DX25519_ASM -DPOLY1305_ASM -DZLIB -DNDEBUG

OPENSSLDIR: "/usr/local/ssl"

ENGINESDIR: "/usr/local/lib64/engines-1.1"

Seeding source: os-specific
如果在make的时候出现出错误:
找到文件: vim auto/lib/openssl/conf
修改 大约39-43行:

CORE_INCS="$CORE_INCS $OPENSSL/.openssl/include"

CORE_DEPS="$CORE_DEPS $OPENSSL/.openssl/include/openssl/ssl.h"

CORE_LIBS="$CORE_LIBS $OPENSSL/.openssl/lib/libssl.a"

CORE_LIBS="$CORE_LIBS $OPENSSL/.openssl/lib/libcrypto.a"

CORE_LIBS="$CORE_LIBS $NGX_LIBDL"

改为:

CORE_INCS="$CORE_INCS $OPENSSL/.openssl/include"

CORE_DEPS="$CORE_DEPS $OPENSSL/include/openssl/ssl.h"

CORE_LIBS="$CORE_LIBS $OPENSSL/lib/libssl.a"

CORE_LIBS="$CORE_LIBS $OPENSSL/lib/libcrypto.a"

CORE_LIBS="$CORE_LIBS $NGX_LIBDL"
到这里openssl版本升级完成
openssl添加到nginx
1. yum安装一个nginx, 检查nginx openssl版本

2. 将新版本openssl加入到nginx中
现有nginx版本检查
[root@node3 openssl-1.1.1d]# nginx -V

nginx version: nginx/1.16.1

built by gcc 4.8.5 20150623 (Red Hat 4.8.5-39) (GCC)

built with OpenSSL 1.0.2k-fips  26 Jan 2017       #-----#nginx版本还没升级

TLS SNI support enabled

configure arguments: --prefix=/usr/share/nginx --sbin-path=/usr/sbin/nginx --modules-path=/usr/lib64/nginx/modules --conf-path=/etc/nginx/nginx.conf --error-log-path=/var/log/nginx/error.log --http-log-path=/var/log/nginx/access.log --http-client-body-temp-path=/var/lib/nginx/tmp/client_body --http-proxy-temp-path=/var/lib/nginx/tmp/proxy --http-fastcgi-temp-path=/var/lib/nginx/tmp/fastcgi --http-uwsgi-temp-path=/var/lib/nginx/tmp/uwsgi --http-scgi-temp-path=/var/lib/nginx/tmp/scgi --pid-path=/run/nginx.pid --lock-path=/run/lock/subsys/nginx --user=nginx --group=nginx --with-file-aio --with-ipv6 --with-http_ssl_module --with-http_v2_module --with-http_realip_module --with-stream_ssl_preread_module --with-http_addition_module --with-http_xslt_module=dynamic --with-http_image_filter_module=dynamic --with-http_sub_module --with-http_dav_module --with-http_flv_module --with-http_mp4_module --with-http_gunzip_module --with-http_gzip_static_module --with-http_random_index_module --with-http_secure_link_module --with-http_degradation_module --with-http_slice_module --with-http_stub_status_module --with-http_perl_module=dynamic --with-http_auth_request_module --with-mail=dynamic --with-mail_ssl_module --with-pcre --with-pcre-jit --with-stream=dynamic --with-stream_ssl_module --with-google_perftools_module --with-debug --with-cc-opt='-O2 -g -pipe -Wall -Wp,-D_FORTIFY_SOURCE=2 -fexceptions -fstack-protector-strong --param=ssp-buffer-size=4 -grecord-gcc-switches -specs=/usr/lib/rpm/redhat/redhat-hardened-cc1 -m64 -mtune=generic' --with-ld-opt='-Wl,-z,relro -specs=/usr/lib/rpm/redhat/redhat-hardened-ld -Wl,-E'
下载新版nginx
wget http://nginx.org/download/nginx-1.17.0.tar.gz
安装必备的包
yum install -y pcre pcre-devel openssl openssl-devel gd-devel zlib-devel
重新编译nginx添加openssl
[root@node3 tools]# tar xf nginx-1.17.0.tar.gz

[root@node3 tools]# cd nginx-1.17.0

#获取原有nginx参数:

nginx version: nginx/1.16.1

built by gcc 4.8.5 20150623 (Red Hat 4.8.5-39) (GCC)

built with OpenSSL 1.0.2k-fips  26 Jan 2017

TLS SNI support enabled

configure arguments: --prefix=/usr/share/nginx --sbin-path=/usr/sbin/nginx --modules-path=/usr/lib64/nginx/modules --conf-path=/etc/nginx/nginx.conf --error-log-path=/var/log/nginx/error.log --http-log-path=/var/log/nginx/access.log --http-client-body-temp-path=/var/lib/nginx/tmp/client_body --http-proxy-temp-path=/var/lib/nginx/tmp/proxy --http-fastcgi-temp-path=/var/lib/nginx/tmp/fastcgi --http-uwsgi-temp-path=/var/lib/nginx/tmp/uwsgi --http-scgi-temp-path=/var/lib/nginx/tmp/scgi --pid-path=/run/nginx.pid --lock-path=/run/lock/subsys/nginx --user=nginx --group=nginx --with-file-aio --with-ipv6 --with-http_ssl_module --with-http_v2_module --with-http_realip_module --with-stream_ssl_preread_module --with-http_addition_module --with-http_xslt_module=dynamic  --with-http_image_filter_module=dynamic --with-http_sub_module --with-http_dav_module --with-http_flv_module --with-http_mp4_module --with-http_gunzip_module --with-http_gzip_static_module --with-http_random_index_module --with-http_secure_link_module --with-http_degradation_module --with-http_slice_module --with-http_stub_status_module --with-http_perl_module=dynamic --with-http_auth_request_module --with-mail=dynamic --with-mail_ssl_module --with-pcre --with-pcre-jit --with-stream=dynamic --with-stream_ssl_module --with-google_perftools_module --with-debug --with-cc-opt='-O2 -g -pipe -Wall -Wp,-D_FORTIFY_SOURCE=2 -fexceptions -fstack-protector-strong --param=ssp-buffer-size=4 -grecord-gcc-switches -specs=/usr/lib/rpm/redhat/redhat-hardened-cc1 -m64 -mtune=generic' --with-ld-opt='-Wl,-z,relro -specs=/usr/lib/rpm/redhat/redhat-hardened-ld -Wl,-E'

#重新编译,添加openssl,但是还要去除模块:   --with-http_image_filter_module=dynamic ,添加这个模块

#不然最后会出现报错:

nginx: [emerg] module "/usr/lib64/nginx/modules/ngx_http_image_filter_module.so" version 1016001 instead of 1017000 in /usr/share/nginx/modules/mod-http-image-filter.conf:1

nginx: configuration file /etc/nginx/nginx.conf test failed

#最终编译参数:

[root@node3 nginx-1.17.0]# ./configure --prefix=/usr/share/nginx --sbin-path=/usr/sbin/nginx --modules-path=/usr/lib64/nginx/modules --conf-path=/etc/nginx/nginx.conf --error-log-path=/var/log/nginx/error.log --http-log-path=/var/log/nginx/access.log --http-client-body-temp-path=/var/lib/nginx/tmp/client_body --http-proxy-temp-path=/var/lib/nginx/tmp/proxy --http-fastcgi-temp-path=/var/lib/nginx/tmp/fastcgi --http-uwsgi-temp-path=/var/lib/nginx/tmp/uwsgi --http-scgi-temp-path=/var/lib/nginx/tmp/scgi --pid-path=/run/nginx.pid --lock-path=/run/lock/subsys/nginx --user=nginx --group=nginx --with-file-aio --with-ipv6 --with-http_ssl_module --with-http_v2_module --with-http_realip_module --with-stream_ssl_preread_module --with-http_addition_module --with-http_xslt_module=dynamic  --with-http_sub_module --with-http_dav_module --with-http_flv_module --with-http_mp4_module --with-http_gunzip_module --with-http_gzip_static_module --with-http_random_index_module --with-http_secure_link_module --with-http_degradation_module --with-http_slice_module --with-http_stub_status_module --with-http_perl_module=dynamic --with-http_auth_request_module --with-mail=dynamic --with-mail_ssl_module --with-pcre --with-pcre-jit --with-stream=dynamic --with-stream_ssl_module --with-google_perftools_module --with-debug --with-cc-opt='-O2 -g -pipe -Wall -Wp,-D_FORTIFY_SOURCE=2 -fexceptions -fstack-protector-strong --param=ssp-buffer-size=4 -grecord-gcc-switches -specs=/usr/lib/rpm/redhat/redhat-hardened-cc1 -m64 -mtune=generic' --with-ld-opt='-Wl,-z,relro -specs=/usr/lib/rpm/redhat/redhat-hardened-ld -Wl,-E' --with-openssl=/server/tools/openssl-1.1.1d

#注意编译关键项: 加入这段

--with-openssl=/server/tools/openssl-1.1.1d

#报错处理:

#1. ./configure: error: the HTTP image filter module requires the GD library.

You can either do not enable the module or install the libraries.

处理:  yum install gd-devel -y

yum install -y gd-devel

#2. ./configure: error: the invalid value in --with-ld-opt="-Wl,-z,relro -specs=/usr/lib/rpm/redhat/redhat-hardened-ld -Wl,-E"

处理: yum -y install redhat-rpm-config.noarch

#3. ./configure: error: the HTTP XSLT module requires the libxml2/libxslt

处理: yum -y install libxml2 libxml2-dev libxslt-devel

#4. ./configure: error: perl module ExtUtils::Embed is required

处理: yum -y install perl-devel perl-ExtUtils-Embed

#5. ./configure: error: the Google perftools module requires the Google perftools

处理: yum install gperftools -y

#6. 编译和替换二进制nginx启动文件后出现报错:

nginx: [emerg] module "/usr/lib64/nginx/modules/ngx_http_image_filter_module.so" version 1016001 instead of 1017000 in /usr/share/nginx/modules/mod-http-image-filter.conf:1

nginx: configuration file /etc/nginx/nginx.conf test failed

解决办法: 重新编译nginx  去除  --with-http_image_filter_module=dynamic 参数即可

#7. 出现报错:nginx: [emerg] open() "/etc/nginx/mime.types" failed (2: No such file or directory) in /etc/nginx/nginx.conf:17

解决办法: cp -a /server/tools/nginx-1.17.0/conf/mime.types /etc/nginx/

#8. make出现出错误:

找到文件: vim auto/lib/openssl/conf

修改 大约39-43行:

CORE_INCS="$CORE_INCS $OPENSSL/.openssl/include"

CORE_DEPS="$CORE_DEPS $OPENSSL/.openssl/include/openssl/ssl.h"

CORE_LIBS="$CORE_LIBS $OPENSSL/.openssl/lib/libssl.a"

CORE_LIBS="$CORE_LIBS $OPENSSL/.openssl/lib/libcrypto.a"

CORE_LIBS="$CORE_LIBS $NGX_LIBDL"

改为:

CORE_INCS="$CORE_INCS $OPENSSL/.openssl/include"

CORE_DEPS="$CORE_DEPS $OPENSSL/include/openssl/ssl.h"

CORE_LIBS="$CORE_LIBS $OPENSSL/lib/libssl.a"

CORE_LIBS="$CORE_LIBS $OPENSSL/lib/libcrypto.a"

CORE_LIBS="$CORE_LIBS $NGX_LIBDL"

========================================================================================

#看到以下信息,则编译成功

Configuration summary

  + using system PCRE library

  + using OpenSSL library: /usr/local/include/openssl/

  + using system zlib library

  nginx path prefix: "/opt/nginx"

  nginx binary file: "/usr/sbin/nginx"

  nginx modules path: "/opt/nginx/modules"

  nginx configuration prefix: "/etc/nginx"

  nginx configuration file: "/etc/nginx/nginx.conf"

  nginx pid file: "/var/log/nginx/nginx.pid"

  nginx error log file: "/var/log/nginx/error.log"

  nginx http access log file: "/var/log/nginx/access.log"

  nginx http client request body temporary files: "/var/nginx/client"

  nginx http proxy temporary files: "/var/nginx/proxy"

  nginx http fastcgi temporary files: "/var/nginx/fcgi"

  nginx http uwsgi temporary files: "/var/nginx/uwsgi"

  nginx http scgi temporary files: "/var/nginx/scgi"

[root@node3 nginx-1.17.0]# echo $?

0

## 完成后,将objs下编译好的nginx可执行文件,替换原有的nginx可执行文件

[root@leilei002 nginx-1.17.0]# cp -af objs/nginx /usr/sbin/nginx

cp: overwrite ‘/usr/sbin/nginx’? y

[root@leilei002 nginx-1.17.0]# nginx -t  进行语法检查,可能入错如下

#错误处理

## nginx 替换了二进制文件后,nginx -t检测报错:

nginx: [emerg] module "/usr/lib64/nginx/modules/ngx_http_image_filter_module.so" version 1016001 instead of 1017000 in /usr/share/nginx/modules/mod-http-image-filter.conf:1

nginx: configuration file /etc/nginx/nginx.conf test failed

解决办法: 重新编译nginx  去除  --with-http_image_filter_module=dynamic 参数即可

##nginx 检测出现报错:

nginx: [emerg] open() "/etc/nginx/mime.types" failed (2: No such file or directory) in /etc/nginx/nginx.conf:17

解决办法:  拷贝 类型文件mime.types

cp -a /server/tools/nginx-1.17.0/conf/mime.types /etc/nginx/
最终检测一次:
nginx 检测:

[root@leilei002 nginx-1.17.0]# nginx -t

nginx: the configuration file /etc/nginx/nginx.conf syntax is ok

nginx: configuration file /etc/nginx/nginx.conf test is successful

检查openssl版本:

[root@leilei002 nginx-1.17.0]# nginx -V

nginx version: nginx/1.17.0

built by gcc 4.8.5 20150623 (Red Hat 4.8.5-36) (GCC)

built with OpenSSL 1.1.1d  10 Sep 2019     ###---- 已经升级为openssl 1.1.d版本. 升级OK

TLS SNI support enabled

configure arguments: --prefix=/usr/share/nginx --sbin-path=/usr/sbin/nginx --modules-path=/usr/lib64/nginx/modules --conf-path=/etc/nginx/nginx.conf --error-log-path=/var/log/nginx/error.log --http-log-path=/var/log/nginx/access.log --http-client-body-temp-path=/var/lib/nginx/tmp/client_body --http-proxy-temp-path=/var/lib/nginx/tmp/proxy --http-fastcgi-temp-path=/var/lib/nginx/tmp/fastcgi --http-uwsgi-temp-path=/var/lib/nginx/tmp/uwsgi --http-scgi-temp-path=/var/lib/nginx/tmp/scgi --pid-path=/run/nginx.pid --lock-path=/run/lock/subsys/nginx --user=nginx --group=nginx --with-file-aio --with-ipv6 --with-http_ssl_module --with-http_v2_module --with-http_realip_module --with-stream_ssl_preread_module --with-http_addition_module --with-http_xslt_module=dynamic --with-http_sub_module --with-http_dav_module --with-http_flv_module --with-http_mp4_module --with-http_gunzip_module --with-http_gzip_static_module --with-http_random_index_module --with-http_secure_link_module --with-http_degradation_module --with-http_slice_module --with-http_stub_status_module --with-http_perl_module=dynamic --with-http_auth_request_module --with-mail=dynamic --with-mail_ssl_module --with-pcre --with-pcre-jit --with-stream=dynamic --with-stream_ssl_module --with-google_perftools_module --with-debug --with-cc-opt='-O2 -g -pipe -Wall -Wp,-D_FORTIFY_SOURCE=2 -fexceptions -fstack-protector-strong --param=ssp-buffer-size=4 -grecord-gcc-switches -specs=/usr/lib/rpm/redhat/redhat-hardened-cc1 -m64 -mtune=generic' --with-ld-opt='-Wl,-z,relro -specs=/usr/lib/rpm/redhat/redhat-hardened-ld -Wl,-E' --with-openssl=/server/tools/openssl-1.1.1d
配置nginx主动推送
nginx主动推送配置
主动推送,可以减少用户请求的报文,缩短响应时间,提高用户访问速度.
nginx配置中添加http2支持:

server {

...

listen 443 ssl http2 default_server;

...

}

主动推送方法1. :

http2_push_preload on;

Link: </styles.css>; rel=preload; as=style

多个资源推送:

Link: </styles.css>; rel=preload; as=style, </example.png>;

rel=preload; as=image

主动推送方式2. :

http2_push /mi.txt;

http2_push /style.css;

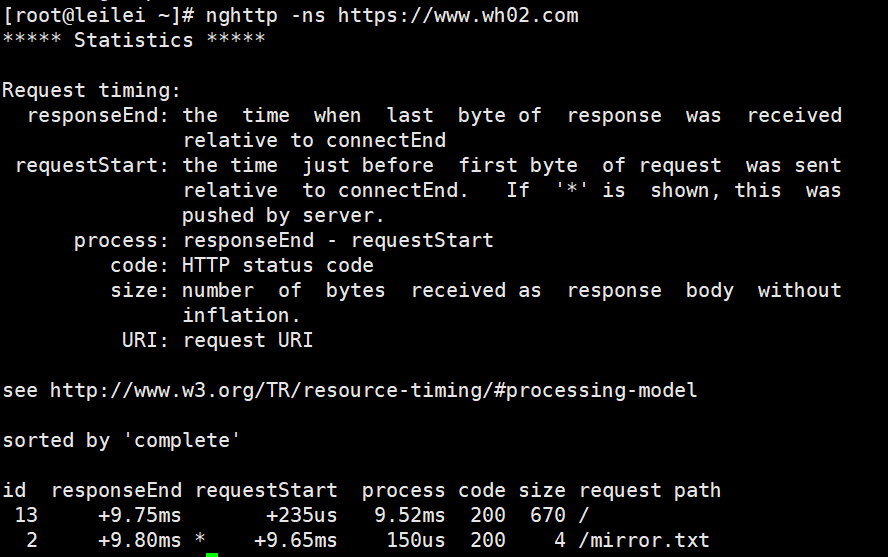
nghttp测试:

nghttp工具默认并没有安装,需要使用 yum install -y nghttp 来安装该测试工具.

nghttp -ns https://wh02.com
结果图:
注意
[当编译安装openssl 没有指定路径后,在当前服务器重装nignx,需要指定openssl路径,如果修改成下面的配置,就可以不用指定openssl路径 [默认路径--with-openssl=/usr/local] ]

nginx-1.16.1/auto/lib/openssl/conf 大约139行的位置,修改完成后再做编译.

39行 6行

vim +39 /server/tools/nginx-1.17.0/auto/lib/openssl/conf

CORE_INCS="$CORE_INCS $OPENSSL/.openssl/include"

CORE_DEPS="$CORE_DEPS $OPENSSL/.openssl/include/openssl/ssl.h"

CORE_LIBS="$CORE_LIBS $OPENSSL/.openssl/lib/libssl.a"

CORE_LIBS="$CORE_LIBS $OPENSSL/.openssl/lib/libcrypto.a"

CORE_LIBS="$CORE_LIBS $NGX_LIBDL"

CORE_LIBS="$CORE_LIBS $NGX_LIBPTHREAD"

改成

CORE_INCS="$CORE_INCS $OPENSSL/include"

CORE_DEPS="$CORE_DEPS $OPENSSL/include/openssl/ssl.h"

CORE_LIBS="$CORE_LIBS $OPENSSL/lib64/libssl.a"

CORE_LIBS="$CORE_LIBS $OPENSSL/lib64/libcrypto.a"

CORE_LIBS="$CORE_LIBS $NGX_LIBDL"

CORE_LIBS="$CORE_LIBS $NGX_LIBPTHREAD"

源码安装货升级openssl没有指定路径的情况下编译nginx.

39行 6行

vim +39 /server/tools/nginx-1.17.2/auto/lib/openssl/conf

这样 nginx 在ngix -V的时候会显示 openssl正确的版本
nginx openssl升级支持http2的更多相关文章
- nginx支持HTTP2的配置过程
一.获取安装包 http://zlib.net/zlib-1.2.11.tar.gz https://www.openssl.org/source/openssl-1.0.2e.tar.gz (ope ...
- nginx如何启用对HTTP2的支持 | nginx如何验证HTTP2是否已启用
nginx启用HTTP2特性 查看当前nginx的编译选项 1 #./nginx -V 2 3 nginx version: nginx/1.9.15 4 built by gcc 5.4.0 2 ...
- nginx编译支持HTTP2.0
nginx编译支持HTTP2.0 nginx编译支持HTTP2.0 wget https://www.openssl.org/source/openssl-1.1.0i.tar.gz #openssl ...
- 阿里云openssl升级,实现nginx主动推送,nginx主动推送能够有效减少不必要的报文传输,减少用户请求次数,以达到更快访问速度
现有版本检查 [root@node3 ~]# openssl version #这个版本是无法支持http2.0主动推送功能.需要升级为2019版本. OpenSSL 1. ...
- 让你的网站免费支持 HTTPS 及 Nginx 平滑升级
为什么要使用 HTTPS ? 首先来说一下 HTTP 与 HTTPS 协议的区别吧,他们的根本区别就是 HTTPS 在 HTTP 协议的基础上加入了 SSL 层,在传输层对网络连接进行加密.简单点说在 ...
- nginx配置支持http2
1.简介 nginx 配置支持http2.目前大多数网站都是http1.1(如果你没有特别配置过的话) 一切都是为了访问更快. 2.如何查看自己网站的http版本 最简单的方法就F12啊,我这里是火狐 ...
- 在Nginx/Openresty中启用http2支持
转自个人博客 chinazt.cc 以下摘自http2的介绍: HTTP/2 源自 SPDY/2 SPDY 系列协议由谷歌开发,于 2009 年公开.它的设计目标是降低 50% 的页面加载时间.当下很 ...
- nginx支持http2协议
1.http2协议 HTTP 2.0 的主要目标是改进传输性能,实现低延迟和高吞吐量.从另一方面看,HTTP 的高层协议语义并不会因为这次版本升级而受影响.所有HTTP 首部.值,以及它们的使用场景都 ...
- 轻松让你的nginx服务器支持HTTP2协议
目录 简介 HTTP1.1和HTTP2 安装最新的nginx 开启HTTP2支持 添加SSL支持 修改加密算法 Diffie–Hellman对消息进行加密 重定向所有的HTTP请求到HTTPS 启动n ...
随机推荐
- 6,HDFS HA
目录 HDFS HA 一.HA(High Availability)的使用原因 二.HA的同步 三.HA的自动容灾 HDFS HA 一.HA(High Availability)的使用原因 1.1 在 ...
- 正式学习MVC 03
1.View -> Controller的数据通信 1) 通过url查询字符串 public ActionResult Index(string user) { return Content(u ...
- 这些Zepto中实用的方法集
前言 时间过得可真快,转眼间2017年已去大半有余,你就说吓不吓人,这一年你成长了多少,是否荒度了很多时光,亦或者天天向上,收获满满.今天主要写一些看Zepto基础模块时,比较实用的部分内部方法,在我 ...
- 钉钉小程序不用canvas在后端绘图前端用image标签获取图片的实践
公司的需求要用电子员工卡代替用了N久的工作证,在各种场合刷二维码来代替刷卡.在钉钉小程序里实现.感觉这回又要躺坑里了. 钉钉小程序第一次做.我这个自封的GDI+大神才不要想用钉钉jsapi的方式用ca ...
- 点云3d检测模型pointpillar
PointPillars 一个来自工业界的模型.https://arxiv.org/abs/1812.05784 3D目标检测通常做法 3d卷积 投影到前平面 在bird-view上操作 处理思路依然 ...
- Markdown语法说明及常用软件推荐(附链接)
Markdown语法同样支持HTML标签 以下所有字符均为英文字符 标题 标题级别由#决定,一个为一级 样例 # 一级标题 ## 二级标题 ### 三级标题 #### 四级标题 ##### 五级标题 ...
- Python3爬虫使用requests爬取lol英雄皮肤
本人博客:https://xiaoxiablogs.top 此次爬取lol英雄皮肤一共有两个版本,分别是多线程版本和非多线程版本. 多线程版本 # !/usr/bin/env python # -*- ...
- web前端问题整理
1.常用那几种浏览器测试?有哪些内核(Layout Engine)? (Q1)浏览器:IE,Chrome,FireFox,Safari,Opera (Q2)内核:Trident,Gecko,Prest ...
- Python学习之布尔和数字
布尔有True和Flase两种值 数字0.None,以及元素为空的容器类对象都可视为False,反之为Ture.
- 【06】openlayers 切片图层
创建地图: //OSM图层 let source = new ol.source.OSM() //切片图层tilelayer let layers = new ol.layer.Tile({ sour ...