cesium入门示例-3dTiles加载
数据转换工具采用cesiumlab1.5.17版本,转换后的3dTiles加载显示比较简单,通过Cesium.Cesium3DTileset接口指定url即可,3dTiles文件可与js前端代码放置一起,也可是远程服务器上的地址。如下:
 //故宫

 var palaceTileset = new Cesium.Cesium3DTileset({

     url: './TestData/output/DAEPalace/tileset.json'

     //或者url: 'http://ip:port/www/DAEPalace/tileset.json'

 })

 viewer.scene.primitives.add(palaceTileset);
通过上述代码加载的三维模型位置和高度可能不符合预期,需要进行调整,调整代码如下:
 var height = -30;  //根据地形设置调整高度

 palaceTileset.readyPromise.then(function(argument) {

     //贴地显示

     var cartographic = Cesium.Cartographic.fromCartesian(dayantaTileset.boundingSphere.center);

     var surface = Cesium.Cartesian3.fromRadians(cartographic.longitude, cartographic.latitude, cartographic.height);

     var offset = Cesium.Cartesian3.fromRadians(cartographic.longitude, cartographic.latitude, cartographic.height + height);

     var translation = Cesium.Cartesian3.subtract(offset, surface, new Cesium.Cartesian3());

     palaceTileset.modelMatrix = Cesium.Matrix4.fromTranslation(translation);

 })
或者通过指定经纬高调整模型位置:
 var longitude = 116.3908443995411;

 var latitude = 39.91600579431837;

 height = 60.38590702090875;

 var heading = 2;

 palaceTileset.readyPromise.then(function(argument) {

     //经纬度、高转笛卡尔坐标

     var position = Cesium.Cartesian3.fromDegrees(longitude, latitude, height);

     var mat = Cesium.Transforms.eastNorthUpToFixedFrame(position);

     var rotationX = Cesium.Matrix4.fromRotationTranslation(Cesium.Matrix3.fromRotationZ(Cesium.Math.toRadians(heading)));

     Cesium.Matrix4.multiply(mat, rotationX, mat);

     palaceTileset._root.transform = mat;

 })
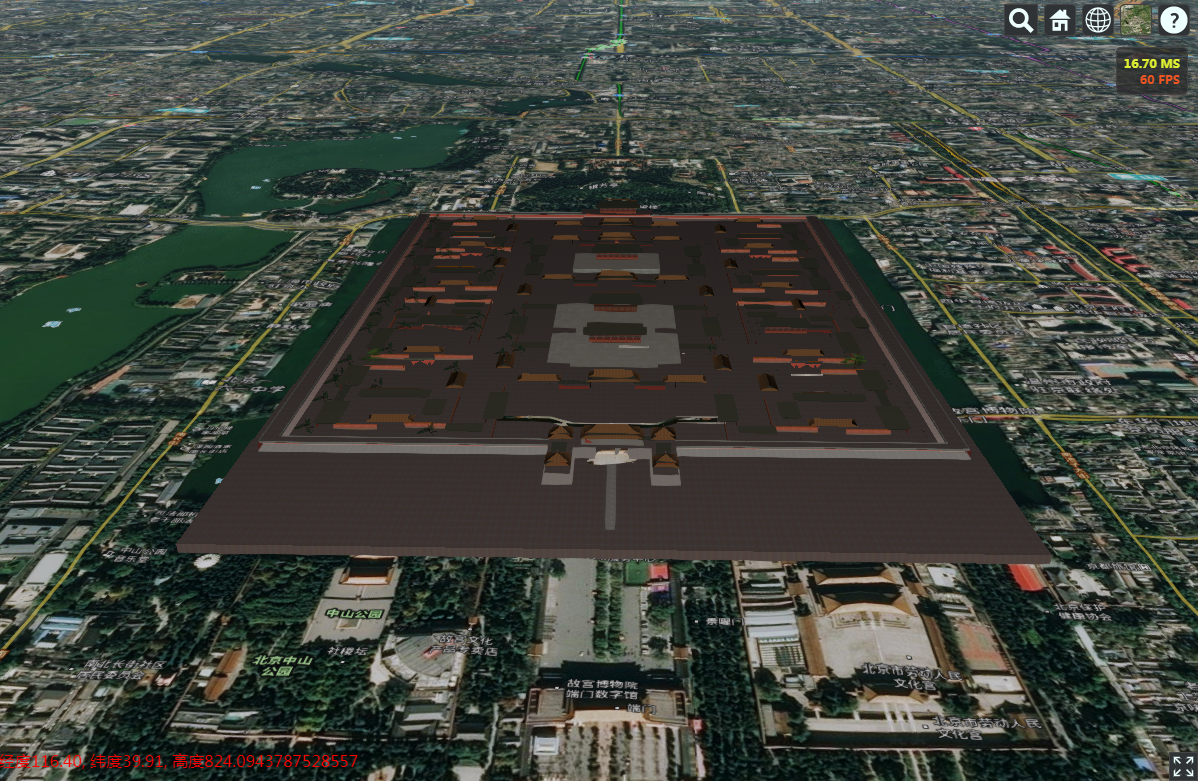
显示效果如下:
1、三维模型显示
由DAE格式模型转换而来,DAE文件与纹理图片在同一级文件夹下,可成功转换出待纹理的3dTiles,否则找不到纹理图片就只有白模;
2、倾斜摄影场景显示
由osgb数据转换而来,cesiumlab中转换时要选择data目录,如下图:
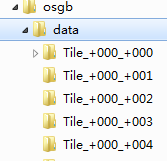
加载显示结果如下:
3、矢量建筑物显示
由shapefile格式的建筑物多边形数据转换而来,包含建筑物高度信息,矢量物批量显示,不用调整建筑物位置,显示效果如下:
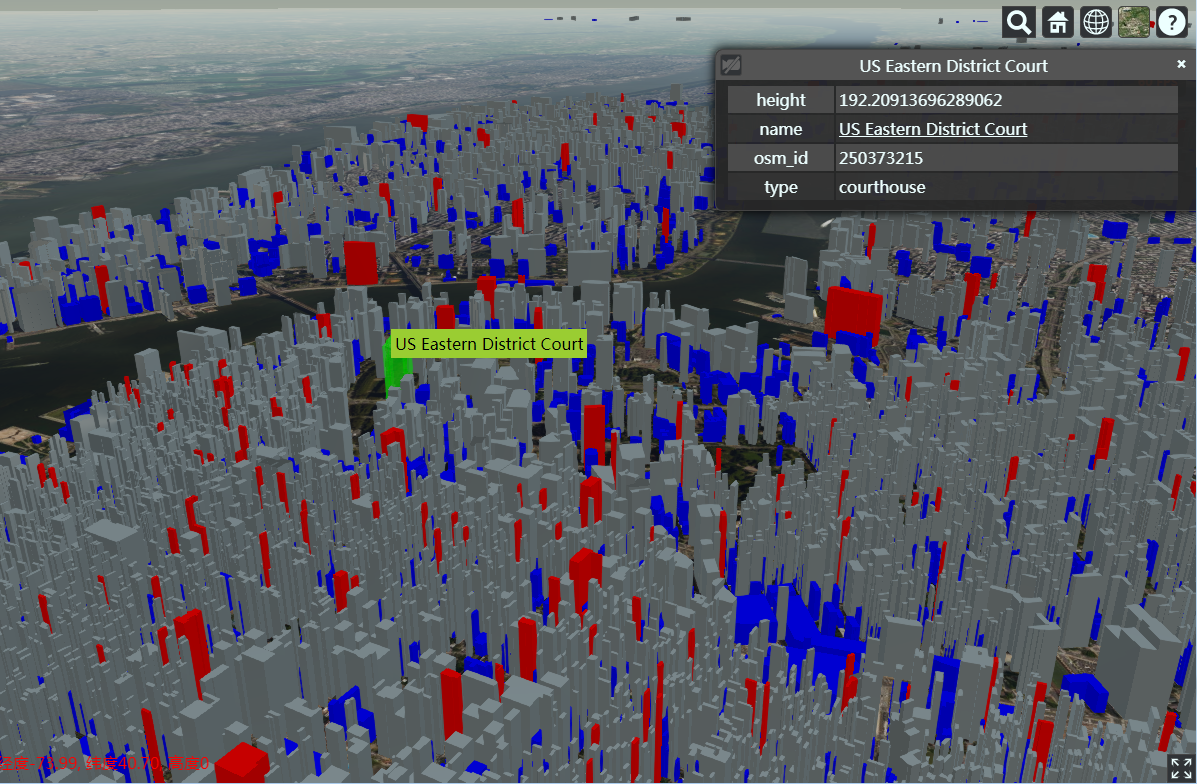
建筑物按高度用颜色区分,设置了tileset的样式如下:
 //注意这个颜色的设置

 tileset.style = new Cesium.Cesium3DTileStyle({

     color: {

         conditions: [

             ['${height} >= 200', 'color("red", 1)'],

             ['${height} >= 100', 'rgba(150, 150, 150, 1)'],

             ['true', 'color("blue")']

         ]

     }

 });
其中height为shapefile中存储建筑物高度的属性字段名称,建筑物选择显示属性信息通过侦听鼠标MOVE和LEFT_CLICK事件,查询要素获得,实现代码如下:
         // HTML overlay for showing feature name on mouseover

         var nameOverlay = document.createElement('div');

         viewer.container.appendChild(nameOverlay);

         nameOverlay.className = 'backdrop';

         nameOverlay.style.display = 'none';

         nameOverlay.style.position = 'absolute';

         nameOverlay.style.bottom = '0';

         nameOverlay.style.left = '0';

         nameOverlay.style['pointer-events'] = 'none';

         nameOverlay.style.padding = '4px';

         nameOverlay.style.backgroundColor = 'yellowgreen';

         // Information about the currently selected feature

         var selected = {

             feature: undefined,

             originalColor: new Cesium.Color()

         };

         // An entity object which will hold info about the currently selected feature for infobox display

         var selectedEntity = new Cesium.Entity();

         // Get default left click handler for when a feature is not picked on left click

         var clickHandler = viewer.screenSpaceEventHandler.getInputAction(Cesium.ScreenSpaceEventType.LEFT_CLICK);

         // Change the feature color.

         // Information about the currently highlighted feature

         var highlighted = {

             feature: undefined,

             originalColor: new Cesium.Color()

         };

         // Color a feature yellow on hover.

         viewer.screenSpaceEventHandler.setInputAction(function onMouseMove(movement) {

             // If a feature was previously highlighted, undo the highlight

             if(Cesium.defined(highlighted.feature)) {

                 highlighted.feature.color = highlighted.originalColor;

                 highlighted.feature = undefined;

             }

             // Pick a new feature

             var pickedFeature = viewer.scene.pick(movement.endPosition);

             if(!Cesium.defined(pickedFeature) || !Cesium.defined(pickedFeature.getProperty)) {

                 nameOverlay.style.display = 'none';

                 return;

             }

             // A feature was picked, so show it's overlay content

             nameOverlay.style.display = 'block';

             nameOverlay.style.bottom = viewer.canvas.clientHeight - movement.endPosition.y + 'px';

             nameOverlay.style.left = movement.endPosition.x + 'px';

             var name = pickedFeature.getProperty('name');

             if(!Cesium.defined(name)) {

                 name = pickedFeature.getProperty('id');

             }

             nameOverlay.textContent = name;

             // Highlight the feature if it's not already selected.

             if(pickedFeature !== selected.feature) {

                 highlighted.feature = pickedFeature;

                 Cesium.Color.clone(pickedFeature.color, highlighted.originalColor);

                 pickedFeature.color = Cesium.Color.YELLOW.withAlpha(0.5);

             }

         }, Cesium.ScreenSpaceEventType.MOUSE_MOVE);

         // Color a feature on selection and show metadata in the InfoBox.

         viewer.screenSpaceEventHandler.setInputAction(function onLeftClick(movement) {

             // If a feature was previously selected, undo the highlight

             if(Cesium.defined(selected.feature)) {

                 selected.feature.color = selected.originalColor;

                 selected.feature = undefined;

             }

             // Pick a new feature

             var pickedFeature = viewer.scene.pick(movement.position);

             if(!Cesium.defined(pickedFeature) || !Cesium.defined(pickedFeature.getProperty)) {

                 clickHandler(movement);

                 return;

             }

             // Select the feature if it's not already selected

             if(selected.feature === pickedFeature) {

                 return;

             }

             selected.feature = pickedFeature;

             console.log(pickedFeature.content.tile.boundingSphere.center);

             console.log(pickedFeature.tileset.boundingSphere.center);

             // Save the selected feature's original color

             if(pickedFeature === highlighted.feature) {

                 Cesium.Color.clone(highlighted.originalColor, selected.originalColor);

                 highlighted.feature = undefined;

             } else {

                 Cesium.Color.clone(pickedFeature.color, selected.originalColor);

             }

             // Highlight newly selected feature

             pickedFeature.color = Cesium.Color.LIME.withAlpha(0.5);

             // Set feature infobox description

             var featureName = pickedFeature.getProperty('name');

             selectedEntity.name = featureName;

             selectedEntity.description = 'Loading <div class="cesium-infoBox-loading"></div>';

             selectedEntity.description = '<table class="cesium-infoBox-defaultTable"><tbody>';

             var propertyNames = pickedFeature.getPropertyNames();

             var length = propertyNames.length;

             for(var i = 0; i < length; ++i) {

                 var propertyName = propertyNames[i];

                 selectedEntity.description += '<tr><th>' + propertyName + '</th><td>' + pickedFeature.getProperty(propertyName) + '</td></tr>';

             }

             selectedEntity.description += '</tbody></table>';

             viewer.selectedEntity = selectedEntity;

         }, Cesium.ScreenSpaceEventType.LEFT_CLICK);
cesium入门示例-3dTiles加载的更多相关文章
- cesium入门示例-矢量化单体分类
实现楼层的分层选择和属性信息展示,该功能基于大雁塔倾斜数据实现单体化分类显示. 数据准备: 1.大雁塔倾斜数据,已转换为3dTiles,参考cesium入门示例-3dTiles加载的第2节osgb数据 ...
- cesium入门示例-测量工具
作为cesium入门示例级别的最后一篇,参考cesium-长度测量和面积测量实现测量工具封装,修改了其中的距离测量函数,计算贴地距离,并对事件内部处理做了调整.包括贴地距离测量.面积测量.结果清除. ...
- cesium入门示例-HelloWorld
示例准备: 在Cesium ion官网(https://cesium.com/)上注册用户,获取AccessToken,在js代码入口设置Cesium.Ion.defaultAccessToken,即 ...
- cesium js学习一加载三维模型【转】
http://blog.csdn.net/tangyajun_168/article/details/50936698 最近项目中用到室外三维模型与室内三维地图交互,室外三维模型的加载我们采用了ces ...
- Android系统编程入门系列之加载界面Activity
上回说到应用初始化加载及其生命周期,在Android系统调用Applicaiton.onCreate()之后,继续创建并加载清单文件中注册的首个界面即主Activity,也可称之为入口界面.主Acti ...
- DevExpress WPF入门指南:加载动画的应用
LoadingDecorator是一个容器控件用于显示 long-loading 的内容.内容还没加载完成的时候会显示一个加载指示器,加载完成后指示器消失,如下图所示: 开启LoadingDecora ...
- 科学计算三维可视化---TVTK入门(数据加载)
一:数据加载 大多数可视化应用的数据并非是在TVTK库中构建的,很多都是通过接口读取外部数据文件 (一)使用vtkSTLReader来读取外部文件 .stl 文件是在计算机图形应用系统中,用于表示三角 ...
- 【iOS入门】UITableView加载图片
学习带图片的列表 官方 LazyTableImages demo http://download.csdn.net/detail/jlyidianyuan/5726749 分析源码是学习的好方法. ...
- MeteoInfoLab脚本示例:加载地图图层
应用最广泛的的地图数据应该是shape格式,网络上有很多免费下载资源.MeteoInfoLab中读取shape文件的函数是shaperead,参数即文件名,返回数据包含图形和属性信息的图层对象.矢量图 ...
随机推荐
- Kattis dragonball1 Dragon Ball I(最短路)
There is a legendary tale about Dragon Balls on Planet X: if one collects seven Dragon Balls, the Dr ...
- Ubuntu---Git
本篇文章简单总结了常用 Git 的使用 前言 设置用户信息 1, Git 是分布式的 SSH 代码管理工具,远程的代码管理是基于 SSH 的,所以要使用远程的 Git 则需要 SSH 的配置. ste ...
- usert
usert类型 不是一个函数,而是一个语言构造器 usert后会不会释放内存 当usert的文件大于2044KB时才会释放内存,否则不释放内存
- nginx中server块的匹配顺序
客户端发出一个http请求时,nginx收到后会取出header头中的host,与nginx.conf中每个server的server_name进行匹配,以此决定到底由哪一个server块来处理这个请 ...
- Java文字识别软件-调用百度ocr实现文字识别
java_baidu_ocr Java调用百度OCR文字识别API实现图片文字识别软件 这是一款小巧方便,强大的文字识别软件,由Java编写,配上了窗口界面 调用了百度ocr文字识别API 识别精度高 ...
- CF 1047 C - Enlarge GCD [素数筛]
传送门:http://codeforces.com/contest/1047/problem/C 题意:给出n个数字,求最少删除几个数可以使剩下的数字的GCD大于n个数字的GCD 思路:最开始想的是先 ...
- vue-resource CRUD示例
GET请求 var demo = new Vue({ el: '#app', data: { gridColumns: ['customerId', 'companyName', 'contactNa ...
- regex(python)
正则表达式 #!/usr/bin/env python # -*- coding: utf-8 -*- # @Time : 2018/7/26 16:39 # @Author : jackendoff ...
- VS2010无法调试页面问题
图片: VS2010报:未能将脚本调试器附加到计算机XXX上的进程iexplore.exe . 已附加了一个调试器”.启动调试失败. 解决:1.以管理员身份打开CMD; 2.运行:regsvr32.e ...
- 使用OkHttp上传图片到服务器
Okhttp上传图片方法,就像网页那样,使用Form的Post. 首先创建requestBody,然后Builder构建Query:最后Response返回服务器请求,最后把response.body ...