
Spring Boot CRUD+分页(基于Mybatis注解方式)
步骤一:关于Mybatis
Mybatis 是用来进行数据库操作的框架。其中分页使用Mybatis中的PageHelper插件。
Mybatis与hibernate对比:
1.hibernate是一个完全的orm框架(对象关系映射,对 对象操作 表就会改变),mybatis并不是一个完全的orm框架,只是对sql语句的封装。
2.hibernate,可以不用写sql语句。mybatis就是面向sql语句的,必须写sql语句。但是底层原理都是JDBC。
3.应用场景:
hibernate:应用传统项目,互联网项目中都不用。
步骤二:创建数据库和表
创建个分类表,字段很简单,就id和name。
create database test01;

use test01;

CREATE TABLE category_ (

  id int(11) NOT NULL AUTO_INCREMENT,

  name varchar(30),

  PRIMARY KEY (id)

) DEFAULT CHARSET=UTF8;
步骤三:准备数据
insert into category_ values(null,'家具');

insert into category_ values(null,'电器');

insert into category_ values(null,'服装');

insert into category_ values(null,'化妆品');
步骤四:基于springboot入门小demo
基于的springboot入门小demo,已包含了前面文章的知识点(比如:热部署、全局异常处理器)。
步骤五:修改application.properties配置文件,连接数据库
spring.mvc.view.prefix=/WEB-INF/jsp/

spring.mvc.view.suffix=.jsp

spring.datasource.url=jdbc:mysql://127.0.0.1:3306/test01?characterEncoding=UTF-8

spring.datasource.username=root

spring.datasource.password=root

spring.datasource.driver-class-name=com.mysql.jdbc.Driver
步骤六:修改pom.xml文件
增加对mysql和mybatis的支持,及增加对PageHelper的支持(分页)。
        <!-- mybatis -->

        <dependency>

            <groupId>org.mybatis.spring.boot</groupId>

            <artifactId>mybatis-spring-boot-starter</artifactId>

            <version>1.1.1</version>

        </dependency>

        <!-- mysql -->

        <dependency>

            <groupId>mysql</groupId>

            <artifactId>mysql-connector-java</artifactId>

            <version>5.1.21</version>

        </dependency>

        <!-- 增加对PageHelper的支持 -->

        <dependency>

            <groupId>com.github.pagehelper</groupId>

            <artifactId>pagehelper</artifactId>

            <version>4.1.6</version>

        </dependency>
步骤七:创建PageHelperConfig 分页配置类
注解@Configuration 表示PageHelperConfig 这个类是用来做配置的。
注解@Bean 表示启动PageHelper这个拦截器。
新增加一个包 cn.xdf.springboot.config, 然后添加一个类PageHelperConfig ,其中进行PageHelper相关配置。
package cn.xdf.springboot.config;

import java.util.Properties;

import org.springframework.context.annotation.Bean;

import org.springframework.context.annotation.Configuration;

import com.github.pagehelper.PageHelper;

@Configuration

public class PageHelperConfig {

    @Bean

    public PageHelper pageHelper(){

        PageHelper pageHelper = new PageHelper();

        Properties p = new Properties();

        //1.offsetAsPageNum:设置为true时,会将RowBounds第一个参数offset当成pageNum页码使用.

        p.setProperty("offsetAsPageNum", "true");

        //2.rowBoundsWithCount:设置为true时,使用RowBounds分页会进行count查询.

        p.setProperty("rowBoundsWithCount", "true");

        //3.reasonable:启用合理化时,如果pageNum<1会查询第一页,如果pageNum>pages会查询最后一页。

        p.setProperty("reasonable", "true");

        pageHelper.setProperties(p);

        return pageHelper;

    }

}
步骤八:创建pojo类Category(不同于JPA的点,不需要映射)
增加一个包:cn.xdf.springboot.pojo,然后创建实体类Category。
package cn.xdf.springboot.pojo;

public class Category {

    private int id;

    private String name;

    public int getId() {

        return id;

    }

    public void setId(int id) {

        this.id = id;

    }

    public String getName() {

        return name;

    }

    public void setName(String name) {

        this.name = name;

    }

}
步骤九:创建接口CategoryMapper(不同于JPA的点)
增加一个包:cn.xdf.springboot.mapper,然后创建接口CategoryMapper。
使用注解@Mapper 表示这是一个Mybatis Mapper接口。
使用@Select注解表示调用findAll方法会去执行对应的sql语句。再增加CRUD方法的支持。
package cn.xdf.springboot.mapper;

import java.util.List;

import org.apache.ibatis.annotations.Delete;

import org.apache.ibatis.annotations.Insert;

import org.apache.ibatis.annotations.Mapper;

import org.apache.ibatis.annotations.Select;

import org.apache.ibatis.annotations.Update;

import cn.xdf.springboot.pojo.Category;

@Mapper

public interface CategoryMapper {

    @Select("select * from category_") // 查询所有

    List<Category> findAll();

    @Insert("insert into category_ (name) values (#{name}) ") // 添加

    public int save(Category category);

    @Delete("delete from category_ where id=#{id} ") // 删除

    public void delete(int id);

    @Select("select * from category_ where id=#{id}  ") // 查询一个

    public Category get(int id);

    @Update("update category_ set name = #{name} where id=#{id} ") // 修改

    public int update(Category category);

}
步骤十:创建CategoryController (不同于JPA的点--分页)
增加一个包:cn.xdf.springboot.controller,然后创建CategoryController 类。
1. 接受listCategory映射
2. 然后获取所有的分类数据
3. 接着放如Model中
4. 跳转到listCategory.jsp中
5.再为CategoryController添加: 增加、删除、获取、修改映射
package cn.xdf.springboot.controller;

import java.util.List;

import org.springframework.beans.factory.annotation.Autowired;

import org.springframework.stereotype.Controller;

import org.springframework.ui.Model;

import org.springframework.web.bind.annotation.RequestMapping;

import org.springframework.web.bind.annotation.RequestParam;

import com.github.pagehelper.PageHelper;

import com.github.pagehelper.PageInfo;

import cn.xdf.springboot.mapper.CategoryMapper;

import cn.xdf.springboot.pojo.Category;

@Controller

public class CategoryController {

    @Autowired

    CategoryMapper categoryMapper;

//    @RequestMapping("/listCategory")

//    public String listCategory(Model m) throws Exception {

//        List<Category> cs = categoryMapper.findAll();

//        m.addAttribute("cs", cs);

//        return "listCategory";

//    }

    @RequestMapping("/listCategory")

    public String listCategory(Model m,@RequestParam(value="start",defaultValue="0")int start,@RequestParam(value = "size", defaultValue = "5") int size) throws Exception {

        //1. 在参数里接受当前是第几页 start ,以及每页显示多少条数据 size。 默认值分别是0和5。

        //2. 根据start,size进行分页,并且设置id 倒排序

        PageHelper.startPage(start,size,"id desc");

        //3. 因为PageHelper的作用,这里就会返回当前分页的集合了

        List<Category> cs = categoryMapper.findAll();

        //4. 根据返回的集合,创建PageInfo对象

        PageInfo<Category> page = new PageInfo<>(cs);

        //5. 把PageInfo对象扔进model,以供后续显示

        m.addAttribute("page", page);

        //6. 跳转到listCategory.jsp

        return "listCategory";

    }

    @RequestMapping("/addCategory")

    public String addCategory(Category c)throws Exception{

        categoryMapper.save(c);

        return "redirect:listCategory";  //添加成功,重定向到分类查询页面

    }

    @RequestMapping("/deleteCategory")

    public String deleteCategory(int id)throws Exception{

        categoryMapper.delete(id);

        return "redirect:listCategory";  //删除成功,重定向到分类查询页面

    }

    @RequestMapping("/updateCategory")    //修改方法

    public String updateCategory(Category c)throws Exception{

        categoryMapper.update(c);

        return "redirect:listCategory";  //修改成功,重定向到分类查询页面

    }

    @RequestMapping("/editCategory")

    public String editCategory(int id ,Model m)throws Exception{

        Category c = categoryMapper.get(id); //根据id查询

        m.addAttribute("c", c); //查到展示到修改页面

        return "editCategory";  //跳转到修改页面

    }

}
步骤十一:创建listCategory.jsp (不同于JPA的点--page中参数)
用jstl遍历从CategoryController传递过来的集合:cs。
通过page.getList遍历当前页面的Category对象。
在分页的时候通过page.pageNum获取当前页面,page.pages获取总页面数。
注:page.getList会返回一个泛型是Category的集合。
<%@ page language="java" contentType="text/html; charset=UTF-8"

    pageEncoding="UTF-8"%>

<%@ taglib uri="http://java.sun.com/jsp/jstl/core" prefix="c" %>

<!DOCTYPE html PUBLIC "-//W3C//DTD HTML 4.01 Transitional//EN" "http://www.w3.org/TR/html4/loose.dtd">

<html>

<head>

<meta http-equiv="Content-Type" content="text/html; charset=UTF-8">

<title>分类展示列表</title>

</head>

<body>

<!--     <table align="center" border="1" > -->

<!--         <tr> -->

<!--             <td>id</td> -->

<!--             <td>name</td> -->

<!--         </tr> -->

<%--         <c:forEach items="${cs}" var="c" varStatus="st"> --%>

<!--             <tr> -->

<%--                 <td>${c.id}</td> --%>

<%--                 <td>${c.name}</td> --%>

<!--             </tr> -->

<%--         </c:forEach> --%>

<!--     </table> -->

<div style="width:500px;margin:20px auto;text-align: center">

    <table align='center' border='1' cellspacing='0'>

        <tr>

            <td>id</td>

            <td>name</td>

            <td>编辑</td>

            <td>删除</td>

        </tr>

        <c:forEach items="${page.list}" var="c" varStatus="st">

            <tr>

                <td>${c.id}</td>

                <td>${c.name}</td>

                <td><a href="editCategory?id=${c.id}">编辑</a></td>

                <td><a href="deleteCategory?id=${c.id}">删除</a></td>

            </tr>

        </c:forEach>

    </table>

    <br>

    <div>

                <a href="?start=1">[首  页]</a>  <!-- 这是相对路径的写法。 前面没有斜线就是相对当前路径加上这个地址。 -->

            <c:if test="${page.pageNum-1>0}">

                <a href="?start=${page.pageNum-1}">[上一页]</a>

            </c:if>

            <c:if test="${page.pageNum+1<page.pages+1}">

                <a href="?start=${page.pageNum+1}">[下一页]</a>

            </c:if>

                <a href="?start=${page.pages}">[末  页]</a>

    </div>

    <br>
   <div>当前页/总页数:<a href="?start=${page.pageNum}">${page.pageNum}</a>/<a href="?start=${page.pages}">${page.pages}</a> </div>
    <br>

    <form action="addCategory" method="post">

         添加分类:

        name: <input name="name"> <br>

    <button type="submit">提交</button>

    </form>

</div>

</body>

</html>
步骤十二:创建editCategory.jsp
修改分类的页面
<%@ page language="java" contentType="text/html; charset=UTF-8"

    pageEncoding="UTF-8"%>

<!DOCTYPE html PUBLIC "-//W3C//DTD HTML 4.01 Transitional//EN" "http://www.w3.org/TR/html4/loose.dtd">

<html>

<head>

<meta http-equiv="Content-Type" content="text/html; charset=UTF-8">

<title>Insert title here</title>

</head>

<body>

    <div style="margin:0px auto; width:500px">

    <form action="updateCategory" method="post">

        name: <input name="name" value="${c.name}"> <br>

        <input name="id" type="hidden" value="${c.id}">

        <button type="submit">提交</button>

    </form>

    </div>

</body>

</html>
步骤十三:重启测试
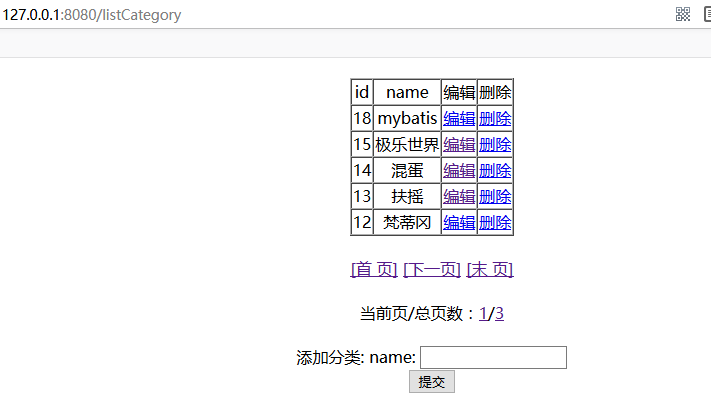
因为在pom中增加了新jar的依赖,所以要手动重启,重启后访问测试地址:http://127.0.0.1:8080/listCategory
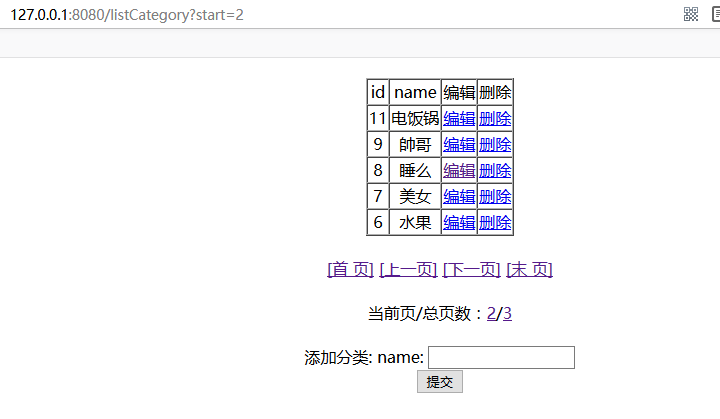
点击下一页:
Spring Boot CRUD+分页(基于Mybatis注解方式)的更多相关文章
- Spring Boot CRUD+分页(基于JPA规范)
步骤一:JPA概念 JPA(Java Persistence API)是Sun官方提出的Java持久化规范,用来方便大家操作数据库. 真正干活的可能是Hibernate,TopLink等等实现了JPA ...
- Spring Boot 框架下使用MyBatis访问数据库之基于XML配置的方式
MyBatis 是一款优秀的持久层框架,它支持定制化 SQL.存储过程以及高级映射.MyBatis 避免了几乎所有的 JDBC 代码和手动设置参数以及获取结果集.MyBatis 可以使用简单的 XML ...
- Spring Boot整合Mybatis(注解方式和XML方式)
其实对我个人而言还是不够熟悉JPA.hibernate,所以觉得这两种框架使用起来好麻烦啊. 一直用的Mybatis作为持久层框架, JPA(Hibernate)主张所有的SQL都用Java代码生成, ...
- spring与hibernate整合配置基于Annotation注解方式管理实务
1.配置数据源 数据库连接基本信息存放到properties文件中,因此先加载properties文件 <!-- jdbc连接信息 --> <context:property-pla ...
- mybatis源码学习--spring+mybatis注解方式为什么mybatis的dao接口不需要实现类
相信大家在刚开始学习mybatis注解方式,或者spring+mybatis注解方式的时候,一定会有一个疑问,为什么mybatis的dao接口只需要一个接口,不需要实现类,就可以正常使用,笔者最开始的 ...
- SpringBoot 源码解析 (九)----- Spring Boot的核心能力 - 整合Mybatis
本篇我们在SpringBoot中整合Mybatis这个orm框架,毕竟分析一下其自动配置的源码,我们先来回顾一下以前Spring中是如何整合Mybatis的,大家可以看看我这篇文章Mybaits 源码 ...
- 6、Spring Boot 2.x 集成 MyBatis
1.6 Spring Boot 2.x 集成 MyBatis 简介 详细介绍如何在Spring Boot中整合MyBatis,并通过注解方式实现映射. 完整源码: 1.6.1 创建 spring-bo ...
- 07.深入浅出 Spring Boot - 数据访问之Mybatis(附代码下载)
MyBatis 在Spring Boot应用非常广,非常强大的一个半自动的ORM框架. 代码下载:https://github.com/Jackson0714/study-spring-boot.gi ...
- Spring Boot简化了基于Spring的应用开发
Spring Boot简化了基于Spring的应用开发,通过少量的代码就能创建一个独立的.产品级别的Spring应用. Spring Boot为Spring平台及第三方库提供开箱即用的设置,这样你就可 ...
随机推荐
- 20165330 2017-2018-2 《Java程序设计》第2周学习总结
课本知识总结 第二章 基本数据类型与数组 标识符:标识类名.变量名.方法名.类型名.数组名及文件名的有效字符序列. 标识符的第一个字符不能是数字字符,且字母区分大小写. Java语言使用Unicode ...
- Apache 2.4 配置多个虚拟主机的问题
以前一直用Apache2.2的版本,最近升级到了2.4的版本,尝尝新版本嘛. 不过遇到了几个问题,一个就是配置了多个virtualhost,虽然没有报错,不过除了第一可以正常访问外,其他的都存在403 ...
- Android 查看自己的keystore的别名及相关信息
1.在DOS窗口下进入自己的keystore所在位置,输入 keytool -list -v -keystore xxxx.keystore -storepass 密码 xxxx.keystore是 ...
- 在django项目中手动模拟实现settings的配置
一 文件结构目录 手写配置文件 有两套配置文件,默认配置,用户的配置 如果某个字段,用户配置了,就用用户的,如果没配置,就用默认的 1.1 test import os os.environ.se ...
- spring 拾遗
1.@PostConstruct VS init-method 1.1 both BeanPostProcessor 1.2 @PostConstruct is a JSR-250 annotati ...
- Mybatis框架学习总结-解决字段名与实体类属性名不相同的冲突
在平时的开发中,我们表中的字段名和表对应实体类的属性名称不一定是完全相同的. 1.准备演示需要使用的表和数据 CREATE TABLE orders( order_id INT PRIMARY KEY ...
- Navicat连接mysql8出现1251错误
我的博客:www.yuehan.online 因为加密方式的问题,在使用mysql8.0的时候需要修改加密规则才能连接navicat. 打开cmd,输入以下命令: ALTER USER 'root ...
- java 字符串截取的方法
1.split()+正则表达式来进行截取. 将正则传入split().返回的是一个字符串数组类型.不过通过这种方式截取会有很大的性能损耗,因为分析正则非常耗时. String str = " ...
- 宏表达式与函数、#undef、条件编译、
宏表达式在预编译期被处理,编译器不知道宏表达式的存在. 宏表达式没有任何的调用开销 宏表达式中不能出现递归定义. C语言中强大的内置宏 __FILE__:被编译的文件名 //双底线 __LINE__: ...
- Django中contenttype的应用
content_type表将app名称与其中的表的关系进行保存 通过下边的示例来理解content_type的具体应用: models: from django.db import models fr ...