
Angular10 组件之间的通讯
1 父组件和子组件之间的通讯
2 利用中间组件实现两个组件之间的通讯
3 利用服务实现两个组件之间的通讯
2017年8月26日20:09:13
待更新...
1 组件之间的关系图
1.1 父子关系
1.2 兄弟关系
1.3 没啥关系
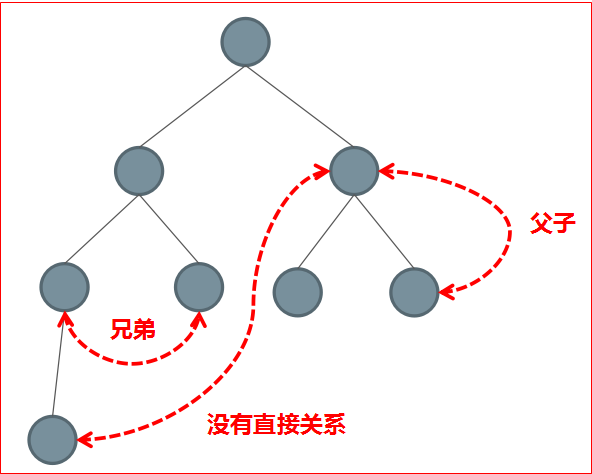
2 组件之间有以下几种典型的通讯方案
2.1 直接父子关系
2.1.1 父组件直接访问子组件的 public 属性和方法
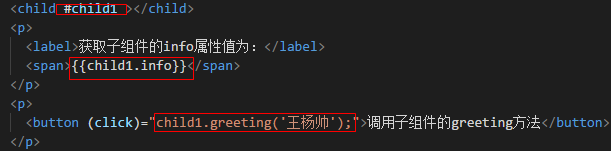
技巧01:父组件的视图中调用子组件的方法需要利用模板变量
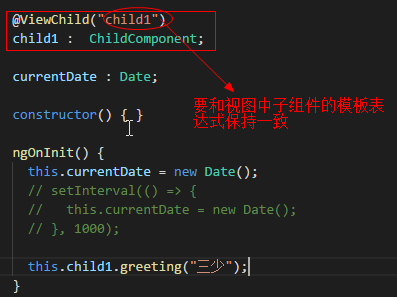
技巧02:父组件的类中调用子组件的方法需利用@ViewChild装饰器
2.1.2 借助于 @Input 和 @Output 进行通讯
就是利用输入属性和输出属性来实现
技巧01:输入属性和输出属性需要用到属性绑定和事件绑定相关的知识
2.2 兄弟关系
利用他们共同的父组件进行通信【有点麻烦】
技巧01:此时他们的父组件相当于一个中间人
2.3 适用于任何关系的方法
2.3.1 借助于service单例进行通讯
2.3.2 利用cookie或者localstorage进行通讯
2.3.3 利用session进行通讯
3 直接调用
对于父子组件而言,父组件可以直接调用子组件的public型属性和方法
缺点:如果父组件直接访问子组件,那么两个组件之间的关系就被固定死了。父子两个组件紧密依赖,谁也离不开谁,也就都不能单独使用了。所以,除非你知道自己在做什么,最好不要直接在父组件里面直接访问子组件上的属性和方法,以免未来一改一大片。
3.1 利用模板变量实现
3.2 利用@ViewChild实现
3.3 代码汇总
》父组件
<div class="panel panel-primary">

  <div class="panel-heading">父组件</div>

  <div class="panel-body">

    <child #child1 ></child>

    <p>

      <label>获取子组件的info属性值为:</label>

      <span>{{child1.info}}</span>

    </p>

    <p>

      <button (click)="child1.greeting('王杨帅');">调用子组件的greeting方法</button>

    </p>

  </div>

  <div class="panel-footer">{{currentDate | date : "yyyy-MM-dd HH:mm:ss"}}</div>

</div>
HTML
import { Component, OnInit, ViewChild } from '@angular/core';

import { ChildComponent } from './child/child.component';

import { AfterViewInit, AfterContentChecked, AfterContentInit, AfterViewChecked } from '@angular/core/src/metadata/lifecycle_hooks';

@Component({

  selector: 'parent',

  templateUrl: './parent.component.html',

  styleUrls: ['./parent.component.scss']

})

export class ParentComponent implements OnInit {

  @ViewChild("child1")

  child1 :  ChildComponent;

  currentDate : Date;

  constructor() { }

  ngOnInit() {

    this.currentDate = new Date();

    // setInterval(() => {

    //   this.currentDate = new Date();

    // }, 1000);

    this.child1.greeting("三少");

  }

}
TS
》子组件
<div class="panel panel-primary">

  <div class="panel-heading">子组件</div>

  <div class="panel-body">

  </div>

  <div class="panel-footer">{{currentDate | date : "yyyy-MM-dd HH:mm:ss"}}</div>

</div>
HTML
import { Component, OnInit, DoCheck,AfterViewChecked, EventEmitter, AfterContentInit, Output, Input, OnChanges, SimpleChanges, AfterViewInit, AfterContentChecked } from '@angular/core';

@Component({

  selector: 'child',

  templateUrl: './child.component.html',

  styleUrls: ['./child.component.scss']

})

export class ChildComponent implements OnInit {

  currentDate : Date;

  info : string;

  constructor() { }

  ngOnInit() {

    this.info = "子组件中的info属性";

    this.currentDate = new Date();

    // setInterval(() => {

    //   this.currentDate = new Date();

    // }, 1000);

  }

  greeting(name : string) : void {

    alert("子组件中greeting方法的返回值: Helo " + name);

    console.log("子组件中greeting方法的返回值: Helo " + name);

  }

}
TS
4 @Input 和 @Output
就是通过属性绑定来实现父组件向子组件的输入属性船值;通过事件绑定来实现子组件向父组件传值
技巧01:其实可以直接利用双向绑定来实现
4.1 父组件向子组件传值
子组件利用@Input定义一个输入属性,父组件视图中在子组件的标签上利用属性绑定来实现
4.2 子组件向父组件传值
子组件利用@Output定义一个输出属性,父组件视图中在子组件标签上利用事件来实现
4.3 代码汇总
》父组件
<div class="panel panel-primary">

  <div class="panel-heading">父组件</div>

  <div class="panel-body">

    <!-- 这三种写法都可以实现 -->

    <!-- <child [info]="parentInfo" (infoChange)="onInfoChange($event)" ></child> -->

    <!-- <child [info]="parentInfo" (infoChange)="parentInfo=$event" ></child>   -->

    <child [(info)]="parentInfo" ></child>

    <p>

      {{parentInfo}}

    </p>

  </div>

  <div class="panel-footer">{{currentDate | date : "yyyy-MM-dd HH:mm:ss"}}</div>

</div>
HTML
import { Component, OnInit, ViewChild } from '@angular/core';

import { ChildComponent } from './child/child.component';

import { AfterViewInit, AfterContentChecked, AfterContentInit, AfterViewChecked } from '@angular/core/src/metadata/lifecycle_hooks';

@Component({

  selector: 'parent',

  templateUrl: './parent.component.html',

  styleUrls: ['./parent.component.scss']

})

export class ParentComponent implements OnInit {

  parentInfo : string;

  currentDate : Date;

  constructor() { }

  ngOnInit() {

    this.parentInfo = "王杨帅";

    this.currentDate = new Date();

    // setInterval(() => {

    //   this.currentDate = new Date();

    // }, 1000);

  }

  onInfoChange(info : string) {

    this.parentInfo = info;

  }

}
TS
》子组件
<div class="panel panel-primary">

  <div class="panel-heading">子组件</div>

  <div class="panel-body">

    <p>

      输入属性info的值为:{{info}}

    </p>

    <p>

      <button (click)="onTest()" >点击向父组件发送数据</button>

    </p>

  </div>

  <div class="panel-footer">{{currentDate | date : "yyyy-MM-dd HH:mm:ss"}}</div>

</div>
HTML
import { Component, OnInit, DoCheck,AfterViewChecked, EventEmitter, AfterContentInit, Output, Input, OnChanges, SimpleChanges, AfterViewInit, AfterContentChecked } from '@angular/core';

@Component({

  selector: 'child',

  templateUrl: './child.component.html',

  styleUrls: ['./child.component.scss']

})

export class ChildComponent implements OnInit {

  currentDate : Date;

  @Input()

  info : string;

  @Output()

  infoChange : EventEmitter<string> = new EventEmitter();

  constructor() { }

  ngOnInit() {

    this.currentDate = new Date();

    // setInterval(() => {

    //   this.currentDate = new Date();

    // }, 1000);

  }

  onTest() : void {

    this.infoChange.emit("子组件传过来的数据");

  }

}
TS
5 服务实现
待更新...
6 cookie或localstorage实现
6.1 原理图

6.2 代码汇总
》工具组件
利用投影来简化代码
<div class="panel panel-primary">

  <div class="panel-heading">

    <ng-content select=".heading"></ng-content>

  </div>

  <div class="panel-body">

    <ng-content select=".body"></ng-content>

  </div>

  <div class="panel-footer">

    {{currentDate | date : "yyyy-MM-dd HH:mm:ss"}}

  </div>

</div>
HTML
import { Component, OnInit } from '@angular/core';

import { setInterval } from 'timers';

@Component({

  selector: 'panel',

  templateUrl: './panel.component.html',

  styleUrls: ['./panel.component.scss']

})

export class PanelComponent implements OnInit {

  currentDate : Date;

  constructor() { }

  ngOnInit() {

    this.currentDate = new Date();

    setInterval(() => {

      this.currentDate = new Date();

    }, 1000);

  }

}
TS
》测试组件01
<panel>

  <div class="heading">

    测试组件01

  </div>

  <div class="body">

    <button (click)="onClick()">写入数据到</button>

  </div>

</panel>
HTML
import { Component, OnInit } from '@angular/core';

import { TestService } from '../services/test.service';

@Component({

  selector: 'test01',

  templateUrl: './test01.component.html',

  styleUrls: ['./test01.component.scss']

})

export class Test01Component implements OnInit {

  constructor(

  ) { }

  ngOnInit() {

  }

  onClick() : void {

    // 将对象转化成JSON字符串并存储道浏览器缓存中

    window.localStorage.setItem("user", JSON.stringify({name: "王杨帅", age: 9}));

  }

}
TS
》测试组件02
<panel>

  <div class="heading">

    测试组件02

  </div>

  <div class="body">

    <p>

      <button (click)="onClick()">获取数据</button>

    </p>

  </div>

</panel>
HTML
import { Component, OnInit } from '@angular/core';

import { TestService } from '../services/test.service';

@Component({

  selector: 'test02',

  templateUrl: './test02.component.html',

  styleUrls: ['./test02.component.scss']

})

export class Test02Component implements OnInit {

  constructor(

  ) { }

  ngOnInit() {

  }

  onClick() : void {

    // 从浏览器缓存中获取数据【PS: 获取到的是string类型的数据】

    let data = localStorage.getItem("user");

    console.log(data);

    // 将JSON字符串转化成对象

    let json_data = JSON.parse(data);

    console.log(json_data.name);

    window.localStorage.removeItem("user");

  }

}
TS
7 session实现
待更新...
Angular10 组件之间的通讯的更多相关文章
- 组件之间的通讯:vuex状态管理,state,getters,mutations,actons的简单使用(一)
之前的文章中讲过,组件之间的通讯我们可以用$children.$parent.$refs.props.data... 但问题来了,假如项目特别大,组件之间的通讯可能会变得十分复杂... 这个时候了我们 ...
- vue.js组件之间的通讯-----父亲向儿子传递数据,儿子接收父亲的数据
<!DOCTYPE html> <html lang="en"> <head> <meta charset="UTF-8&quo ...
- angular组件之间的通讯
组件通讯,意在不同的指令和组件之间共享信息.如何在两个多个组件之间共享信息呢. 最近在项目上,组件跟组件之间可能是父子关系,兄弟关系,爷孙关系都有.....我也找找了很多关于组件之间通讯的方法,不同的 ...
- Vue父子组件之间的通讯(学习笔记)
<!DOCTYPE html> <html lang="en"> <head> <meta charset="UTF-8&quo ...
- Angular组件之间通讯
组件之间会有下列3种关系: 1. 父子关系 2. 兄弟关系 3. 没有直接关系 通常采用下列方式处理(某些方式是框架特有)组件间的通讯,如下: 1父子组件之间的交互(@Input/@Output/模板 ...
- Angular 发布订阅模式实现不同组件之间通讯
在我们项目中要实现不同组件之间通讯,Angular的@Input和@Output只能实现有父子组件的限制,如果是复杂跨组件实现不同组件可以通过共享变量的方式实现,比如这个博客的思路:https://w ...
- vue组件的基本使用,以及组件之间的基本传值方式
组件(页面上的每一个部分都是组件) 1.三部分:结构(template),样式(style),逻辑(script) 2.组件的作用:复用 3.模块包含组件 4.组件创建: 1.全局组件:Vue ...
- Angular学习笔记之组件之间的交互
1.@Input:可设置属性 当它通过属性绑定的形式被绑定时,值会“流入”这个属性. 在子组件中使用,例如:@Input()name:string 父组件定义宾亮,并在父组件的模板中绑定,例如: 子组 ...
- React组件间的通讯
组件化开发应该是React核心功能之一,组件之间的通讯也是我们做React开发必要掌握的技能.接下来我们将从组件之间的关系来分解组件间如何传递数据. 1.父组件向子组件传递数据 通讯是单向的,数据必须 ...
随机推荐
- UVALive - 6257 K - Chemist's vows 【DFS】【BFS】【DP】
题目链接 https://icpcarchive.ecs.baylor.edu/index.php?option=com_onlinejudge&Itemid=8&page=show_ ...
- Data Structure Graph: prim
最小生成树算法.这里的s是可以随意选取的,不影响树的生成,但是不同的s有不同的dis #include <iostream> #include <vector> #includ ...
- Data Structure Array: Find the Missing Number
http://www.geeksforgeeks.org/find-the-missing-number/ 1. use sum formula, O(n), O(1) 2. use XOR, O(n ...
- sql 常用的查询套路
1. 写一个sql:,查询商城每天的用户数及每天累计用户数 date user_count total_count2016-12-01 1 12016- ...
- mysql 启动服务错误
在博客上看到下面这个文档解决了问题.推荐可以看下. http://blog.csdn.net/yaowuliu/article/details/51133279
- LUA学习之一 初次接触
对于一个开源工程,开始学习它的第一步自然是编译工程. 使用vc编译lua,在网上已有许多介绍,但“纸上得来终觉浅”,自己走一遍还是有必要的. 步骤如下: 1.下载源代码,从lua.org下载最新源代码 ...
- BZOJ 4650 [Noi2016]优秀的拆分:后缀数组
题目链接:http://www.lydsy.com/JudgeOnline/problem.php?id=4650 题意: 给你一个字符串s,问你s及其子串中,将它们拆分成"AABB&quo ...
- Linux配置redis服务器
1.安装redis 2.开启6379端口,使外部机器能够访问 3.
- POJ 3349 Snowflake Snow Snowflakes (哈希表)
题意:每片雪花有六瓣,给出n片雪花,六瓣花瓣的长度按顺时针或逆时针给出,判断其中有没有相同的雪花(六瓣花瓣的长度相同) 思路:如果直接遍历会超时,我试过.这里要用哈希表,哈希表的关键码key用六瓣花瓣 ...
- 第二章 python基础(一)
第一节 Python文件类型 源代码 Python源代码的文件以“py”为扩展名,由Python程序解释,不需要编译 字节代码 Python源文件经编译后生成的扩展名为“pyc”的文件 编译方法 im ...