linux中mysql,mongodb,redis,hbase数据库操作
.实验内容与完成情况:(实验具体步骤和实验截图说明)
(一) MySQL 数据库操作
学生表 Student
Name English Math Computer zhangsan
lisi 根据上面给出的 Student 表,在 MySQL 数据库中完成如下操作:
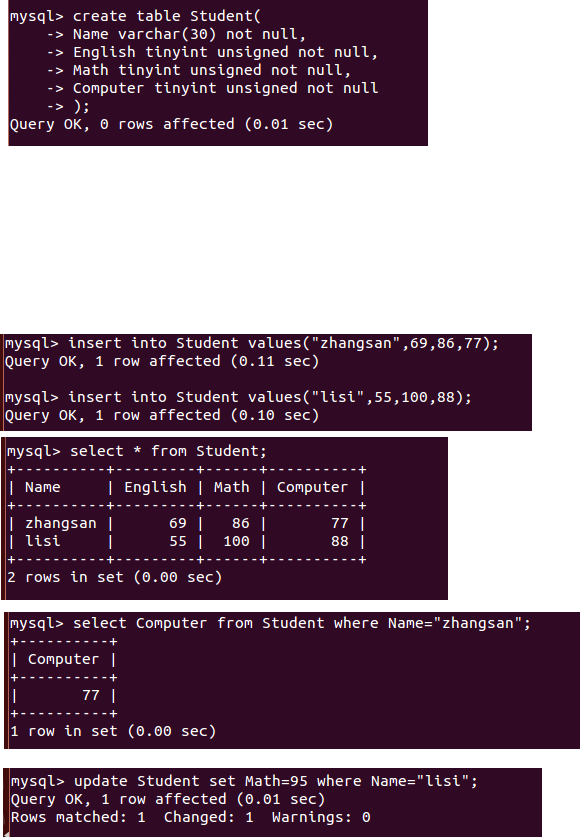
()在 MySQL 中创建 Student 表,并录入数据;
()用 SQL 语句输出 Student 表中的所有记录;
()查询 zhangsan 的 Computer 成绩;
()修改 lisi 的 Math 成绩, 改为 。
根据上面已经设计出的 Student 表,使用 MySQL 的 JAVA 客户端编程实现以下操作:

(1)向 Student 表中添加如下所示的一条记录:

scofield

源代码:

package com.mysql;

import java.sql.*;

public class MysqlTest {

   static final String driver="com.mysql.jdbc.Driver";

   static final String DB="jdbc:mysql://localhost/test1";

   static final String user="root";

   static final String password="wangli";

   public static void main(String[] args) {

       Connection conn=null;

       Statement stmt=null;

       try {

           Class.forName(driver);

           conn=DriverManager.getConnection(DB,user,password);

           stmt=conn.createStatement();

           String sql="insert into Student values('scofied',45,89,100)";

           stmt.executeUpdate(sql);

           System.out.println("插入成功!");

       } catch (SQLException | ClassNotFoundException e) {

        // TODO Auto-generated catch block

        e.printStackTrace();

    }finally {

        if(stmt!=null) {

                try {

                    stmt.close();

                } catch (SQLException e) {

                    // TODO Auto-generated catch block

                    e.printStackTrace();

                }

        }

        if(conn!=null) {

            try {

                conn.close();

            } catch (SQLException e) {

                e.printStackTrace();

            }

        }

    }

   }

}

(2) 获取 scofield 的 English 成绩信息

源代码:

package com.mysql;

import java.sql.*;

public class MysqlTest {

   static final String driver="com.mysql.jdbc.Driver";

   static final String DB="jdbc:mysql://localhost/test1";

   static final String user="root";

   static final String password="wangli";

   public static void main(String[] args) {

       Connection conn=null;

       Statement stmt=null;

       ResultSet rs=null;

       try {

           Class.forName(driver);

           conn=DriverManager.getConnection(DB,user,password);

           stmt=conn.createStatement();

           String sql="select Name,English from Student where Name='scofied' ";

           rs=stmt.executeQuery(sql);

           System.out.println("name"+"\t\t"+"English");

           while(rs.next()) {

               System.out.print(rs.getString()+"\t\t");

               System.out.println(rs.getString());

           }

           System.out.println("输出完成!");

       } catch (SQLException | ClassNotFoundException e) {

        // TODO Auto-generated catch block

        e.printStackTrace();

    }finally {

        if(stmt!=null) {

                try {

                    stmt.close();

                } catch (SQLException e) {

                    // TODO Auto-generated catch block

                    e.printStackTrace();

                }

        }

        if(conn!=null) {

            try {

                conn.close();

            } catch (SQLException e) {

                e.printStackTrace();

            }

        }

    }

   }

}

(二) HBase 数据库操作

学生表 Student

name     score

English     Math     Computer

zhangsan

lisi

根据上面给出的学生表 Student 的信息, 执行如下操作:

() 用 Hbase Shell 命令创建学生表 Student;

()用 scan 命令浏览 Student 表的相关信息;

()查询 zhangsan 的 Computer 成绩;

()修改 lisi 的 Math 成绩, 改为 。

.根据上面已经设计出的 Student 表, 用 HBase API 编程实现以下操作:

()添加数据: English: Math: Computer:

scofield

源代码:

package hbase_test;

import java.io.IOException;

import org.apache.hadoop.conf.Configuration;

import org.apache.hadoop.hbase.HBaseConfiguration;

import org.apache.hadoop.hbase.TableName;

import org.apache.hadoop.hbase.client.Admin;

import org.apache.hadoop.hbase.client.Connection;

import org.apache.hadoop.hbase.client.ConnectionFactory;

import org.apache.hadoop.hbase.client.Put;

import org.apache.hadoop.hbase.client.Table;

public class HBaseTest {

    public static Configuration configuration;

    public static Connection connection;

    public static Admin admin;

    public static void main(String[] args) {

        configuration=HBaseConfiguration.create();

        configuration.set("hbase.rootdir", "hdfs://localhost:9000/hbase");

        try {

            connection=ConnectionFactory.createConnection(configuration);

            admin=connection.getAdmin();

            insertRow("Student","scofield","score","English","");

            insertRow("Student","scofield","score","Math","");

            insertRow("Student","scofield","score","Computer","");

            System.out.println("插入成功!");

        } catch (IOException e) {

            // TODO Auto-generated catch block

            e.printStackTrace();

        }

        close();

    }

    public static void insertRow(String tableName, String rowKey, String colFamily, String col, String val) {

        try {

            Table table = connection.getTable(TableName.valueOf(tableName));

            Put put = new Put(rowKey.getBytes());

            put.addColumn(colFamily.getBytes(), col.getBytes(), val.getBytes());

            table.put(put);

            table.close();

        } catch (IOException e) {

            // TODO Auto-generated catch block

            e.printStackTrace();

        }

    }

    public static void close() {

        try {

            if (admin != null) {

                admin.close();

            }

            if(null!=connection) {

                connection.close();

            }

        } catch (IOException e) {

            // TODO Auto-generated catch block

            e.printStackTrace();

        }

    }

}

(2)获取 scofield 的 English 成绩信息。

源代码:

package hbase_test;

import java.io.IOException;

import org.apache.hadoop.conf.Configuration;

import org.apache.hadoop.hbase.Cell;

import org.apache.hadoop.hbase.CellUtil;

import org.apache.hadoop.hbase.HBaseConfiguration;

import org.apache.hadoop.hbase.TableName;

import org.apache.hadoop.hbase.client.Admin;

import org.apache.hadoop.hbase.client.Connection;

import org.apache.hadoop.hbase.client.ConnectionFactory;

import org.apache.hadoop.hbase.client.Get;

import org.apache.hadoop.hbase.client.Put;

import org.apache.hadoop.hbase.client.Result;

import org.apache.hadoop.hbase.client.Table;

public class HBaseTest2 {

    public static Configuration configuration;

    public static Connection connection;

    public static Admin admin;

    public static void main(String[] args) {

        configuration=HBaseConfiguration.create();

        configuration.set("hbase.rootdir", "hdfs://localhost:9000/hbase");

        try {

            connection=ConnectionFactory.createConnection(configuration);

            admin=connection.getAdmin();

            getData("Student","scofield","score","English");

            System.out.println("输出完成!");

        } catch (IOException e) {

            // TODO Auto-generated catch block

            e.printStackTrace();

        }

        close();

    }

    public static void getData(String tableName, String rowKey, String colFamily, String col) {

        try {

            Table table = connection.getTable(TableName.valueOf(tableName));

            Get get=new Get(rowKey.getBytes());

            get.addColumn(colFamily.getBytes(), col.getBytes());

            Result result=table.get(get);

            showCell(result);

            table.close();

        } catch (IOException e) {

            // TODO Auto-generated catch block

            e.printStackTrace();

        }

    }

    private static void showCell(Result result) {

        Cell[] cells=result.rawCells();

        for(Cell cell:cells) {

            System.out.println("RowName:"+new String(CellUtil.cloneRow(cell))+"     ");

            System.out.println("Timetamp:"+cell.getTimestamp()+"     ");

            System.out.println("column Family"+new String(CellUtil.cloneFamily(cell))+"     ");

            System.out.println("row Name:"+new String(CellUtil.cloneValue(cell))+"     ");

            System.out.println("value"+new String(CellUtil.cloneValue(cell))+"     ");

        }

    }

    public static void close() {

        try {

            if (admin != null) {

                admin.close();

            }

            if(null!=connection) {

                connection.close();

            }

        } catch (IOException e) {

            // TODO Auto-generated catch block

            e.printStackTrace();

        }

    }

}

(三) Redis 数据库操作

Student 键值对如下:

zhangsan:{

English:

Math:

Computer:

}

lisi:{

English:

Math:

Computer:

}

. 根据上面给出的键值对, 完成如下操作:

()用 Redis 的哈希结构设计出学生表 Student (键值可以用 student.zhangsan 和 student.lisi来表示两个键值属于同一个表);

() 用 hgetall 命令分别输出 zhangsan 和 lisi 的成绩信息;

() 用 hget 命令查询 zhangsan 的 Computer 成绩;

()修改 lisi 的 Math 成绩, 改为 。

.根据上面已经设计出的学生表 Student, 用 Redis 的 JAVA 客户端编程(jedis),实现如下
操作:
()添加数据: English: Math: Computer:
该数据对应的键值对形式如下:
scofield:{
English:
Math:
Computer: }
(四) MongoDB 数据库操作
Student 文档如下:
{
“name”: “zhangsan”,
“score”: {
“English”: ,
“Math”: ,
“Computer”:
} } {
“name”: “lisi”,
“score”: {
“English”: ,
“Math”: ,
“Computer”:
} } .根据上面给出的文档,完成如下操作:
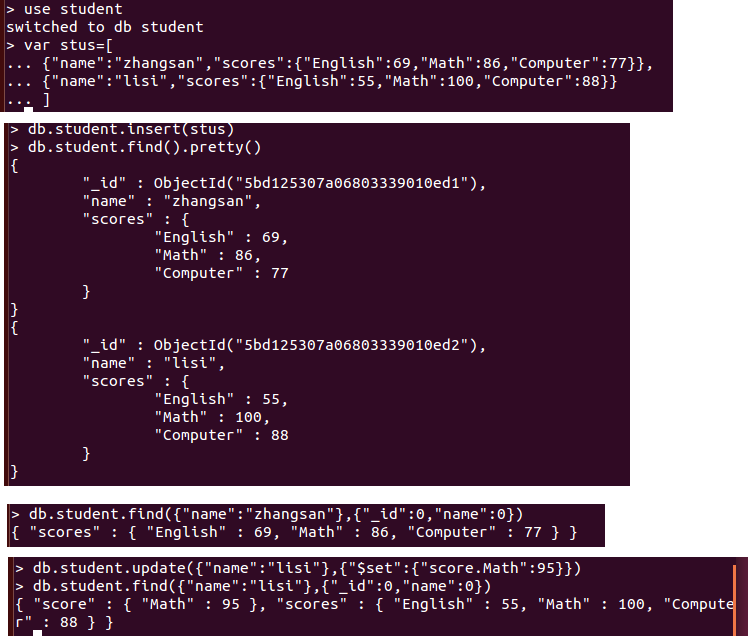
() 用 MongoDB Shell 设计出 student 集合;
()用 find()方法输出两个学生的信息;
()用 find()方法查询 zhangsan 的所有成绩(只显示 score 列);
()修改 lisi 的 Math 成绩, 改为 。
.根据上面已经设计出的 Student 集合,用 MongoDB 的 Java 客户端编程,实现如下操作:

() 添加数据: English: Math: Computer:

与上述数据对应的文档形式如下:

{

“name”: “scofield”,

“score”: {

“English”: ,

“Math”: ,

“Computer”:

} }

源代码:

package com.mongo;

import java.util.ArrayList;

import java.util.List;

import org.bson.Document;

import com.mongodb.MongoClient;

import com.mongodb.client.MongoCollection;

import com.mongodb.client.MongoDatabase;

public class MongoTest {

    public static void main(String[] args) {

        MongoClient mongoClient=new MongoClient("localhost",);

        MongoDatabase mongoDatabase=mongoClient.getDatabase("student");

        MongoCollection<Document> collection=mongoDatabase.getCollection("student");

        Document document=new Document("name","scofield").append("score",

                new Document("English",).append("Math", ).append("Computer",

                        ));

        List<Document> documents=new ArrayList<Document>();

        documents.add(document);

        collection.insertMany(documents);

        System.out.println("文档插入成功!");

    }

}

实验截图:

(2)获取 scofield 的所有成绩成绩信息(只显示 score 列)

源代码:

package com.mongo;

import org.bson.Document;

import com.mongodb.MongoClient;

import com.mongodb.client.MongoCollection;

import com.mongodb.client.MongoCursor;

import com.mongodb.client.MongoDatabase;

public class MongoTest2 {

    public static void main(String[] args) {

        MongoClient mongoClient=new MongoClient("localhost",);

        MongoDatabase mongoDatabase=mongoClient.getDatabase("student");

        MongoCollection<Document> collection=mongoDatabase.getCollection("student");

        MongoCursor<Document> cursor=collection.find(new Document("name","scofield")).

                projection(new Document("score",).append("_id", )).iterator();

        while(cursor.hasNext())

            System.out.println(cursor.next().toJson());

    }

}
linux中mysql,mongodb,redis,hbase数据库操作的更多相关文章
- Scrapy连接到各类数据库(SQLite,Mysql,Mongodb,Redis)
如何使用scrapy连接到(SQLite,Mysql,Mongodb,Redis)数据库,并把爬取的数据存储到相应的数据库中. 一.SQLite 1.修改pipelines.py文件加入如下代码 # ...
- 数据库们~MySQL~MongoDB~Redis
mysql基础 mysql进阶 python操作mysql MongoDB Redis
- Linux中python3,django,redis以及mariab的安装
1. Linux中python3,django,redis以及mariab的安装 2. CentOS下编译安装python3 编译安装python3.6的步骤 1.下载python3源码包 wget ...
- linux中MySQL主从配置(Django实现主从读写分离)
一 linux中MySQL主从配置原理(主从分离,主从同步) mysql主从配置的流程大体如图: 1)master会将变动记录到二进制日志里面: 2)master有一个I/O线程将二进制日志发送到sl ...
- 转载-清除Linux中MySQL的使用痕迹~/.mysql_history
原文地址:清除Linux中MySQL的使用痕迹~/.mysql_history 作者:RogerZhuo 原贴:http://bbs.chinaunix.net/thread-3676498-1-1. ...
- 回顾:Linux环境 Mysql新建用户和数据库并授权
回顾:Linux环境 Mysql新建用户和数据库并授权 一.新建用户 //登录Mysql @>mysql -u root -p @>密码 //创建用户 mysql> insert i ...
- hbase数据库操作
.实验内容与完成情况:(实验具体步骤和实验截图说明) (一)编程实现以下指定功能,并用 Hadoop 提供的 HBase Shell 命令完成相同任务: () 列出 HBase 所有的表的相关信息,例 ...
- Python交互数据库(Mysql | Mongodb | Redis)
数据库 Mysql Mysql MySQL是一个关系型数据库管理系统,由瑞典MySQL AB公司开发,后来被Sun公司收购,Sun公司后来又被Oracle公司收购,目前属于Oracle旗下产品 MyS ...
- Linux中mysql的操作
一.mysql服务操作 二.数据库操作 三.数据表操作 四.修改表结构 五.数据备份和恢复 六.卸载数据库
随机推荐
- 为什么不推荐用破解版的winrar
站在winrar公司的角度,作为winrar的开发商或者运营商当然不希望用户使用破解版的winrar,因为这损害了他们的利益,这是屁股问题. 站在用户的角度,我希望免费使用世界上所有的软件.但这个世界 ...
- android json解析(JSONObject方法实现)
今天刚刚学到json解析,看了一整天,大概了解到json就是你通过一个API(我用的聚合数据的API)发送一个请求,接着会收到json数据,比如说天气预报吧,他会给你发送一大段字符串,大概是未来几天的 ...
- vue 之 指令系统介绍
浏览目录 条件渲染 class 与style绑定 事件处理 指令系统介绍 所谓指令系统,大家可以联想咱们的cmd命令行工具,只要我输入一条正确的指令,系统就开始干活了. 在vue中,指令系统,设置一些 ...
- Entity Framework Tutorial Basics(20):Persistence in Entity Framework
Persistence in Entity Framework There are two scenarios when persisting an entity using EntityFramew ...
- js/jq基础(日常整理记录)-3-一个自定义表格
一.一个自定义的表格 这个js是我刚工作的时候,我们老大让我做一个功能,我觉得html自带的table功能单一,没有分页和排序功能,所有就尝试着做一下,所以这个东西就出来了.很久没写博客了,贴出来吧, ...
- [学习笔记]scanf弊端以及解决方案
#include<stdio.h> #include<stdlib.h> #include<unistd.h> int main(void) { ]; //mems ...
- SpringMVC 配置式开发-BeanNameUrlHandlerMapping(七)
第一种处理器映射器BeanNameUrlHandlerMapping.class(注册器映射器 bean节点的class属性中用到的,这种方式dean id属性必须要以“/”开头) 第二种处理器映射 ...
- Binder学习笔记(四)—— ServiceManager如何响应checkService请求
这要从frameworks/native/cmds/servicemanager/service_manager.c:347的main函数说起,该文件编译后生成servicemanager. int ...
- Chrome 67 以后版本无法离线安装crx插件
原文链接:https://blog.csdn.net/wanwuguicang/article/details/80716178 升级了Chrome后无法离线安装扩展 如图: 谷歌自Chrome 67 ...
- Python翻译器
import urllib.request import urllib.parse import json content='有了我,翻译再也不是问题啦' print(content) while c ...