使用Tensorflow object detection API——训练模型(Window10系统)
【数据标注处理】
1、先将下载好的图片训练数据放在models-master/research/images文件夹下,并分别为训练数据和测试数据创建train、test两个文件夹。文件夹目录如下

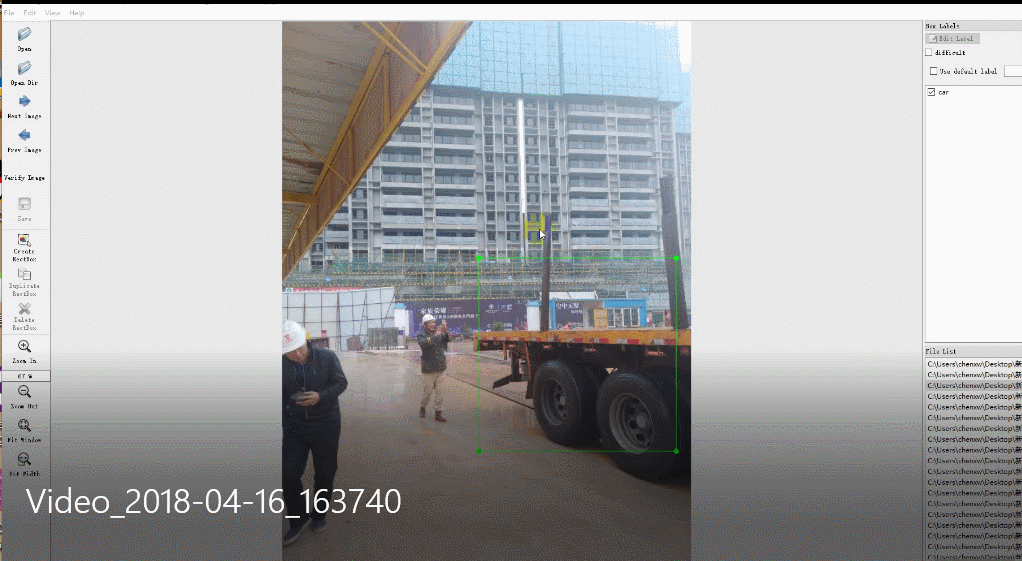
2、下载LabelImg这款小软件对图片进行标注
3、下载完成后解压,直接运行。(注:软件目录最好不要存在中文,否则可能会报错)
4、设置图片目录,逐张打开图片,按快捷键W,然后通过鼠标拖拽实现目标物体框选,随后输入物体类别,单张图片多目标则重复操作,目标框选完成后,保存操作。
5、重复上述操作,直至所有图片完成选定。
【图片标注数据处理】
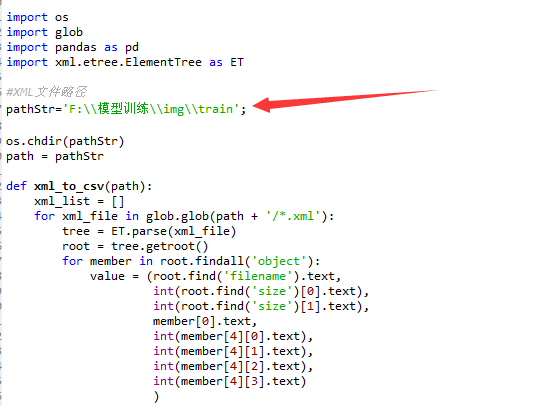
1、打开xml_to_csv.py,修改path 为对应train、test文件夹路径,并运行,在对应目录下将会生成csv文件,将生成的csv文件拷贝到models-master\research\object_detection\data文件夹下。
# -*- coding: utf-8 -*-

"""

Created on Sat Apr 14 10:01:27 2018

@author: Administrator

"""

# -*- coding: utf-8 -*-

"""

Created on Tue Jan 16 00:52:02 2018

@author: Xiang Guo

将文件夹内所有XML文件的信息记录到CSV文件中

"""

import os

import glob

import pandas as pd

import xml.etree.ElementTree as ET

#XML文件路径

pathStr='F:\\模型训练\\img\\train';

os.chdir(pathStr)

path = pathStr

def xml_to_csv(path):

    xml_list = []

    for xml_file in glob.glob(path + '/*.xml'):

        tree = ET.parse(xml_file)

        root = tree.getroot()

        for member in root.findall('object'):

            value = (root.find('filename').text,

                     int(root.find('size')[0].text),

                     int(root.find('size')[1].text),

                     member[0].text,

                     int(member[4][0].text),

                     int(member[4][1].text),

                     int(member[4][2].text),

                     int(member[4][3].text)

                     )

            xml_list.append(value)

    column_name = ['filename', 'width', 'height', 'class', 'xmin', 'ymin', 'xmax', 'ymax']

    xml_df = pd.DataFrame(xml_list, columns=column_name)

    return xml_df

def main():

    image_path = path

    xml_df = xml_to_csv(image_path)

    xml_df.to_csv('person.csv', index=None)

    print('Successfully converted xml to csv.')

main()
2、打开python generate_tfrecord.py,将对应的label改成自己的类别,python generate_tfrecord.py --csv_input=data/person_train.csv --output_path=data/person_train.record,输入对应train、test.csv文件路径,生成对应tfrecord数据文件。

# -*- coding: utf-8 -*-

"""

Created on Sat Apr 14 10:04:27 2018

@author: Administrator

"""

# -*- coding: utf-8 -*-

"""

由CSV文件生成TFRecord文件

"""

"""

Usage:

  # From tensorflow/models/

  # Create train data:

  python csv_to_TFRecords.py --csv_input=data/train_labels.csv  --output_path=data/person_train.record

  # Create test data:

  python csv_to_TFRecords.py --csv_input=data/test_labels.csv  --output_path=test.record

"""

import os

import io

import pandas as pd

import tensorflow as tf

from PIL import Image

from object_detection.utils import dataset_util

from collections import namedtuple, OrderedDict

#这改成object_detection路径

os.chdir('F:\\模型训练\\models-master\\research\\object_detection\\')

flags = tf.app.flags

flags.DEFINE_string('csv_input', '', 'Path to the CSV input')

flags.DEFINE_string('output_path', '', 'Path to output TFRecord')

FLAGS = flags.FLAGS

# TO-DO replace this with label map

#注意将对应的label改成自己的类别!!!!!!!!!!

def class_text_to_int(row_label):

    if row_label == 'person':

        return 1

    else:

        None

def split(df, group):

    data = namedtuple('data', ['filename', 'object'])

    gb = df.groupby(group)

    return [data(filename, gb.get_group(x)) for filename, x in zip(gb.groups.keys(), gb.groups)]

def create_tf_example(group, path):

    with tf.gfile.GFile(os.path.join(path, '{}'.format(group.filename)), 'rb') as fid:

        encoded_jpg = fid.read()

    encoded_jpg_io = io.BytesIO(encoded_jpg)

    image = Image.open(encoded_jpg_io)

    width, height = image.size

    filename = group.filename.encode('utf8')

    image_format = b'jpg'

    xmins = []

    xmaxs = []

    ymins = []

    ymaxs = []

    classes_text = []

    classes = []

    for index, row in group.object.iterrows():

        xmins.append(row['xmin'] / width)

        xmaxs.append(row['xmax'] / width)

        ymins.append(row['ymin'] / height)

        ymaxs.append(row['ymax'] / height)

        classes_text.append(row['class'].encode('utf8'))

        classes.append(class_text_to_int(row['class']))

    tf_example = tf.train.Example(features=tf.train.Features(feature={

        'image/height': dataset_util.int64_feature(height),

        'image/width': dataset_util.int64_feature(width),

        'image/filename': dataset_util.bytes_feature(filename),

        'image/source_id': dataset_util.bytes_feature(filename),

        'image/encoded': dataset_util.bytes_feature(encoded_jpg),

        'image/format': dataset_util.bytes_feature(image_format),

        'image/object/bbox/xmin': dataset_util.float_list_feature(xmins),

        'image/object/bbox/xmax': dataset_util.float_list_feature(xmaxs),

        'image/object/bbox/ymin': dataset_util.float_list_feature(ymins),

        'image/object/bbox/ymax': dataset_util.float_list_feature(ymaxs),

        'image/object/class/text': dataset_util.bytes_list_feature(classes_text),

        'image/object/class/label': dataset_util.int64_list_feature(classes),

    }))

    return tf_example

def main(_):

    writer = tf.python_io.TFRecordWriter(FLAGS.output_path)

    path = os.path.join(os.getcwd(), 'images')

    examples = pd.read_csv(FLAGS.csv_input)

    grouped = split(examples, 'filename')

    for group in grouped:

        tf_example = create_tf_example(group, path)

        writer.write(tf_example.SerializeToString())

    writer.close()

    output_path = os.path.join(os.getcwd(), FLAGS.output_path)

    print('Successfully created the TFRecords: {}'.format(output_path))

if __name__ == '__main__':

    tf.app.run()
3、打开或下载ssd_mobilenet_v1_coco.config配置文件,修改训练、测试数据路径、分类数、批次图片数量(避免超出显存,稍微小点),放置在models-master\research\object_detection\training文件夹下。
# SSD with Mobilenet v1 configuration for MSCOCO Dataset.

# Users should configure the fine_tune_checkpoint field in the train config as

# well as the label_map_path and input_path fields in the train_input_reader and

# eval_input_reader. Search for "PATH_TO_BE_CONFIGURED" to find the fields that

# should be configured.

model {

  ssd {

  #训练的数据类数

    num_classes: 1

    box_coder {

      faster_rcnn_box_coder {

        y_scale: 10.0

        x_scale: 10.0

        height_scale: 5.0

        width_scale: 5.0

      }

    }

    matcher {

      argmax_matcher {

        matched_threshold: 0.5

        unmatched_threshold: 0.5

        ignore_thresholds: false

        negatives_lower_than_unmatched: true

        force_match_for_each_row: true

      }

    }

    similarity_calculator {

      iou_similarity {

      }

    }

    anchor_generator {

      ssd_anchor_generator {

        num_layers: 6

        min_scale: 0.2

        max_scale: 0.95

        aspect_ratios: 1.0

        aspect_ratios: 2.0

        aspect_ratios: 0.5

        aspect_ratios: 3.0

        aspect_ratios: 0.3333

      }

    }

    image_resizer {

      fixed_shape_resizer {

        height: 300

        width: 300

      }

    }

    box_predictor {

      convolutional_box_predictor {

        min_depth: 0

        max_depth: 0

        num_layers_before_predictor: 0

        use_dropout: false

        dropout_keep_probability: 0.8

        kernel_size: 1

        box_code_size: 4

        apply_sigmoid_to_scores: false

        conv_hyperparams {

          activation: RELU_6,

          regularizer {

            l2_regularizer {

              weight: 0.00004

            }

          }

          initializer {

            truncated_normal_initializer {

              stddev: 0.03

              mean: 0.0

            }

          }

          batch_norm {

            train: true,

            scale: true,

            center: true,

            decay: 0.9997,

            epsilon: 0.001,

          }

        }

      }

    }

    feature_extractor {

      type: 'ssd_mobilenet_v1'

      min_depth: 16

      depth_multiplier: 1.0

      conv_hyperparams {

        activation: RELU_6,

        regularizer {

          l2_regularizer {

            weight: 0.00004

          }

        }

        initializer {

          truncated_normal_initializer {

            stddev: 0.03

            mean: 0.0

          }

        }

        batch_norm {

          train: true,

          scale: true,

          center: true,

          decay: 0.9997,

          epsilon: 0.001,

        }

      }

    }

    loss {

      classification_loss {

        weighted_sigmoid {

        }

      }

      localization_loss {

        weighted_smooth_l1 {

        }

      }

      hard_example_miner {

        num_hard_examples: 3000

        iou_threshold: 0.99

        loss_type: CLASSIFICATION

        max_negatives_per_positive: 3

        min_negatives_per_image: 0

      }

      classification_weight: 1.0

      localization_weight: 1.0

    }

    normalize_loss_by_num_matches: true

    post_processing {

      batch_non_max_suppression {

        score_threshold: 1e-8

        iou_threshold: 0.6

        max_detections_per_class: 100

        max_total_detections: 100

      }

      score_converter: SIGMOID

    }

  }

}

train_config: {

  batch_size: 1#训练批次

  optimizer {

    rms_prop_optimizer: {

      learning_rate: {

        exponential_decay_learning_rate {

          initial_learning_rate: 0.004

          decay_steps: 800720

          decay_factor: 0.95

        }

      }

      momentum_optimizer_value: 0.9

      decay: 0.9

      epsilon: 1.0

    }

  }

  #这两行注释

  #fine_tune_checkpoint: "PATH_TO_BE_CONFIGURED/model.ckpt"

  #from_detection_checkpoint: true

  # Note: The below line limits the training process to 200K steps, which we

  # empirically found to be sufficient enough to train the pets dataset. This

  # effectively bypasses the learning rate schedule (the learning rate will

  # never decay). Remove the below line to train indefinitely.

  num_steps: 200000

  data_augmentation_options {

    random_horizontal_flip {

    }

  }

  data_augmentation_options {

    ssd_random_crop {

    }

  }

}

#训练数据

train_input_reader: {

  tf_record_input_reader {

    input_path: "data/person_train.record"

  }

  label_map_path: "data/person.pbtxt"

}

eval_config: {

  num_examples: 8000

  # Note: The below line limits the evaluation process to 10 evaluations.

  # Remove the below line to evaluate indefinitely.

  max_evals: 10

}

#测试数据

eval_input_reader: {

  tf_record_input_reader {

    input_path: "data/person_test.record"

  }

  label_map_path: "data/person.pbtxt"

  shuffle: false

  num_readers: 1

}
4、在data文件下创建对应.pbtxt文件,修改类型对应的ID序号,id序号注意与前面创建CSV文件时保持一致。
item {

  id: 1

  name: 'person'

}

item {

  id: 2

  name: 'car'

}
【训练模型】
1、在models-master\research\object_detection目录下运行python train.py --logtostderr --train_dir=training/ --pipeline_config_path=training/ssd_mobilenet_v1_coco.config

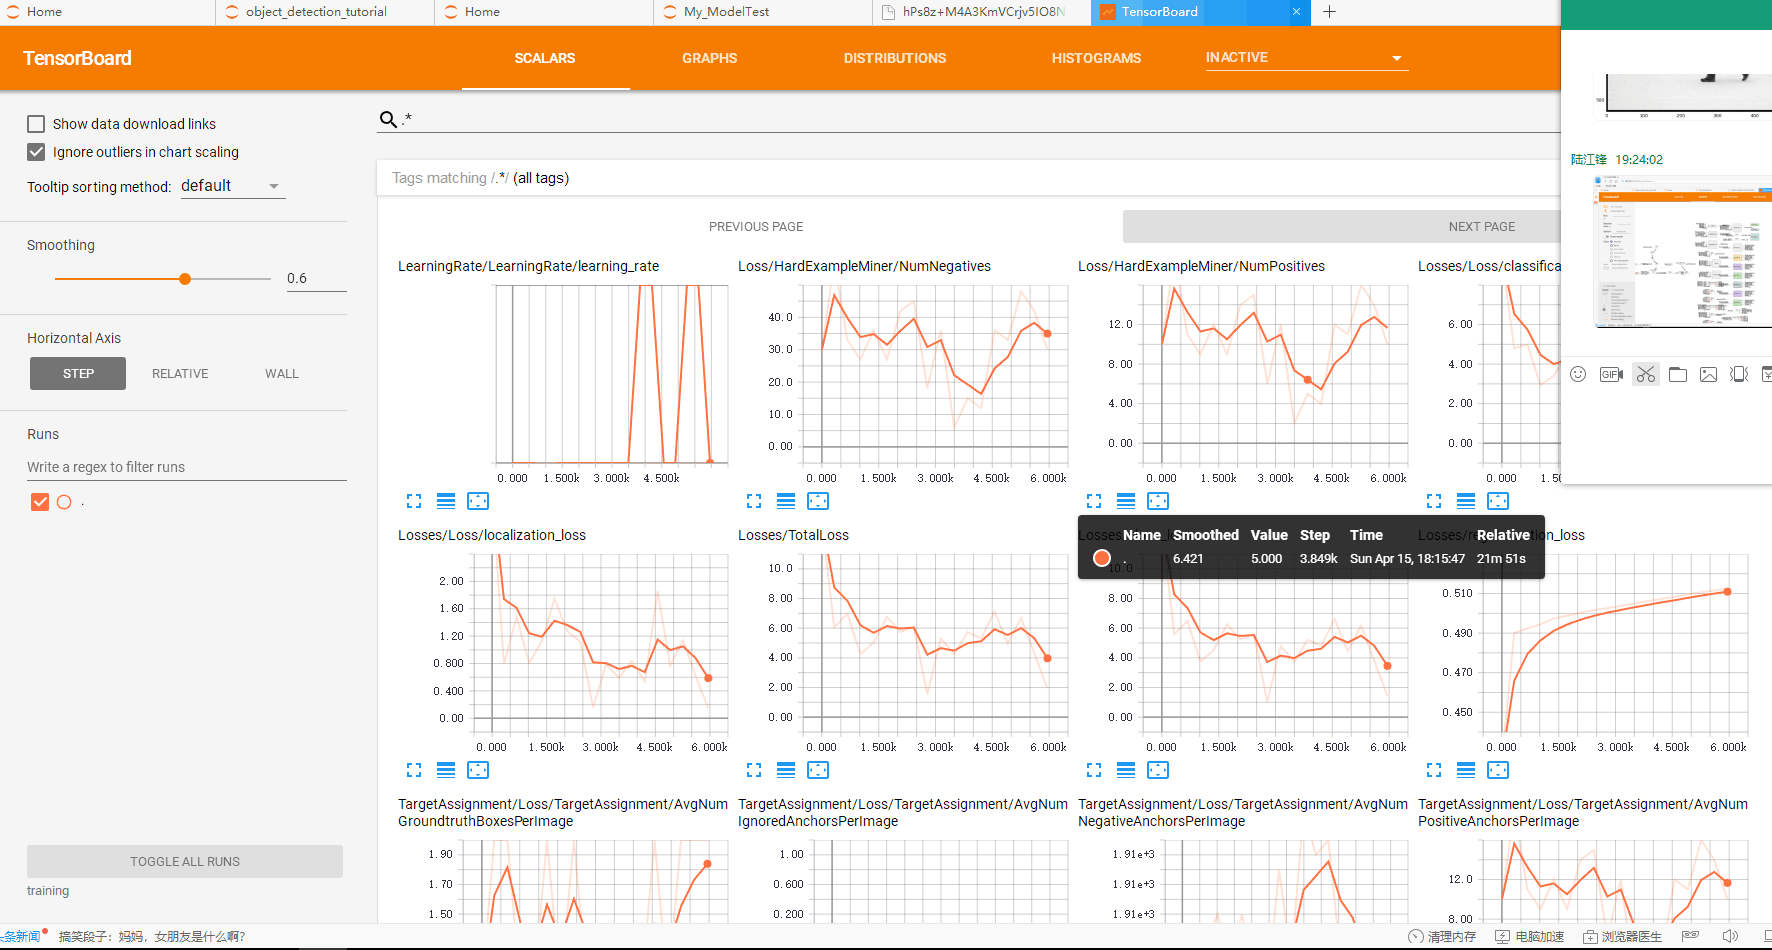
2、等待loss稳定在一个比较小的值之间,则可以停止训练。(直接关闭窗口以上即可)
3、可视化操作:在models-master\research\object_detection文件夹下,运行tensorboard --logdir='training' ,然后在浏览器中输入localhost:6006即可查看模型训练的各项参数情况。
4、Anaconda Prompt 定位到 models\research\object_detection 文件夹下,运行
python export_inference_graph.py \ --input_type image_tensor \ --pipeline_config_path training/ssd_mobilenet_v1_coco.config \ --trained_checkpoint_prefix training/model.ckpt-31012 \ --output_directory person_vehicle_inference_graph
trained_checkpoint_prefix training/model.ckpt-31012 这个checkpoint(.ckpt-后面的数字)可以在training文件夹下找到你自己训练的模型的情况,填上对应的数字(如果有多个,选最大的)。
output_directory tv_vehicle_inference_graph 改成自己的名字
运行完后,可以在person_vehicle_inference_graph (这是我的名字)文件夹下发现若干文件,有saved_model、checkpoint、frozen_inference_graph.pb等。 .pb结尾的就是最重要的frozen model了,还记得第一大部分中frozen model吗?没错,就是我们在后面要用到的部分
【测试模型】
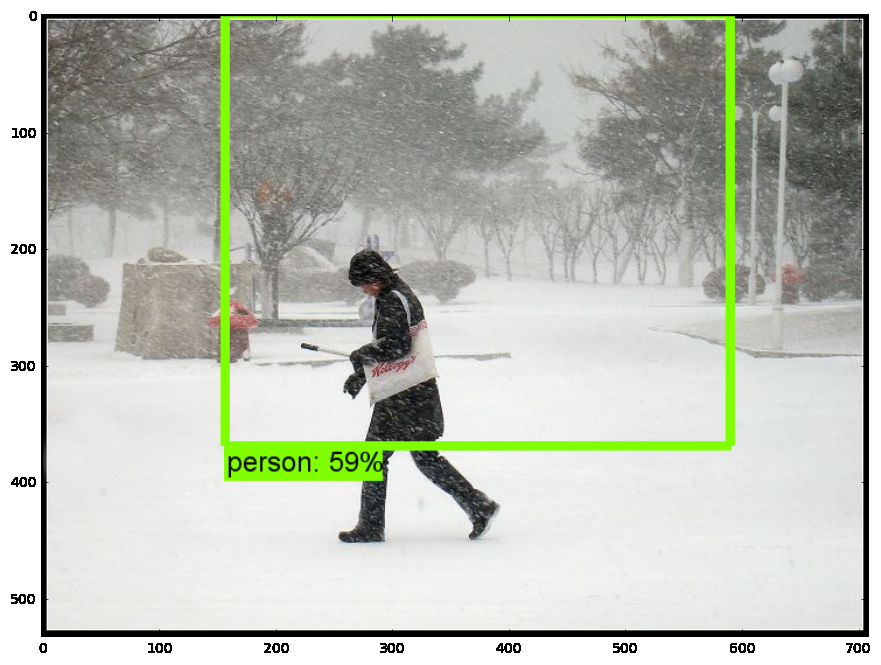
1、打开jupyter notebook,先复制object detection API自带的object_detection_tutorial.ipynb代码;
2、将模型修改为刚刚导出的模型地址,以及pbtxt文件位置;

3、设置测试图片路径

4、运行
源码获取方式,关注公总号RaoRao1994,查看往期精彩-所有文章,,即可获取资源下载链接

更多资源获取,请关注公总号RaoRao1994
使用Tensorflow object detection API——训练模型(Window10系统)的更多相关文章
- 谷歌开源的TensorFlow Object Detection API视频物体识别系统实现教程
视频中的物体识别 摘要 物体识别(Object Recognition)在计算机视觉领域里指的是在一张图像或一组视频序列中找到给定的物体.本文主要是利用谷歌开源TensorFlow Object De ...
- 谷歌开源的TensorFlow Object Detection API视频物体识别系统实现(二)[超详细教程] ubuntu16.04版本
本节对应谷歌开源Tensorflow Object Detection API物体识别系统 Quick Start步骤(一): Quick Start: Jupyter notebook for of ...
- 谷歌开源的TensorFlow Object Detection API视频物体识别系统实现(一)[超详细教程] ubuntu16.04版本
谷歌宣布开源其内部使用的 TensorFlow Object Detection API 物体识别系统.本教程针对ubuntu16.04系统,快速搭建环境以及实现视频物体识别系统功能. 本节首先介绍安 ...
- 【TensorFlow】获取object detection API训练模型的输出坐标
如下图,谷歌开源的object detection API提供了五种网络结构的fine-tuning训练权重,方便我们针对目标检测的需求进行模型训练,本文详细介绍下导出训练模型后,如何获得目标检测框的 ...
- 对于谷歌开源的TensorFlow Object Detection API视频物体识别系统实现教程
本教程针对Windows10实现谷歌近期公布的TensorFlow Object Detection API视频物体识别系统,其他平台也可借鉴. 本教程将网络上相关资料筛选整合(文末附上参考资料链接) ...
- 安装运行谷歌开源的TensorFlow Object Detection API视频物体识别系统
Linux安装 参照官方文档:https://github.com/tensorflow/models/blob/master/research/object_detection/g3doc/inst ...
- 使用TensorFlow Object Detection API+Google ML Engine训练自己的手掌识别器
上次使用Google ML Engine跑了一下TensorFlow Object Detection API中的Quick Start(http://www.cnblogs.com/take-fet ...
- TensorFlow object detection API
cloud执行:https://github.com/tensorflow/models/blob/master/research/object_detection/g3doc/running_pet ...
- Tensorflow object detection API 搭建属于自己的物体识别模型
一.下载Tensorflow object detection API工程源码 网址:https://github.com/tensorflow/models,可通过Git下载,打开Git Bash, ...
随机推荐
- Ueditor/自定义配置
UEditor除 了具有轻量.可定制等优点外,还始终将优化编辑操作.提升用户体验摆在了很重要的位置.在这一点上,除了对编辑器功能.性能.实现细节等不断地改进和追求 创新之外,众多灵活而人性化的自定义配 ...
- Android Fragment用法详解(2)--动态添加Fragment
在上一篇文章<Android Fragment用法详解(1)--静态使用Fragment>我们讲解了Fragment的最简单的用法.这次我们来说一说Fragment复杂一丢丢的用法.在代码 ...
- 『原』在Linux下反编译Android .apk文件 使用apktool dex2jar JD-eclipse
一.使用apktool 将 apk反编译生成程序的源代码和图片.XML配置.语言资源等文件 具体步骤: (1)下载反编译工具包:apktool 官方的打不开 http://apktool.shouji ...
- day17-jdbc 2.jdbc介绍
SQL是一种非过程性语言,只能写一条嘛,你写多条不行嘛.每个数据库都有自己的存储过程.你可以做编程,你可以写多条SQL语句把它放到一起.这就是存储过程.然后用的时候一调它就执行这个逻辑结构了.因为多条 ...
- Linux 使用静态库注意事项
1. 静态库一定要放在生成文件后面 gcc main.c -o main libhello.a 2. 使用静态库时一定要连接所有用到的静态库 gcc main.c -o main liba.a lib ...
- php学习笔记-php中的比较运算符
其中比较难懂的是==和=== ==是只比较两个变量的值,不仅仅是用于比较两个数是否相等,还可以比较int和string,不过会先转化string为int类型再比较,值相等则返回true,值不相等则返回 ...
- Libcurl 简明使用指南
http://blog.csdn.net/weiling_shen/article/details/7620397 我们的程序中使用的是人家的Easy.h头文件.....完成文件的上传和下传. 尤其是 ...
- NSClassFromString 实例话静态库中的类
Class myClass = NSClassFromString("StaticLibyClassName"); StaticLibyClassName是从静态库中实例化一个Cl ...
- p4068 [SDOI2016]数字配对
传送门 分析 我们考虑对所有a[i]质因数分解,然后记cnt[i]为a[i]是由几个质数相乘得到的 然后我们建一个二分图,左面为所有cnt[i]为奇数的点,右面是为偶数的点 我们从源点向左面点连容量b ...
- Luogu 1514 [NOIP2010] 引水入城
我就是过来开心一下……这道题从开坑以来已经堆积了大半年了……今天才发现广搜一直写挂…… 丢个线段覆盖的模板,设$f_{i}$表示覆盖区间[1, i]的最小代价,$g_{i, j}$表示覆盖区间[i, ...