微信小程序自定义顶部导航
注释:自定义导航需要自备相应图片
一、设置自定义顶部导航
Navigation是小程序的顶部导航组件,当页面配置navigationStyle设置为custom的时候可以使用此组件替代原生导航栏。
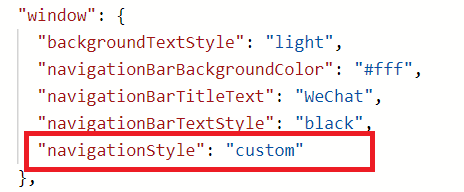
1.全局顶部导航自定义,在app.json的“window”里添加"navigationStyle": "custom"
2.只在某一个页面自定义顶部导航,在该页面的json文件里添加"navigationStyle": "custom"

二、获取手机屏幕数据,app.js
//app.js

const Utils = require('./utils/utils')

App({

  onLaunch: function () {

    // 获取屏幕参数

    try {

      const res = wx.getSystemInfoSync()

      if (res.platform == 'ios') {

        this.globalData.platform = 'ios'

      } else if (res.platform == 'android') {

        this.globalData.platform = 'android'

      }

      // 导航高度

      let navHeight = res.statusBarHeight

      // 屏幕宽度/高度,单位px

      this.globalData.screenWidth = res.screenWidth

      this.globalData.screenHeight = res.screenHeight

      // 状态栏的高度,单位px

      this.globalData.statusBarHeight = res.statusBarHeight

      // 设备像素比

      this.globalData.pixelRatio = res.pixelRatio

      // 可使用窗口宽度,单位px

      this.globalData.winWidth = res.windowWidth

      // 安卓时,胶囊距离状态栏8px,iOS距离4px

      if (res.system.indexOf('Android') !== -1) {

        this.globalData.navHeight = navHeight + 14 + 32

        this.globalData.navTitleTop = navHeight + 8

        // 视窗高度 顶部有占位栏时

        this.globalData.winHeight = res.screenHeight - navHeight - 14 - 32

        // tab主页视窗高度

        this.globalData.winHeightTab = res.windowHeight - navHeight - 14 - 32

      } else {

        this.globalData.navHeight = navHeight + 12 + 32

        this.globalData.navTitleTop = navHeight + 4

        // 视窗高度 顶部有占位栏时

        this.globalData.winHeight = res.screenHeight - navHeight - 12 - 32

        // tab主页视窗高度

        this.globalData.winHeightTab = res.windowHeight - navHeight - 12 - 32

      }

      console.log(wx.getSystemInfoSync(), this.globalData.winHeightTab)

    } catch (e) {

      console.log(e)

    }

  },

  globalData: {

    platform: 'ios',

    pixelRatio: 2,

    statusBarHeight: 20,

    navHeight: 64,

    navTitleTop: 26,

    winHeight: 655,

    winWidth: 750,

    screenWidth: 375,

    screenHeight: 812

  }

})
三、封装导航组件,根目录创建components/navbar文件夹,创建Component
<!--navbar.wxml-->

<view>

  <view class="nav-bar {{isWhite=='true'?'nav-bar-white':''}}" style="height: {{navHeight}}px;background-color:{{navColor}};" catchtap="toTop">

    <text class="navbar-title" style="top:{{navTitleTop}}px;color:{{navTitleColor}};">{{navTitle}}</text>

    <view wx:if="{{noArrow=='false'&&isArrowWhite=='false'&&isNavHome=='false'}}" catchtap="navBack" class="navbar-icon-wrap" style="top:{{navTitleTop}}px;">

      <image class="navbar-icon" src="../../images/arrow_left.png"></image>

    </view>

    <view wx:if="{{isArrowWhite=='true'&&isNavHome=='false'&&noArrow=='false'}}"  catchtap="navBack" class="navbar-icon-wrap" style="top:{{navTitleTop}}px;">

      <image src="../../images/arrow_left_white.png" class="navbar-icon"></image>

    </view>

    <view wx:if="{{isNavHome=='true'&&isArrowWhite=='false'&&noArrow=='false'}}" catchtap="navHome" class="navbar-icon-wrap" style="top:{{navTitleTop}}px;">

      <image src="../../images/Home@3x.png" class="navbar-icon"></image>

    </view>

    <view wx:if="{{isNavHome=='true'&&isArrowWhite=='true'&&noArrow=='false'}}"  catchtap="navHome" class="navbar-icon-wrap" style="top:{{navTitleTop}}px;">

      <image src="../../images/Home@3x_white.png" class="navbar-icon"></image>

    </view>

  </view>

  <view wx:if="{{isWhite=='true'}}" class="nav-bar-place" style="height: {{navHeight}}px;background-color:{{navColor}};"></view>

</view>
// navbar.js

const app = getApp()

Component({

  /**

   * 组件的属性列表

   */

  properties: {

    navHeight: {

      type: Number,

      value: 20

    },

    navTitleTop: {

      type: Number,

      value: 26

    },

    navTitle: { // 导航标题 可以为空

      type: String,

      value: ''

    },

    navTitleColor: { // 导航标题颜色 默认黑色

      type: String,

      value: '#000'

    },

    isWhite: { // 是否为白底

      type: String,

      value: 'true'

    },

    noArrow: { // 取消返回箭头

      type: String,

      value: 'false'

    },

    isArrowWhite: {//白色箭头

      type: String,

      value: 'false'

    },

    isNavHome: { // 返回首页

      type: String,

      value: 'false'

    },

    navColor: { // 导航栏背景色 默认白色

      type: String

    },

    backPath: { // 返回页面路径

      type: String,

      default: ''

    },

    backDelta: { // 返回页面层数

      type: Number,

      default: 1

    }

  },

  /**

   * 组件的初始数据

   */

  data: {

    navHeight: 0,

    navTitleTop: 0

  },

  attached() {

    // 在组件实例进入页面节点树时执行

    // 获取顶部导航高度

    this.setData({

      navHeight: app.globalData.navHeight,

      navTitleTop: app.globalData.navTitleTop

    })

  },

  /**

   * 组件的方法列表

   */

  methods: {

    // 回到首页

    navHome:function(){

      wx.switchTab({

        url: '/pages/index/index'

      })

    },

    // 回到顶部

    toTop: function () {

      wx.pageScrollTo({

        scrollTop: 0,

        duration: 300

      })

      this.triggerEvent('scrollEvent', {}) // 可绑定点击标题栏时的事件

    },

    // 返回上一页

    navBack: function () {

      if (this.properties.backPath === '') {

        wx.navigateBack({

          delta: this.properties.backDelta

        })

      } else {

        wx.redirectTo({

          url: this.properties.backPath

        })

      }

      this.triggerEvent('backEvent', {}) // 可绑定点击返回时的事件

    }

  }

})
/* navbar.wxss */

/*自定义导航栏*/

.nav-bar {

  position: fixed;

  top:;

  left:;

  width: 100%;

  z-index:;

}

.nav-bar-white {

  background-color: #fff;

}

.navbar-title {

  position: absolute;

  height: 32px;

  line-height: 32px;

  /* width: 100%; */

  width: 320rpx;

  text-align: center;

  font-size: 16px;

  color: #000;

  overflow: hidden;

  white-space: nowrap;

  text-overflow: ellipsis;

  left: 28%;

}

.navbar-icon-wrap {

  position: absolute;

  left: 9px;

  width: 44px;

  height: 32px;

  display: flex;

  justify-content: center;

  align-items: center;

}

.navbar-icon {

  width: 44px;

  height: 32px;

}

.navbar-scan {

  width: 28px;

  height: 28px;

}
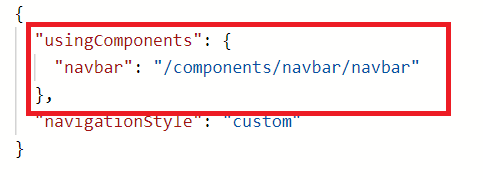
四、引入组件(页面的json文件)
五、使用组件(根据属性可以自由配置导航,这里例举几个样式,也可以根据自己需求更改组件)
<navbar navTitle="顶部导航demo" style="width:200rpx;"></navbar>
—————————————————————————————————
<navbar navTitle="无返回顶部导航" noArrow="true"></navbar>

—————————————————————————————————
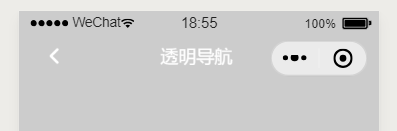
<navbar navTitle="透明导航" isWhite="false" isArrowWhite='true' navTitleColor="#fff"></navbar>
—————————————————————————————————
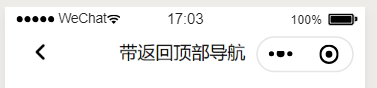
<navbar navTitle="主页按钮导航" isNavHome='true' isArrowWhite='false' noArrow='false'></navbar>

微信小程序自定义顶部导航的更多相关文章
- 微信小程序-自定义底部导航
代码地址如下:http://www.demodashi.com/demo/14258.html 一.前期准备工作 软件环境:微信开发者工具 官方下载地址:https://mp.weixin.qq.co ...
- 微信小程序-自定义菜单导航(实现楼梯效果)
设计初衷 在开发页面时,往往需要实现,点击页面的导航菜单页面滚动到相应位置,滚动页面实现菜单选项的高亮.在html开发中,我们可以用到a标签锚点实现,jq的动画相结合实现类似效果.在框架中vant U ...
- 微信小程序自定义底部导航栏组件+跳转
微信小程序本来封装有底部导航栏,但对于想自定义样式和方法的开发者来说,这并不是很好. 参考链接:https://github.com/ljybill/miniprogram-utils/tree/ma ...
- 微信小程序 自定义头部导航栏和导航栏背景图片 navigationStyle
这两天因为要做一个带背景的小程序头,哭了,小程序导航栏有背景也就算了,还得让导航栏上的背景顺下来,心态小崩.现在可以单独设置一个页面的小程序头了,但是前提是要微信7.0以上的版本,考虑到兼容性问题 ...
- 微信小程序自定义下导航页面切换效果的合理写法
上图::: 导航模板内容页面的定义: <template name="naviBot"> <view class='navwrap t_cen font_26 ...
- 微信小程序自定义头部导航栏
<!--index.wxml--> <view> <navbar id='index_header' background='{{background}}' pageNa ...
- 微信小程序 自定义顶部状态栏
1>项目的结构如下: 2>组件的index.wxml代码如下: <!--没有按钮的情况--> <view class="custom flex_center&q ...
- 微信小程序自定义顶部
wxml <view style="height:{{titleHeight}}px;background:{{background}}" class="user- ...
- 微信小程序之顶部导航栏
wxml: <!--导航条--><view class="navbar"> <text wx:for="{{navbar}}" d ...
随机推荐
- Android.bp文件简介
Android.bp是用来替换Android.mk的配置文件,它使用Blueprint框架来解析.Blueprint是生成.解析Android.bp的工具,是Soong的一部分.Soong则是专为An ...
- Centos7 安装Python3.7
如果电脑自带的python2.7 先卸载 1.强制删除已安装python及其关联 rpm -qa|grep python|xargs rpm -ev --allmatches --nodeps 2.删 ...
- Resnet——深度残差网络(一)
我们都知道随着神经网络深度的加深,训练过程中会很容易产生误差的积累,从而出现梯度爆炸和梯度消散的问题,这是由于随着网络层数的增多,在网络中反向传播的梯度会随着连乘变得不稳定(特别大或特别小),出现最多 ...
- 小白的linux笔记7:批量运行复杂的linux命令组合——BASH简单使用法
linux的BASH就相当于windows下的BAT文件,可以批处理命令.比如写好一个python脚本后,需要在运行时候加参数,但这个参数又不想每次输入,就可以用BASH的方式写好整条命令,然后直接运 ...
- vim编辑超大文件
进入大文件(12g,250w+ lines),vim,耐心等待 有两种方法编辑删除冗余字段 1.set number ,可以通过:+数字组合跳到指定行,输入命令 ":100,200d&q ...
- Win10查看屏保的所在位置
路径 C:\Users\Hlzy\AppData\Local\Packages\Microsoft.Windows.ContentDeliveryManager_cw5n1h2txyewy\Local ...
- SP1805 HISTOGRA - Largest Rectangle in a Histogram
--------------------------------------------------- 我就是想学个单调栈然后全网都是个蓝题 ----------------------------- ...
- P1339 [USACO09OCT]热浪Heat Wave(SPFA)
-------------------------------------- 农夫约翰再显神威,双向热浪,双倍数组 (双倍大小,否则RE) ------------------------------ ...
- ie8兼容rgba写法
ie使用filter解决半透明兼容性问题 filter:progid:DXImageTransform.Microsoft.gradient(startColorstr=#19ffffff,endCo ...
- Qt文件发布
1.打开Qt文件夹下的,其他版本可能为Qt (版本号)for Desktop cmd 2.将Release文件下的exe文件复制到别的文件夹,我这里为G:\Qt\QT_project\ff 3.在Qt ...