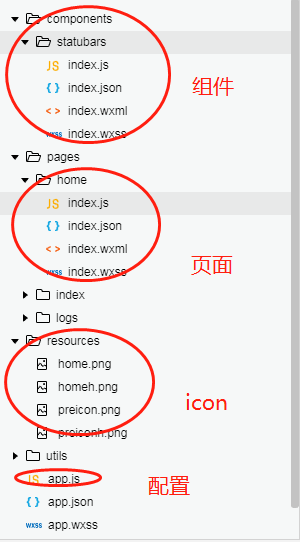
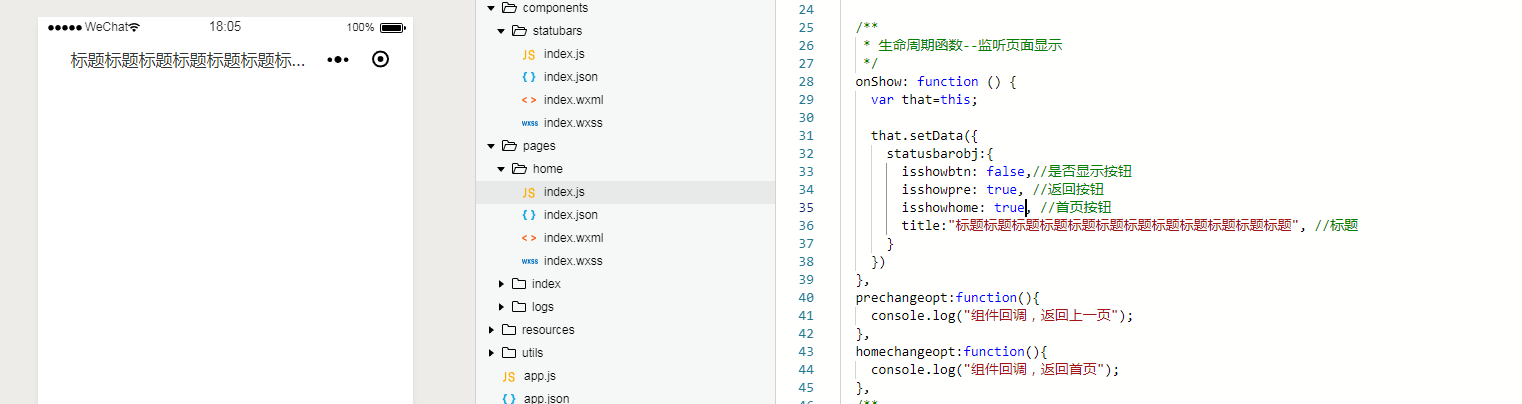
1>项目的结构如下:
2>组件的index.wxml代码如下:
<!--没有按钮的情况-->
<view class="custom flex_center" style="padding-top:{{statusBarHeight}}px" wx:if="{{!isshowbtn}}">
<view class='custom titlev'>{{title}}</view>
</view>
<!--显示按钮的情况-->
<view class="custom flex_center" style="padding-top:{{statusBarHeight}}px" wx:else>
<view class='custom iconv'>
<image src='/resources/preicon.png' class='icon' bindtap='goprepageopt' wx:if="{{isshowpre}}"></image>
<image src='/resources/home.png' class='icon' bindtap='gohomepageopt' wx:if="{{isshowhome}}"></image>
</view>
<view class='custom title'>{{title}}</view>
</view>
<!--站位行,填补空白-->
<view class="empty_custom" style="padding-top:{{statusBarHeight}}px"></view>
3>样式index.wxss文件代码如下:
.flex_center {
position: fixed;
width: 100%;
top: 0;
left: 0;
height: 45px;
background: #fff;
z-index: 999;
display: flex;
}
.custom .iconv {
color: #fff;
font-size: 34rpx;
font-weight: 500;
max-width: 150rpx;
min-width: 80rpx;
text-align: center;
display: flex;
border: 1rpx solid #ccc;
border-radius: 60rpx;
margin: 12rpx 10rpx;
justify-content: space-around;
padding: 0 10rpx;
}
.custom .iconv .icon {
width: 32rpx;
height: 32rpx;
margin: 15rpx 10rpx;
}
.custom .title {
color: #333;
font-size: 34rpx;
font-weight: 500;
min-width: 350rpx;
max-width: 420rpx;
line-height: 45px;
text-align: center;
text-overflow: ellipsis;
overflow: hidden;
white-space: nowrap;
}
.custom .titlev {
color: #333;
font-size: 34rpx;
font-weight: 500;
width: 500rpx;
line-height: 45px;
text-align: center;
text-overflow: ellipsis;
overflow: hidden;
white-space: nowrap;
margin-left: 50rpx;
}
.empty_custom {
height: 45px;
width: 100%;
}
4>组件的逻辑代码,如下:
Component({
/**
* 组件的属性列表
*/
properties: {
receiveData: {
type: null,
observer: function (newVal, oldVal) {
console.log("顶部状态栏参数:");
console.log(newVal);
this.setData({
isshowbtn: newVal.isshowbtn,//是否显示按钮
isshowpre: newVal.isshowpre, //返回按钮
isshowhome:newVal.isshowhome, //首页按钮
title: newVal.title, //标题
})
}
},
},
/**
* 组件的初始数据
*/
data: {
statusBarHeight: getApp().globalData.statusBarHeight
},
/**
* 组件的方法列表
*/
methods: {
//点击返回前一个页面
goprepageopt: function() {
console.log("点击返回上个页面");
this.triggerEvent('prechange', 'false');
},
//点击返回首页页面
gohomepageopt: function() {
console.log("点击返回首页");
this.triggerEvent('homechange', 'false');
},
}
})
5>配置文件的设置
globalData: {
userInfo: null,
statusBarHeight: wx.getSystemInfoSync()['statusBarHeight']
}
6>页面home调用
《1》index.json
{
"navigationStyle":"custom",
"navigationBarTitleText": "标题",
"usingComponents": {
"statusbars":"../../components/statubars/index"
}
}
《2》index.wxml
<statusbars receiveData="{{statusbarobj}}" bindprechange="prechangeopt" bindhomechange="homechangeopt" />
《3》index.js初始化组件数据和组件点击事件的回调
/**
* 生命周期函数--监听页面显示
*/
onShow: function () {
var that=this;
that.setData({
statusbarobj:{
isshowbtn: true,//是否显示按钮
isshowpre: true, //返回按钮
isshowhome: true, //首页按钮
title:"标题标题标题标题标题标题标题标题标题标题标题标题", //标题
}
})
},
prechangeopt:function(){
console.log("组件回调,返回上一页");
},
homechangeopt:function(){
console.log("组件回调,返回首页");
},
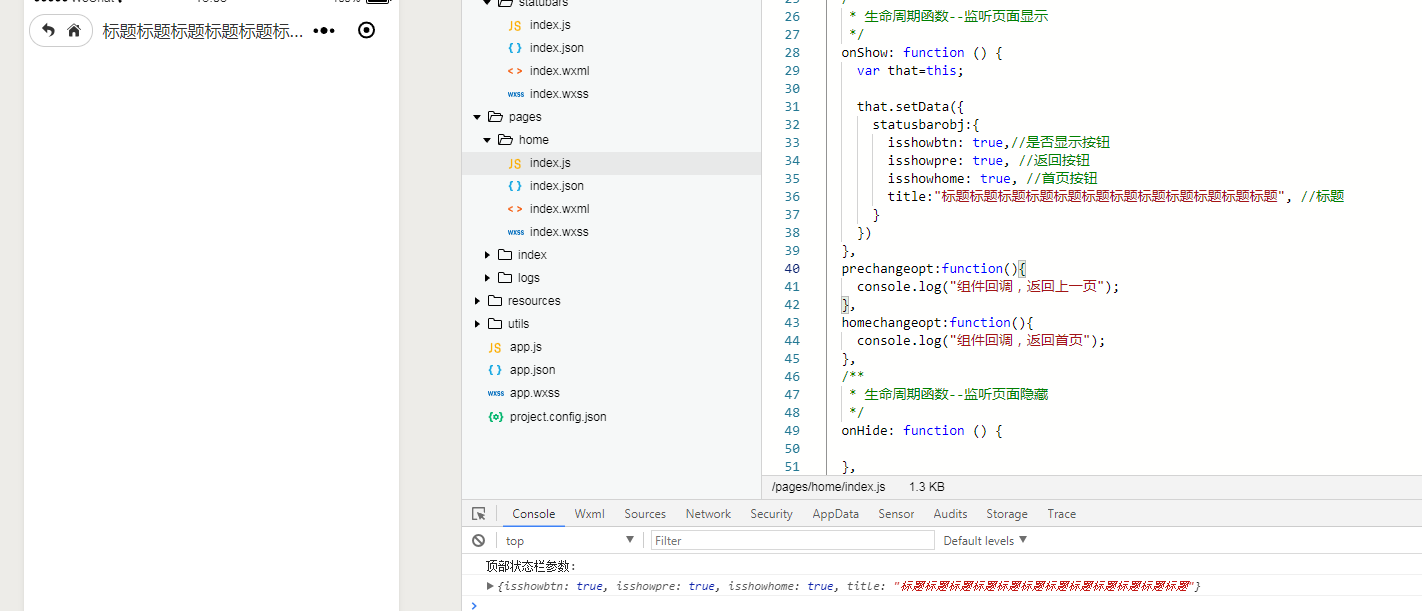
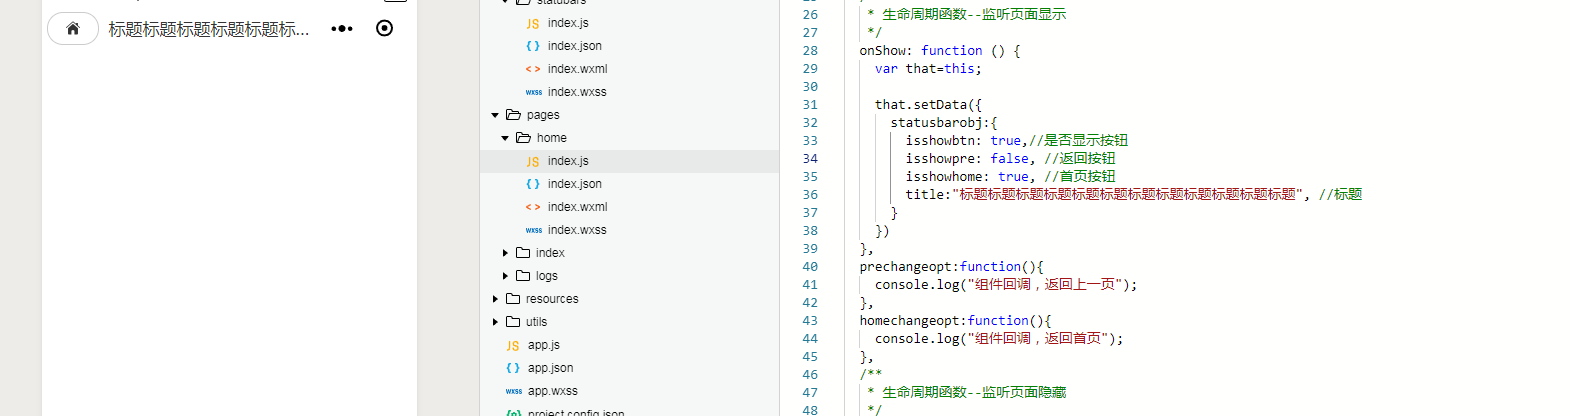
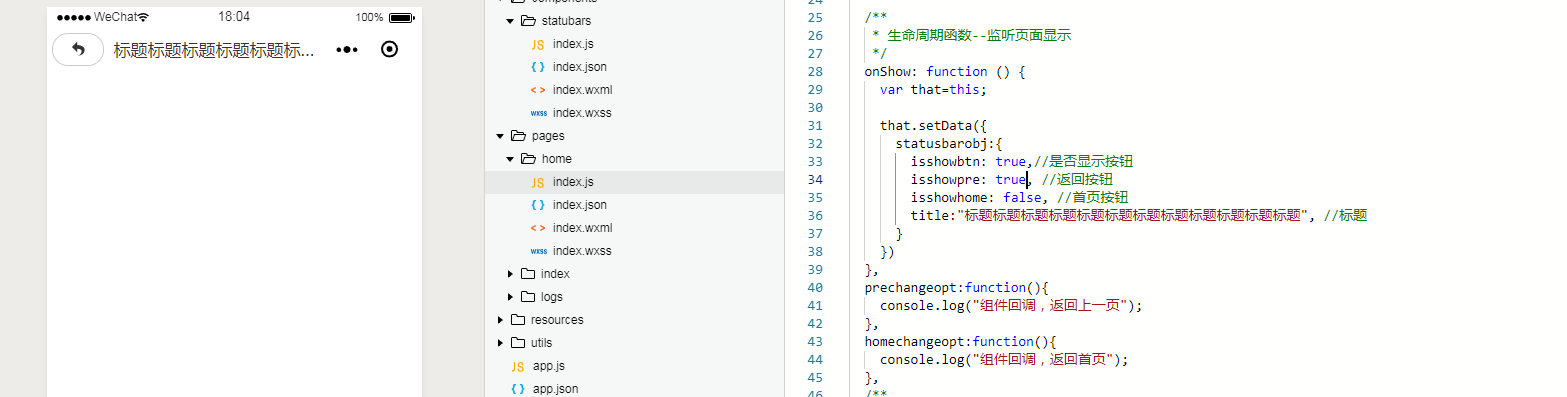
7>测试页面效果
《1》全部显示
《2》只显示首页icon
《3》只显示返回按钮
《4》只显示标题
- 微信小程序自定义顶部导航
注释:自定义导航需要自备相应图片 一.设置自定义顶部导航 Navigation是小程序的顶部导航组件,当页面配置navigationStyle设置为custom的时候可以使用此组件替代原生导航栏. 1 ...
- 微信小程序自定义顶部
wxml <view style="height:{{titleHeight}}px;background:{{background}}" class="user- ...
- 微信小程序——自定义导航栏
微信头部导航栏可能通过json配置: 但是有时候我们项目需求可能需要自定义头部导航栏,如下图所示: 现在具体说一下实现步骤及方法: 步骤: 1.在 app.json 里面把 "navigat ...
- 微信小程序自定义弹窗wcPop插件|仿微信弹窗样式
微信小程序自定义组件弹窗wcPop|小程序消息提示框|toast自定义模板弹窗 平时在开发小程序的时候,弹窗应用场景还是蛮广泛的,但是微信官方提供的弹窗比较有局限性,不能自定义修改.这个时候首先想到的 ...
- 微信小程序自定义 tabbar
一定的需求情况下,无法使用小程序原生的 tabbar 的时候,需要自行实现一个和 tabbar 功能一模一样的自制组件. 查阅了海量的博客和文档之后,亲自踩坑.总结了三种在不使用微信小程序原生 tab ...
- 微信小程序-自定义底部导航
代码地址如下:http://www.demodashi.com/demo/14258.html 一.前期准备工作 软件环境:微信开发者工具 官方下载地址:https://mp.weixin.qq.co ...
- 微信小程序自定义tabbar的实现
微信小程序自定义tabbar的实现 目的:当采用微信的自定义tabbar组件的时候,切换的时候会出现闪屏的效果:当使用微信默认的tabbar的时候,限制了tabbar的数量以及灵活配置. 方案:自己动 ...
- 微信小程序 自定义导航组件 nav头部 全面屏设计
nav-dynamic 微信小程序自定义nav头部组件:适配全面屏设计: 实现功能 初始进入页面时,展示初始状态下的nav样式: 页面滚动时,监听页面滚动事件,展示滚动状态下的nav样式: 根据配置字 ...
- 微信小程序自定义组件,提示组件
微信小程序自定义组件,这里列举了一个常用的提示自定义组件,调用自定义组件中的方法和字段.仅供参考和学习. 编写组件: 在根目录下添加“components”目录,然后像添加Page页面一样添加自定义组 ...
随机推荐
- [日常] 免费的文本比较工具Meld使用
需要在linux桌面环境进行文件比较的时候,发现的一款文本比较工具,并且还有windows版本.之前一直在windows下使用的是beyond compare这个的破解版,这个软件本身是收费的而且还非 ...
- Shell命令-用户用户组管理之visudo、sudo
文件及内容处理 - visudo.sudo 1. visudo:编辑/etc/sudoers文件的专属命令 visudo命令的功能说明 visudo命令专门用来编辑/etc/sudoers这个文件的. ...
- 02-webpack的基本配置-运行webpack
1安装webPack的方式 第一次全局安装 npm i webpack -g 第一次安装了之后以后就不需要在安装了 在项目根录中运行 npm i webpack --save-dev 安装到项目依赖中 ...
- 8.Java基础_if-else和switch选择语句
/* 选择语句(基本与C++相同) if-else语句: 格式一: if(关系式){ 语句体; } 格式二: if(关系式){ 语句体; } else{ 语句体; } 格式三: if(关系式){ 语句 ...
- centos7下安装配置prometheus
prometheus官网:https://prometheus.io/download/ 搭建环境参考:https://blog.csdn.net/baidu_36943075/article/det ...
- DHCP服务基本搭建
DHCP原理 DHCP租约四部曲: A:客户端进行IP请求 当一个DHCP客户机启动时,会自动将自己的IP地址配置成0.0.0.0,由于使用0.0.0.0不能进行正常通信,所以客户机就必须通过DHCP ...
- mask-rcnn环境配置windows
安装pycocotools 这个方法非常简便 但是需要先安装git,并且同时配置一下C++的工具 https://blog.csdn.net/qq_41271957/article/details/8 ...
- 浅谈C++ STL vector 容器
浅谈C++ STL vector 容器 本篇随笔简单介绍一下\(C++STL\)中\(vector\)容器的使用方法和常见的使用技巧.\(vector\)容器是\(C++STL\)的一种比较基本的容器 ...
- Ubuntu16.04 UltraEdit 安装&破解&使用
(1)下载:登录到官网(http://www.ultraedit.com/downloads/uex.html)选在对应的版本进行下载. (2)安装: (使用命令行方式安装)在本地路径进行安装:sud ...
- css3之水波效果
这些效果可谓多种多样,当然用canvas.svg也都能实现奈何对这些有不熟悉(尴尬),不过咱们用css来写貌似也没想象中的那么难吧. 一 悬浮球水波效果 效果图 css .container { w ...
