微信小程序自定义顶部导航
注释:自定义导航需要自备相应图片
一、设置自定义顶部导航
Navigation是小程序的顶部导航组件,当页面配置navigationStyle设置为custom的时候可以使用此组件替代原生导航栏。
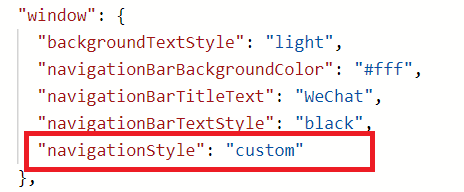
1.全局顶部导航自定义,在app.json的“window”里添加"navigationStyle": "custom"
2.只在某一个页面自定义顶部导航,在该页面的json文件里添加"navigationStyle": "custom"

二、获取手机屏幕数据,app.js
//app.js

const Utils = require('./utils/utils')

App({

  onLaunch: function () {

    // 获取屏幕参数

    try {

      const res = wx.getSystemInfoSync()

      if (res.platform == 'ios') {

        this.globalData.platform = 'ios'

      } else if (res.platform == 'android') {

        this.globalData.platform = 'android'

      }

      // 导航高度

      let navHeight = res.statusBarHeight

      // 屏幕宽度/高度,单位px

      this.globalData.screenWidth = res.screenWidth

      this.globalData.screenHeight = res.screenHeight

      // 状态栏的高度,单位px

      this.globalData.statusBarHeight = res.statusBarHeight

      // 设备像素比

      this.globalData.pixelRatio = res.pixelRatio

      // 可使用窗口宽度,单位px

      this.globalData.winWidth = res.windowWidth

      // 安卓时,胶囊距离状态栏8px,iOS距离4px

      if (res.system.indexOf('Android') !== -1) {

        this.globalData.navHeight = navHeight + 14 + 32

        this.globalData.navTitleTop = navHeight + 8

        // 视窗高度 顶部有占位栏时

        this.globalData.winHeight = res.screenHeight - navHeight - 14 - 32

        // tab主页视窗高度

        this.globalData.winHeightTab = res.windowHeight - navHeight - 14 - 32

      } else {

        this.globalData.navHeight = navHeight + 12 + 32

        this.globalData.navTitleTop = navHeight + 4

        // 视窗高度 顶部有占位栏时

        this.globalData.winHeight = res.screenHeight - navHeight - 12 - 32

        // tab主页视窗高度

        this.globalData.winHeightTab = res.windowHeight - navHeight - 12 - 32

      }

      console.log(wx.getSystemInfoSync(), this.globalData.winHeightTab)

    } catch (e) {

      console.log(e)

    }

  },

  globalData: {

    platform: 'ios',

    pixelRatio: 2,

    statusBarHeight: 20,

    navHeight: 64,

    navTitleTop: 26,

    winHeight: 655,

    winWidth: 750,

    screenWidth: 375,

    screenHeight: 812

  }

})
三、封装导航组件,根目录创建components/navbar文件夹,创建Component
<!--navbar.wxml-->

<view>

  <view class="nav-bar {{isWhite=='true'?'nav-bar-white':''}}" style="height: {{navHeight}}px;background-color:{{navColor}};" catchtap="toTop">

    <text class="navbar-title" style="top:{{navTitleTop}}px;color:{{navTitleColor}};">{{navTitle}}</text>

    <view wx:if="{{noArrow=='false'&&isArrowWhite=='false'&&isNavHome=='false'}}" catchtap="navBack" class="navbar-icon-wrap" style="top:{{navTitleTop}}px;">

      <image class="navbar-icon" src="../../images/arrow_left.png"></image>

    </view>

    <view wx:if="{{isArrowWhite=='true'&&isNavHome=='false'&&noArrow=='false'}}"  catchtap="navBack" class="navbar-icon-wrap" style="top:{{navTitleTop}}px;">

      <image src="../../images/arrow_left_white.png" class="navbar-icon"></image>

    </view>

    <view wx:if="{{isNavHome=='true'&&isArrowWhite=='false'&&noArrow=='false'}}" catchtap="navHome" class="navbar-icon-wrap" style="top:{{navTitleTop}}px;">

      <image src="../../images/Home@3x.png" class="navbar-icon"></image>

    </view>

    <view wx:if="{{isNavHome=='true'&&isArrowWhite=='true'&&noArrow=='false'}}"  catchtap="navHome" class="navbar-icon-wrap" style="top:{{navTitleTop}}px;">

      <image src="../../images/Home@3x_white.png" class="navbar-icon"></image>

    </view>

  </view>

  <view wx:if="{{isWhite=='true'}}" class="nav-bar-place" style="height: {{navHeight}}px;background-color:{{navColor}};"></view>

</view>
// navbar.js

const app = getApp()

Component({

  /**

   * 组件的属性列表

   */

  properties: {

    navHeight: {

      type: Number,

      value: 20

    },

    navTitleTop: {

      type: Number,

      value: 26

    },

    navTitle: { // 导航标题 可以为空

      type: String,

      value: ''

    },

    navTitleColor: { // 导航标题颜色 默认黑色

      type: String,

      value: '#000'

    },

    isWhite: { // 是否为白底

      type: String,

      value: 'true'

    },

    noArrow: { // 取消返回箭头

      type: String,

      value: 'false'

    },

    isArrowWhite: {//白色箭头

      type: String,

      value: 'false'

    },

    isNavHome: { // 返回首页

      type: String,

      value: 'false'

    },

    navColor: { // 导航栏背景色 默认白色

      type: String

    },

    backPath: { // 返回页面路径

      type: String,

      default: ''

    },

    backDelta: { // 返回页面层数

      type: Number,

      default: 1

    }

  },

  /**

   * 组件的初始数据

   */

  data: {

    navHeight: 0,

    navTitleTop: 0

  },

  attached() {

    // 在组件实例进入页面节点树时执行

    // 获取顶部导航高度

    this.setData({

      navHeight: app.globalData.navHeight,

      navTitleTop: app.globalData.navTitleTop

    })

  },

  /**

   * 组件的方法列表

   */

  methods: {

    // 回到首页

    navHome:function(){

      wx.switchTab({

        url: '/pages/index/index'

      })

    },

    // 回到顶部

    toTop: function () {

      wx.pageScrollTo({

        scrollTop: 0,

        duration: 300

      })

      this.triggerEvent('scrollEvent', {}) // 可绑定点击标题栏时的事件

    },

    // 返回上一页

    navBack: function () {

      if (this.properties.backPath === '') {

        wx.navigateBack({

          delta: this.properties.backDelta

        })

      } else {

        wx.redirectTo({

          url: this.properties.backPath

        })

      }

      this.triggerEvent('backEvent', {}) // 可绑定点击返回时的事件

    }

  }

})
/* navbar.wxss */

/*自定义导航栏*/

.nav-bar {

  position: fixed;

  top:;

  left:;

  width: 100%;

  z-index:;

}

.nav-bar-white {

  background-color: #fff;

}

.navbar-title {

  position: absolute;

  height: 32px;

  line-height: 32px;

  /* width: 100%; */

  width: 320rpx;

  text-align: center;

  font-size: 16px;

  color: #000;

  overflow: hidden;

  white-space: nowrap;

  text-overflow: ellipsis;

  left: 28%;

}

.navbar-icon-wrap {

  position: absolute;

  left: 9px;

  width: 44px;

  height: 32px;

  display: flex;

  justify-content: center;

  align-items: center;

}

.navbar-icon {

  width: 44px;

  height: 32px;

}

.navbar-scan {

  width: 28px;

  height: 28px;

}
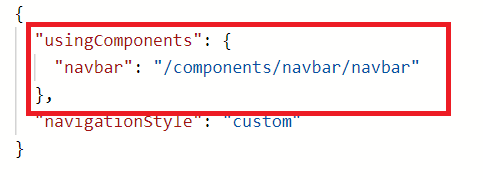
四、引入组件(页面的json文件)
五、使用组件(根据属性可以自由配置导航,这里例举几个样式,也可以根据自己需求更改组件)
<navbar navTitle="顶部导航demo" style="width:200rpx;"></navbar>
—————————————————————————————————
<navbar navTitle="无返回顶部导航" noArrow="true"></navbar>

—————————————————————————————————
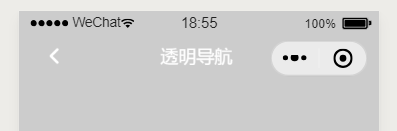
<navbar navTitle="透明导航" isWhite="false" isArrowWhite='true' navTitleColor="#fff"></navbar>
—————————————————————————————————
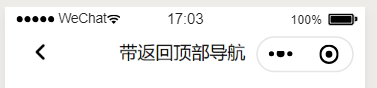
<navbar navTitle="主页按钮导航" isNavHome='true' isArrowWhite='false' noArrow='false'></navbar>

微信小程序自定义顶部导航的更多相关文章
- 微信小程序-自定义底部导航
代码地址如下:http://www.demodashi.com/demo/14258.html 一.前期准备工作 软件环境:微信开发者工具 官方下载地址:https://mp.weixin.qq.co ...
- 微信小程序-自定义菜单导航(实现楼梯效果)
设计初衷 在开发页面时,往往需要实现,点击页面的导航菜单页面滚动到相应位置,滚动页面实现菜单选项的高亮.在html开发中,我们可以用到a标签锚点实现,jq的动画相结合实现类似效果.在框架中vant U ...
- 微信小程序自定义底部导航栏组件+跳转
微信小程序本来封装有底部导航栏,但对于想自定义样式和方法的开发者来说,这并不是很好. 参考链接:https://github.com/ljybill/miniprogram-utils/tree/ma ...
- 微信小程序 自定义头部导航栏和导航栏背景图片 navigationStyle
这两天因为要做一个带背景的小程序头,哭了,小程序导航栏有背景也就算了,还得让导航栏上的背景顺下来,心态小崩.现在可以单独设置一个页面的小程序头了,但是前提是要微信7.0以上的版本,考虑到兼容性问题 ...
- 微信小程序自定义下导航页面切换效果的合理写法
上图::: 导航模板内容页面的定义: <template name="naviBot"> <view class='navwrap t_cen font_26 ...
- 微信小程序自定义头部导航栏
<!--index.wxml--> <view> <navbar id='index_header' background='{{background}}' pageNa ...
- 微信小程序 自定义顶部状态栏
1>项目的结构如下: 2>组件的index.wxml代码如下: <!--没有按钮的情况--> <view class="custom flex_center&q ...
- 微信小程序自定义顶部
wxml <view style="height:{{titleHeight}}px;background:{{background}}" class="user- ...
- 微信小程序之顶部导航栏
wxml: <!--导航条--><view class="navbar"> <text wx:for="{{navbar}}" d ...
随机推荐
- java开发学生信息管理系统 源码
开发环境: Windows操作系统开发工具: Eclipse+Jdk+Tomcat+MYSQL数据库 运行效果图 源码及原文链接:https://javadao.xyz/forum.php?mo ...
- 伪造TGT黄金票据
通过上一篇文章我们初步了解了Kerberos协议的工作过程,解决的两个问题 第一个问题:如何证明你本人是XXX用户的问题 由Authentication Server负责 第二个问题:提供服务的服 ...
- yum的repo的配置文件说明
[base]:容器名称,一定要放在[]中.name:容器说明,可以自己随便写.mirrorlist:镜像站点,这个可以注释掉.baseurl:我们的 yum 源服务器的地址.默认是 CentOS 官方 ...
- luogu2173 [ZJOI2012]网络
题目链接 problem 给出一个无向图,每条边有一种颜色.每种颜色都构成一个森林.需要完成以下操作. 修改点权 修改边的颜色 询问某种颜色的森林中某条路径上点权最大值 solution 颜色数量不超 ...
- vuex学习详细解(主页目录
学习vuex过程中,通过 vue-cli命令来配置和使用vuex笔记整理 vue-cli中配置vuex流程和注意事项 vuex目录配置 vuex的states.js vuex的getters.js v ...
- PMP--1.5 项目管理描述
项目所处的环境将影响每个项目管理过程的实施方式以及项目制约因素的优先顺序. 一. 管理一个项目的过程 管理一个项目通常包括(但不限于): 1. 识别项目需求 2. 处理相关方的各种需要.关注和期望 ...
- 探究Redis两种持久化方式下的数据恢复
对长期奋战在一线的后端开发人员来说,都知道redis有两种持久化方式RDB和AOF,虽说大家都知道这两种方式大概运作方式,但想必有实操的人不会太多. 这里是自己实操两种持久化方式的一点点记录. 先看以 ...
- Expert C Programming(C专家编程) 读书笔记
目录 几个比较奇葩的指针赋值 int (* fun())() int (* foo())[] int (*foo[])() const 关键词的意义是什么? char const (*next )() ...
- h5 中修改input中 placeholder的颜色
input::-webkit-input-placeholder{ color:blue; } input::-moz-placeholder{ /* Mozilla Firefox 19+ */ c ...
- ThinkPHP v6.0.x 反序列化漏洞利用
前言: 上次做了成信大的安询杯第二届CTF比赛,遇到一个tp6的题,给了源码,目的是让通过pop链审计出反序列化漏洞. 这里总结一下tp6的反序列化漏洞的利用. 0x01环境搭建 现在tp新版本的官网 ...