Centos7安装搭建Bugzilla 5.0
1、安装准备:
Centos7保证网络连通,如果网络不能连通,可通过配置yum源使用代理服务。
vim /etc/yum.conf
# The proxy server - proxy server:port
proxy=http://192.168.178.1:8080
# The account details for yum connections
# proxy_username=yum-user
# proxy_password=qwerty
2、关闭SELinux、防火墙
sudo sed -i 's/^SELINUX=enforcing$/SELINUX=permissive/g' /etc/selinux/config
systemctl stop firewalld.service
systemctl disable firewalld.service
centos7默认防火墙为firewalld,若已经安装iptables,可关闭iptables或者打开80端口,不然后续http请求失败
iptables -I INPUT -p tcp --dport 80 -j ACCEPT
service iptables save
service iptables restart
3、执行以下命令启用EPEL仓库
yum install deltarpm epel-release
yum update
若内核更新,reboot重启虚拟机
4、安装环境使用依赖包
yum install mod_ssl mod_ssl mod_perl mod_perl-devel
5、安装apache服务,并启动服务
systemctl start httpd.service
systemctl status httpd.service #查看状态
systemctl enable httpd.service #设置开机启功
apache服务开启后,打开浏览器,输入http://ip-of-your-server/ ,若看到testing123界面,代表Apache已经开启
6、安装MariaDB
centos7引入MariaDB替代MYSQL数据库,Maria作为开源的数据库系统,使用效果与MYSQL不相上下
yum install mariadb-server mariadb mariadb-devel php-mysql
systemctl start mariadb.service #开启服务
systemctl status mariadb.service #查看状态
systemctl enable mariadb.service #设置开机启动
7、设置数据库root管理员密码
mysql -u root
MariaDB [ (none) ]> SET PASSWORD FOR 'root'@'localhost' = PASSWORD('myrootpassword'); #替换myrootpassword为你的密码
Query OK, 0 rows affected (0.00 sec)
MariaDB [ (none) ]> \q
Bye
登陆root用户进行测试
mysql -u root -p
Enter password: myrootpassword
Your MariaDB connection id is 5
Server version: 5.5.41-MariaDB MariaDB Server
Copyright (c) 2000, 2014, Oracle, MariaDB Corporation Ab and others.
Type 'help;' or '\h' for help. Type '\c' to clear the current input statement.
# maximum allowed size of an attachment upload
#change this if you need more!
max_allowed_packet=4M #设置最大传输大小4M
Enter password: myrootpassword
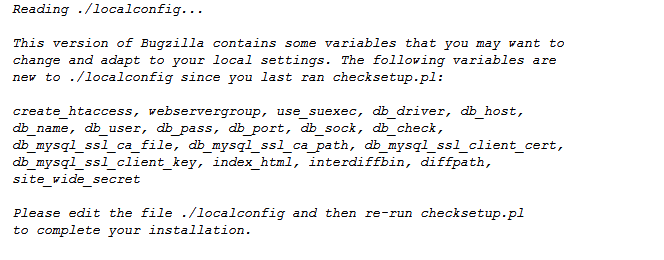
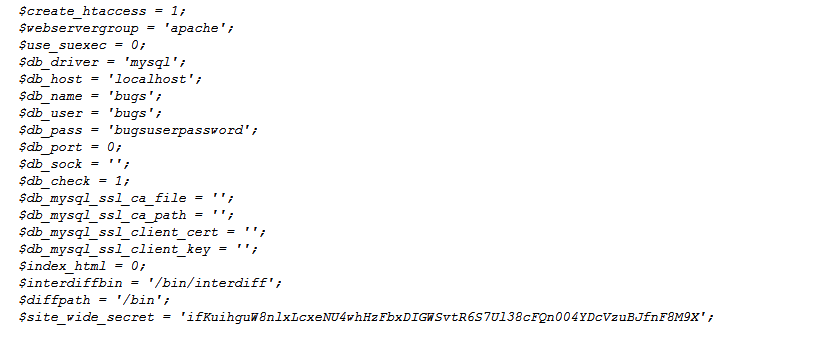
(4)编译./localconfig ,配置成我们自己的环境(主要是数据库名、密码与前面一致)
vim ./localconfig
下面是我的配置文件:
(5)完成Bugzilla注册信息
./checksetup.pl

(6)创建Bugzilla安装脚本
sed -i 's/^Options -Indexes$/#Options -Indexes/g' ./.htaccess
10、配置Bugzilla安装Apache服务
Apache默认识别不了Bugzilla,通过创建文件/etc/httpd/conf.d/bugzilla.conf ,把我们的Bugzilla网页系统引入到Apache服务
vim /etc/httpd/conf.d/bugzilla.conf
添加下面信息:
#/etc/httpd/conf.d/bugzilla.conf
<VirtualHost *:80>
DocumentRoot /var/www/html/bugzilla/</VirtualHost><Directory /var/www/html/bugzilla>AddHandler cgi-script .cgiOptions +Indexes +ExecCGIDirectoryIndex index.cgiAllowOverride Limit FileInfo Indexes</Directory>
重启Apache服务:
systemctl restart httpd.service
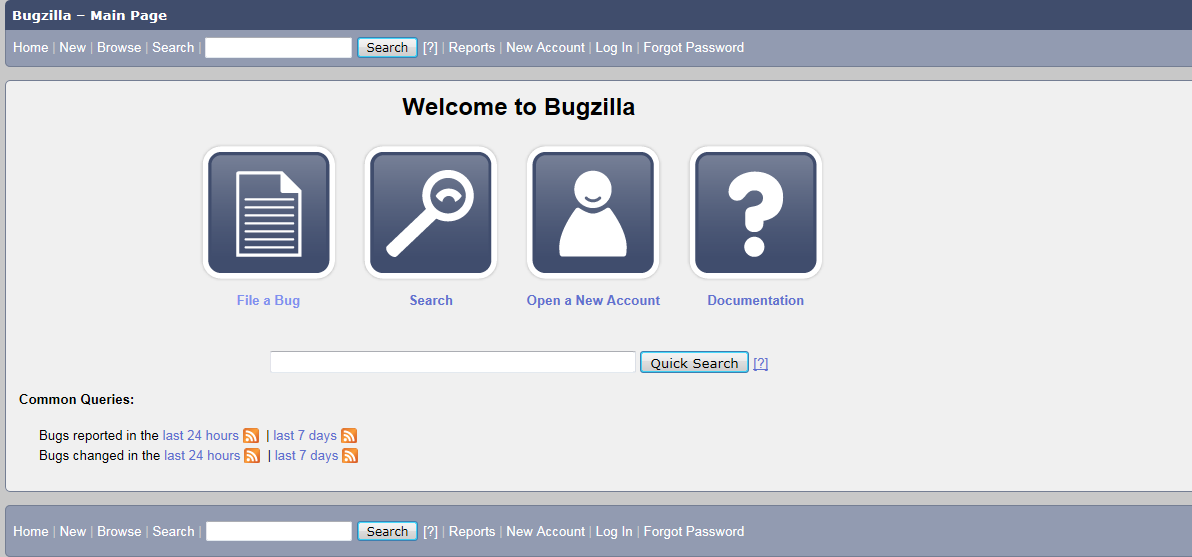
至此,我们就已经成功部署了Bugzilla系统,打开网页,输入http://ip-of-you-server,(ip-of-you-server为你的centos7主机ip)我们可以看到如下界面
Centos7安装搭建Bugzilla 5.0的更多相关文章
- Centos7.5搭建ELK-6.5.0日志分析平台
Centos7.5搭建ELK-6.5.0日志分析平台 1. 简介 工作工程中,不论是开发还是运维,都会遇到各种各样的日志,主要包括系统日志.应用程序日志和安全日志,对于开发人员来说,查看日志,可以实时 ...
- CentOS7.5搭建Solr7.4.0集群服务
一.Solr集群概念 solr单机版搭建参考: https://www.cnblogs.com/frankdeng/p/9615253.html 1.概念 SolrCloud(solr 云)是Solr ...
- CentOS7安装搭建.Net Core 2.0环境-详细步骤
一.构建.Net core 2的应用程web发布 因为是用来测试centos上的core 环境,先直接用vs17自带的core实例. 二.部署CentOS7的core环境 1.连接并启动之前安装的虚拟 ...
- centos7.5搭建cdh5.13.0
序言 本文集群搭建为三台机器,cdh版本为5.13.0,以下是安装过程中所用到的软件包等,可以自行下载.一.前期准备1.安装环境 系统:centos7.5/最小安装版本/64位 内存:主节点 --&g ...
- centos7安装部署opentsdb2.4.0
写在前面 安装HBase 在HBase中创建表结构 安装配置并启动opentsdb 写在前面 最近因为项目需要在读opentsdb的一部分源码,后面会做个小结分享出来.本人是不大喜欢写这种安装部署的文 ...
- 【Linux】【MySQL】CentOS7安装最新版MySQL8.0.13(最新版MySQL从安装到运行)
1.前言 框框博客在线报时:2018-11-07 19:31:06 当前MySQL最新版本:8.0.13 (听说比5.7快2倍) 官方之前表示:MySQL 8.0 正式版 8.0.11 已发布,MyS ...
- Centos7安装搭建NTP服务器和NTP客户端同步时间
NTP简介: NTP是网络时间协议(Network Time Protocol),它是用来同步网络中各个计算机的时间的协议. 在计算机的世界里,时间非常地重要 例如:对于火箭发射这种科研活动,对时间的 ...
- CentOS7.5搭建Solr7.4.0单机服务
一.Solr安装环境 1.官方参考文档 Solr教程参考指南:http://lucene.apache.org/solr/guide/7_4/solr-tutorial.html 2.Solr运行环境 ...
- 在CentOS7下搭建Hadoop2.9.0集群
系统环境:CentOS 7 JDK版本:jdk-8u191-linux-x64 MYSQL版本:5.7.26 Hadoop版本:2.9.0 Hive版本:2.3.4 Host Name Ip User ...
随机推荐
- java中微信统一下单采坑(app微信支付)
app支付前java后台统一下单文档:https://pay.weixin.qq.com/wiki/doc/api/app/app.php?chapter=9_1 微信支付接口签名校验工具:https ...
- PyTorch(一)Basics
PyTorch Basics import torch import torchvision import torch.nn as nn import numpy as np import torch ...
- 【2019北京集训测试赛(十三)】数据(sj) 冷静分析
题目大意:给你一个代表区间$[1,n]$的线段树,问你随机访问区间$[1,n]$中的一个子区间,覆盖到的线段树节点个数的期望(需要乘上$\frac{n(n-1)}{2}$后输出). 数据范围:$n≤1 ...
- null、undefined、typeof、instanceof
目录 概述 null undefined typeof instanceof 概述 JavaScript(ECMAScript标准)里共有5种基本类型: undefined, null, Boolea ...
- CSS 将一个页面平均分成四个部分(div)
在项目中遇到需求,数据监控页面需要同时显示4个板块内容,如下图: CSS 如何将一个页面平均分成四个部分(div)呢? <!DOCTYPE html> <html lang=&quo ...
- CentOS安装.NET CORE
Add the dotnet product feed sudo rpm --import https://packages.microsoft.com/keys/microsoft.asc sudo ...
- underscore.js源码解析【对象】
// Object Functions // ---------------- // Keys in IE < 9 that won't be iterated by `for key in . ...
- Kotlin 最佳实践
为什么写此文 Kotlin很烦,Gralde很烦,还都是升级狂,加一块更烦.几个月不接触Kotlin,再次上手时便一片迷茫.所以记录此文,以便再次上手时查阅. 使用Gradle创建Kotlin项目 m ...
- Linux_CentOS-服务器搭建 <五> 补充
O:文件的编码格式 1.文件转码问题 Windows中默认的文件格式是GBK(gb2312),而Linux一般都是UTF-8. 那么先说,如何查看吧.这时候强大的vi说,I can do that.( ...
- MongoDB-副本集搭建与管理
目录 MongoDB 副本集 一.副本集概念 二.副本集部署 三 .副本集维护 四.注意事项 MongoDB 副本集 一.副本集概念 单节点的 MongoDB 在数据的安全和冗余方面是比较低的,在生产 ...