手撕coreML之yolov2 object detection物体检测(含源代码)
一些闲话:
前面我有篇博客 https://www.cnblogs.com/riddick/p/10434339.html ,大致说了下如何将pytorch训练的.pth模型转换为mlmodel,部署在IOS端进行前向预测。只是介绍了下类接口,并没有示例,因此有可能会陷入没有demo你说个p的境地。因此,今天就拿实际的模型来说上一说。
其实coreML的demo,github上有很多,但是大部分都是用swift写的,而对于从C/C++语言过来的同学来说,Objective-C或许会更容易看懂一些。所以这次就以yolov2实现的object detection为例,创建Objective-C工程并用真机调试,来实现前向预测(并且附源代码)。
当然,为了偷懒起见,模型并不是我训练的,模型来自这里:https://github.com/syshen/YOLO-CoreML 。该仓库使用swift实现的,有兴趣的可以对比着看。yolov2的mlmodel模型文件,请看上面仓库的readMe中这句话:
execute download.sh to download the pre-trained model % sh download.sh
闲话少说,进入正题:
一、创建xcode工程,选择编程语言为Objective-C。将模型添加到xcode工程中,我将模型名字改为yoloModel,并且量化到了16bit。当然使用原始模型200多MB也完全OK。
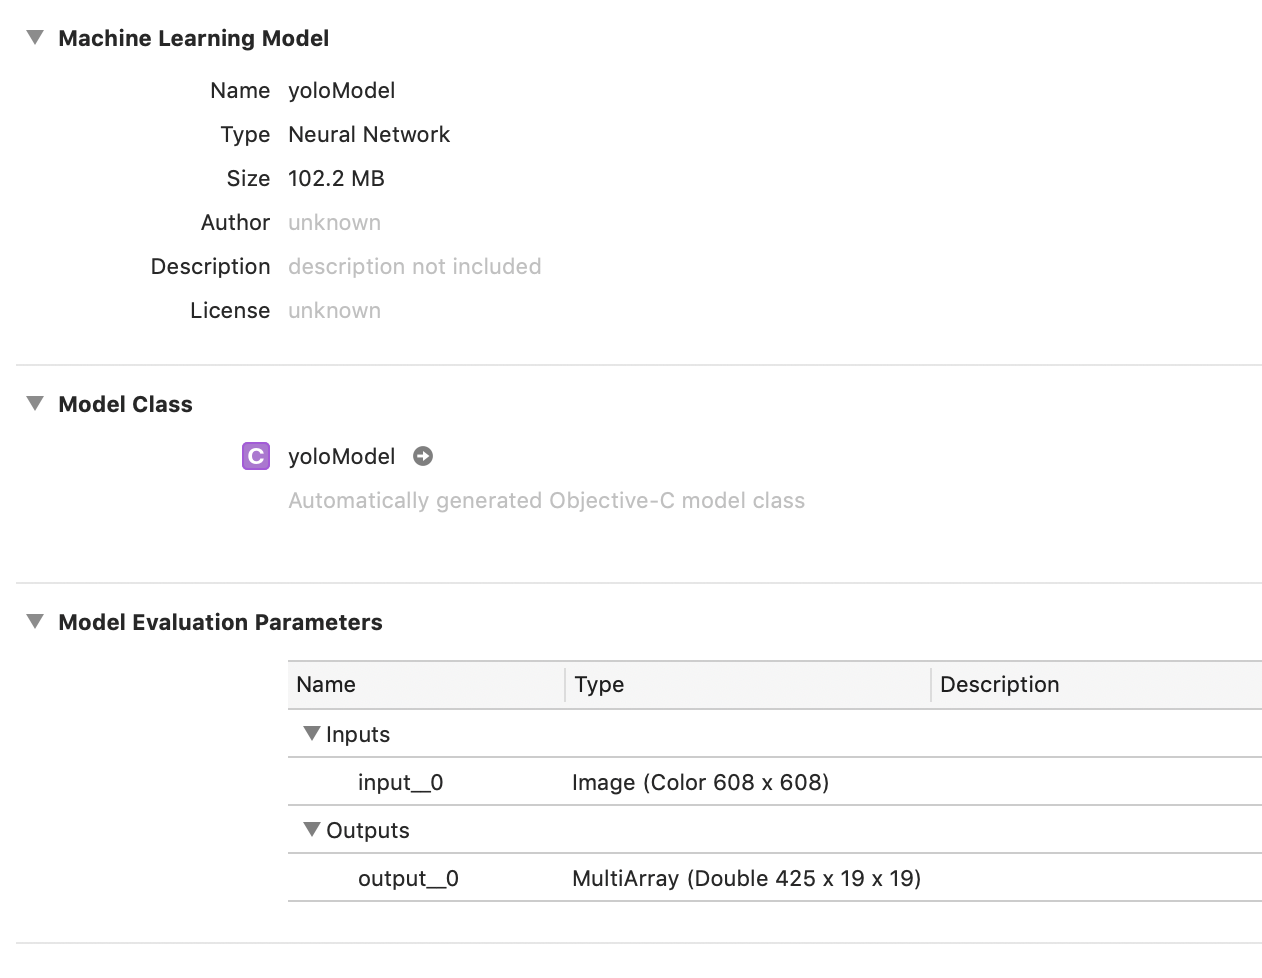
二、模型添加到工程后,会自动生成yoloModel类头文件,如下:
//

// yoloModel.h

//

// This file was automatically generated and should not be edited.

//

#import <Foundation/Foundation.h>

#import <CoreML/CoreML.h>

#include <stdint.h>

NS_ASSUME_NONNULL_BEGIN

/// Model Prediction Input Type

API_AVAILABLE(macos(10.13.), ios(11.2), watchos(4.2), tvos(11.2)) __attribute__((visibility("hidden")))

@interface yoloModelInput : NSObject<MLFeatureProvider>

/// input__0 as color (kCVPixelFormatType_32BGRA) image buffer, 608 pixels wide by 608 pixels high

@property (readwrite, nonatomic) CVPixelBufferRef input__0;

- (instancetype)init NS_UNAVAILABLE;

- (instancetype)initWithInput__0:(CVPixelBufferRef)input__0;

@end

/// Model Prediction Output Type

API_AVAILABLE(macos(10.13.), ios(11.2), watchos(4.2), tvos(11.2)) __attribute__((visibility("hidden")))

@interface yoloModelOutput : NSObject<MLFeatureProvider>

/// output__0 as 425 x 19 x 19 3-dimensional array of doubles

@property (readwrite, nonatomic, strong) MLMultiArray * output__0;

- (instancetype)init NS_UNAVAILABLE;

- (instancetype)initWithOutput__0:(MLMultiArray *)output__0;

@end

/// Class for model loading and prediction

API_AVAILABLE(macos(10.13.), ios(11.2), watchos(4.2), tvos(11.2)) __attribute__((visibility("hidden")))

@interface yoloModel : NSObject

@property (readonly, nonatomic, nullable) MLModel * model;

- (nullable instancetype)init;

- (nullable instancetype)initWithContentsOfURL:(NSURL *)url error:(NSError * _Nullable * _Nullable)error;

- (nullable instancetype)initWithConfiguration:(MLModelConfiguration *)configuration error:(NSError * _Nullable * _Nullable)error API_AVAILABLE(macos(10.14), ios(12.0), watchos(5.0), tvos(12.0)) __attribute__((visibility("hidden")));

- (nullable instancetype)initWithContentsOfURL:(NSURL *)url configuration:(MLModelConfiguration *)configuration error:(NSError * _Nullable * _Nullable)error API_AVAILABLE(macos(10.14), ios(12.0), watchos(5.0), tvos(12.0)) __attribute__((visibility("hidden")));

/**

    Make a prediction using the standard interface

    @param input an instance of yoloModelInput to predict from

    @param error If an error occurs, upon return contains an NSError object that describes the problem. If you are not interested in possible errors, pass in NULL.

    @return the prediction as yoloModelOutput

*/

- (nullable yoloModelOutput *)predictionFromFeatures:(yoloModelInput *)input error:(NSError * _Nullable * _Nullable)error;

/**

    Make a prediction using the standard interface

    @param input an instance of yoloModelInput to predict from

    @param options prediction options

    @param error If an error occurs, upon return contains an NSError object that describes the problem. If you are not interested in possible errors, pass in NULL.

    @return the prediction as yoloModelOutput

*/

- (nullable yoloModelOutput *)predictionFromFeatures:(yoloModelInput *)input options:(MLPredictionOptions *)options error:(NSError * _Nullable * _Nullable)error;

/**

    Make a prediction using the convenience interface

    @param input__0 as color (kCVPixelFormatType_32BGRA) image buffer, 608 pixels wide by 608 pixels high:

    @param error If an error occurs, upon return contains an NSError object that describes the problem. If you are not interested in possible errors, pass in NULL.

    @return the prediction as yoloModelOutput

*/

- (nullable yoloModelOutput *)predictionFromInput__0:(CVPixelBufferRef)input__0 error:(NSError * _Nullable * _Nullable)error;

/**

    Batch prediction

    @param inputArray array of yoloModelInput instances to obtain predictions from

    @param options prediction options

    @param error If an error occurs, upon return contains an NSError object that describes the problem. If you are not interested in possible errors, pass in NULL.

    @return the predictions as NSArray<yoloModelOutput *>

*/

- (nullable NSArray<yoloModelOutput *> *)predictionsFromInputs:(NSArray<yoloModelInput*> *)inputArray options:(MLPredictionOptions *)options error:(NSError * _Nullable * _Nullable)error API_AVAILABLE(macos(10.14), ios(12.0), watchos(5.0), tvos(12.0)) __attribute__((visibility("hidden")));

@end

NS_ASSUME_NONNULL_END
模型名称为yoloModel,那么自动生成的类头文件就是"yoloModel.h",生成的类名也叫 yoloModel。
模型的输入名称为input_0,输出为output_0。那么自动生成的API接口就会带有input_0, output_0字段:举个栗子如下:
- (nullable yoloModelOutput *)predictionFromInput__0:(CVPixelBufferRef)input__0 error:(NSError * _Nullable * _Nullable)error;
三、在viewDidLoad里面写调用的demo。当然,从调用demo和自动生成的yoloModel类之间还有很多工作要做,比如说,图像的预处理,比如说得到预测output之后还要对其进行解析得到矩形框信息等,所以我中间封装了一层,这是后话:
- (void)viewDidLoad {

    [super viewDidLoad];

    // Do any additional setup after loading the view, typically from a nib.

    //load image

    NSString* imagePath_=[[NSBundle mainBundle] pathForResource:@"dog416" ofType:@"jpg"];

    std::string imgPath = std::string([imagePath_ UTF8String]);

    cv::Mat image = cv::imread(imgPath);

    cv::cvtColor(image, image, CV_BGR2RGBA);

    //set classtxt path

    NSString* classtxtPath_ = [ [NSBundle mainBundle] pathForResource:@"classtxt" ofType:@"txt"];

    std::string classtxtPath = std::string([classtxtPath_ UTF8String]);

    //init Detection

    bool useCpuOny = false;

    MLComputeUnits computeUnit = MLComputeUnitsAll;

    cv::Size scaleSize(, );

    CDetectObject objectDetection;

    objectDetection.init(useCpuOny, computeUnit, classtxtPath, scaleSize);

    //run detection

    std::vector<DetectionInfo> detectionResults;

    objectDetection.implDetection(image, detectionResults);

    //draw rectangles

    cv::Mat showImage;

    cv::resize(image, showImage, scaleSize);

    for (int i=; i<detectionResults.size();i++)

    {

        cv::rectangle(showImage,detectionResults[i].box, cv::Scalar(, ,), );

    }

    //show in iphone

    cv::cvtColor(showImage, showImage, cv::COLOR_RGBA2BGRA);

    [self showUIImage:showImage];

}
上面加粗的地方就是自己封装的类CDetectObject,该类暴露的两个接口是init和implDetection。
init接收设置的计算设备信息、类别标签文件的路径,以及模型接收的图像尺寸大小。
implDetection接收输入的图像(RGBA格式),输出检测结果结构体信息,里面包含每个目标属于的类别名、置信度、以及矩形框信息。
struct DetectionInfo {

    std::string name;

    float confidence;

    cv::Rect2d box;

};
四、来让我们看看都要做哪些初始化init操作
包括计算设备的设置、模型初始化、一些基本参数的初始化、和加载标签文件信息。
//init model

int CDetectObject::init(const BOOL useCpuOnly, const MLComputeUnits computeUnit, const std::string& classtxtPath, const cv::Size& scaleSize){

    //init configuration

    option = [[MLPredictionOptions alloc] init];

    option.usesCPUOnly = useCpuOnly;

    config = [ [MLModelConfiguration alloc] init];

    config.computeUnits = computeUnit;

    NSError* err;

    Model = [[yoloModel alloc] initWithConfiguration:config error:&err];

    //init paramss

    inputSize = scaleSize;

    maxBoundingBoxes = ;

    confidenceThreshold = 0.5;

    nmsThreshold = 0.6;

    // anchor boxes

    anchors = {0.57273, 0.677385, 1.87446, 2.06253, 3.33843, 5.47434, 7.88282, 3.52778, 9.77052, 9.16828};

    //load labels

    int ret = loadClasstxt(classtxtPath, classes);

    return ret;

}
五、再来看看执行预测时要做些什么:
首先,对图像预处理,包括resize到模型要求的尺寸等。
其次,将预处理后的结果送给prediction,得到预测结果。调用coreML自动生成的类预测接口就在这里了。
然后,将预测得到的结果进行解析,根据yolov2模型的输出feature结构来解析出上面DetectionInfo里面的信息。
最后,解析出来后会有大量矩形框,为了去除重复的矩形框信息,需要做一个nmsBox来除去重复量高的矩形框,得到最终结果。
int CDetectObject::implDetection(const cv::Mat& image, std::vector<DetectionInfo>& detectionResults){

    if(image.empty()){

        NSLog(@"Error! image is empty!");

        return -;

    }

    //preprocessing

    cv::Mat inputImage;

    preprocessImage(image,  inputImage);

    //prediction

    MLMultiArray* outFeature = predictImageScene(inputImage);

    //analyze the output

    std::vector<int> idxList;

    std::vector<float> confidenceList;

    std::vector<cv::Rect> boxesList;

    parseFeature(outFeature, idxList, confidenceList, boxesList);

    //nms box

    std::vector<int> indices;

    cv::dnn::NMSBoxes(boxesList, confidenceList, confidenceThreshold, nmsThreshold, indices);

    //get result

    for (int i=; i<indices.size(); i++){

        int idx = indices[i];

        DetectionInfo objectInfo;

        objectInfo.name = classes[idxList[idx]];

        objectInfo.confidence = confidenceList[idx];

        objectInfo.box = boxesList[idx];

        detectionResults.push_back(objectInfo);

    }

    return ;

}
预测函数:
MLMultiArray* CDetectObject::predictImageScene(const cv::Mat& imgTensor) {

    //preprocess image

    //convert to cvPixelbuffer

    ins::PixelBufferPool mat2pixelbuffer;

    CVPixelBufferRef buffer = mat2pixelbuffer.GetPixelBuffer(imgTensor);

    //predict from image

    NSError *error;

    yoloModelInput  *input = [[yoloModelInput alloc] initWithInput__0:buffer];

    yoloModelOutput *output = [Model predictionFromFeatures:input options:option error:&error];

    return output.output__0;

}
解析feature函数:
void CDetectObject::parseFeature(MLMultiArray* feature, std::vector<int>& ids, std::vector<float>& confidences, std::vector<cv::Rect>& boxes){

    NSArray<NSNumber*>* featureShape = feature.shape;

    int d0 = [[featureShape objectAtIndex:] intValue];

    int d1 = [[featureShape objectAtIndex:] intValue];

    int d2 = [[featureShape objectAtIndex:] intValue];

    int stride0 = [feature.strides[] intValue];

    int stride1 = [feature.strides[] intValue];

    int stride2 = [feature.strides[] intValue];

    int blockSize = ;

    int gridHeight = d1;

    int gridWidth = d2;

    int boxesPerCell = ;//Int(anchors.count/5)

    int numClasses = (int)classes.size();

    double* pdata = (double*)feature.dataPointer;

    for (int cy =; cy< gridHeight; cy++){

        for (int cx =; cx< gridWidth; cx++){

            for (int b=; b<boxesPerCell; b++){

                int channel = b*(numClasses + );

                int laterId= cx*stride2+cy*stride1;

                float tx = (float)pdata[channel*stride0 + laterId];

                float ty = (float)pdata[(channel+)*stride0 + laterId];

                float tw = (float)pdata[(channel+)*stride0 + laterId];

                float th = (float)pdata[(channel+)*stride0 + laterId];

                float tc = (float)pdata[(channel+)*stride0 + laterId];

                // The predicted tx and ty coordinates are relative to the location

                // of the grid cell; we use the logistic sigmoid to constrain these

                // coordinates to the range 0 - 1. Then we add the cell coordinates

                // (0-12) and multiply by the number of pixels per grid cell (32).

                // Now x and y represent center of the bounding box in the original

                // 608x608 image space.

                float x = (float(cx) + sigmoid(tx)) * blockSize;

                float y = (float(cy) + sigmoid(ty)) * blockSize;

                // The size of the bounding box, tw and th, is predicted relative to

                // the size of an "anchor" box. Here we also transform the width and

                // height into the original 608x608 image space.

                float w = exp(tw) * anchors[*b] * blockSize;

                float h = exp(th) * anchors[*b + ] * blockSize;

                // The confidence value for the bounding box is given by tc. We use

                // the logistic sigmoid to turn this into a percentage.

                float confidence = sigmoid(tc);

                std::vector<float> classesProb(numClasses);

                for (int i = ; i < numClasses; ++i) {

                    int offset = (channel++i)*stride0 + laterId;

                    classesProb[i] =  (float)pdata[offset];

                }

                softmax(classesProb);

                // Find the index of the class with the largest score.

                auto max_itr = std::max_element(classesProb.begin(), classesProb.end());

                int index = int(max_itr - classesProb.begin());

                // Combine the confidence score for the bounding box, which tells us

                // how likely it is that there is an object in this box (but not what

                // kind of object it is), with the largest class prediction, which

                // tells us what kind of object it detected (but not where).

                float confidenceInClass = classesProb[index] * confidence;

                if(confidence>confidenceThreshold){

                // Since we compute 19x19x5 = 1805 bounding boxes, we only want to

                // keep the ones whose combined score is over a certain threshold.

                //if (confidenceInClass > confidenceThreshold){

                    cv::Rect2d rect =cv::Rect2d(float(x-w*0.5), float(y-h*0.5), float(w), float(h));

                    ids.push_back(index);

                    confidences.push_back(confidenceInClass);

                    boxes.push_back(rect);

                }

            }

        }

    }

}
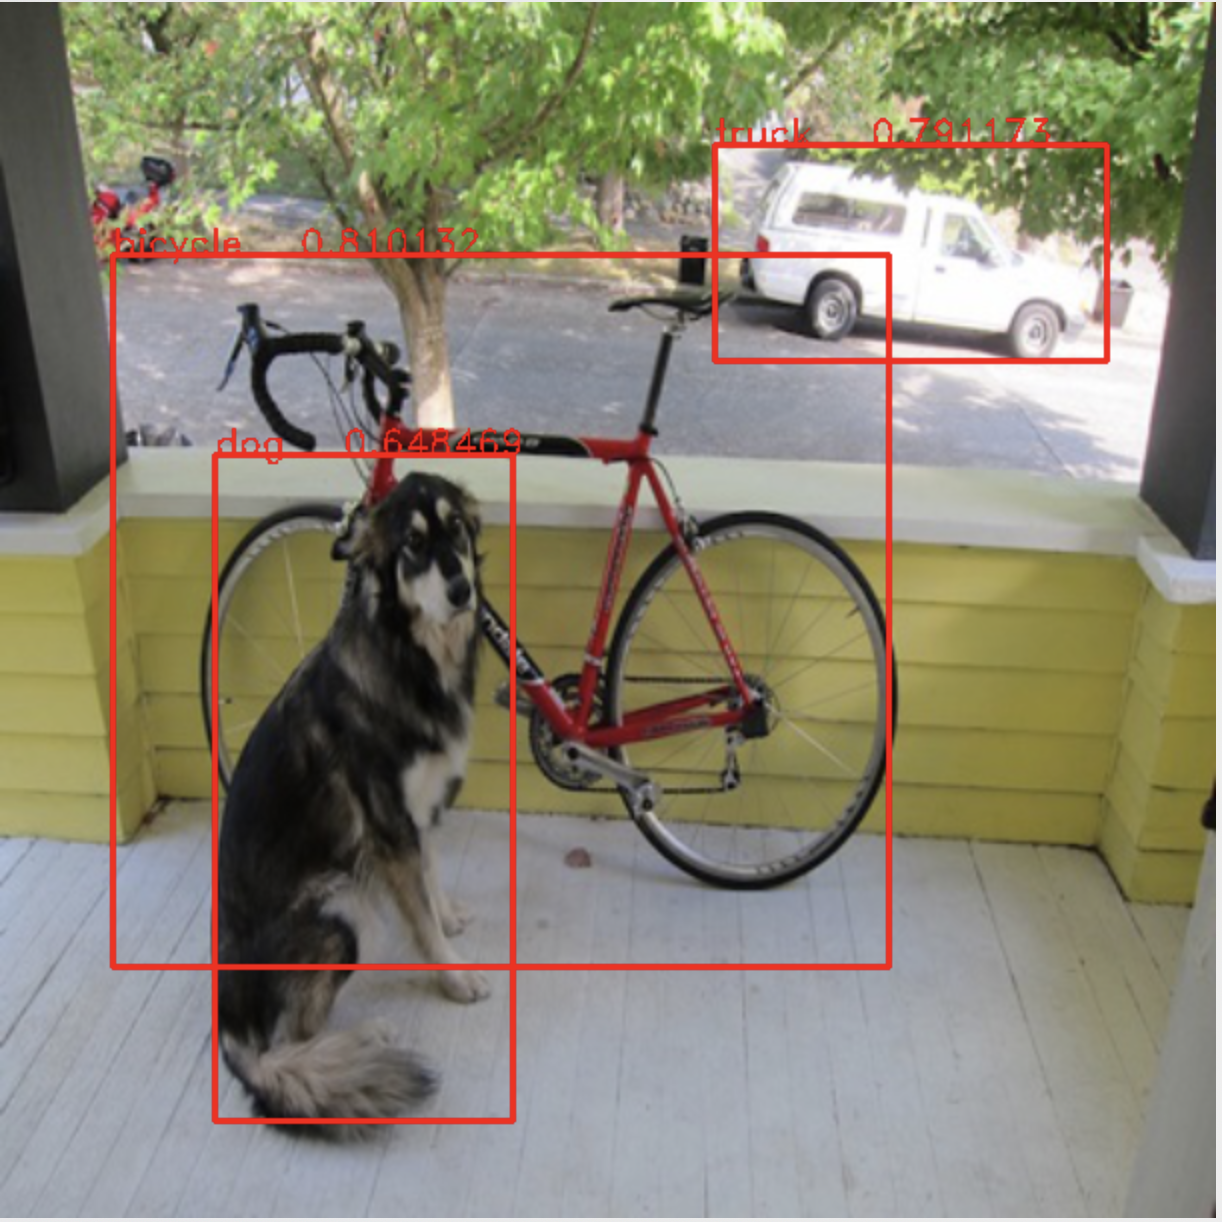
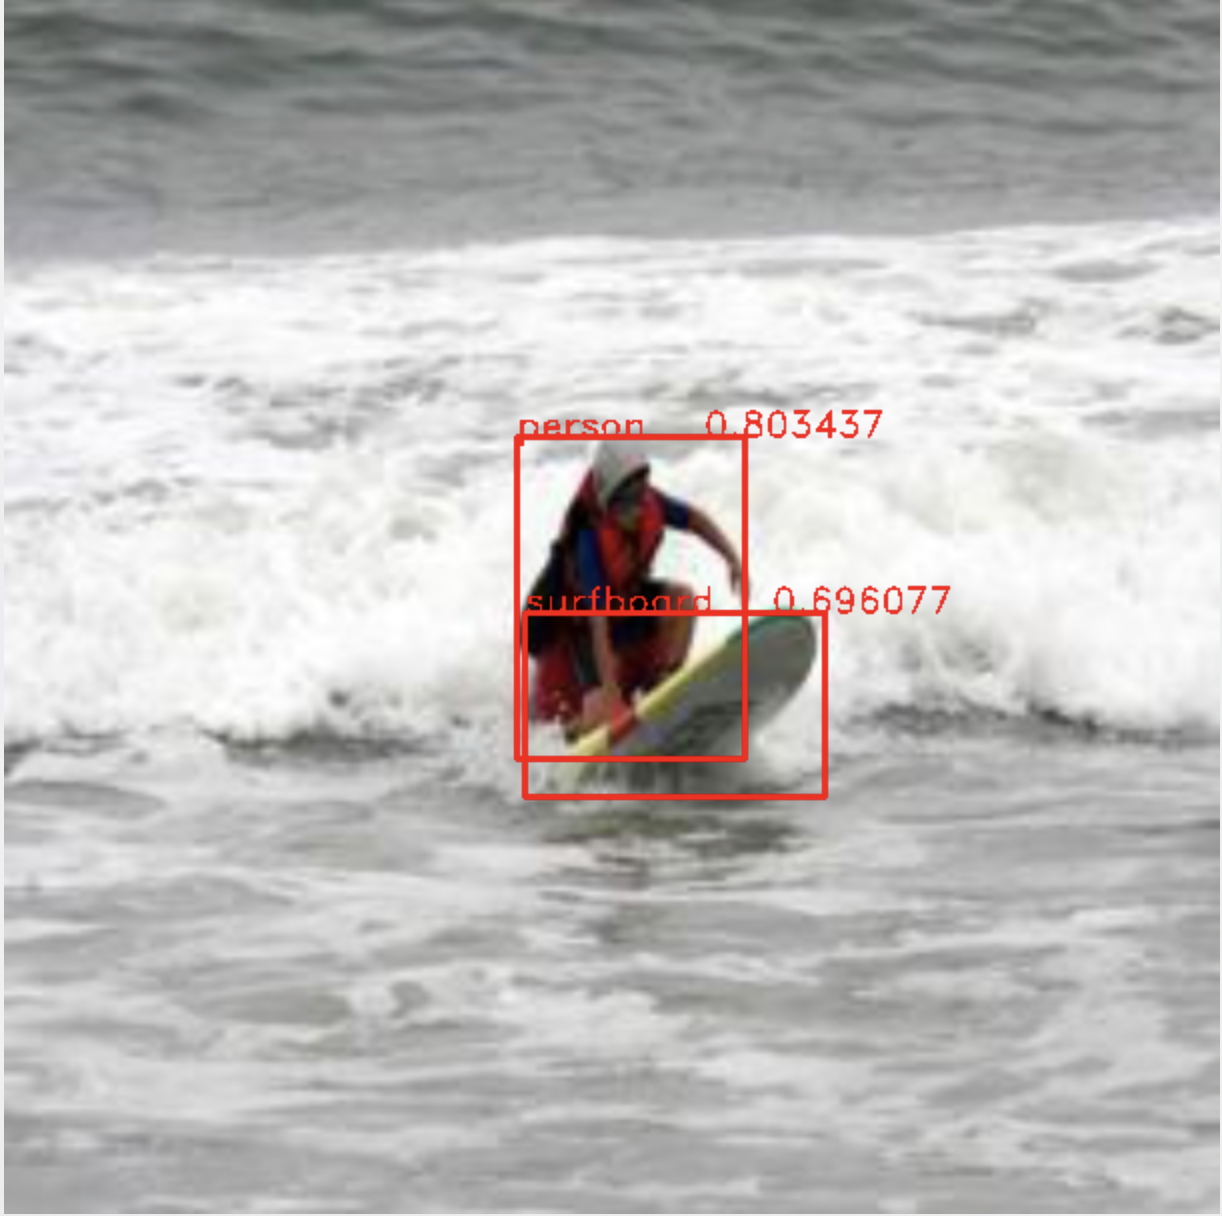
六、来看看预测结果如何:
开发环境:MacOS Mojave (10.14.3), Xcode10.2 , Iphone XS (IOS 12.2), opencv2framework.
上面代码我放在码云git上:https://gitee.com/rxdj/yolov2_object_detection.git 。
仅供参考,如有错误,望不吝赐教。
手撕coreML之yolov2 object detection物体检测(含源代码)的更多相关文章
- 谷歌开源的TensorFlow Object Detection API视频物体识别系统实现教程
视频中的物体识别 摘要 物体识别(Object Recognition)在计算机视觉领域里指的是在一张图像或一组视频序列中找到给定的物体.本文主要是利用谷歌开源TensorFlow Object De ...
- Tensorflow object detection API 搭建物体识别模型(四)
四.模型测试 1)下载文件 在已经阅读并且实践过前3篇文章的情况下,读者会有一些文件夹.因为每个读者的实际操作不同,则文件夹中的内容不同.为了保持本篇文章的独立性,制作了可以独立运行的文件夹目标检测. ...
- Tensorflow object detection API 搭建物体识别模型(三)
三.模型训练 1)错误一: 在桌面的目标检测文件夹中打开cmd,即在路径中输入cmd后按Enter键运行.在cmd中运行命令: python /your_path/models-master/rese ...
- Tensorflow object detection API 搭建物体识别模型(一)
一.开发环境 1)python3.5 2)tensorflow1.12.0 3)Tensorflow object detection API :https://github.com/tensorfl ...
- Tensorflow object detection API 搭建物体识别模型(二)
二.数据准备 1)下载图片 图片来源于ImageNet中的鲤鱼分类,下载地址:https://pan.baidu.com/s/1Ry0ywIXVInGxeHi3uu608g 提取码: wib3 在桌面 ...
- 课程四(Convolutional Neural Networks),第三 周(Object detection) —— 2.Programming assignments:Car detection with YOLOv2
Autonomous driving - Car detection Welcome to your week 3 programming assignment. You will learn abo ...
- 谷歌开源的TensorFlow Object Detection API视频物体识别系统实现(二)[超详细教程] ubuntu16.04版本
本节对应谷歌开源Tensorflow Object Detection API物体识别系统 Quick Start步骤(一): Quick Start: Jupyter notebook for of ...
- 谷歌开源的TensorFlow Object Detection API视频物体识别系统实现(一)[超详细教程] ubuntu16.04版本
谷歌宣布开源其内部使用的 TensorFlow Object Detection API 物体识别系统.本教程针对ubuntu16.04系统,快速搭建环境以及实现视频物体识别系统功能. 本节首先介绍安 ...
- Tensorflow物体检测(Object Detection)API的使用
Tensorflow在更新1.2版本之后多了很多新功能,其中放出了很多用tf框架写的深度网络结构(看这里),大大降低了吾等调包侠的开发难度,无论是fine-tuning还是该网络结构都方便了不少.这里 ...
随机推荐
- mySQL配置文件、备份与恢复
mysql配置文件 mysql的配置文件为/etc/my.cnf 配置文件查找次序:若在多个配置文件中均有设定,则最后找到的最终生效 /etc/my.cnf --> /etc/mysql/my. ...
- sock5客户端解密数据流
一.安装 略 二.配置 vi /etc/shadowsocks.json { "server":"x.x.x.x", , , "password&qu ...
- 第41章:MongoDB-集群--Sharding(分片)
①Sharding分片概念 分片(sharding)是指将数据库拆分,将其分散在不同的机器上的过程.将数据分散到不同的机器上,不需要功能强大的服务器就可以存储更多的数据和处理更大的负载. 分片是每个分 ...
- java_io
JAVA IO流(一)参考文章:http://ifeve.com/java-io-network/,并发编程网原创文章,转载请注明: 转载自并发编程网 – ifeve.com本文链接地址: Java ...
- 在jenkins中调用maven的变量
Maven内置变量说明: ${basedir} 项目根目录(即pom.xml文件所在目录) ${project.build.directory} 构建目录,缺省为target目录 ${project. ...
- Runtime之实例总结
通过前面几篇对Runtime的讲解,本篇汇总一下Runtime实际中常用的一些场景. 1.获取类的基本信息 获取类名: const char *className = class_getName(cl ...
- utf-8 decode
摘自 Lua 5.3 源文件 lutf8lib.c /* ** Decode one UTF-8 sequence, returning NULL if byte sequence is invali ...
- 2017CS231n学习笔记——计算机视觉的概述
本节课主要讲述了cs231n课程的背景和计算机视觉的历史,也主要介绍了目前很重要的一个计算机视觉数据集--IMAGENET. 更多内容参考我的AI学习之路 课程简介 这门课程是由stanford大学计 ...
- 一次对SNMP服务的渗透测试
Hacking SNMP Service - The Post Exploitation :Attacking Network - Network Pentesting原文地址:http://www. ...
- Python3基础语法你学会了么
编码 默认:源码文件以UTF-8编码,字符串都是unicode字符串 指定: 标识符 第一个字符:字母表中的字符或下划线 _ 其它部分:由字母.数字.下划线 _ 组成 大小写敏感 python ...