
Tensorflow object detection API 搭建物体识别模型(二)
二、数据准备
1)下载图片
图片来源于ImageNet中的鲤鱼分类,下载地址:https://pan.baidu.com/s/1Ry0ywIXVInGxeHi3uu608g 提取码: wib3
在桌面新建文件夹目标检测,把下载好的压缩文件n01440764.tar放到其中,并解压
2)选择图片
在此数据集中,大部分图片都较为清晰,但是有极少数图片像素点少,不清晰。像素点少的图片不利于模型训练或模型测试,选出部分图片文件,在目标检测路径下输入jupyter notebook,新建一个get_some_qualified_images的文件:

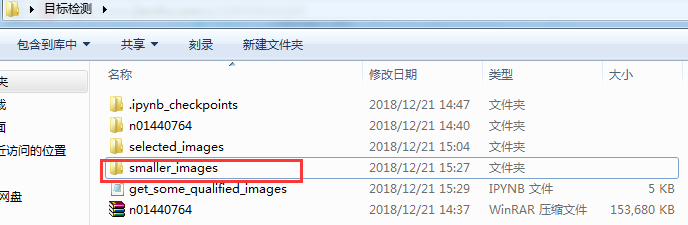
代码运行完成后,在桌面的目标检测文件夹中,会有一个selected_images文件夹,如下图所示:
import os

import random

from PIL import Image

import shutil

#获取1000张图片中随机选出数量为sample_number*2的一部分图片的路径

def get_some_imagePath(dirPath, sample_number):

    fileName_list = os.listdir(dirPath)

    all_filePath_list = [ os.path.join(dirPath, fileName) for fileName in fileName_list ]

    all_imagePath_list = [ filePath for filePath in all_filePath_list if '.jpg' in filePath ]

    some_filePath_list = random.sample( all_filePath_list, k=sample_number * 2)

    return some_filePath_list

#获取一部分像素足够,即长,宽都大于300的图片

def get_some_qualified_images(dirPath, sample_number, new_dirPath):

    some_imagePath_list = get_some_imagePath(dirPath, sample_number)

    if not os.path.isdir(new_dirPath):

        os.mkdir(new_dirPath)

    i = 0

    for imagePath in some_imagePath_list:

        image = Image.open(imagePath)

        width, height = image.size

        if width > 300 and height > 300:

            i += 1

            new_imagePath = 'selected_images/%03d.jpg' % i

            #在处理图像的时候常常需要将一个图像复制到另一个文件夹中,Python可以很方便的利用shutil.copy(src,dst)函数实现这个操作

            #返回复制图像的文件路径

            shutil.copy( imagePath, new_imagePath)

        if i == sample_number:

            break

#获取数量为100的合格样本存放到selected_images文件夹中

get_some_qualified_images('n01440764', 100, 'selected_images')

3)缩小图片
前面我们选出了100张像素足够的图片存放在selected_images文件夹中,即淘汰了像素过小的图片。接着我们实现将像素过大的图片做缩小
import os

from PIL import Image

def get_small_images(dirPath, new_dirPath):

    fileName_list = os.listdir(dirPath)

    filePath_list = [os.path.join(dirPath, fileName) for fileName in fileName_list]

    imagePath_list = [filePath for filePath in filePath_list if '.jpg' in filePath]

    if not os.path.isdir(new_dirPath):

        os.mkdir(new_dirPath)

    for imagePath in imagePath_list:

        image = Image.open( imagePath )

        width, height = image.size

        imageName = imagePath.split('\\')[-1]

        save_path = os.path.join(new_dirPath, imageName)

        if width >= 600 and height >= 600:

            minification = min(width, height) // 300 #缩小倍数

            new_width = width // minification

            new_height = height // minification

            resized_image = image.resize( (new_width, new_height),Image.ANTIALIAS )

            print('图片%s由原来的宽%d,高%d,缩小为宽%d,高%d' % (imageName, width, height, new_width, new_height))

            resized_image.save(save_path)

        else:

            image.save(save_path)

get_small_images('selected_images', 'smaller_images')
4)给图片打标签
使用打标签工具LabelImg,下载页面链接:https://tzutalin.github.io/labelImg/

下载后解压,打开:

在输入法为英文输入的情况下,按键盘上的w键则可以开始绘制方框,方框会框住图片中的物体。完成绘制方框后,还需要为方框标上类别,如下图所示。
注意:每完成一张图的打标签,一定要记得保存!!!,初次使用可以在edit选项中设置正方形和矩形框:


在本文演示中,需要给图片中的鲤鱼和人脸2个类别打标签。鲤鱼的标签名叫做fish,人脸的标签名叫human_face,打标签的结果如上图所示
注意:用方框框住物体时,尽量框住物体的所有部位,例如本文中的鱼,鱼鳍是一个重要特征。保证框住物体所有部位的情况下,也不要使方框四周留出过多空白。用LabelImg软件打标签会给每张图片产生对应的xml文件
还有:打标签很耗时间!!!
每次打完标签,会生成对应的xml数据,感兴趣的可以查看一下某个xml文件,其中记录了标签及bounding box坐标:

5)xml转csv
xml转csv的意思是,将xml文件中的信息整合到csv文件中,其中利用的是xml模块
import os

import pandas as pd

import xml.etree.ElementTree as ET

from sklearn.model_selection import train_test_split

def xmlPath_list_to_df(xmlPath_list):

    xmlContent_list = []

    for xmlPath in xmlPath_list:

        print(xmlPath)

        tree = ET.parse(xmlPath)

        root = tree.getroot()

        for member in root.findall('object'):

            value = ( root.find('filename').text,#文件名

                     int( root.find('size')[0].text),#width

                     int( root.find('size')[1].text),#height

                     member[0].text,#标签

                     int( member[4][0].text),#xmin

                     int( member[4][1].text),#ymin

                     int( member[4][2].text),#xmax

                     int( member[4][3].text)#ymax

                    )

            xmlContent_list.append(value)

    column_name = ['filename', 'width', 'height', 'class', 'xmin', 'ymin', 'xmax', 'ymax']

    xmlContent_df = pd.DataFrame( xmlContent_list, columns = column_name )

    return xmlContent_df

def dirPath_to_csv(dirPath):

    fileName_list = os.listdir(dirPath)

    all_xmlPath_list = [os.path.join(dirPath, fileName) for fileName in fileName_list if '.xml' in fileName]

    train_xmlPath_list, test_xmlPath_list = train_test_split(all_xmlPath_list, test_size=0.1, random_state=1)

    train_df = xmlPath_list_to_df( train_xmlPath_list)

    train_df.to_csv('train.csv')

    print('成功产生文件train.csv,训练集共有%d张图片' % len(train_xmlPath_list) )

    test_df = xmlPath_list_to_df(test_xmlPath_list)

    test_df.to_csv('test.csv')

    print('成功产生文件test.csv,测试集共有%d张图片' % len(test_xmlPath_list) )

dirPath_to_csv('smaller_images')
将函数train_test_split的参数random_state的值设为1,这样每次划分的训练集和测试集总是相同。如果不设置此参数,则每次划分的训练集和测试集不同。上面一段代码的运行结果如下:

我们以train.csv文件来看看xml转换为csv后的信息:

6)csv转tfrecord
由于下面的代码我们需要模块
from object_detection.utils import dataset_util
该模块是我们在Tensorflow object detection API 搭建物体识别模型(一)中下载的,要想使用该模块,我们需要添加环境变量PATHPATH。方法如下:右键计算机->属性
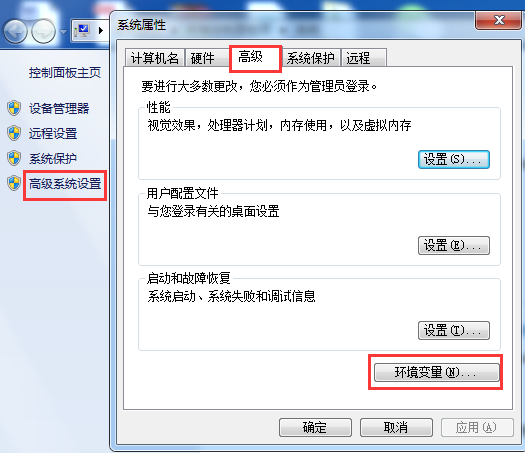
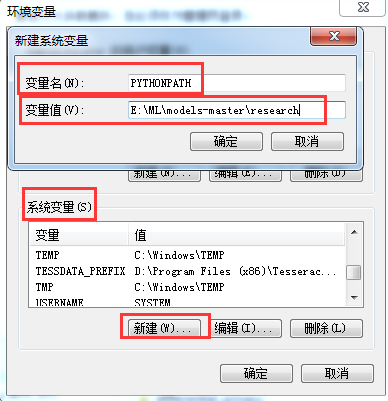
其中变量值包含下载的objec_detection路径及slim路径,如E:\ML\models-master\research;E:\ML\models-master\research\slim
#csv转tfrecords

import os

import pandas as pd

import tensorflow as tf

from object_detection.utils import dataset_util

import shutil

def csv2tfrecord( csv_path, imageDir_path, tfrecord_path):

    objectInfo_df = pd.read_csv(csv_path)

    tfrecord_writer = tf.python_io.TFRecordWriter(tfrecord_path)

    for filename, group in objectInfo_df.groupby('filename'):

        height = group.iloc[0]['height']

        width = group.iloc[0]['width']

        filename_bytes = filename.encode('utf-8')

        image_path = os.path.join( imageDir_path, filename)

        with open(image_path, 'rb') as file:

            encoded_jpg = file.read()

        image_format = b'jpg'

        xmin_list = list(group['xmin'] / width )

        xmax_list = list(group['xmax'] / width )

        ymin_list = list(group['ymin'] / height )

        ymax_list = list(group['ymax'] / height )

        classText_list = [ classText.encode('utf-8') for classText in group['class']]

        classLabel_list = [ classText_to_classLabel(classText) for classText in group['class']]

        tf_example = tf.train.Example( features=tf.train.Features(

                        feature = {

                            'image/height' : dataset_util.int64_feature(height),

                            'image/width'  : dataset_util.int64_feature(width),

                            'image/filename' : dataset_util.bytes_feature(filename_bytes),

                            'image/source_id' : dataset_util.bytes_feature(filename_bytes),

                            'image/encoded' : dataset_util.bytes_feature(encoded_jpg),

                            'image/format' : dataset_util.bytes_feature(image_format),

                            'image/object/bbox/xmin' : dataset_util.float_list_feature(xmin_list),

                            'image/object/bbox/xmax' : dataset_util.float_list_feature(xmax_list),

                            'image/object/bbox/ymin' : dataset_util.float_list_feature(ymin_list),

                            'image/object/bbox/ymax' : dataset_util.float_list_feature(ymax_list),

                            'image/object/class/text' : dataset_util.bytes_list_feature(classText_list),

                            'image/object/class/label' : dataset_util.int64_list_feature(classLabel_list),

                        }))

        tfrecord_writer.write(tf_example.SerializeToString())

    tfrecord_writer.close()

    print('成功产生tfrecord文件,保存在路径:%s' % tfrecord_path)

#如果训练自己的模型,目标检测类别不同,需要修改此处

def classText_to_classLabel(row_label):

    if row_label == 'fish':

        return 1

    elif row_label == 'human_face':

        return 2

    else:

        return None

dir_name = 'training'

if not os.path.isdir(dir_name):

    os.mkdir(dir_name)

csv2tfrecord('train.csv', 'smaller_images', 'training/train.tfrecord')

csv2tfrecord('test.csv', 'smaller_images', 'training/test.tfrecord')
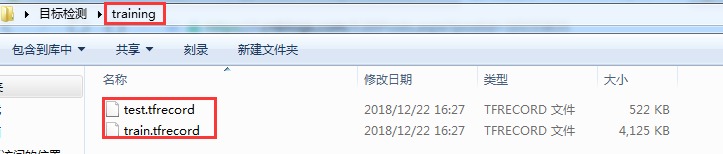
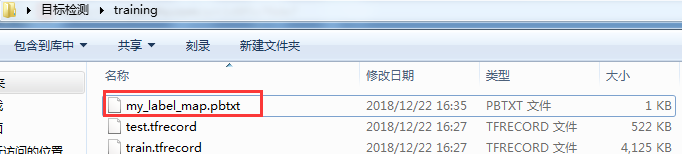
运行上面的代码,目标检测文件夹中会产生一个文件夹training,如下图所示:
7)编写pbtxt文件
在目标检测的文件夹training中,创建文本文件my_label_map.pbtxt。复制下面一段内容到文本文件my_label_map.pbtxt中:
item {

    name : "fish"

    id : 1

}

item {

    name : "human_face"

    id : 2

}
8)编写配置文件
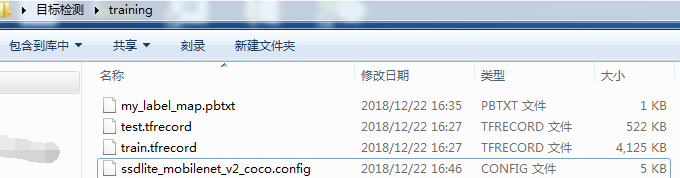
可以在object_detection文件夹中的samples/config路径下,找到原生配置文件ssdlite_mobilenet_v2_coco.config,先复制1份到桌面文件目标检测的文件夹training中,并做如下修改:
- 第9行的num_classes,对于本文来说,此数设置为
2 - 第143行的batch_size,对于本文来说,此数设置为
5,读者根据自己的电脑配置,可以调高或者调低 - 第177行input_path设置成
"training/train.tfrecord" - 第179行label_map_path设置成
"training/my_label_map.pbtxt" - 第191行input_path设置成
"training/test.tfrecord" - 第193行label_map_path设置成
"training/my_label_map.pbtxt" - 第158、159这2行需要删除
修改配置文件ssdlite_mobilenet_v2_coco.config并保存后,此时文件夹training中有4个文件,如下图所示:
9)模型训练
Tensorflow object detection API 搭建物体识别模型(二)的更多相关文章
- Tensorflow object detection API 搭建物体识别模型(四)
四.模型测试 1)下载文件 在已经阅读并且实践过前3篇文章的情况下,读者会有一些文件夹.因为每个读者的实际操作不同,则文件夹中的内容不同.为了保持本篇文章的独立性,制作了可以独立运行的文件夹目标检测. ...
- Tensorflow object detection API 搭建物体识别模型(三)
三.模型训练 1)错误一: 在桌面的目标检测文件夹中打开cmd,即在路径中输入cmd后按Enter键运行.在cmd中运行命令: python /your_path/models-master/rese ...
- Tensorflow object detection API 搭建物体识别模型(一)
一.开发环境 1)python3.5 2)tensorflow1.12.0 3)Tensorflow object detection API :https://github.com/tensorfl ...
- 对于谷歌开源的TensorFlow Object Detection API视频物体识别系统实现教程
本教程针对Windows10实现谷歌近期公布的TensorFlow Object Detection API视频物体识别系统,其他平台也可借鉴. 本教程将网络上相关资料筛选整合(文末附上参考资料链接) ...
- 谷歌开源的TensorFlow Object Detection API视频物体识别系统实现教程
视频中的物体识别 摘要 物体识别(Object Recognition)在计算机视觉领域里指的是在一张图像或一组视频序列中找到给定的物体.本文主要是利用谷歌开源TensorFlow Object De ...
- 谷歌开源的TensorFlow Object Detection API视频物体识别系统实现(一)[超详细教程] ubuntu16.04版本
谷歌宣布开源其内部使用的 TensorFlow Object Detection API 物体识别系统.本教程针对ubuntu16.04系统,快速搭建环境以及实现视频物体识别系统功能. 本节首先介绍安 ...
- 谷歌开源的TensorFlow Object Detection API视频物体识别系统实现(二)[超详细教程] ubuntu16.04版本
本节对应谷歌开源Tensorflow Object Detection API物体识别系统 Quick Start步骤(一): Quick Start: Jupyter notebook for of ...
- 安装运行谷歌开源的TensorFlow Object Detection API视频物体识别系统
Linux安装 参照官方文档:https://github.com/tensorflow/models/blob/master/research/object_detection/g3doc/inst ...
- 基于谷歌开源的TensorFlow Object Detection API视频物体识别系统搭建自己的应用(四)
本章主要内容是利用mqtt.多线程.队列实现模型一次加载,批量图片识别分类功能 目录结构如下: mqtt连接及多线程队列管理 MqttManager.py # -*- coding:utf8 -*- ...
随机推荐
- [离散时间信号处理学习笔记] 9. z变换性质
z变换描述 $x[n] \stackrel{\mathcal{Z}}{\longleftrightarrow}X(z) ,\quad ROC=R_x$ 序列$x[n]$经过z变换后得到复变函数$X(z ...
- HTML知识点总结[部分]
Web服务的本质(socket实例) import socket def handle_request(client): buf = client.recv(1024) client.send(byt ...
- linux shell系列9 统计用户的权限
#!/bin/bash #set -x host=`hostname` ip=`ifconfig $(ip a|grep eth|head -n1|awk -F: '{print $2}') |gre ...
- JSON笔记
JSPN示例1: { "firstName": "Brett", "lastName":"McLaughlin", &q ...
- AHOI(十二省联考)2019 退役记
我也想退役失败.jpg Day 0 我才知道联考原来是4.5h? 下午居然还有讲题,感觉变得正规多了. 试机敲了LCT,NTT,SA,加起来花了大概40min,基本1A,感觉海星.键盘似乎有点过于灵敏 ...
- #191 sea(动态规划)
假设已经求出了i个点j个桥的连通图数量f[i][j],容易由此推出最终答案,套路地枚举1号点所在连通块大小即可. 假设已经求出了i个点的边双连通图数量h[i],考虑由此推出f[i][j].可以枚举其中 ...
- 微信web开发者工具 移动调试
1 下载 微信web开发者工具:https://mp.weixin.qq.com/wiki?t=resource/res_main&id=mp1455784140 下载一个自己能用的版本: 2 ...
- python调用opencv库教程
OpenCV安装pip install --upgrade setuptoolspip install numpy Matplotlibpip install opencv-python OpenCV ...
- 【BZOJ3999】【TJOI2015】旅游 树剖
题目大意 给你一棵树,有\(n\)个点.有\(q\)个操作,每次要你从\(x\)到\(y\)的路径上选两个点,使得距离\(x\)比较远的点的点权\(-\)距离\(x\)比较近的点的点权最大,然后把这条 ...
- mysql中存储字段类型的查询效率
检索性能从快到慢的是(此处是听人说的): 第一:tinyint,smallint,mediumint,int,bigint第二:char,varchar第三:NULL 解释(转载): 整数类型1.TI ...