Android布局之线性布局——LinearLayout
本文将详细介绍线性布局的各种xml属性。
xml属性
<?xml version="1.0" encoding="utf-8"?>

<LinearLayout xmlns:android="http://schemas.android.com/apk/res/android"

    android:layout_width="match_parent"

    android:layout_height="match_parent"

    android:orientation="vertical">

</LinearLayout>
①android:layout_width---->设置此布局的宽度,有三种模式:
fill_parent:充满屏幕(已过时,用下面的match_parent代替)
match_parent:充满屏幕(推荐)
wrap_content:包含组件,意思就是你的组件多大,那么就占多大的空间。
②android:layout_height---->设置此布局的高度,模式同上;
③android:orientation---->此属性设置此线性布局的方式,有两个参数:
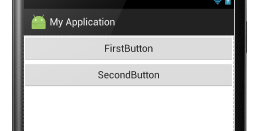
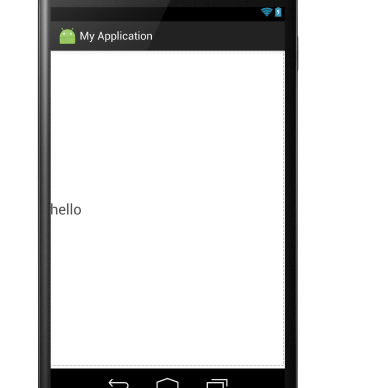
vertical:垂直布局:即子控件都在子控件的上下位置,例如
<LinearLayout xmlns:android="http://schemas.android.com/apk/res/android"

    android:layout_width="match_parent"

    android:layout_height="match_parent"

    android:orientation="vertical">            //这里选用垂直布局

    <Button

        android:layout_width="match_parent"        //宽度充满屏幕

        android:layout_height="wrap_content"        //高度包含组件

        android:text="FirstButton"

        android:id="@+id/button" />

    <Button

        android:layout_width="match_parent"

        android:layout_height="wrap_content"

        android:text="SecondButton"

        android:id="@+id/button2" />

</LinearLayout>
显示结果:
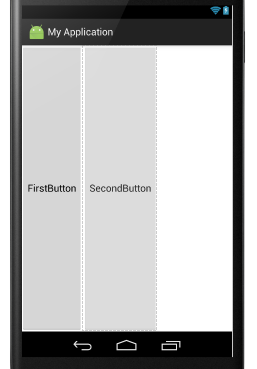
horizontal:水平布局:即子控件都在子控件的左右位置。例如:
<LinearLayout xmlns:android="http://schemas.android.com/apk/res/android"

    android:layout_width="match_parent"

    android:layout_height="match_parent"

    android:orientation="horizontal">      //这里设置为水平布局,

    <Button

        android:layout_width="wrap_content"      //宽度包含组件

        android:layout_height="match_parent"    //这里设置Button控件的高度充满屏幕

        android:text="FirstButton"

        android:id="@+id/button" />

    <Button

        android:layout_width="wrap_content"

        android:layout_height="match_parent"

        android:text="SecondButton"

        android:id="@+id/button2" />

</LinearLayout>
显示结果:
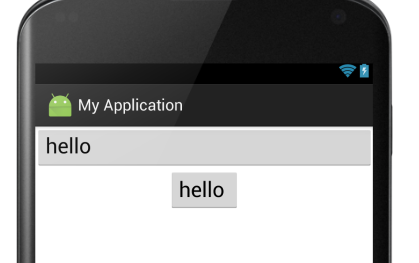
④android:baselineAligned---->此布局中的子控件是否基线对齐,其实就是设置在不在一条线上,他只有两个参数,true和false
false:若设置false,那么他里面的内容就不对齐。
true:若设置true,那么就对齐。 例如:
<LinearLayout xmlns:android="http://schemas.android.com/apk/res/android"

    android:layout_width="match_parent"

    android:layout_height="match_parent"

    android:baselineAligned="false"      //这里设置为false

    android:orientation="horizontal">

    <TextView

        android:layout_width="wrap_content"

        android:layout_height="wrap_content"

        android:text="hello "

        android:textSize="24sp"

         />

    <TextView

        android:layout_width="wrap_content"

        android:layout_height="wrap_content"

        android:text="world"

         />

    <TextView

        android:layout_width="wrap_content"

        android:layout_height="wrap_content"

        android:text="hello world"

        android:textSize="45sp"

        />

</LinearLayout>
显示结果:
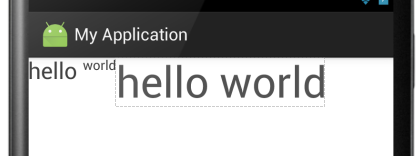
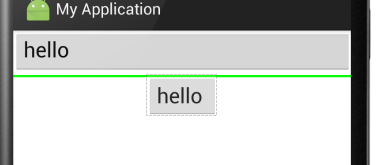
当设置为true时:

结果一目了然。
⑤android:gravity:指定布局里面的子控件的位置,几个常用参数,可以接受两个参数中间用”|“分隔开
center:控件处于布局的中心位置。
left:控件位于布局的左边。
right:控件位于布局的右边。
center|left:控件位于布局的中左位置。(也可以用center_vertical,和这个同样的作用)
官方给出的属性:
大家可以见明知义。例子:
<LinearLayout xmlns:android="http://schemas.android.com/apk/res/android"

    android:layout_width="match_parent"

    android:layout_height="match_parent"

    android:gravity="center|left"

    android:orientation="horizontal">

    <TextView

        android:layout_width="wrap_content"

        android:layout_height="wrap_content"

        android:text="hello "

        android:textSize="24sp"

         />

</LinearLayout>
显示结果为:
⑥android:layout_gravity:是指此子控件在布局中的位置。参数同上:
<LinearLayout xmlns:android="http://schemas.android.com/apk/res/android"

    android:layout_width="match_parent"

    android:layout_height="match_parent"

    android:orientation="vertical">

    <Button

        android:layout_width="match_parent"

        android:layout_height="wrap_content"

        android:text="hello "

        android:gravity="left"

        android:textSize="24sp"

         />

    <Button

        android:layout_width="wrap_content"

        android:layout_height="wrap_content"

        android:text="hello "

        android:textSize="24sp"

        android:layout_gravity="center"

        />

</LinearLayout>
显示结果:
⑦android:divider:绘制子组件之间的分割线,参数可以是一个图片也可以是一个xml的shape标记,图片或者shape位于drawable下
android:showDividers:显示分割线的方式,有四种:
begging:在整体的上方添加
middle:在每个组件之间添加
end:在整体的下方添加
none:不显示
例如:
<LinearLayout xmlns:android="http://schemas.android.com/apk/res/android"

    android:layout_width="match_parent"

    android:layout_height="match_parent"

    android:divider="@drawable/shapee"      //这里引用的shapee为一个xml文件,代码在下面

    android:showDividers="middle"         //这里显示方法为在每个组件之间添加

    android:orientation="vertical">
shapee.xml文件
<?xml version="1.0" encoding="utf-8"?>

<shape xmlns:android="http://schemas.android.com/apk/res/android">

    <solid android:color="#00ff00" />         //此属性指定颜色

    <size android:height="5px" />            //分割线的高度

</shape>
效果如下:
⑧android:weightSum:设定子控件中weight中的总和,其实就是控制子控件与屏幕或者其他子控件的比例,个人感觉这个比较重要,对于布局有很好的作用。
例如一下代码:
<LinearLayout xmlns:android="http://schemas.android.com/apk/res/android"

    android:layout_width="match_parent"

    android:layout_height="match_parent"

    android:orientation="horizontal"                  //布局设置为水平布局

    android:weightSum="1"                        //设置子控件的weight总和为1

    >

    <Button

        android:layout_width="0dp"                  //这里设置为0是为了好计算,计算公式在下面介绍

        android:layout_height="wrap_content"

        android:layout_weight="0.5"                  //这里设置weight(权值)为0.5,也就是占用了一行的一半。

        android:text="hello "

        android:textSize="24sp"

         />

    <Button

        android:layout_width="0dp"

        android:layout_height="wrap_content"

        android:layout_weight="0.4"                    //这里是0.4,就是40%,还有1-0.5-0.4=0.1为空白

        android:text="hello "

        android:textSize="24sp"

        />

</LinearLayout>
显示结果:

计算公式: 此实例中Button的宽度计算:{ Button的width值+Button的weight*父控件width(这里是match_content,
如果父控件为200dp,那么这里就是200)/ weightSum的值 }
Android布局之线性布局——LinearLayout的更多相关文章
- Android开发之线性布局详解(布局权重)
布局权重 线性布局支持给个别的子视图设定权重,通过android:layout_weight属性.就一个视图在屏幕上占多大的空间而言,这个属性给其设 定了一个重要的值.一个大的权重值,允许它扩大到填充 ...
- android学习之线性布局
效图如下 移通152余继彪 该布局使用了线性布局完成 父布局为线性布局,黄色和灰色部分为水平的线性布局,剩余50%部分为水平线性布局,该布局中包含了两个垂直的线性布局分别占了三分之1和三分之二
- 第21/22讲 UI_布局 之 线性布局
第21/22讲 UI_布局 之 线性布局 布局管理就是组件在activity中呈现方式,包括组件的大小,间距和对齐方式等. Android提供了两种布局的实现方式: 1.在xml配置文件中声明:这种方 ...
- Android:控件布局(线性布局)LinearLayout
LinearLayout是线性布局控件:要么横向排布,要么竖向排布 决定性属性:必须有的! android:orientation:vertical (垂直方向) .horizontal(水平方向) ...
- Android 自学之线性布局 LinearLayout
线性布局(LinearLayout),线性布局有点想AWT编程里面的FolwLayout,他们都会将容器里面的组件挨个的排列起来. 他们最大的区别在于:Android的线性布局不会换行:AWT里面的F ...
- Android——布局(线性布局linearLayout,表格布局TableLayout,帧布局FrameLayout)
线性布局: <?xml version="1.0" encoding="utf-8"?> <LinearLayout xmlns:androi ...
- .Net程序猿玩转Android开发---(6)线性布局LinearLayout
LinearLayout控件是Android中重要的布局控件,是一个线性控件,所谓线性控件的意思是指该控件里面的内容仅仅能水平或垂直排列.也就 ...
- android布局之线性布局
LinearLayout 线性布局有两种,分别是水平线性布局和垂直线性布局,LinearLayout属性中android:orientation为设置线性布局当其="vertical&quo ...
- Android 布局(线性布局、相对布局)
一.线性布局(LinearLayout) <LinearLayout****</LinearLayout>1. orientation(布局方向)value=0 horizontal ...
随机推荐
- 仅用递归函数操作逆序一个栈(Swift 4)
/// 取出栈底的数 func getAndRemoveLastElement(_ items: inout [Int]) -> Int { let value = items.remove(a ...
- [NOIP2018校模拟赛]T1聚会 party
题目链接: 聚会 分析: 设每个点到1号点的距离为dist_{i},每个点的权值为x_{i},目标点到1号点的距离为dist,权值为x,那么对于每一次查询,我们讨论三种情况: ① 目标家庭在区间左边( ...
- h5-22-地理位置
<!DOCTYPE html> <html> <head> <meta charset="UTF-8"> <title> ...
- web 前端的一些问题
1. HTML 和 JS 一个网页显示出来的静态的内容为html创见的静态object 对这些object的操作通过JS来响应 2. HTTP cookie cookie是由server set, 由 ...
- SqlParameter 操作 image 字段
public static void AddEmployee( string lastName, string firstName, string title, DateTime hireDate, ...
- c#学习系列之装箱拆箱
1. 装箱和拆箱是一个抽象的概念 2. 装箱是将值类型转换为引用类型 :拆箱是将引用类型转换为值类型 利用装箱和拆箱功能,可通过允许值类型的任何值与Object 类型的 ...
- D. Tavas and Malekas DFS模拟 + kmp + hash || kmp + hash
http://codeforces.com/contest/535/problem/D 如果真的要把m个串覆盖上一个串上面,是可以得,不会超时. 要注意到一点,全部覆盖后再判断时候合法,和边放边判断, ...
- mongoDB内置文档定义
在最近的设计数据库时,犯了一个低级的错误,就是设置内置文档是定义了错误了,导致数据取不出,去找了很多资料都无法解决.最后看了一了一下自己设置的model文件.配置错误,所以导致数据取不出了. 数据库时 ...
- [转]VC++中对文件的写入和读取
本文转自:http://blog.csdn.net/fanghb_1984/article/details/7425705 本文介绍两种方法对文件进行读取和写入操作:1.采用fstream类:2.采用 ...
- 模板方法模式及php实现
模板方法模式: 定义一个操作中的算法的骨架,而将一些步骤延迟到子类中.TemplateMethod 使得子类可以不改变一个算法的结构即可重定义该算法的某些特定步骤. 角色: 抽象模板角色:抽象模板类, ...