spring security认证
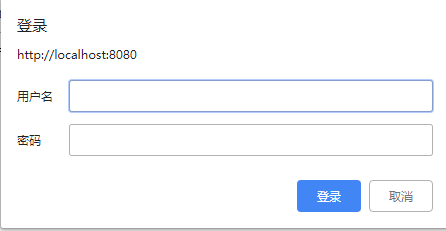
1 开发基于表单的认证
Spring security核心的功能
- 认证(你是谁?)
- 授权(你能干什么?)
- 攻击防护(防止伪造身份)
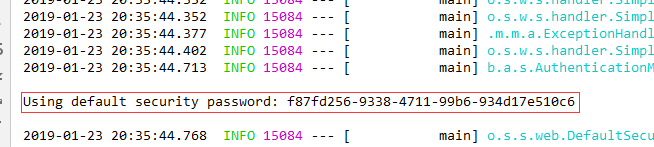
spring security实现了默认的用户名+密码认证,默认用户名为user,密码为:
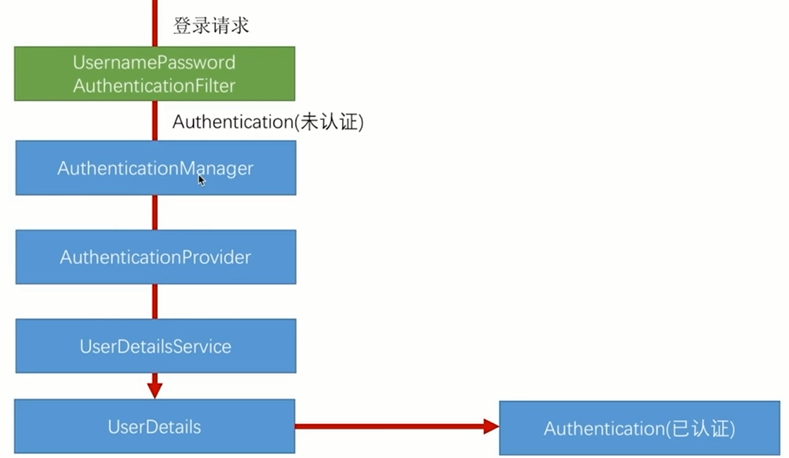
spring security基本原理:过滤器链
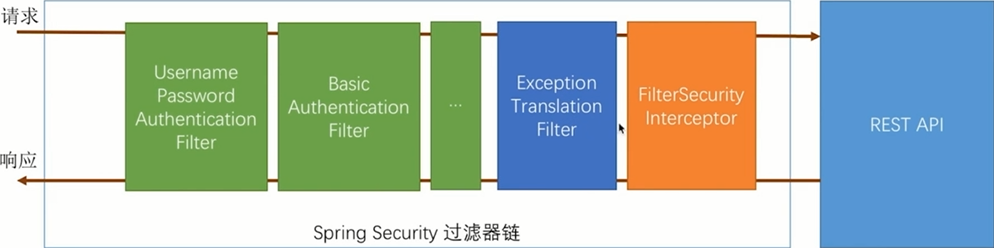
对于UsernamePasswordAuthenticationFilter只会拦截 url为/login,method为POST的请求。
1.1 自定义用户认证逻辑
1)处理用户信息获取逻辑
UserDetailsService接口,只有一个方法:loadUserByUsername
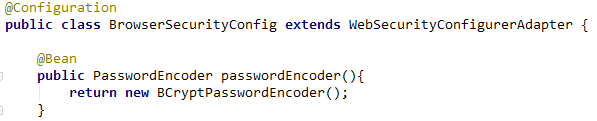
实现该接口:数据库中存放的是加密密码,对于同一个密码不同时间的加密密文不一样
@Component

public class MyUserDetailsService implements UserDetailsService {

    private Logger logger = LoggerFactory.getLogger(getClass());

    @Autowired

    private PasswordEncoder passwordEncoder;

    @Override

    public UserDetails loadUserByUsername(String s) throws UsernameNotFoundException {

        logger.info("用户名信息:" + s);

        // 根据用户名查找用户信息

        logger.info("数据库密码:" + passwordEncoder.encode("123456"));

        // 用户名和密码信息用来做认证,权限信息用来对该用户做授权

        return new User(s, "$2a$10$eFw06n0ABK2NFuse8y5f/eDUq7we26qQTceEtXSWNbMXnQ5Yf5Iha",

                AuthorityUtils.commaSeparatedStringToAuthorityList("admin"));

    }

}
2)处理用户信息校验逻辑

处理密码加密解密:在配置文件中将PasswordEncoder对象注入spring容器,等价于@Component+包扫描组件
1.2 个性化用户认证流程
1)对于浏览器,返回自定义登录页面,让UsernamePasswordXxxFilter来处理登录请求;对于调用RESTful服务,返回json错误信息。
用户登录成功后 ,对于浏览器,返回需要的页面;对于服务,返回json数据。

权限配置:
    @Override

    protected void configure(HttpSecurity http) throws Exception {

        http.formLogin()// 表单登录

                .loginPage("/authentication/require") //将登录页面重定向到controller

                .loginProcessingUrl("/authentication/form")

                .and()

                .authorizeRequests() //请求授权

                .antMatchers("/authentication/require",

                        securityProperties.getBrowser().getLoginPage()).permitAll()//该页面允许通过

                .anyRequest()

                .authenticated()  // 其他资源需要认证

                .and()

                .csrf().disable();  // 将跨站防护关掉

    }
控制器,根据之前URL的路径判断是否为RESTful服务,在处理
/*

当客户端发出请求,当需要认证时,spring security会重定向到该控制器

 */

@RestController

public class BrowserSecurityController {

    private Logger logger = LoggerFactory.getLogger(getClass());

    // 请求缓存

    private RequestCache requestCache = new HttpSessionRequestCache();

    private RedirectStrategy redirectStrategy = new DefaultRedirectStrategy();

    @Autowired

    private SecurityProperties securityProperties;

    /**

     * 当需要身份认证时跳转到这里

     * @param request

     * @param response

     * @return

     */

    @RequestMapping("/authentication/require")

    @ResponseStatus(code = HttpStatus.UNAUTHORIZED)

    public SimpleResponse requireAuthentication(HttpServletRequest request, HttpServletResponse response) throws IOException {

        // 判断请求类型,HTML或者app

        SavedRequest savedRequest = requestCache.getRequest(request, response);

        if(savedRequest!=null){

            String targetUrl = savedRequest.getRedirectUrl();

            logger.info("引发跳转的URL:"+targetUrl);

            // 如果之前的URL为.html结尾的URL,则重定向到登录页面

            if(StringUtils.endsWithIgnoreCase(targetUrl, ".html")){

                redirectStrategy.sendRedirect(request, response,

                        securityProperties.getBrowser().getLoginPage());

            }

        }

        return new SimpleResponse("请求的服务需要身份认证,请引导用户到登录页面");

    }

}
BrowserSecurityController.java
在启动项目中的application.properties文件中配置登录页面:
# 配置登录页面

getword.security.browser.loginPage=/demo.html
读取配置文件信息:
import org.springframework.boot.context.properties.ConfigurationProperties;

// 读取前缀为getword.security的属性配置,其中browser中的属性会被读取到browserProperties中

@ConfigurationProperties(prefix = "getword.security")

public class SecurityProperties {

    // browser的属性会匹配getword.security.browser后面的属性

    private BrowserProperties browser = new BrowserProperties();

    public BrowserProperties getBrowser() {

        return browser;

    }

    public void setBrowser(BrowserProperties browser) {

        this.browser = browser;

    }

}
SecurityProperties.java
public class BrowserProperties {

    private String loginPage = "/login.html"; //默认值

    public String getLoginPage() {

        return loginPage;

    }

    public void setLoginPage(String loginPage) {

        this.loginPage = loginPage;

    }

}
BrowserProperties.java
@Configuration

@EnableConfigurationProperties(SecurityProperties.class) //让属性配置读取器生效

public class SecurityCodeConfig {

}
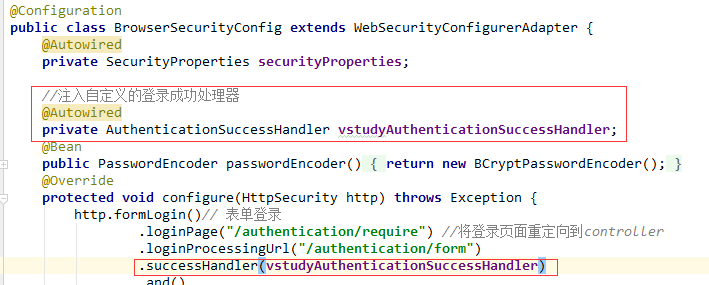
2)自定义登录成功处理,异步登录,AuthenticationSuccessHandler接口
自定义登录成处理:
@Component("vstudyAuthenticationSuccessHandler")

public class VstudyAuthenticationSuccessHandler implements AuthenticationSuccessHandler {

    private Logger logger = LoggerFactory.getLogger(getClass());

    //工具类, 将对象转成json

    @Autowired

    private ObjectMapper objectMapper;

    // 登录成功后调用

    @Override

    public void onAuthenticationSuccess(HttpServletRequest request, HttpServletResponse response, Authentication authentication) throws IOException, ServletException {

        logger.info("登录成功");

        response.setContentType("application/json;charset=utf-8");

        response.getWriter().write(objectMapper.writeValueAsString(authentication));

    }

}
VstudyAuthenticationSuccessHandler
注册,使处理器生效:
3)登录失败处理
@Component("vstudyAuthenticationFailHandler")

public class VstudyAuthenticationFailHandler implements AuthenticationFailureHandler {

    @Autowired

    private ObjectMapper objectMapper;

    private Logger logger = LoggerFactory.getLogger(getClass());

    @Override

    public void onAuthenticationFailure(HttpServletRequest request, HttpServletResponse response,

                                        AuthenticationException e) throws IOException, ServletException {

        logger.info("登录失败");

        response.setStatus(HttpStatus.INTERNAL_SERVER_ERROR.value()); //服务器内部错误

        response.setContentType("application/json;charset=utf-8");

        response.getWriter().write(objectMapper.writeValueAsString(e));

    }

}
VstudyAuthenticationFailHandler.java
配置:和success类似
4)判断请求方式,做出相应的处理
successHandler:
@Component("vstudyAuthenticationSuccessHandler")

public class VstudyAuthenticationSuccessHandler extends SavedRequestAwareAuthenticationSuccessHandler {

    private Logger logger = LoggerFactory.getLogger(getClass());

    //工具类, 将对象转成json

    @Autowired

    private ObjectMapper objectMapper;

    @Autowired

    private SecurityProperties securityProperties; //获取配置信息

    // 登录成功后调用

    @Override

    public void onAuthenticationSuccess(HttpServletRequest request, HttpServletResponse response, Authentication authentication) throws IOException, ServletException {

        logger.info("登录成功");

        if(LoginType.JSON.equals(securityProperties.getBrowser().getLoginType())){

            response.setContentType("application/json;charset=utf-8");

            response.getWriter().write(objectMapper.writeValueAsString(authentication));

        }else{

            // 调用父类方法,完成重定向跳转

            super.onAuthenticationSuccess(request, response, authentication);

        }

    }

}
VstudyAuthenticationSuccessHandler
failureHandler:
@Component("vstudyAuthenticationFailHandler")

public class VstudyAuthenticationFailHandler extends SimpleUrlAuthenticationFailureHandler {

    @Autowired

    private SecurityProperties securityProperties;

    @Autowired

    private ObjectMapper objectMapper;

    private Logger logger = LoggerFactory.getLogger(getClass());

    @Override

    public void onAuthenticationFailure(HttpServletRequest request, HttpServletResponse response,

                                        AuthenticationException e) throws IOException, ServletException {

        logger.info("登录失败");

        if(LoginType.JSON.equals(securityProperties.getBrowser().getLoginType())){

            response.setStatus(HttpStatus.INTERNAL_SERVER_ERROR.value()); //服务器内部错误

            response.setContentType("application/json;charset=utf-8");

            response.getWriter().write(objectMapper.writeValueAsString(e));

        }else{

            super.onAuthenticationFailure(request, response, e);

        }

    }

}
VstudyAuthenticationFailHandler
2 认证流程
3 图形验证码
3.1 生成图形验证码
验证码图片信息:
public class ImageCode {

    private BufferedImage image;

    private String code;

    private LocalDateTime expireTime;//过期时间

    public ImageCode(BufferedImage image, String code, int expireIn){

        this.image = image;

        this.code = code;

        this.expireTime = LocalDateTime.now().plusSeconds(expireIn);

    }

    public ImageCode(BufferedImage image, String code, LocalDateTime expireTime){

        this.image = image;

        this.code = code;

        this.expireTime = expireTime;

    }

}
ImageCode
控制器:
@RestController

public class ValidateCodeController {

    public static String SESSION_KEY = "SESSION_KEY_IMAGE_CODE";

    private SessionStrategy sessionStrategy = new HttpSessionSessionStrategy();

    @Autowired

    private SecurityProperties securityProperties;

    @GetMapping("/image/code")

    public void createCode(HttpServletRequest request, HttpServletResponse response) throws IOException {

        ImageCode imageCode = createImageCode(new ServletWebRequest(request,response));

        sessionStrategy.setAttribute(new ServletWebRequest(request, response), SESSION_KEY, imageCode);

        ImageIO.write(imageCode.getImage(), "JPEG", response.getOutputStream());

    }

    /**

     * 生成ImageCode验证码

     * @param request

     * @return

     */

    public ImageCode createImageCode(ServletWebRequest request){

        // 生成验证码,方法很多

        int width = 60;

        int height = 20;

        BufferedImage image = new BufferedImage(width, height, BufferedImage.TYPE_INT_RGB);

        Graphics g = image.getGraphics();

        Random random = new Random();

        g.setColor(getRandColor(200, 250));

        g.fillRect(0, 0, width, height);

        g.setFont(new Font("Times New Roman", Font.ITALIC, 20));

        g.setColor(getRandColor(160, 200));

        for (int i = 0; i < 155; i++) {

            int x = random.nextInt(width);

            int y = random.nextInt(height);

            int xl = random.nextInt(12);

            int yl = random.nextInt(12);

            g.drawLine(x, y, x + xl, y + yl);

        }

        String sRand = "";

        for (int i = 0; i < 4; i++) {

            String rand = String.valueOf(random.nextInt(10));

            sRand += rand;

            g.setColor(new Color(20 + random.nextInt(110), 20 + random.nextInt(110), 20 + random.nextInt(110)));

            g.drawString(rand, 13 * i + 6, 16);

        }

        g.dispose();

        return new ImageCode(image, sRand, 100);

    }

    /**

     * 生成随机背景条纹

     *

     * @param fc

     * @param bc

     * @return

     */

    private Color getRandColor(int fc, int bc) {

        Random random = new Random();

        if (fc > 255) {

            fc = 255;

        }

        if (bc > 255) {

            bc = 255;

        }

        int r = fc + random.nextInt(bc - fc);

        int g = fc + random.nextInt(bc - fc);

        int b = fc + random.nextInt(bc - fc);

        return new Color(r, g, b);

    }

}
ValidateCodeController
3.2 验证码校验
自定义过滤器:
public class ValidateCodeFilter extends OncePerRequestFilter {

    /**

     * 验证码校验失败处理器

     */

    private AuthenticationFailureHandler authenticationFailureHandler;

    /**

     * 系统配置信息

     */

    private SessionStrategy sessionStrategy = new HttpSessionSessionStrategy();

    /**

     * 系统中的校验码处理器

     */

    @Override

    protected void doFilterInternal(HttpServletRequest request, HttpServletResponse response, FilterChain filterChain) throws ServletException, IOException {

        // 只处理登录请求

        if (StringUtils.equals("/authetication/form", request.getRequestURI())

                && StringUtils.equalsIgnoreCase(request.getMethod(), "POST")) {

            try {

                logger.info("验证码校验通过");

            } catch (ValidateCodeException e) {

                //验证失败

                authenticationFailureHandler.onAuthenticationFailure(request, response, e);

            }

        }

        filterChain.doFilter(request, response);

    }

    protected void validate(ServletWebRequest request) throws ServletRequestBindingException {

        // 从session中拿到imageCode

        ImageCode codeInSession = (ImageCode) sessionStrategy.getAttribute(request, ValidateCodeController.SESSION_KEY);

        // 获取客户端输入的code,当前请求参数

        String codeInRequest = ServletRequestUtils.getStringParameter(request.getRequest(), "imageCode");

        if(StringUtils.isBlank(codeInRequest)){

            throw new ValidateCodeException("验证码不能为空");

        }

        if(codeInSession==null){

            throw new ValidateCodeException("验证码不存在");

        }

        if(codeInSession.isExpired()){

            throw new ValidateCodeException("验证码已过期");

        }

        if(!StringUtils.equalsIgnoreCase(codeInSession.getCode(), codeInRequest)){

            throw new ValidateCodeException("验证码不匹配");

        }

        sessionStrategy.removeAttribute(request, ValidateCodeController.SESSION_KEY);

    }

    public AuthenticationFailureHandler getAuthenticationFailureHandler() {

        return authenticationFailureHandler;

    }

    public void setAuthenticationFailureHandler(AuthenticationFailureHandler authenticationFailureHandler) {

        this.authenticationFailureHandler = authenticationFailureHandler;

    }

}
ValidateCodeFilter
配置:
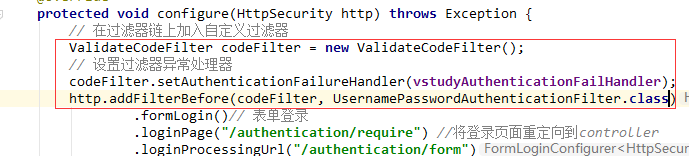
执行流程:
/index.html ->redirect ->/authentication/require(控制器,判断是.html结尾)->login.html ->ValidateCodeFilter ->exception -> VstudyAuthenticationFailHandler ->loginType:JSON
login.html中,使用ajax发送登录请求 -> 验证码过滤器通过 -> UsernamePasswordFilter通过 -> 返回登录结果信息
3.3 验证码的接口
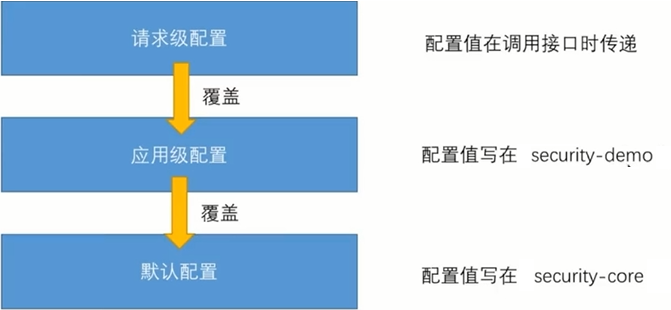
- 为了方便修改验证码的参数,如宽度、高度、长度等信息,我们将通过配置文件的形式配置这些信息。还有验证码的URL地址。
- 验证码拦截的接口可配置,比如为了限制用户操作频率,对用户操作使用验证码进行限制。验证码过滤器可以拦截多个控制器请求。
- 验证码的生成逻辑可以配置
三级配置:
1)验证码参数:
默认配置:
/**

 * 图形验证码

 */

public class ImageCodeProperties {

    private int width = 67;

    private int height = 23;

    private int len = 4;

    private int expireIn = 60; //60秒后过期

//seter getter

}
验证码信息:
/**

 * 验证码:包括图形验证码、短信验证码

 */

public class ValidateCodeProperties {

    private ImageCodeProperties image;

}
属性读取:
@ConfigurationProperties(prefix = "getword.security")

public class SecurityProperties {

    // browser的属性会匹配getword.security.browser后面的属性

    private BrowserProperties browser = new BrowserProperties();

    // 验证码属性匹配getword.security.code后面的属性

    private ValidateCodeProperties code = new ValidateCodeProperties();

}
end
spring security认证的更多相关文章
- Spring Security认证配置(三)
学习本章之前,可以先了解下上篇Spring Security认证配置(二) 本篇想要达到这样几个目的: 1.登录成功处理 2.登录失败处理 3.调用方自定义登录后处理类型 具体配置代码如下: spri ...
- spring security 认证源码跟踪
spring security 认证源码跟踪 在跟踪认证源码之前,我们先根据官网说明一下security的内部原理,主要是依据一系列的filter来实现,大家可以根据https://docs.sp ...
- Spring Security 入门(1-4-2)Spring Security - 认证过程之AuthenticationProvider的扩展补充说明
1.用户信息从数据库获取 通常我们的用户信息都不会向第一节示例中那样简单的写在配置文件中,而是从其它存储位置获取,比如数据库.根据之前的介绍我们知道用户信息是通过 UserDetailsService ...
- Spring Security 入门(1-4-1)Spring Security - 认证过程
理解时可结合一下这位老兄的文章:http://www.importnew.com/20612.html 1.Spring Security的认证过程 1.1.登录过程 - 如果用户直接访问登录页面 用 ...
- Authentication讲解(Spring security认证)
标准认证过程: 1.用户使用username和password登录 2.系统验证这个password对于该username是正确的 3.假设第二步验证成功,获取该用户的上下文信息(如他的角色列表) 4 ...
- Spring Security认证配置(二)
学习本章之前,可以先了解下上篇Spring Security基本配置. 本篇想要达到这样几个目的: 1.访问调用者服务时,如果是html请求,则跳转到登录页,否则返回401状态码和错误信息 2.调用方 ...
- Spring Security认证配置(一)
学习本章之前,可以先了解下上篇 Spring Security基本配置. 本篇主要讲述Spring Security基于表单,自定义用户认证配置(上篇中的配置,本篇将不再阐述).一共分为三步: 1.处 ...
- Authentication(Spring Security 认证笔记)
这篇文章是对Spring Security的Authentication模块进行一个初步的概念了解,知道它是如何进行用户认证的 考虑一个大家比较熟悉的标准认证过程: 1.用户使用username和pa ...
- spring-security-4 (4)spring security 认证和授权原理
在上一节我们讨论了spring security过滤器的创建和注册原理.请记住springSecurityFilterChain(类型为FilterChainProxy)是实际起作用的过滤器链,Del ...
随机推荐
- django系列6--Ajax03 ajax参数
ajax的参数 data: 当前ajax请求要携带的数据,是一个json的object对象,ajax方法会默认的把它编码成某种格式 (urlencoded:?a=1&b=2)发送给服务端;此外 ...
- python---基本数据类型 dict(字典)
1. 什么是字典 字典是python中唯一的映射类型, 由{ } 括起来的键值对组成,在dict中key是唯一的.字典是以key:value的形式来保存数据, 字典存储数据的时候是用的hash值来存储 ...
- python学习笔记-控制流(if for while break continue)
if语句 if语句用以检查条件:如果条件为真(True),将运行一块语句(称作 if-block 或 if 块),否则将运行另一块语句(称作 else-block 或 else 块).其中else 从 ...
- c++之选择排序和冒泡排序实现
1.冒泡排序 冒泡排序就是通过对比前一个和后一个数的大小,按照规则进行顺序的调换.每一轮对比之后最大或者最小值都会浮到最上面或者沉到最低下. 如:对这一数组进行冒泡排序:int a[5]{34,12 ...
- IDEA自动生成TestNG的testng.xml的插件
某地方见到的,自己实际操作一遍,记录一下.方便以后查询. 下载Create TestNG XML 插件,重启IDEA即可. 重启idea,新建Maven项目. pom.xml增加依赖 <depe ...
- XMPPManager 解析
一.用户登录流程 用户登录流程.png 注意:XMPP核心文件,基于TCP的XML流的传输,XMPPFrame框架是通过代理的方式实现消息传递的 实现用户登录的步骤如下: 1.实例化XMPPStrea ...
- QuantLib 金融计算——基本组件之 Calendar 类
目录 QuantLib 金融计算--基本组件之 Calendar 类 Calendar 对象的构造 一些常用的成员函数 自定义假期列表 工作日修正 如果未做特别说明,文中的程序都是 Python3 代 ...
- jsp页面struts2标签展示clob类型的数据
直接从数据库中查出来的数据,是clob类型的在前端页面展示的时候是这样: 后来找到了一个方法,在action中添加一个方法,解析转换clob数据的方法 public String getClob(Cl ...
- 关于莫比乌斯函数的塞 : 莫比乌斯前n项和 , 莫比乌斯函数绝对值的前n项和
https://ac.nowcoder.com/acm/contest/874#submit/{%22problemIdFilter%22%3A25455%2C%22statusTypeFilter% ...
- 基于Cython和内置distutils库,实现python源码加密(非混淆模式)
起因 python本身只能做混淆,不能加密,多年的商业软件开发经验导致有某种"洁癖"欲望,将py编译打包 尝试 pyinstaller原理是freeze打包pyc文件,利用工具可完 ...