C#代码安装Windows服务(控制台应用集成Windows服务)
最近在为一款C/S架构的科研软件开发云计算版,需要用到WCF,考虑到不需要什么界面以及稳定性,无人值守性,准备用Windows Service作为宿主,无奈Windows Service的安装太为繁复,就想如何通过C#代码完成Windows服务的安装及配置,在网上找了些资料,大多都是非常简单的代码,并没有一个完整的示例,可能一些初学者看起来不是很清晰,特别做了这个Demo!
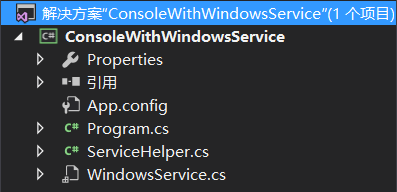
首先建立项目,结构非常简单,一个控制台应用程序,添加一个类库(ServiceHelper.cs 安装、卸载服务辅助类),一个Window服务(WindowsService.cs)
项目的思路就是,启动控制台应用程序,自动识别是应该以服务身份启动服务还是以控制台应用身份启动服务配置
首先来看Windows服务定义

using System;

using System.Collections.Generic;

using System.ComponentModel;

using System.Data;

using System.Diagnostics;

using System.Linq;

using System.ServiceProcess;

using System.Text;

using System.Threading.Tasks;

namespace ConsoleWithWindowsService

{

    partial class WindowsService : ServiceBase

    {

        public WindowsService()

        {

            InitializeComponent();

        }

        protected override void OnStart(string[] args)

        {

            // TODO: 在此处添加代码以启动服务。

            System.IO.File.AppendAllText(@"D:\Log.txt", " Service Start :" + DateTime.Now.ToString());

        }

        protected override void OnStop()

        {

            // TODO: 在此处添加代码以执行停止服务所需的关闭操作。

            System.IO.File.AppendAllText(@"D:\Log.txt", " Service Stop :" + DateTime.Now.ToString());

        }

    }

}
为了简单演示,这里我没有做什么工作,只是简单的往D盘写入了一个日志,证明服务正常工作就行了
然后来看Windows服务的辅助类
using System;

using System.Collections;

using System.Collections.Generic;

using System.Configuration.Install;

using System.Linq;

using System.Reflection;

using System.ServiceProcess;

using System.Text;

using System.Threading.Tasks;

namespace ConsoleWithWindowsService

{

    public class ServiceHelper

    {

        /// <summary>

        /// 服务是否存在

        /// </summary>

        /// <param name="serviceName"></param>

        /// <returns></returns>

        public static bool IsServiceExisted(string serviceName)

        {

            ServiceController[] services = ServiceController.GetServices();

            foreach (ServiceController s in services)

            {

                if (s.ServiceName == serviceName)

                {

                    return true;

                }

            }

            return false;

        }

        /// <summary>

        /// 启动服务

        /// </summary>

        /// <param name="serviceName"></param>

        public static void StartService(string serviceName)

        {

            if (IsServiceExisted(serviceName))

            {

                System.ServiceProcess.ServiceController service = new System.ServiceProcess.ServiceController(serviceName);

                if (service.Status != System.ServiceProcess.ServiceControllerStatus.Running &&

                    service.Status != System.ServiceProcess.ServiceControllerStatus.StartPending)

                {

                    service.Start();

                    for (int i = ; i < ; i++)

                    {

                        service.Refresh();

                        System.Threading.Thread.Sleep();

                        if (service.Status == System.ServiceProcess.ServiceControllerStatus.Running)

                        {

                            break;

                        }

                        if (i == )

                        {

                            throw new Exception("Start Service Error:" + serviceName);

                        }

                    }

                }

            }

        }

        /// <summary>

        /// 获取服务状态

        /// </summary>

        /// <param name="serviceName"></param>

        /// <returns></returns>

        public static ServiceControllerStatus GetServiceStatus(string serviceName)

        {

            System.ServiceProcess.ServiceController service = new System.ServiceProcess.ServiceController(serviceName);

            return service.Status;

        }

        /// <summary>

        /// 配置服务

        /// </summary>

        /// <param name="serviceName"></param>

        /// <param name="install"></param>

        public static void ConfigService(string serviceName, bool install)

        {

            TransactedInstaller ti = new TransactedInstaller();

            ti.Installers.Add(new ServiceProcessInstaller

            {

                Account = ServiceAccount.LocalSystem

            });

            ti.Installers.Add(new ServiceInstaller

            {

                DisplayName = serviceName,

                ServiceName = serviceName,

                Description = "MicroID微检系统数据后台服务",

                ServicesDependedOn = new string[] { "MSSQLSERVER" },//前置服务

                StartType = ServiceStartMode.Automatic//运行方式

            });

            ti.Context = new InstallContext();

            ti.Context.Parameters["assemblypath"] = "\"" + Assembly.GetEntryAssembly().Location + "\" /service";

            if (install)

            {

                ti.Install(new Hashtable());

            }

            else

            {

                ti.Uninstall(null);

            }

        }

    }

}
这里有四个函数,分别是用于验证指定服务是否存在,启动服务,获取指定服务状态和最关键的服务安装及卸载(服务配置)
验证服务存在性及获取服务状态没什么好说的,启动服务因为会有一个延时,通过一个循环模拟等待服务启动的这段时间,超时即为启动失败,重点是第四个服务配置函数
public static void ConfigService(string serviceName, bool install)
这里我们需要传入你希望命名的服务名称,通过一个bool值判断是安装还是卸载服务,项目中我统一都命名为MyService,接下来看下面这段代码
ti.Installers.Add(new ServiceInstaller

            {

                DisplayName = serviceName,

                ServiceName = serviceName,

                Description = "MicroID微检系统数据后台服务",

                ServicesDependedOn = new string[] { "MSSQLSERVER" },//前置服务

                StartType = ServiceStartMode.Automatic//运行方式

            });
在这段代码中,为服务设置了友好名(DisplayName即为任务管理器、服务管理器中看到的服务名),服务名,说明,前置服务,以及运行方式
这里的前置服务是告诉Windows,启动我的时候,记得要先等待SQLServer启动,我需要用到它,如果你的服务需要访问SQLServer数据库,那可千万不要忘了这里
最后是控制台应用程序的入口
using System;

using System.Collections.Generic;

using System.Linq;

using System.ServiceProcess;

using System.Text;

using System.Threading.Tasks;

namespace ConsoleWithWindowsService

{

    class Program

    {

        static void Main(string[] args)

        {

            //带参启动运行服务

            if (args.Length > )

            {

                try

                {

                    ServiceBase[] serviceToRun = new ServiceBase[] { new WindowsService() };

                    ServiceBase.Run(serviceToRun);

                }

                catch (Exception ex)

                {

                    System.IO.File.AppendAllText(@"D:\Log.txt", "\nService Start Error:" + DateTime.Now.ToString()+"\n"+ex.Message);

                }

            }

            //不带参启动配置程序

            else

            {

                StartLable:

                Console.WriteLine("请选择你要执行的操作——1:自动部署服务,2:安装服务,3:卸载服务,4:验证服务状态,5:退出");

                Console.WriteLine("————————————————————");

                ConsoleKey key = Console.ReadKey().Key;

                if (key == ConsoleKey.NumPad1 || key == ConsoleKey.D1)

                {

                    if (ServiceHelper.IsServiceExisted("MyService"))

                    {

                        ServiceHelper.ConfigService("MyService", false);

                    }

                    if (!ServiceHelper.IsServiceExisted("MyService"))

                    {

                        ServiceHelper.ConfigService("MyService", true);

                    }

                    ServiceHelper.StartService("MyService");

                    goto StartLable;

                }

                else if (key == ConsoleKey.NumPad2 || key == ConsoleKey.D2)

                {

                    if (!ServiceHelper.IsServiceExisted("MyService"))

                    {

                        ServiceHelper.ConfigService("MyService", true);

                    }

                    else

                    {

                        Console.WriteLine("\n服务已存在......");

                    }

                    goto StartLable;

                }

                else if (key == ConsoleKey.NumPad3 || key == ConsoleKey.D3)

                {

                    if (ServiceHelper.IsServiceExisted("MyService"))

                    {

                        ServiceHelper.ConfigService("MyService", false);

                    }

                    else

                    {

                        Console.WriteLine("\n服务不存在......");

                    }

                    goto StartLable;

                }

                else if (key == ConsoleKey.NumPad4 || key == ConsoleKey.D4)

                {

                    if (!ServiceHelper.IsServiceExisted("MyService"))

                    {

                        Console.WriteLine("\n服务不存在......");

                    }

                    else

                    {

                        Console.WriteLine("\n服务状态:" + ServiceHelper.GetServiceStatus("MyService").ToString());

                    }

                    goto StartLable;

                }

                else if (key == ConsoleKey.NumPad5 || key == ConsoleKey.D5) { }

                else

                {

                    Console.WriteLine("\n请输入一个有效键!");

                    Console.WriteLine("————————————————————");

                    goto StartLable;

                }

            }

        }

    }

}
有了这三部分,就算完成啦,当我们生成项目后,启动应用程序,这时会默认启动控制台应用程序,因为arg[] 参数为空,有人可能有疑问,那服务又如何启动呢,注意Windows服务辅助类中的这句代码
ti.Context.Parameters["assemblypath"] = "\"" + Assembly.GetEntryAssembly().Location + "\" /service";
我们在为服务注册的时候,在后面加了"/service"这个参数,也就是说,当我们直接启动可执行文件时,这个参数为空,程序会启动控制台应用程序,而我们注册的服务会携带这个参数,你会在后面看到效果,每次服务启动时因为都带了这个参数,程序会自动执行下面的代码来直接启动服务,由此做到了两种程序的动态选择
///带参启动运行服务

            if (args.Length > )

            {

                try

                {

                    ServiceBase[] serviceToRun = new ServiceBase[] { new WindowsService() };

                    ServiceBase.Run(serviceToRun);

                }

                catch (Exception ex)

                {

                    System.IO.File.AppendAllText(@"D:\Log.txt", "Service Start Error:" + DateTime.Now.ToString()+"\n"+ex.Message);

                }

            }
还有最重要的一点:Win7+系统,由于权限问题,需要为执行程序设置以管理员方式运行,通过VS直接Debug是无法执行成功的,这也是很多网上的老旧资料忽略的一点
以下是运行效果演示

这里我首先获取了一下服务状态,显示服务并不存在,然后通过自动部署(其实就是判断服务状态,不存在则安装,存在则先卸载再安装,最后启动服务),完成后,再次获取服务状态,显示Running!!!
然后我们进入服务管理器看下
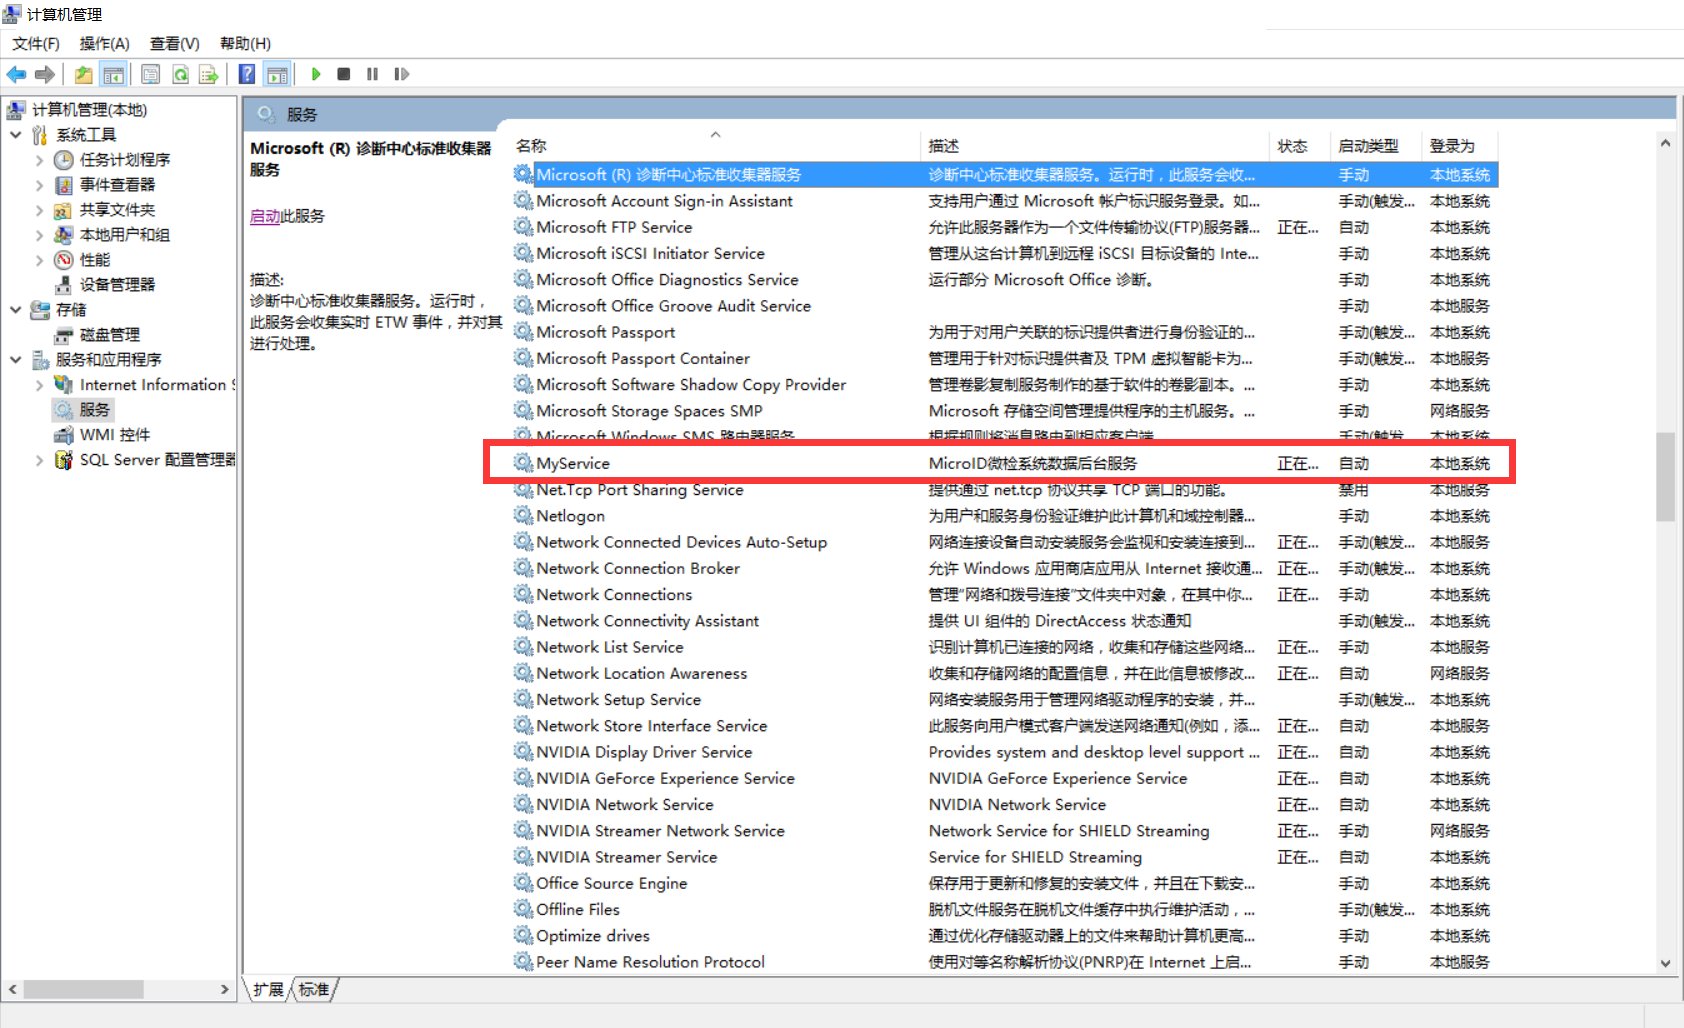
没错,就是它了,跟我们上面设置的友好名,以及说明一致,然后我们点开这个服务的属性
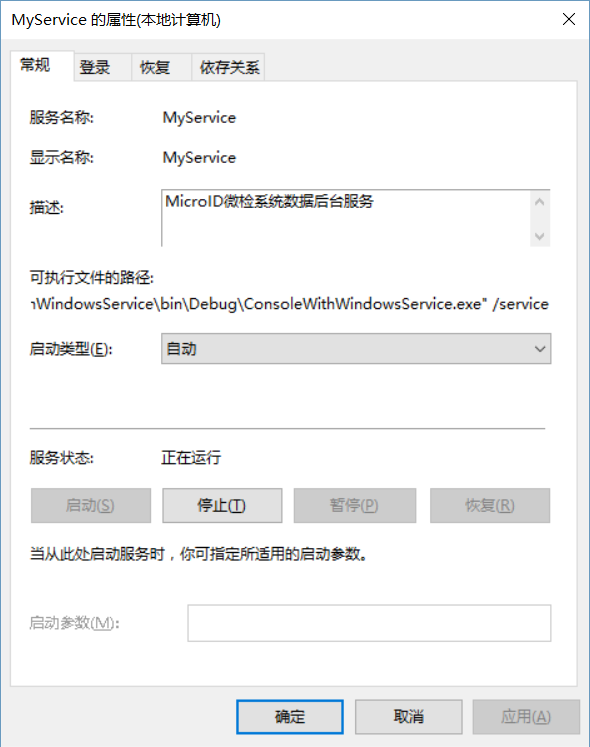
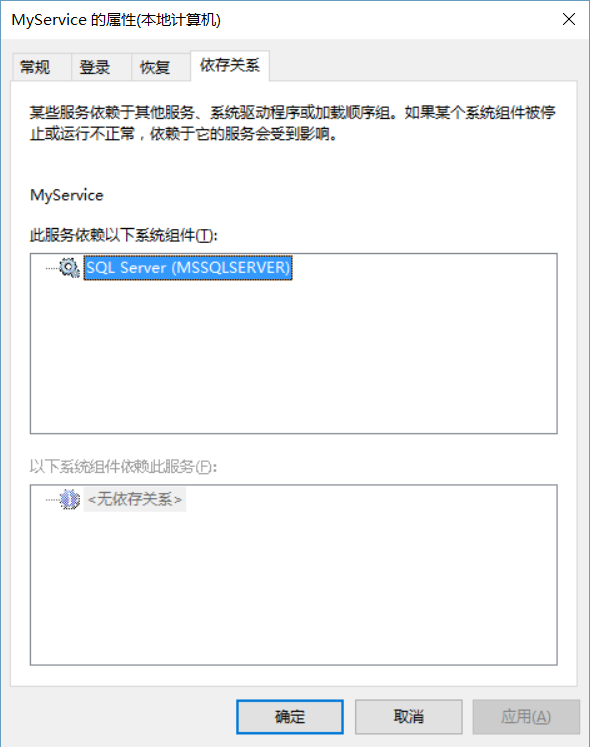
你是不是已经看到玄机了,可执行文件路径后面带上了参数,这就是动态选择启动控制台程序还是启动服务的关键,同时依存关系里面有了SQLServer,接下来我们做最后一步验证,打开D盘日志文件

至此,证明整套的服务安装,启动均已完成,是不是很方便,以后再也不用通过命令行去安装,卸载了,每次都可以直接启动这个控制台应用程序,就可以完成对服务的配置!!!
原创文章,转载请注明出处
最后附上源码
开发环境:Visual studio 2015 / .Net Framework 4.5.2
转自:http://www.cnblogs.com/MadisonSky/p/5848446.html
C#代码安装Windows服务(控制台应用集成Windows服务)的更多相关文章
- C#代码安装、卸载、监控Windows服务
C#编写Windows服务之后都不可避免的需要安装,卸载等操作.而传统的方式就是通过DOS界面去编写命令,这样的操作方式无疑会增加软件实施人员的工作量,下面就介绍一种简单.高效.快速方便的方式.1.安 ...
- c#创建windows服务(代码方式安装、启动、停止、卸载服务)
转载于:https://www.cnblogs.com/mq0036/p/7875864.html 一.开发环境 操作系统:Windows 10 X64 开发环境:VS2015 编程语言:C# .NE ...
- 微软 WCF的几种寄宿方式,寄宿IIS、寄宿winform、寄宿控制台、寄宿Windows服务
WCF寄宿方式是一种非常灵活的操作,可以在IIS服务.Windows服务.Winform程序.控制台程序中进行寄宿,从而实现WCF服务的运行,为调用者方便.高效提供服务调用.本文分别对这几种方式进行详 ...
- 禅道ZenTao在windows和Lniux下集成安装环境和一键安装方法整理
一共4种安装方法看官可以根据你自己的实际环境来选择一个都很简单 windows下用禅道官网的一键安装包方法(推荐): 为了简化大家在windows下面的安装,我们在xampp基础上做了禅道的windo ...
- Windows服务一:新建Windows服务、安装、卸载服务
Windows 服务(即,以前的 NT 服务)使您能够创建在它们自己的 Windows 会话中可长时间运行的可执行应用程序.这些服务可以在计算机启动时自动启动,可以暂停和重新启动而且不显示任何用户界面 ...
- .NET Core 代码安装服务启动
最近做了一些.NET Core的程序,有在Windows下运行的 有在CentOS 下运行的,Windows下运行的还好,对Windows下还算比较熟悉了,但CentOS 下 每次都是找笔记支持命令 ...
- windows服务搭建(VS2019创建Windows服务不显示安装组件)
1.创建windows服务应用 2.右键查看代码 3.写个计时器Timer using System.Timers; 如上图,按tab键快速操作 会自动创建一个委托 改为下边的方式,打印日志来记录 ...
- [SDK2.2]Windows Azure Storage (16) 使用WCF服务,将本地图片上传至Azure Storage (上) 客户端代码
<Windows Azure Platform 系列文章目录> 前一章我们完成了服务器端的代码,并且已经发布到了Windows Azure云端. 本章我们将实现客户端的代码,客户端这里我们 ...
- kafka 以windows服务的方式在windows下安装并自启动
准备工作: 下载kafka http://apache.fayea.com/kafka/0.10.0.0/kafka_2.10-0.10.0.0.tgz 解压kafka至D:\bigdata\kafk ...
随机推荐
- BZOJ_3993_[SDOI2015]星际战争_二分+网络流
BZOJ_3993_[SDOI2015]星际战争_二分+网络流 Description 3333年,在银河系的某星球上,X军团和Y军团正在激烈地作战.在战斗的某一阶段,Y军团一共派遣了N个巨型机器人进 ...
- BZOJ_1503_[NOI2004]郁闷的出纳员_权值线段树
BZOJ_1503_[NOI2004]郁闷的出纳员_权值线段树 Description OIER公司是一家大型专业化软件公司,有着数以万计的员工.作为一名出纳员,我的任务之一便是统计每位员工的 工资. ...
- Guess 任意猜
age_of_oldboy = 56 count = 0 while count <3: guess_age = int(input("guess age:")) if gu ...
- Java开源生鲜电商平台-通知模块设计与架构(源码可下载)
Java开源生鲜电商平台-通知模块设计与架构(源码可下载) 说明:对于一个生鲜的B2B平台而言,通知对于我们实际的运营而言来讲分为三种方式: 1. 消息推送:(采用极光推送) ...
- MIP 问题解决方案大全(2018-06更新)
在 MIP 推出后,我们收到了一些站长的疑问.现将常见问题整理出来,帮助大家了解 MIP 的知识. 一.MIP 认知类问题 二.改造前准备 三.前端改造,组件使用 四.提交生效 五.MIPCache ...
- php session序列化攻击面浅析
目录 0x00 首先,session_start()是什么? 0x01 初识php-session序列化机制 0x02 php_serialize引擎(反)序列化测试 0x03 当使用不同的引擎来处理 ...
- C#字符串的一些常用方法
字符串常用方法 string str =""; string[] strArray = str.Split('截取字符'); //按字符将字符串拆分为数组 str = str.Re ...
- 使用myeclipse修改项目映射路径
这里主要做下记录,找到myeclipse中对项目路径进行查看以及修改的地址 如图 点击项目右键 实例url:http://localhost:8080/myFirstServlet/one 对应路径中 ...
- 第5章 令牌自省端点(Token Introspection Endpoint) - IdentityModel 中文文档(v1.0.0)
OAuth 2.0令牌自省的客户端库是作为HttpClient扩展方法提供的. 以下代码将引用令牌发送到内省端点: var client = new HttpClient(); var respons ...
- 用系统为centos6的主机,搭建PXE服务器,实现批量安装centos6,7系统
1. iptables -F setenforce 0 临时关掉selinux,清掉防火墙 永久生效更改配置文件:vim /etc/sysconfig/selinux chkconfig iptabl ...