
使用Cordova插件实现两个app之间的相互调用和通讯
几年前使用Cordova 进行两个app之间的相互调用和通讯;当时也是几经折腾,今天把它整理出来,理一下思路,也方便有同样需求的朋友参考
一、require引入 plugin
require("cordova!com.lampa.startapp-master");
这个插件下载 https://github.com/dengxiaoning/com.lampa.startapp
(申明:该插件参考https://github.com/lampaa/com.lampa.startapp自己实现了ios的参数传递以及 downloadApps应用下载的功能)
二、源文件分析
首选来看看这个插件的实现
plugin.xml
  <js-module src="www/startApp.js" name="startapp">

        <merges target="startApp" />

    </js-module>
指定了js module 的路径和调用时的名称target="startApp"
    <!-- android -->

    <platform name="android">

        <config-file target="res/xml/config.xml" parent="/*">

            <feature name="startApp">

                <param name="android-package" value="com.lampa.startapp.startApp"/>

            </feature>

        </config-file>

        <source-file src="src/android/startApp.java" target-dir="src/com/lampa/startapp" />

    </platform>

	<platform name="ios">

		<config-file target="config.xml" parent="/*">

			<feature name="startApp">

				<param name="ios-package" value="startApp"/>

			</feature>

		</config-file>

		<header-file src="src/ios/startApp.h"/>

		<source-file src="src/ios/startApp.m"/>

	</platform>
指定插件源文件路径,根据不同平台,定义插件包名、将文件写入平台指定的路径下
startApp.js
var exec = require('cordova/exec');

module.exports = {

	set: function(params, extra) {

		var output = [params];

		if(extra != undefined) {

			output.push(extra);

		}

		else {

			output.push(null);

		}

		return {

			start: function(completeCallback, errorCallback) {

				completeCallback = completeCallback || function() {};

				errorCallback = errorCallback || function() {};

				exec(completeCallback, errorCallback, "startApp", "start", output);

			},

	},

	/**

	 * extra values

	 */

	getExtras: function(completeCallback, errorCallback) {

		exec(completeCallback, errorCallback, "startApp", "getExtras", []);

	},

}
该js 实现了使用Cordova 调用android 和 ios 原生接口然后返回参数,
如:exec(completeCallback, errorCallback, "startApp", "start", output); 其中startApp指定调用的类名
【ios是@interface startApp : CDVPlugin,android是public class startApp extends CordovaPlugin】;
start指定调用该类的方法名;其他参数就是cordova 导出的成功、错误回调和携带返回数据。
startApp.java(中增加方法)
	/**

	 * download application from market

	 * */

	public void downloadApps(JSONArray args, CallbackContext callback){

		JSONObject params;

		try {

			if(args.get(0) instanceof JSONObject){

				params = args.getJSONObject(0);

				if(params.has("application")) {

					Uri uri = Uri.parse("market://details?id="+params.getString("application")+"");

			        Intent it = new Intent(Intent.ACTION_VIEW, uri);

			        cordova.getActivity().startActivity(it);

				}

				if(params.has("downloadurl")){

					cordova.getActivity().startActivity(new Intent(Intent.ACTION_VIEW, Uri.parse(params.getString("downloadurl"))));

				}

			}

		}

		catch (JSONException e) {

			callback.error("JSONException: " + e.getMessage());

			e.printStackTrace();

		}

		catch (ActivityNotFoundException e) {

			callback.error("ActivityNotFoundException: " + e.getMessage());

			e.printStackTrace();

		}

	}
增加Android 根据路径下载apk的方法
startApp.h(中增加方法)
- (void)getExtras:(CDVInvokedUrlCommand*)command;

- (void)downloadApps:(CDVInvokedUrlCommand*)command;

- (void)exitApplication:(CDVInvokedUrlCommand*)command;
增加ISO平台下 获取应用调用时传入的参数,在未安装时根据url下载应用
startApp.m(中增加方法)
- (void)getExtras:(CDVInvokedUrlCommand*)command{

	 CDVPluginResult* pluginResult = nil;

	// 从 url中获取保存的参数,将其返回给Cordova

	 NSString *userurl = [[NSUserDefaults standardUserDefaults] objectForKey:@"url"];

	if(userurl == nil || userurl == NULL){

		 NSString *addResult = @"returnFalse";

		 pluginResult = [CDVPluginResult resultWithStatus:CDVCommandStatus_ERROR messageAsString:addResult];

	}else{

		pluginResult = [CDVPluginResult resultWithStatus:CDVCommandStatus_OK messageAsString:userurl];

		[[NSUserDefaults standardUserDefaults] setObject:nil forKey:@"url"];

	}

	[self.commandDelegate sendPluginResult:pluginResult callbackId:command.callbackId];

}

-(void)downloadApps:(CDVInvokedUrlCommand*)command{

	 CDVPluginResult* pluginResult = nil;

    NSString* scheme = [command.arguments objectAtIndex:0];

    if ([[UIApplication sharedApplication] canOpenURL:[NSURL URLWithString:scheme]]) {

		[[UIApplication sharedApplication] openURL:[NSURL URLWithString:scheme]];

        pluginResult = [CDVPluginResult resultWithStatus:CDVCommandStatus_OK messageAsBool:(true)];

    }

    else {

        pluginResult = [CDVPluginResult resultWithStatus:CDVCommandStatus_ERROR messageAsBool:(false)];

    }

    [self.commandDelegate sendPluginResult:pluginResult callbackId:command.callbackId];

}

- (void)exitApplication:(CDVInvokedUrlCommand*)command {

	exit(0);

}
三、配置应用Scheme
3.1 使用xcode 手动配置
首先将该ios文件导入xcode,点击.xcodeproj后缀的文件,xcode将会自动打开,再找到 LSApplicationQueriesScheme 为应用添加允许访问的app的白名单。 然后添加Scheme(只有这样另一个app在添加白名单时才知道写什么)。具体操作如下图
 找到info 找到info
|
 添加白名单 添加白名单
|
 配置应用Scheme 配置应用Scheme
|
 配置Scheme 配置Scheme
|
注意这个配置Scheme是需要调用者app和被调用app都需要设置的
同时配置ios访问设备的一些权限,否则无权限访问时应用会崩溃
找到 你的项目名-info.plist 文件打开,在最后一个array标签下加入配置
<!-- 相册 -->

<key>NSPhotoLibraryUsageDescription</key>

<string>App需要您的同意,才能访问相册</string>

<!-- 相机 -->

<key>NSCameraUsageDescription</key>

<string>App需要您的同意,才能访问相机</string>

<!-- 麦克风 -->

<key>NSMicrophoneUsageDescription</key>

<string>App需要您的同意,才能访问麦克风</string>

<!-- 位置 -->

<key>NSLocationUsageDescription</key>

<string>App需要您的同意,才能访问位置</string>

<!-- 在使用期间访问位置 -->

<key>NSLocationWhenInUseUsageDescription</key>

<string>App需要您的同意,才能在使用期间访问位置</string>

<!-- 始终访问位置 -->

<key>NSLocationAlwaysUsageDescription</key>

<string>App需要您的同意,才能始终访问位置</string>

<!-- 日历 -->

<key>NSCalendarsUsageDescription</key>

<string>App需要您的同意,才能访问日历</string>

<!-- 提醒事项 -->

<key>NSRemindersUsageDescription</key>

<string>App需要您的同意,才能访问提醒事项</string>

<!-- 运动与健身 -->

<key>NSMotionUsageDescription</key> <string>App需要您的同意,才能访问运动与健身</string>

<!-- 健康更新 -->

<key>NSHealthUpdateUsageDescription</key>

<string>App需要您的同意,才能访问健康更新 </string>

<!-- 健康分享 -->

<key>NSHealthShareUsageDescription</key>

<string>App需要您的同意,才能访问健康分享</string>

<!-- 蓝牙 -->

<key>NSBluetoothPeripheralUsageDescription</key>

<string>App需要您的同意,才能访问蓝牙</string>

<!-- 媒体资料库 -->

<key>NSAppleMusicUsageDescription</key>

<string>App需要您的同意,才能访问媒体资料库</string>
操作截图
 找到 项目名-info.plist 文件 找到 项目名-info.plist 文件
|
 添加配置 添加配置
|
3.2 使用plugin.xml自动配置
自己写的一个配置ios 相关权限和Scheme的xml

创建如上类似文件夹考入即可:
<?xml version="1.0" encoding="UTF-8"?>

<plugin xmlns="http://apache.org/cordova/ns/plugins/1.0"

	xmlns:android="http://schemas.android.com/apk/res/android"

	id="cordova-plugin-plistconfig" version="5.3.0">

    <name>开启第三方应用</name>

    <description>新开启第三方应用相关配置</description>

    <license>MIT</license>

    <keywords>cordova,sina</keywords>

    <!--require cordova version -->

    <engines>

        <engine name="cordova" version=">=3.5.0" />

    </engines>

    <!-- ios -->

    <platform name="ios">

        <!-- 允许访问的应用的 Scheme白名单,如打包A应用;此处应写B应用的scheme,(假如 将A定义为 aapp B定义为bapp 配置如下)。  反之打包的是B应用下面的配置就要反过来写了 -->

        <config-file platform="ios" target="*-Info.plist" parent="LSApplicationQueriesSchemes">

            <array>

                <string>bapp</string>

            </array>

        </config-file>

        <!-- 当前应用自己的 Scheme -->

        <config-file platform="ios" target="*-Info.plist" parent="CFBundleURLTypes">

            <array>

            	<dict>

            		<key>CFBundleTypeRole</key>

            		<string>Editor</string>

            	     <key>CFBundleURLSchemes</key>

            		<array>

               			 <string>aapp</string>

                	</array>

                </dict>

            </array>

        </config-file>

        <!-- 配置相关权限 -->

        <config-file platform="ios" target="*-Info.plist" parent="NSAppleMusicUsageDescription">

			<string>App需要您的同意,才能访问媒体资料库</string>

		</config-file>

		<config-file platform="ios" target="*-Info.plist" parent="NSBluetoothPeripheralUsageDescription">

			<string>App需要您的同意,才能访问蓝牙</string>

		</config-file>

		<config-file platform="ios" target="*-Info.plist" parent="NSCalendarsUsageDescription">

			<string>App需要您的同意,才能访问日历</string>

		</config-file>

		<config-file platform="ios" target="*-Info.plist" parent="NSCameraUsageDescription">

			<string>App需要您的同意,才能访问相机</string>

		</config-file>

		<config-file platform="ios" target="*-Info.plist" parent="NSHealthShareUsageDescription">

			<string>App需要您的同意,才能访问健康分享</string>

		</config-file>

		<config-file platform="ios" target="*-Info.plist" parent="NSHealthUpdateUsageDescription">

			<string>App需要您的同意,才能访问健康更新 </string>

		</config-file>

		<config-file platform="ios" target="*-Info.plist" parent="NSLocationAlwaysUsageDescription">

			<string>App需要您的同意,才能始终访问位置</string>

		</config-file>

		<config-file platform="ios" target="*-Info.plist" parent="NSLocationUsageDescription">

			<string>App需要您的同意,才能访问位置</string>

		</config-file>

		<config-file platform="ios" target="*-Info.plist" parent="NSLocationWhenInUseUsageDescription">

			<string>App需要您的同意,才能在使用期间访问位置</string>

		</config-file>

		<config-file platform="ios" target="*-Info.plist" parent="NSMainNibFile">

			<string></string>

		</config-file>

		<config-file platform="ios" target="*-Info.plist" parent="NSMainNibFile~ipad">

			<string></string>

		</config-file>

		<config-file platform="ios" target="*-Info.plist" parent="NSMicrophoneUsageDescription">

			<string>App需要您的同意,才能访问麦克风</string>

		</config-file>

		<config-file platform="ios" target="*-Info.plist" parent="NSMotionUsageDescription">

			<string>App需要您的同意,才能访问运动与健身</string>

		</config-file>

		<config-file platform="ios" target="*-Info.plist" parent="NSPhotoLibraryUsageDescription">

			<string>App需要您的同意,才能访问相册</string>

		</config-file>

		<config-file platform="ios" target="*-Info.plist" parent="NSRemindersUsageDescription">

			<string>App需要您的同意,才能访问提醒事项</string>

        </config-file>

    </platform>

</plugin>
3.4 在ios 的 AppDelegate.m中增后参数接收(这个是重点)
// 在该方法中新增如下代码

- (BOOL)application:(UIApplication*)application openURL:(NSURL*)url sourceApplication:(NSString*)sourceApplication annotation:(id)annotation{

	 NSString *URLString= [url absoluteString];

	  [[NSUserDefaults standardUserDefaults] setObject:URLString forKey:@"url"];

	  [[NSUserDefaults standardUserDefaults] synchronize];

}
操作截图
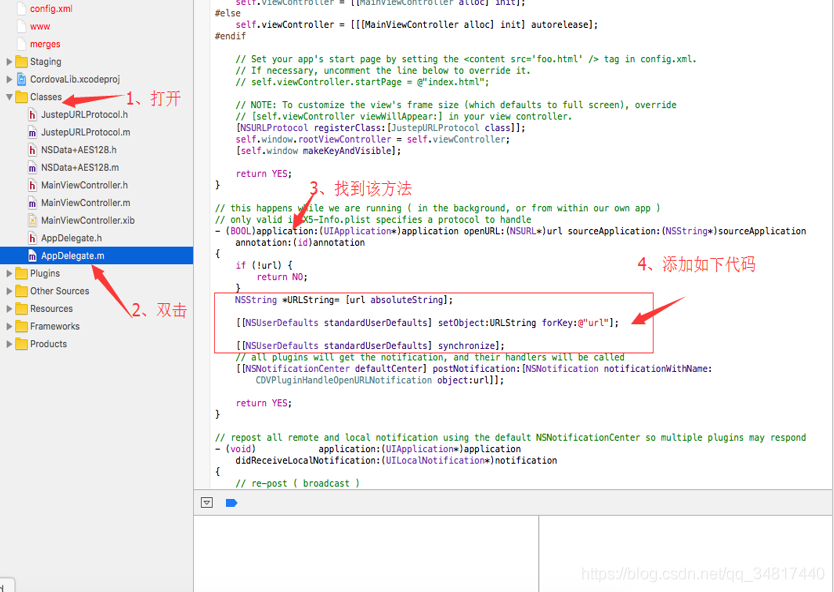
四、js中调用
4.1 android平台
A应用调用B应用的方法
invokeBapp(){

	var sApp;

	sApp = startApp.set({// 设置应用包名----注意修改----该包名对应【被叫application】

		"application" : "com.myapplication.bapp"// 替换为你真实的包名

		}, {//传递给B应用的参数

			"username" : "lili"

			"userId" : "123456"

		});

		/*

		 * 监测应用是否安装

		 */

		cordova.plugins.fileOpener2.appIsInstalled(packageName, {

			success : function(res) {

				if (res.status === 0) {

				     startApp.downloadApps({

				"downloadurl":“https://192.168.1.1:8080/bapp/bapp.apk” //替换为你服务器真实的apk路径

			},function(success){

				console.log("success");

			},function(error){

				alert(error);

			});

				} else {

					sApp.start(function(success) { // success

						console.log("OK");

					}, function(error) { // fail

						alert(error);

					});

				}

			}

		});

}
4.2 iOS平台
A应用调用B应用的方法
invokeBapp(){

	var sApp;

	var sendParams = "username:lili;userId:123456"; //传递给B应用的参数(ios不能传递json对象)

	var twitter = “bapp://”; // B应用的Scheme(就是上面 第三 步配置的那个  再加上冒号和双斜杠就ok了)

	sApp = startApp.set(twitter + sendParams + "");

		/* 监测是否安装应用 */

		sApp.check(function(values) {

			sApp.start(function(success) { // success

			}, function(error) { // fail

				alert(error);

			});

		}, function(error) {

		   startApp.downloadApps({

				"downloadurl":"itms-services:///?action=download-manifest&url=https://192.168.1.1:8080/bapp/dependence.plist" //替换为你服务器真实的plis路径(这里使用的是plist进行ipa下载,如果你已经发布到AppStore那就直接写AppStore下载路径了)

		});

}
4.3 B应用接收参数
receiveAappParams(){

	startApp.getExtras(function(res){

		// to do something...

		console.log(res);

	});

}
五、配置 plist文件
由于没u有上传到商店,ipa无法在ios应用中下载,所有使用plis进行ipa映射,然后调用Safari进行下载安装
<?xml version="1.0" encoding="UTF-8"?>

<!DOCTYPE plist PUBLIC "-//Apple//DTD PLIST 1.0//EN" "http://www.apple.com/DTDs/PropertyList-1.0.dtd">

<plist version="1.0">

<dict>

	<key>items</key>

	<array>

		<dict>

			<key>assets</key>

			<array>

				<dict>

					<key>kind</key>

					<string>software-package</string>

					<key>url</key>

					<!-- ipa位于服务器的真实路径 -->

					<string>https://192.168.1.1:8080/bapp/bapp.ipa</string>

				</dict>

				<dict>

					<key>kind</key>

					<string>full-size-image</string>

					<key>needs-shine</key>

					<true/>

					<key>url</key>

					<!-- app下载时显示的图标 -->

					<string>https://192.168.1.1:8080/bapp/icon.png</string>

				</dict>

				<dict>

					<key>kind</key>

					<string>display-image</string>

					<key>needs-shine</key>

					<true/>

					<key>url</key>

					<!-- app下载时显示的图标 -->

					<string>https://192.168.1.1:8080/bapp/icon.png</string>

				</dict>

			</array>

			<key>metadata</key>

			<dict>

				<key>bundle-identifier</key>

				<!-- app包名 -->

				<string>com.myapplication.bapp</string>

				<key>bundle-version</key>

				<!-- app当前版本 -->

				<string>1.0.0</string>

				<key>kind</key>

				<string>software</string>

				<key>title</key>

				<!-- app名称 -->

				<string>客户咨询平台</string>

			</dict>

		</dict>

	</array>

</dict>

</plist>
ok到这里就结束了,写得不对 的地方请指正,有更好的方法请分享
使用Cordova插件实现两个app之间的相互调用和通讯的更多相关文章
- 两个APP之间怎么调用《IT蓝豹》
两个app之间怎么调用? (1):通过显示Intent 启动 首先:配置好B app 的action,即AndroidManifest.xml中声明 <intent-filter> ...
- 通过AIDL在两个APP之间Service通信
一.项目介绍 [知识准备] ①Android Interface definition language(aidl,android接口定义语言),其目的实现跨进程的调用.进程是程序在os中执行的载体, ...
- 两个App之间的跳转 并传值
两个App之间的传值最主要的是方法是 Intent intent = getPackageManager().getLaunchIntentForPackage("com.example.a ...
- ios两个app之间跳转,传值的实现
两个APP之间的跳转是通过[[UIApplication sharedApplication] openURL:url]这种方式来实现的. 1.首先设置第一个APP的url地址 2.接着设置第二个AP ...
- 吧,其实spring自带的BeanUtils就有这样的功能,引入spring-beans和spring-core之后,就有BeanUtils.copyProperties(a, b);可以实现两个javabean之间的相互拷贝,自己写的就当是研究咯---https://www.cnblogs.com/NieXiaoHui/p/7150928.html
吧,其实spring自带的BeanUtils就有这样的功能,引入spring-beans和spring-core之后,就有BeanUtils.copyProperties(a, b);可以实现两个ja ...
- JAVA和C/C++之间的相互调用。
在一些Android应用的开发中,需要通过JNI和 Android NDK工具实现JAVA和C/C++之间的相互调用. Java Native Interface (JNI)标准是java平台的一部分 ...
- C 程序与 C++ 程序之间的相互调用
因为 C 编译器编译函数时不带参数的类型信息,只包含函数的符号名字.如 void foo( int x ) , C 编译器会将此函数编译成类似 _foo 的符号,C 链接器只要找到了调用函数的符号,就 ...
- C#与Javascript变量、函数之间的相互调用
原文地址:http://blog.csdn.net/wonsoft/article/details/2595743 C#与Javascript变量.函数之间的相互调用 一.javascript调用C ...
- iOS中两个APP之间的跳转和通信
app间的跳转 一:在第一个app首先要做下面这些操作: 1.在info.plist文件中的Information Property List下添加一项:URL types. 2.点开URL type ...
- uLua学习笔记(三):Unity3D和Lua之间的相互调用
这篇笔记主要集中学习一下uLua和Unity3D之间相互调用的方法,我们导入了uLua之后,现在会弹出一个类似学习屏幕的东西,如下: 先赞一个! Unity3D调用Lua Unity3D调用Lua的方 ...
随机推荐
- P4555 最长双回文串 解题报告
看到回文串,于是就想到了马拉车. 马拉车可以帮我们求出每个 \(i\) 的最大扩展距离,容易得出,双回文串就是两个回文串拼一起.当然,两个回文串必须要相交,不然形不成一个字符串. 有的小可爱就会想直接 ...
- Mybatisplus----DML编程---多记录操作
批量处理数据: @Test void testDelete(){ //批量按id删除 List<Long> list = new ArrayList<>(); list.add ...
- Navicate 远程连接Mysql数据库
123步骤是在服务器上运行,第四步是在本机的navicate上运行 1.use mysql 2.update user set host = '%' where user = 'root' 3.flu ...
- ShardingSphere 数据分片之 Sharding-JDBC 深入理解
更多内容,前往 IT-BLOG MySQL 的存储单位是 page[16kb],索引使用 B+Tree,深度为3(3次 IO便能查出数据).为了提高查询速度,存储单元中都存储的是索引的指针.MySQL ...
- H5 visibilityChange事件 --- 监听页面的显示或者隐藏 新开一个webview
mounted() { document.addEventListener('visibilityChange', 事件处理函数) }, destoryed() { document.removeEv ...
- MarkdownStudy01markdown用法
一级标题 二级标题 三级标题 字体 Hello,Word! Hello,Word! Hello,Word! Hello,Word! 引用 好好学Java 分割线 图片 超链接 点击跳转 列表 A B ...
- Rancher 系列文章-RHEL7.8 离线有代理条件下安装单节点 Rancher
一 基础信息 1.1 前提 本次安装的为 20220129 最新版:Rancher v2.6.3 VM 版本为 RHEL 7.8, 7.9 或 8.2, 8.3, 8.4(Rancher 官网要求) ...
- MySQL相关知识点思维导图整理
MySQL相关知识点思维导图整理 Xmind思维导图下载地址: 蓝奏云:https://shuihan.lanzoui.com/iXZw7frkn5a
- ASP.NET Core - 缓存之内存缓存(上)
1. 缓存 缓存指的是在软件应用运行过程中,将一些数据生成副本直接进行存取,而不是从原始源(数据库,业务逻辑计算等)读取数据,减少生成内容所需的工作,从而显著提高应用的性能和可伸缩性,使用好缓存技术, ...
- CentOS8 搭建Kubernetes
CentOS8 搭建Kubernetes 主机名 IP 组件 k8s-master 192.168.40.128/24 kubeadm.kubelet.kubectl.docker-ce k8s-no ...