
通过AIDL在两个APP之间Service通信
一、项目介绍
【知识准备】
①Android Interface definition language(aidl,android接口定义语言),其目的实现跨进程的调用。进程是程序在os中执行的载体,一个程序对应一个进程,不同进程就是指不同程序,aidl实现不同程序之间的调用。
②主线程与子线程通信使用handler,handler可以在子线程中发出消息,在主线程处理消息,从而完成线程之间的通信,即使有多个线程,仍然是一个程序。
③不同程序之间需要通过aidl通信,通信方式可以有多种,aidl是其中一种。实现的结果就像自己的程序调用自己的其他方法一样,感觉就像一个程序。
④业务场景:例如购物app需要支付,购物app是淘宝,支付app是支付宝。所以就需要不同的程序进行通信。
二、首先介绍一个App之间的Service和Activity之间的通信
【项目结构】
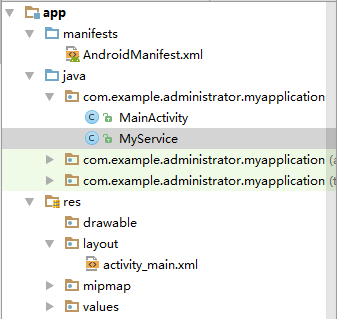
【MyService】
【提示】
①创建Service
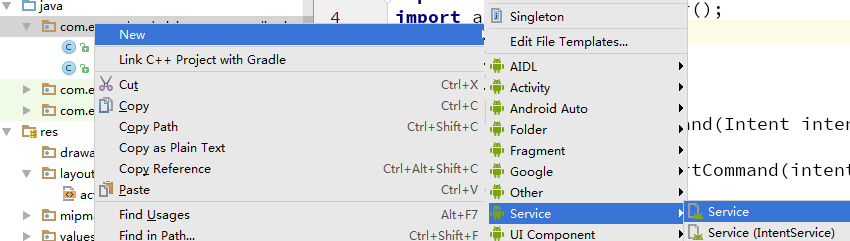
②如果不是通过上述方法创建,一定要记得注册
 <service

             android:name=".MyService"

             android:enabled="true"

             android:exported="true"></service>
【代码】
 public class MyService extends Service {

     public MyService() {

     }

     @Override

     public IBinder onBind(Intent intent) {

         return new MyBinder();//return MyBinder通过ServiceConnection在activity中拿到MyBinder

     }

     @Override

     public int onStartCommand(Intent intent, int flags, int startId) {

         return super.onStartCommand(intent, flags, startId);

     }

     public  void  payService(){

         Log.i("MyService", "payService: --------");

     }

     class MyBinder extends Binder{

         public void pay(){

             payService();

         }//通过Binder实例将service中的方法暴露出去

     }

 }
【layout_main】
添加按钮,点击便于调用
     <Button

         android:id="@+id/btn_paly"

         android:text="Pay"

         android:layout_width="wrap_content"

         android:layout_height="wrap_content" />
【MainActivity】
 public class MainActivity extends AppCompatActivity {

     MyService.MyBinder binder = null;

     ServiceConnection conn;

     @Override

     protected void onCreate(Bundle savedInstanceState) {

         super.onCreate(savedInstanceState);

         setContentView(R.layout.activity_main);

         Button btnPlay = (Button) findViewById(R.id.btn_paly);

         conn = new ServiceConnection() {

             @Override

             public void onServiceConnected(ComponentName componentName, IBinder iBinder) {

                 binder = (MyService.MyBinder) iBinder;

             }

             @Override

             public void onServiceDisconnected(ComponentName componentName) {

             }

         };

         Intent intent = new Intent(MainActivity.this,MyService.class);

         bindService(intent,conn,BIND_AUTO_CREATE);//开启服务

         btnPlay.setOnClickListener(new View.OnClickListener() {

             @Override

             public void onClick(View view) {

                 if (binder!=null){

                     binder.play();

                 }

             }

         });

     }

 }
【效果】

点击后输出service中pay方法中的内容

三、两个App之间的Service通信
【项目结构】
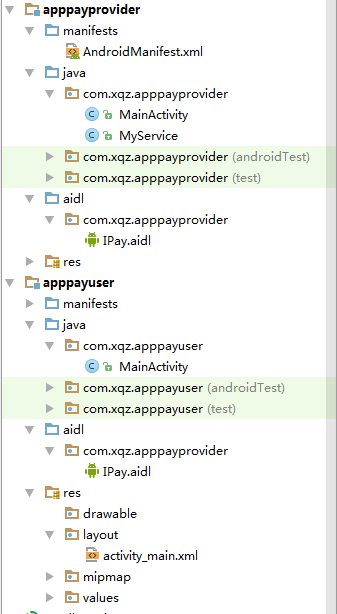
【步骤】
①在AppPayProvider中创建MyService
代码同上
【注册】
Ⅰ、注册时(android:enabled="true" android:exported="true")设置为true,将Service暴露出去,另一个App才能访问到它
Ⅱ、添加『<intent-filter>』。由于不是同一个App,通过intent-filter对Intent进行过滤,让另一个app通过action开启服务
         <service

             android:name=".MyService"

             android:enabled="true"

             android:exported="true">

             <!--enable:ture设置可用

             exported:ture对外暴露 -->

             <intent-filter>

                 <action android:name="com.xqz.apppayprovider.MyService" />

             </intent-filter>

         </service>
②MainActivity和layout_main保留创建时不作任何修改,但也不要删掉,因为安装程序必须提供起始页面,否则将会出错
③在AppPayProvider中添加AIDL
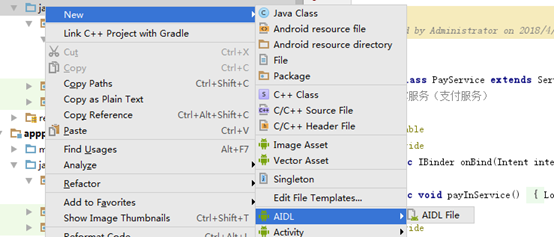
【代码】
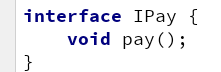
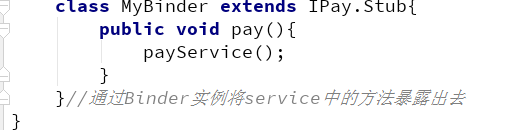
【提示】接口中定义中方法要和Service中的MyBinder中的方法一致
④再创建好AIDL,添加完方法后,android studio需要对这个aidl进行编译,会自动按aidl规范生成一个Binder子类的代码。
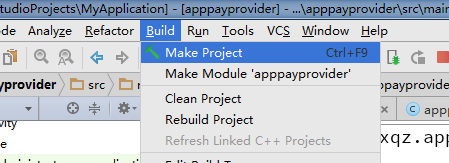
⑤对MyService中的MyBinder进行修改
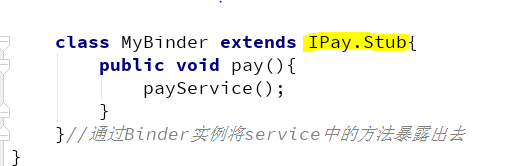
【提示】继承IPay.Stub。在这之前必须Make Project,否则将没有只能联想
⑥创建AppPayUser对AppPayProvider中的MyService进行操作
【layout-main】
     <Button

         android:id="@+id/btnPay"

         android:text="pay"

         android:layout_width="wrap_content"

         android:layout_height="wrap_content" />
⑦将AppPayProvider中AIDL拷贝到AppPayUser中
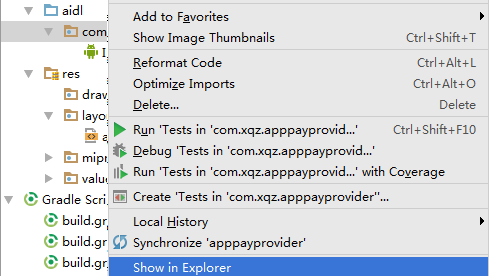
【提示】Ⅰ、包名要相同,按目录位置复制,通过下述方法,直接在文件夹进行复制。『此处可以查看项目结构,可以看到包名是相同的』
Ⅱ、同样拷贝过来后需要Make Project
⑧【AppPayUser-MainActivity】
 public class MainActivity extends AppCompatActivity {

     Button btnPay;

     private IPay myBinder;//定义AIDL

     ServiceConnection conn = new ServiceConnection() {

         @Override

         public void onServiceConnected(ComponentName componentName, IBinder iBinder) {

             myBinder = IPay.Stub.asInterface(iBinder);

         }

         @Override

         public void onServiceDisconnected(ComponentName componentName) {

         }

     };

     @Override

     protected void onCreate(Bundle savedInstanceState) {

         super.onCreate(savedInstanceState);

         setContentView(R.layout.activity_main);

         Intent intent = new Intent();

         intent.setAction("com.xqz.apppayprovider.MyService");

         //表示按照什么进行过滤,启动意图

         /*android5.0之后,如果servicer不在同一个App的包中,

          需要设置service所在程序的包名

          (包名可以到App的清单文件AndroidManifest中查看)*/

         intent.setPackage("com.xqz.apppayprovider");

         bindService(intent,conn,BIND_AUTO_CREATE);//开启Service

         btnPay = (Button) findViewById(R.id.btnPay);

         btnPay.setOnClickListener(new View.OnClickListener() {

             @Override

             public void onClick(View view) {

                 try {

                     myBinder.pay();

                 } catch (RemoteException e) {

                     //因为是跨程序调用服务,可能会出现远程异常

                     e.printStackTrace();

                 }

             }

         });

     }

 }
【安装】
先安装AppPayProvider再安装AppPayUser。
【效果】
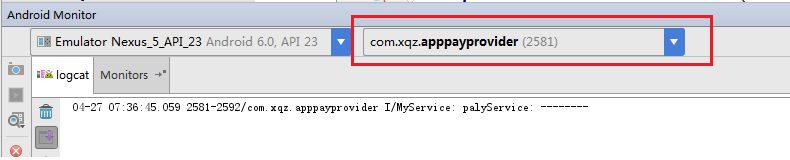
将run中的 视图调到AppPayProvider,点击模拟器AppPayUser中的pay按钮,将会执行AppPayProvider中MyService中pay方法中的内容。
四、总结
【跨App和同App之间的区别】
①跨App开启服务是提供服务的App需要设置intent-filter过滤器,控制服务的App需要通过。setAction和setPackage方法进行设置action和包名,才能开启服务。而同App只需要指定启动的service就可。
②跨App的MyBinder实例要通过AIDL获取,两个应用定义同样的接口的方法,通过对应的AIDL名称.Stub.asInterface方法得到binder实例,然后就和同App的myBinder使用么有区别了。
③跨App的MyBinder对象的使用必须捕获异常,而同App不需要。
④可以根据上方简单的例子实现很多类似的功能。
通过AIDL在两个APP之间Service通信的更多相关文章
- 两个APP之间怎么调用《IT蓝豹》
两个app之间怎么调用? (1):通过显示Intent 启动 首先:配置好B app 的action,即AndroidManifest.xml中声明 <intent-filter> ...
- 两个App之间的跳转 并传值
两个App之间的传值最主要的是方法是 Intent intent = getPackageManager().getLaunchIntentForPackage("com.example.a ...
- ios两个app之间跳转,传值的实现
两个APP之间的跳转是通过[[UIApplication sharedApplication] openURL:url]这种方式来实现的. 1.首先设置第一个APP的url地址 2.接着设置第二个AP ...
- Android中两个Activity之间简单通信
在Android中,一个界面被称为一个activity,在两个界面之间通信,采用的是使用一个中间传话者(即Intent类)的模式,而不是直接通信. 下面演示如何实现两个activity之间的通信. 信 ...
- 基于WSAAsyncSelect模型的两台计算机之间的通信
任务目标 编写Win32程序模拟实现基于WSAAsyncSelect模型的两台计算机之间的通信,要求编程实现服务器端与客户端之间双向数据传递.客户端向服务器端发送"请输出从1到1000内所有 ...
- iOS中两个APP之间的跳转和通信
app间的跳转 一:在第一个app首先要做下面这些操作: 1.在info.plist文件中的Information Property List下添加一项:URL types. 2.点开URL type ...
- 跳转APP(app之间互相通信)
摘要 步骤: 1,添加URL Types项 2,配置URL Scheme 3,其他应用的跳转 4,参数的接收 开发IOS项目的时候,有可能会遇到两个APP应用相互调用的需求,比如说:支付宝支付.. ...
- 同一个Tomcat部署两个project之间的通信问题
同一个tomcat下的两个project是无法通信的. 同一个tomcat中的project能互相调用吗 启动一个tomcat部署多个项目,那么每个项目算是一个线程还是进程呢? Tomcat中的pro ...
- iOS - (两个APP之间的跳转)
一个程序若要跳到另一个程序.需要在目标程序的plist文件里面修改: 打开info.plist,添加一项URL types 展开URL types,再展开Item0,将Item0下的URL ident ...
随机推荐
- spring-oauth-server实践:授权方式三:PASSWORD模式下 authorities:ROLE_{user.privillege}, ROLE_USER
一.数据库配置 1.oauth_client_details 2.user_ 3.user_privillege 二.password模式 授权过程 1.授权者granter和请求参数 Resourc ...
- zuul入门(2)zuul的过滤器分类和加载
一.Groovy编写的Filter 1.可以放到指定目录加载 创建一个pre类型的filter,在run方法中获取HttpServletRequest 然后答应header信息 在代码中加入groov ...
- transform-style为什么子元素需要定位?
有个园友问我一个问题: 为什么ul和li都要absolute定位呢,让其自然排列,然后沿着x轴进行旋转不行吗?这块一直无法理解. 在这里进行详细的解答: 我们知道圆是有圆心和半径的, 我用定位的方式就 ...
- Android:认识R类、findViewById方法查找组件、@string查找字符、@color查找颜色、@drawable查找图片、@dimen某个组件尺寸定义、项目引入资源国际化
导入 之前都是断断续续的看了一些于如何使用android开发的文章.资料等,到目前位置很多基础的东西都不清楚,于是去学习了别人的课程,才了认识了R类.findViewById方法查找组件.项目引入资源 ...
- CSS Box Model 盒子模型
1. 介绍 1.1 什么是 Box Model 在HTML中的每个element(元素)都可以看作一个矩形的盒子,矩形从内到外依次由元素的内容(content).内边距(padding).边框(bor ...
- https原理通俗了解
摘要:本文尝试一步步还原HTTPS的设计过程,以理解为什么HTTPS最终会是这副模样.但是这并不代表HTTPS的真实设计过程.在阅读本文时,你可以尝试放下已有的对HTTPS的理解,这样更利于" ...
- 手把手教你实现boost::bind
前言 boost::bind操作想必大家都使用过,它特别神奇,能够绑定函数与参数,绑定后能够改变参数数量,并且还可以使用占位符.它可以绑定普通函数也可以绑定类成员函数.好多小伙伴试图看过boost:: ...
- Vue 项目代理设置的优化
Vue 项目代理设置的优化 Vue 类的项目开发中项目结构基本都是类似于 Vue-cli 生成的方式, 这种方式开发中,最常用到的模式是开启代理进行 mock 调试或远程调试, 也就是使用了 Vue- ...
- 一篇文章说透Nginx的rewrite模块
rewrite模块即ngx_http_rewrite_module模块,主要功能是改写请求URI,是Nginx默认安装的模块.rewrite模块会根据PCRE正则匹配重写URI,然后发起内部跳转再匹配 ...
- ES6关于Promise的用法
Promise 对象用于一个异步操作的最终完成(或失败)及其结果值的表示.简单点说,它就是用于处理异步操作的,异步处理成功了就执行成功的操作,异步处理失败了就捕获错误或者停止后续操作. 它的一般表示形 ...