
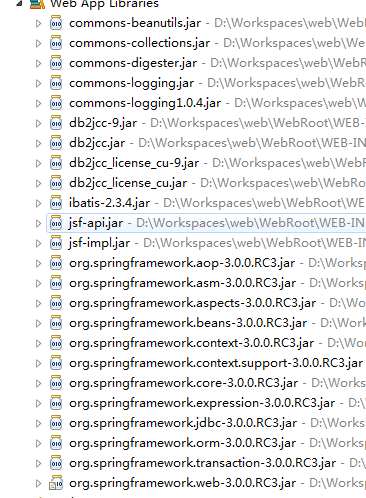
spring3.0+jsf+ibatis整合
user.xml
<?xml version="1.0" encoding="UTF-8" ?>

<!DOCTYPE sqlMap

    PUBLIC "-//ibatis.apache.org//DTD SQL Map 2.0//EN"

    "http://ibatis.apache.org/dtd/sql-map-2.dtd">

<sqlMap namespace="user">

  <!-- Use type aliases to avoid typing the full classname every time. -->

  <typeAlias alias="User" type="****.beans.User"/>

  <!-- Result maps describe the mapping between the columns returned

       from a query, and the class properties.  A result map isn't

       necessary if the columns (or aliases) match to the properties

       exactly. -->

  <resultMap id="UserResult" class="User">

    <result property="userName" column="name"/>

    <result property="password" column="password"/>

  </resultMap>

  <!-- Select with no parameters using the result map for Account class. -->

  <select id="selectAllUser" resultMap="UserResult">

    select * from User

  </select>

  <!-- A simpler select example without the result map.  Note the

       aliases to match the properties of the target result class. -->

  <select id="selectUserByName" parameterClass="java.lang.String" resultClass="User">

    select

      name as userName,

      password as password

    from user

    where name = #userName#

  </select>

  <!-- Insert example, using the User parameter class-->

  <insert id="insertUser" parameterClass="User">

    insert into User (

      name,

      password )

    values (#userName#,#password#)

  </insert>

 </sqlMap>
SqlMapConfig.xml
<?xml version="1.0" encoding="UTF-8" ?>

<!DOCTYPE sqlMapConfig

    PUBLIC "-//ibatis.apache.org//DTD SQL Map Config 2.0//EN"

    "http://ibatis.apache.org/dtd/sql-map-config-2.dtd">

<sqlMapConfig>

   <!-- The properties (name=value) in the file specified here can be used

        placeholders in this config file (e.g. “${driver}”. The file is relative

        to the classpath and is completely optional.

   <properties resource="db.properties" /> -->

   <!-- These settings control SqlMapClient configuration details, primarily

        to do with transaction management. They are all optional (more detail

        later in this document).

  <settings

    cacheModelsEnabled="true"

    enhancementEnabled="true"

    lazyLoadingEnabled="true"

    maxRequests="32"

    maxSessions="10"

    maxTransactions="5"

    useStatementNamespaces="false"/> -->

  <!-- Configure a built-in transaction manager.  If you're using an

       app server, you probably want to use its transaction manager

       and a managed datasource

  <transactionManager type="JDBC" commitRequired="false">

    <dataSource type="SIMPLE">

      <property name="JDBC.Driver" value="${driver}"/>

      <property name="JDBC.ConnectionURL" value="${url}"/>

      <property name="JDBC.Username" value="${username}"/>

      <property name="JDBC.Password" value="${password}"/>

      <property name="JDBC.DefaultAutoCommit" value="true" />

      <property name="Pool.MaximumActiveConnections" value="10"/>

      <property name="Pool.MaximumIdleConnections" value="5"/>

      <property name="Pool.MaximumCheckoutTime" value="120000"/>

      <property name="Pool.TimeToWait" value="500"/>

      <property name="Pool.PingQuery" value="select 1 from User"/>

      <property name="Pool.PingEnabled" value="false"/>

      <property name="Pool.PingConnectionsOlderThan" value="1"/>

      <property name="Pool.PingConnectionsNotUsedFor" value="1"/>

    </dataSource>

  </transactionManager> -->

  <!-- List the SQL Map XML files. They can be loaded from the classpath, as they are here (com.domain.data...) -->

  <!-- List more here...

  <sqlMap resource="com/mydomain/data/Order.xml"/>

  <sqlMap resource="com/mydomain/data/Documents.xml"/>

  -->

  <sqlMap resource="******/beans/User.xml"/>

</sqlMapConfig>
beans.xml
<?xml version="1.0" encoding="UTF-8"?>

<beans xmlns="http://www.springframework.org/schema/beans"

       xmlns:xsi="http://www.w3.org/2001/XMLSchema-instance"

       xmlns:context="http://www.springframework.org/schema/context"

       xsi:schemaLocation="http://www.springframework.org/schema/beans

           http://www.springframework.org/schema/beans/spring-beans-3.0.xsd

           http://www.springframework.org/schema/context

           http://www.springframework.org/schema/context/spring-context-3.0.xsd">

<context:property-placeholder location="classpath:db.properties"/>

<context:annotation-config/>

<context:component-scan base-package="com.***"/>

<!--此bean用来告诉Spring去何处找数据库信息,有此Bean才会有下面dataSource中用${}标记来取变量的语句

<bean id="propertyConfig" class="org.springframework.beans.factory.config.PropertyPlaceholderConfigurer">

    <property name="location">

    <value>classpath:db.properties</value>

    </property>

</bean>

 -->

<!--配置一个数据源,根据上面propertyConfig指定的location去找数据库连接的配置信息 -->

<bean id="dataSource" class="org.springframework.jdbc.datasource.DriverManagerDataSource">

    <property name="driverClassName">

    <value>${driver}</value>

    </property>

    <property name="url">

    <value>${url}</value>

    </property>

    <property name="username">

    <value>${username}</value>

    </property>

    <property name="password">

    <value>${password}</value>

    </property>

</bean>

<!--根据dataSource和configLocation创建一个SqlMapClient -->

<bean id="sqlMapClient" class="org.springframework.orm.ibatis.SqlMapClientFactoryBean">

    <property name="configLocations">

        <list>

            <!-- sql语句配置xml文件 -->

            <value>classpath:SqlMapConfig.xml</value>

        </list>

    </property>

    <property name="dataSource">

        <ref bean="dataSource" />

    </property>

</bean>

<!--根据sqlMapClien创建一个sqlMapClientTemplate模版类 -->

<bean id="sqlMapClientTemplate" class="org.springframework.orm.ibatis.SqlMapClientTemplate">

    <property name="sqlMapClient">

       <ref bean="sqlMapClient" />

    </property>

</bean>

<bean name="userServiceSpring" class="*****.service.UserServiceSpring">

  <property name="sqlMapClientTemplate">

     <ref bean="sqlMapClientTemplate"/>

  </property>

</bean>

<bean id="user" class="****.beans.User"/>

</beans>
faces-config.xml
<?xml version='1.0' encoding='UTF-8'?>

<faces-config xmlns="http://java.sun.com/xml/ns/javaee"

    xmlns:xsi="http://www.w3.org/2001/XMLSchema-instance"

    xsi:schemaLocation="http://java.sun.com/xml/ns/javaee http://java.sun.com/xml/ns/javaee/web-facesconfig_1_2.xsd"

    version="1.2">

<!--此配置把jsf bean 交给spring管理-->

      <application>

         <variable-resolver>org.springframework.web.jsf.DelegatingVariableResolver</variable-resolver>

      </application>

<!--

    <managed-bean>

        <managed-bean-name>user</managed-bean-name>

        <managed-bean-class>*****.beans.User</managed-bean-class>

        <managed-bean-scope>session</managed-bean-scope>

    </managed-bean>

-->

    <navigation-rule>

        <from-view-id>/index.jsp</from-view-id>

        <navigation-case>

            <from-outcome>success</from-outcome>

            <to-view-id>/sucess.jsp</to-view-id>

        </navigation-case>

    </navigation-rule>

</faces-config>
//jsf  中获取spring实例的对象
ServletContext context = (ServletContext) FacesContext.getCurrentInstance().getExternalContext().getContext();

ApplicationContext ctx = WebApplicationContextUtils.getRequiredWebApplicationContext(context);
spring3.0+jsf+ibatis整合的更多相关文章
- spring3.0+struts2+ibatis整合
User.xml <?xml version="1.0" encoding="UTF-8" ?> <!DOCTYPE sqlMap PUBLI ...
- MyEclipse-10.0下Struts2.1+Spring3.0+Hibernate3.3整合过程
新建web project: 命名为SSH,做如下设置: 新建后的工程目录如下: 然后开始添加SSH框架,这里我按照struts-spring-hibernate顺序进行添加. 首先添加struts2 ...
- Struts2.1.8 + Spring3.0+ Hibernate3.2整合笔记
body, p, th, td, li, ul, ol, h1, h2, h3, h4, h5, h6, pre { font-family: simsun; line-height: 1.4; } ...
- Spring3.0 与 MyBatis框架 整合小实例
本文将在Eclipse开发环境下,采用Spring MVC + Spring + MyBatis + Maven + Log4J 框架搭建一个Java web 项目. 1. 环境准备: 1.1 创建数 ...
- Jbpm4.4+hibernate3.5.4+spring3.0.4+struts2.1.8整合例子(附完整的请假流程例子,jbpm基础,常见问题解决)
Jbpm4.4+hibernate3.5.4+spring3.0.4+struts2.1.8 整合例子(附完整的请假流程例子). 1.jbpm4.4 测试环境搭建 2.Jbpm4.4+hibernat ...
- Maven整合Spring3.0+Mybatis3.2+Struts2.3+查找坐标+jar包依赖(五)
依赖传递 只添加了一个struts2-core依赖,发现项目中出现了很多jar,这种情况 叫 依赖传递
- Jbpm4.4+hibernate3.5.4+spring3.0.4+struts2.1.8 整合例子
转自:http://www.blogjava.net/wangxinsh55/archive/2011/07/24/354925.html Jbpm4.4+hibernate3.5.4+sprin ...
- spring3.0的jar包详解
1. spring.jar 是包含有完整发布模块的单个jar 包. 2. org.springframework.aop 包含在应用中使用Spring的AOP特性时所需的类. 3. org.sprin ...
- Spring3.0.5jar包用法详解 [转载]
Spring3.X以后jar包进行了重构,取消了原来2.X版本中的总的spring.jar包,而是把总包中的功能全部分开打包.正在向osgi靠拢. 各个jar包详解如下: 1. org.springf ...
随机推荐
- ubuntu16.04编译linux3.9内核
下载linux内核 解压内核 tar -xvf 安装低版本gcc,不然会报错 apt-cache search gcc-4.7 sudo apt-get install 搜索的名字 设置默认gccsu ...
- 202-基于TI DSP TMS320C6678、Xilinx K7 FPGA XC72K325T的高速数据处理核心板
基于TI DSP TMS320C6678.Xilinx K7 FPGA XC72K325T的高速数据处理核心板 一.板卡概述 该DSP+FPGA高速信号采集处理板由我公司自主研发,包含一片TI DSP ...
- go语言从例子开始之Example31.定时器
我们常常需要在后面一个时刻运行 Go 代码,或者在某段时间间隔内重复运行. Go 的内置 定时器 和 打点器 特性让这些很容易实现.我们将先学习定时器,然后再学习打点器. Example: packa ...
- Strings=newString(“xyz”);创建了几个 StringObject?
两个对象,一个是"xyx",一个是指向"xyx"的引用对象 s
- UVA10779 Collectors Problem 【迁移自洛谷博客】
这是一道不错的练最大流建模的基础题. 这种题目审题是关键. Bob's friends will only exchange stickers with Bob, and they will give ...
- NetCore中的环境变量的值取自于哪里?
环境 操作系统 win10 IIS 10 net core 2.2 ,net core 3.0 分别生成了三个环境变量的配置文件: 以及测试代码: public void Configure(IApp ...
- JS中的作用域及闭包
1.JS中的作用域 在 es6 出现之前JS中只有全局作用域和函数作用域,没有块级作用域,即 JS 在函数体内有自己的作用域,但是如果不是在函数体的话就全部都是全局作用域.比如在 if.for 等有 ...
- 【Linux】RedHat换源(转)
版权声明:本文为博主原创文章,遵循 CC 4.0 BY-SA 版权协议,转载请附上原文出处链接和本声明. 原本链接:https://blog.csdn.net/otmqixi/article/deta ...
- get the deadlock information from sql server
https://stackoverflow.com/questions/12422986/sql-query-to-get-the-deadlocks-in-sql-server-2008 You c ...
- 解决修改 Linux 下的 PHP 环境变量不生效的方法
这个问题出现服务器有多个 PHP 版本,php -v和phpinfo()显示两个不同的版本 最近真的,都给朋友解决问题了... phpinfo查看的 php 版本是 7.2.6,到 bash 去使用p ...