Netty学习第四章 spring boot整合netty的使用
现在大多数项目都是基于spring boot进行开发,所以我们以spring boot作为开发框架来使用netty。使用spring boot的一个好处就是能给将netty的业务拆分出来,并通过spring cloud整合到项目中。
我们以一个简单的客户端发送消息到服务的场景编写一个实例。
一、服务端模块
netty中服务端一般分为两个类,一个是启动配置类,另一个是消息的逻辑处理类,但是首先我们要配置spring boot的启动类,启动netty
@SpringBootApplication

public class DemoApplication implements CommandLineRunner {

    @Autowired

    NettyServer nettyServer;

    public static void main(String[] args) {

        SpringApplication.run(DemoApplication.class, args);

    }

    @Override

    public void run(String... args) throws Exception {

        nettyServer.startServer();

    }

}
1.启动配置类
import io.netty.bootstrap.ServerBootstrap;

import io.netty.channel.*;

import io.netty.channel.nio.NioEventLoopGroup;

import io.netty.channel.socket.SocketChannel;

import io.netty.channel.socket.nio.NioServerSocketChannel;

import org.springframework.beans.factory.annotation.Autowired;

import org.springframework.context.annotation.Configuration;

/**

 * Netty

 * 服务端

 */

@Configuration

public class NettyServer {

    //四个处理请求的逻辑类

    @Autowired

    ServerInboundHandler serverInboundHandler;

    @Autowired

    ServerInboundGetTimeHandler serverInboundGetTimeHandler;

    @Autowired

    ServerLastOutboundHandler serverLastOutboundHandler;

    @Autowired

    ServerOutboundHandler serverOutboundHandler;

    public void startServer() {

        System.out.println("服务端启动成功");

        //创建两个线程组,用于接收客户端的请求任务,创建两个线程组是因为netty采用的是反应器设计模式

        //反应器设计模式中bossGroup线程组用于接收

        EventLoopGroup bossGroup = new NioEventLoopGroup();

        //workerGroup线程组用于处理任务

        EventLoopGroup workerGroup = new NioEventLoopGroup();

        //创建netty的启动类

        ServerBootstrap bootstrap = new ServerBootstrap();

        //创建一个通道

        ChannelFuture f = null;

        try {

            bootstrap.group(bossGroup, workerGroup) //设置线程组

                    .channel(NioServerSocketChannel.class) //设置通道为非阻塞IO

                    .option(ChannelOption.SO_BACKLOG, 128) //设置日志

                    .option(ChannelOption.SO_RCVBUF, 32 * 1024)  //接收缓存

                    .childOption(ChannelOption.SO_KEEPALIVE, true)//是否保持连接

                    .childHandler(new ChannelInitializer<SocketChannel>() {

                        //设置处理请求的逻辑处理类

                        @Override

                        protected void initChannel(SocketChannel ch) throws Exception {

                            //ChannelPipeline是handler的任务组,里面有多个handler

                            ChannelPipeline pipeline = ch.pipeline();

                            //逻辑处理类

                            pipeline.addLast(serverLastOutboundHandler);

                            pipeline.addLast(serverOutboundHandler);

                            pipeline.addLast(serverInboundHandler);

                            pipeline.addLast(serverInboundGetTimeHandler);

                        }

                    });

            f = bootstrap.bind(84).sync();//阻塞端口号,以及同步策略

            f.channel().closeFuture().sync();//关闭通道

        } catch (InterruptedException e) {

            e.printStackTrace();

        } finally {

            //优雅退出

            bossGroup.shutdownGracefully();

            workerGroup.shutdownGracefully();

        }

    }

}
2.启动配置类中的各个组件
1)EventLoop 与 EventLoopGroup
EventLoop 好比一个线程,1个EventLoop 可以服务多个channel,而一个channel只会有一个EventLoop 。EventLoop 在netty中就是负责整个IO操作,包括从消息的读取、编码以及后续 ChannelHandler 的执行,这样做的好处就是避免了线程中的上下文切换时,大量浪费资源情况。
EventLoopGroup 是负责分配EventLoop到新创建的channel,EventLoopGroup 就好比线程池,它里面包含多个EventLoop。
2)BootStrap
BootStrap 是netty中的引导启动类也就是一个工厂配置类,可以通过它来完成 Netty 的客户端或服务器端的 Netty 初始化,所以我们主要来看它的几个常用的配置方法。
① gruop() 方法
gruop()方法用于配置netty中的线程组,也就是我们的EventLoopGroup ,在服务端中需要配置两个线程组,这是因为netty中采用的是反应器设计模式(reactor ),我们知道反应器设计模式中是需要两个线程组,一个用于接收用户的请求,另一个用于处理请求的内容。
② channel() 方法
channel()方法用于配置通道的IO类型,IO类型有两个:阻塞IO(BIO)OioServerSocketChannel;非阻塞IO(NIO)NioServerSocketChannel。
③ childHandler () 方法
用于设置处理请求的适配器,这个在下面详细介绍。
④ childOption() 方法
给每条child channel连接设置一些TCP底层相关的属性,比如上面,我们设置了两种TCP属性,其中 ChannelOption.SO_KEEPALIVE表示是否开启TCP底层心跳机制,true为开
⑤ option
给每条parent channel 连接设置一些TCP底层相关的属性。
关于option的属性有:
SO_RCVBUF ,SO_SNDBUF:用于设置TCP连接中使用的两个缓存区。
TCP_NODELAY:立即发送数据,采用的是Nagle算法。Nagle算法是当小数据过多时,就会将这些小数据碎片连接成更大的报文,从而保证发送的报文数量最小。所以如果数据量小就要禁用这个算法,netty默认是禁用的值为true。
通俗地说,如果要求高实时性,有数据发送时就马上发送,就关闭,如果需要减少发送次数减少网络交互,就开启。
SO_KEEPALIVE:底层TCP协议的心跳机制。Socket参数,连接保活,默认值为False。启用该功能时,TCP会主动探测空闲连接的有效性。
SO_REUSEADDR:Socket参数,地址复用,默认值False
SO_LINGER:Socket参数,关闭Socket的延迟时间,默认值为-1,表示禁用该功能。
SO_BACKLOG:Socket参数,服务端接受连接的队列长度,如果队列已满,客户端连接将被拒绝。默认值,Windows为200,其他为128。
SO_BROADCAST:Socket参数,设置广播模式。
3)ChannelFuture
我们知道netty中的所有IO操作都是异步的,这意味着任何IO调用都会立即返回,不管结果如果状态如果。而ChannelFuture 的存在就是为了解决这一问题,它会提供IO操作中有关的信息、结果或状态。
ChannelFuture 一共有两个状态:
未完成状态:当IO操作开始时,将创建一个新的ChannelFuture 对象,此时这个对象既没有操作成功也没有失败,那么就说这个对象就是未完成的状态。简单来说未完成指创建了对象且没有完成IO操作。
已完成状态:当IO操作完成后,不管操作是成功还是失败,future都是标记已完成的,失败时也会有对应的具体失败信息。
3.消息逻辑处理类
可以看到我一共在pipeline里面配置了4个handler,这是为了查看inboundhandler和outboundhandler的数据传递方式,以及每个handler的执行顺序
ServerInboundGetTimeHandler:
import io.netty.buffer.ByteBuf;

import io.netty.buffer.Unpooled;

import io.netty.channel.ChannelHandlerContext;

import io.netty.channel.ChannelInboundHandlerAdapter;

import org.springframework.context.annotation.Configuration;

import java.text.SimpleDateFormat;

import java.util.Date;

/**

 * Inbound处理类

 * 给客户端返回一个时间戳

 */

@Configuration

public class ServerInboundGetTimeHandler  extends ChannelInboundHandlerAdapter {

    /**

     * 获取客户端的内容类

     * @param ctx

     * @param msg

     * @throws Exception

     */

    @Override

    public void channelRead(ChannelHandlerContext ctx, Object msg) throws Exception {

        //将传递过来的内容转换为ByteBuf对象

        ByteBuf buf = (ByteBuf) msg;

        //和文件IO一样,用一个字节数组读数据

        byte[] reg = new byte[buf.readableBytes()];

        buf.readBytes(reg);

        //将读取的数据转换为字符串

        String body = new String(reg, "UTF-8");

        //给客户端传递的内容,同样也要转换成ByteBuf对象

        Date dNow = new Date( );

        SimpleDateFormat ft = new SimpleDateFormat ("yyyy-MM-dd hh:mm:ss");

        String respMsg = body+ft.format(dNow);

        System.out.println("服务器当前时间是:"+ft.format(dNow));

        ByteBuf respByteBuf = Unpooled.copiedBuffer(respMsg.getBytes());

        //调用write方法,通知并将数据传给outboundHand

        ctx.write(respByteBuf);

    }

    /**

     * 刷新后才将数据发出到SocketChannel

     * @param ctx

     * @throws Exception

     */

    @Override

    public void channelReadComplete(ChannelHandlerContext ctx) throws Exception {

        ctx.flush();

    }

    /**

     * 关闭

     * @param ctx

     * @param cause

     * @throws Exception

     */

    @Override

    public void exceptionCaught(ChannelHandlerContext ctx, Throwable cause)

            throws Exception {

        cause.printStackTrace();

        ctx.close();

    }

}
ServerInboundHandler:
import io.netty.buffer.ByteBuf;

import io.netty.buffer.Unpooled;

import io.netty.channel.ChannelHandler;

import io.netty.channel.ChannelHandlerContext;

import io.netty.channel.ChannelInboundHandlerAdapter;

import org.springframework.context.annotation.Configuration;

/**

 * Inbound处理类,是用来处理客户端发送过来的信息

 * Sharable 所有通道都能使用的handler

 */

@Configuration

@ChannelHandler.Sharable

public class ServerInboundHandler extends ChannelInboundHandlerAdapter {

    /**

     * 获取客户端的内容类

     * @param ctx

     * @param msg

     * @throws Exception

     */

    @Override

    public void channelRead(ChannelHandlerContext ctx, Object msg) throws Exception {

        //将传递过来的内容转换为ByteBuf对象

        ByteBuf buf = (ByteBuf) msg;

        //和文件IO一样,用一个字节数组读数据

        byte[] reg = new byte[buf.readableBytes()];

        buf.readBytes(reg);

        //将读取的数据转换为字符串

        String body = new String(reg, "UTF-8");

        System.out.println( "服务端接收的信息是: " + body);

        //给客户端传递的内容,同样也要转换成ByteBuf对象

        String respMsg = "你好我是服务端,当前时间是:";

        ByteBuf respByteBuf = Unpooled.copiedBuffer(respMsg.getBytes());

        //调用fireChannelRead方法,通知并将数据传给下一个handler

        ctx.fireChannelRead(respByteBuf);

    }

    /**

     * 刷新后才将数据发出到SocketChannel

     * @param ctx

     * @throws Exception

     */

    @Override

    public void channelReadComplete(ChannelHandlerContext ctx) throws Exception {

        ctx.flush();

    }

    /**

     * 关闭

     * @param ctx

     * @param cause

     * @throws Exception

     */

    @Override

    public void exceptionCaught(ChannelHandlerContext ctx, Throwable cause)

            throws Exception {

        cause.printStackTrace();

        ctx.close();

    }

}
ServerLastOutboundHandler:
import io.netty.buffer.ByteBuf;

import io.netty.buffer.Unpooled;

import io.netty.channel.ChannelHandlerContext;

import io.netty.channel.ChannelOutboundHandlerAdapter;

import io.netty.channel.ChannelPromise;

import org.springframework.context.annotation.Configuration;

/**

 * Outbound表示服务器发送的handler

 */

@Configuration

public class ServerLastOutboundHandler extends ChannelOutboundHandlerAdapter {

    /**

     * 服务端要传递消息的方法

     * @param ctx

     * @param msg

     * @param promise

     * @throws Exception

     */

    @Override

    public void write(ChannelHandlerContext ctx, Object msg, ChannelPromise promise) throws Exception {

        //将传递过来的内容转换为ByteBuf对象

        ByteBuf buf = (ByteBuf) msg;

        //和文件IO一样,用一个字节数组读数据

        byte[] reg = new byte[buf.readableBytes()];

        buf.readBytes(reg);

        String body=new String(reg,"UTF-8");

        String respMsg = body+"\n1.吃饭 2.睡觉";

        System.out.println("服务端要发送的消息是:\n"+respMsg);

        ByteBuf respByteBuf = Unpooled.copiedBuffer(respMsg.getBytes());

        ctx.write(respByteBuf);

        ctx.flush(); //ctx.write()方法执行后,需要调用flush()方法才能令它立即执行

    }

}
ServerOutboundHandler:
import io.netty.buffer.ByteBuf;

import io.netty.buffer.Unpooled;

import io.netty.channel.ChannelHandlerContext;

import io.netty.channel.ChannelOutboundHandlerAdapter;

import io.netty.channel.ChannelPromise;

import org.springframework.context.annotation.Configuration;

/**

 * Outbound表示服务器发送的handler

 */

@Configuration

public class ServerOutboundHandler extends ChannelOutboundHandlerAdapter{

    /**

     * 服务端要传递消息的方法

     * @param ctx

     * @param msg

     * @param promise

     * @throws Exception

     */

    @Override

    public void write(ChannelHandlerContext ctx, Object msg, ChannelPromise promise) throws Exception {

        //将传递过来的内容转换为ByteBuf对象

        ByteBuf buf = (ByteBuf) msg;

        //和文件IO一样,用一个字节数组读数据

        byte[] reg = new byte[buf.readableBytes()];

        buf.readBytes(reg);

        String body=new String(reg,"UTF-8");

        System.out.println("serverOutbound的内容:\n"+body);

        String respMsg = body+"\n请问你需要操作什么任务";

        ByteBuf respByteBuf = Unpooled.copiedBuffer(respMsg.getBytes());

        ctx.write(respByteBuf);

        ctx.flush(); //ctx.write()方法执行后,需要调用flush()方法才能令它立即执行

    }

}
4.channelHandler中的各个组件
1)channel
channel的本质就是一个socket连接,是服务端与客户端连接的通道。channel除了连接客户端与服务端外,还能监控通道的状态,如:什么时候传输、传输完成情况都能监控到。
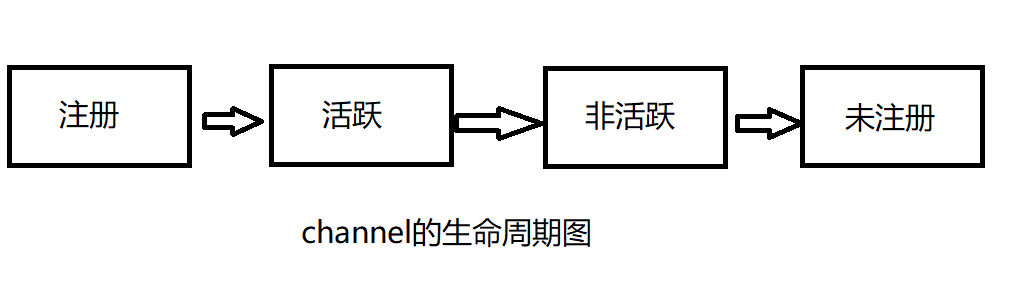
channel的一个有四个状态:
channelReistered:channel注册到一个EventLoop,此时为注册状态
channelUnregistered:channel已经创建好了还未进行注册,此时为未注册状态
channelActive:客户端与服务端连接后,channel会变为活跃状态,此时可以接收和发送数据
channelInactive:非活跃状态,没有连接远程主机的时候。
channel的生命周期状态变化大致如图:
2)channelHandler
channelHandler就是我们处理数据逻辑的地方,它一共分为两大类:InboundHandler和呕Outboundhandler。InboundHandler用于处理输入的数据和改变channel状态类型,OutboundHandler用于回写给外界的数据。
channelHandler的执行顺序:
InboundHandler:顺序执行
OutboundHandler:逆序执行
在channelHandler的执行过程中,InboundHandler会覆盖后面的OutboundHandler,所以在开发中应该先执行OutboundHandler再执行InboundHandler
3)channelPipeline
管理channelHandler的有序容器,它里面可以有多个channelHandler。
channel、channelHandler、channelPipeline三者的关系:
一个channel有一个容器channelPipeline,容器中有多个channelHandler。创建channel时会自动创建一个channelPipeline,每个channel都有一个管理它的channelPipeline,这个关联是永久的。
二、客户端代码
netty中客户端的各个组件都是和服务端一样的,所以不用再介绍客户端的组件
1.配置类代码
import io.netty.bootstrap.Bootstrap;

import io.netty.channel.ChannelFuture;

import io.netty.channel.ChannelInitializer;

import io.netty.channel.EventLoopGroup;

import io.netty.channel.nio.NioEventLoopGroup;

import io.netty.channel.socket.SocketChannel;

import io.netty.channel.socket.nio.NioSocketChannel;

import org.springframework.context.annotation.Configuration;

import java.net.InetSocketAddress;

/**

 * netty 客户端类

 */

@Configuration

public class NettyClient {

    public static void main(String[] args) {

        //客户端只需要创建一个线程就足够了

        EventLoopGroup group = new NioEventLoopGroup();

        try {

            //客户端启动类

            Bootstrap bootstrap = new Bootstrap();

            bootstrap.group(group)//设置线程组

                    .channel(NioSocketChannel.class)//设置通道类型

                    .remoteAddress(new InetSocketAddress("127.0.0.1", 84))//设置IP和端口

                    .handler(new ChannelInitializer<SocketChannel>() {

                        @Override

                        protected void initChannel(SocketChannel socketChannel) throws Exception {

                            socketChannel.pipeline().addLast(new ClientHandler());

                        }

                    });

            //阻塞通道

            ChannelFuture channelFuture = bootstrap.connect().sync();

            channelFuture.channel().closeFuture().sync();

        } catch (Exception e) {

        } finally {

            group.shutdownGracefully();

        }

    }

}
2.逻辑处理类代码
import io.netty.buffer.ByteBuf;

import io.netty.buffer.Unpooled;

import io.netty.channel.ChannelHandlerContext;

import io.netty.channel.SimpleChannelInboundHandler;

import io.netty.util.CharsetUtil;

/**

 * 客户端逻辑处理类

 */

public class ClientHandler  extends SimpleChannelInboundHandler<ByteBuf> {

    /**

     * 发送给服务器消息的方法

     * @param ctx

     * @throws Exception

     */

    @Override

    public void channelActive(ChannelHandlerContext ctx) throws Exception {

        ctx.writeAndFlush(Unpooled.copiedBuffer("你好,我是客户端", CharsetUtil.UTF_8));

    }

    /**

     * 回调方法,接收服务器发送的消息

     * @param ctx

     * @param msg

     * @throws Exception

     */

    @Override

    protected void channelRead0(ChannelHandlerContext ctx, ByteBuf msg) throws Exception {

        System.out.println( msg.toString(CharsetUtil.UTF_8));

    }

    /**

     * 在处理过程中引发异常时被调用

     * @param ctx

     * @param cause

     * @throws Exception

     */

    @Override

    public void exceptionCaught(ChannelHandlerContext ctx, Throwable cause) throws Exception {

        cause.printStackTrace();

        ctx.close();

    }

}
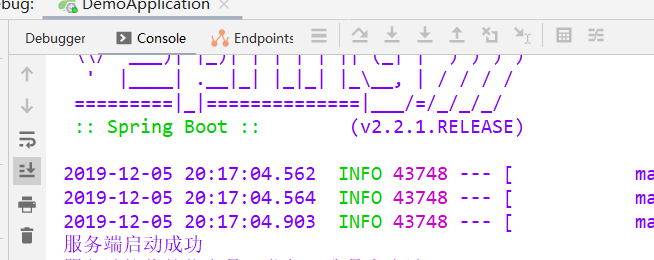
测试结果,先启动服务端:
然后启动客户端:
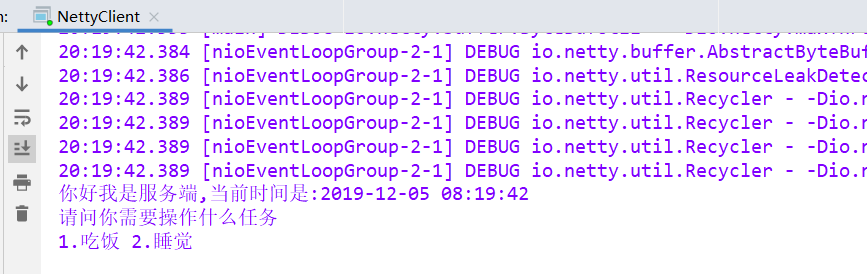
最后再来看看服务端:

Netty学习第四章 spring boot整合netty的使用的更多相关文章
- Spring Boot(十四):spring boot整合shiro-登录认证和权限管理
Spring Boot(十四):spring boot整合shiro-登录认证和权限管理 使用Spring Boot集成Apache Shiro.安全应该是互联网公司的一道生命线,几乎任何的公司都会涉 ...
- (转)Spring Boot (十四): Spring Boot 整合 Shiro-登录认证和权限管理
http://www.ityouknow.com/springboot/2017/06/26/spring-boot-shiro.html 这篇文章我们来学习如何使用 Spring Boot 集成 A ...
- Spring Boot (十四): Spring Boot 整合 Shiro-登录认证和权限管理
这篇文章我们来学习如何使用 Spring Boot 集成 Apache Shiro .安全应该是互联网公司的一道生命线,几乎任何的公司都会涉及到这方面的需求.在 Java 领域一般有 Spring S ...
- 从.Net到Java学习第四篇——spring boot+redis
从.Net到Java学习系列目录 “学习java已经十天,有时也怀念当初.net的经典,让这语言将你我相连,怀念你......”接上一篇,本篇使用到的框架redis.FastJSON. 环境准备 安装 ...
- spring Boot 学习(四、Spring Boot与任务)
一.异步任务 在Java应用中,绝大多数情况下都是通过同步的方式来实现交互处理的:但是在 处理与第三方系统交互的时候,容易造成响应迟缓的情况,之前大部分都是使用 多线程来完成此类任务,其实,在Spri ...
- kafka学习(五)Spring Boot 整合 Kafka
文章更新时间:2020/06/08 一.创建Spring boot 工程 创建过程不再描述,创建后的工程结构如下: POM文件中要加入几个依赖: <?xml version="1.0& ...
- dubbo学习(十)spring boot整合dubbo
工程搭建与配置 生产者 1.创建一个生产者的spring boot工程,配置好依赖,并把接口实现类文件夹复制到新的工程里 2.pom.xml配置dubbo的相关依赖 <!-- Dubbo Spr ...
- 【Spring Boot学习之三】Spring Boot整合数据源
环境 eclipse 4.7 jdk 1.8 Spring Boot 1.5.2 一.Spring Boot整合Spring JDBC 1.pom.xml <project xmlns=&quo ...
- Spring Boot初识(4)- Spring Boot整合JWT
一.本文介绍 上篇文章讲到Spring Boot整合Swagger的时候其实我就在思考关于接口安全的问题了,在这篇文章了我整合了JWT用来保证接口的安全性.我会先简单介绍一下JWT然后在上篇文章的基础 ...
随机推荐
- virt-manager 使用 shh 远程访问配置方法
1.下载安装 Xming+Xshell 或者 Xming+putty,启动Xming服务 Xming下载地址 2.XMing的配置:打开XLaunch,记住Display Number,现在这里是0 ...
- fail-fast与fail-safe机制
----以下来自网址----- http://blog.csdn.net/ch717828/article/details/46892051 什么是 fail-fast 机制? fail-fast机制 ...
- leetcode 4寻找两个有序数组的中位数
最优解O(log(min(m,n))) /** 之前用合并有序数组的思想做了O((m+n+1)/2),现在试一试O(log(min(m,n))) 基本思路为:通过二分查找较小的数组得到对应的中位数(假 ...
- python3 以utf-8编码写文件
原来的 save = open('1.txt', 'w', 'utf8') 用下面的 save = codecs.open('1.txt', 'w', 'utf8')
- 杂项-桌面应用程序:Windows Live Writer(WLW)
ylbtech-杂项-桌面应用程序:Windows Live Writer(WLW) Windowslive Writer 即(WLW) 是一个免费的桌面应用程序,您可以使用它轻松发布丰富的内容到您的 ...
- Python基础(函数部分)
写在前面 加勒比海盗今天上映! 一.函数的基本概念 - 函数是什么? 函数,就是一个'锤子',一个具有特定功能的'锤子',使用者可以在适当的时候使用这个'锤子',而不用再去从头做一个'锤子':即可以 ...
- 五:flask-url_for使用详解
from flask import url_for url_for(视图函数名):根据视图函数名指定url,只要视图函数不变,url随便变都不会影响 url_for源码: 示例视图,执行流程 带参数: ...
- 【java】的传值方式
[java]的传值方式 当你问大多数程序员Java是传值还是传引用的时候,你可能会得到两种答案之一: (1)Java传递原始类型数据时使用的是传值方式:传递对象时则使用传引用方式:String类型的数 ...
- c++获取当前进程所在位置
char buffer[MAX_PATH]; GetModuleFileNameA(NULL, buffer, MAX_PATH ); string::size_type pos = string( ...
- 【ABAP系列】SAP ABAP 取两个内表的交集 比较两个内表的不同
公众号:SAP Technical 本文作者:matinal 原文出处:http://www.cnblogs.com/SAPmatinal/ 原文链接:[ABAP系列]SAP ABAP 取两个内表的交 ...