WebLogic 12c Linux 命令行 静默安装
CentOS 6.3安装配置Weblogic 10 http://www.linuxidc.com/Linux/2014-02/96918.htm
Oracle WebLogic 11g 安装部署文档 PDF http://www.linuxidc.com/Linux/2013-04/83658.htm
Linux部署Weblogic11g http://www.linuxidc.com/Linux/2013-01/77940.htm
Oracle基础教程之安装与配置Weblogic单实例 http://www.linuxidc.com/Linux/2012-02/54418.htm
Linux下Weblogic卸载 http://www.linuxidc.com/Linux/2012-01/51886.htm
Weblogic多机器集群的配置 http://www.linuxidc.com/Linux/2011-12/50577.htm
Weblogic的安装和配置 http://www.linuxidc.com/Linux/2011-12/49082.htm
安装最新的weblogic版本,版本号为 12.1.X(12.1.2,12.1.3)。开始以为和旧版安装一样,使用控制台的方式,下载bin文件,然后一步步在console执行下来就行了。万万没想到,从12C版本后,bin文件不提供了,改成全系统通用的jar文件 (generic.jar)。试了半天原来那种安装方式不能用了,非得用图形界面安装。由于服务器只能远程登录,于是各种百度、各种找材料,最后终于找到一种静默方式的安装。请看下文。
weblogic12C各版本所支持的JDK版本:
fmw_12.1.3.0.0_wls.jar 需要jdk1.7.0_15以上的版本
wls_121200.jar 需要jdk1.7版本;1.8版本不可用
weblogic在安装的时候会对系统进行严格的检查,
包括jdk版本,cpu性能,swap空间,磁盘空间,tmp临时空间[软件在安装时会产生大约1G的日志以及其他必须的文件]等;
一、前期准备
1.新建用户组 web
[root@edwcube3 ~]#
[root@edwcube3 ~]# groupadd web
[root@edwcube3 ~]#
2.新建用户weblogic 并修改用户密码
[root@edwcube3 ~]#
[root@edwcube3 ~]# useradd -g web weblogic //添加用户,并用-g参数来制定 web用户组
[root@edwcube3 ~]
[root@edwcube3 ~]# passwd weblogic //passwd命令修改密码
Changing password for user weblogic.
New UNIX password:
Retype new UNIX password:
passwd: all authentication tokens updated successfully.
[root@edwcube3 ~]#
[root@edwcube3 ~]#
3.如果没有安装jdk的话,还需要安装jdk
第一步:从官网下载压缩包 jdk-7-linux-i586.tar.gz
http://download.oracle.com/otn-pub/java/jdk/7/jdk-7-linux-i586.tar.gz
[root@odstest jdk1.7]$ tar -zxv -f jdk-7u55-linux-i586.tar.gz -C ./jdk1.7
第三步.移动文件/usr/local
注:具体位置可以根据用户习惯自己移动
[root@odstest /]# mv ./jdk1.7 /usr/local/jdk1.7
第四步.配置环境变量
环境分量分为整个系统的,已经只针对当前用户设置的,我们这边只对weblogic用户设置
~/.bashrc :仅对当前用户生效
在 ~/.bashrc 最后添加以下部分
JAVA_HOME=/usr/local/jdk1.7
export JRE_HOME=/usr/local/jdk1.7/jre
export CLASSPATH=.:$JAVA_HOME/lib:$JRE_HOME/lib:$CLASSPATH
export PATH=$JAVA_HOME/bin:$JRE_HOME/bin:$PATH
保存,执行 source ~/.bashrc 。使修改生效
退出,重新登陆,查看是否生效
[weblogic@edwcube3 ~]$ java -version
java version "1.7.0_40"
Java(TM) SE Runtime Environment (build 1.7.0_40-b43)
Java HotSpot(TM) Server VM (build 24.0-b56, mixed mode)
[weblogic@edwcube3 ~]$
[weblogic@edwcube3 ~]$
jdk安装完毕~
二、开始安装
Slient Mode静默方式
首先看命令的格式:
java -jar wls_121200.jar -silent -responseFile file -invPtrLoc file
-response file:响应文件
-invPtrLoc file:初始化环境文件
1、创建响应文件 wls.rsp [响应文件中的项一定要写全,否则会报参数不足等错误]
|
[ENGINE] #DO NOT CHANGE THIS. Response File Version=1.0.0.0.0 [GENERIC] #The oracle home location. This can be an existing Oracle Home or a new Oracle Home ORACLE_HOME=/u02/bea #Set this variable value to the Installation Type selected. e.g. WebLogic Server, Coherence, Complete with Examples. INSTALL_TYPE=WebLogic Server #Provide the My Oracle Support Username. If you wish to ignore Oracle Configuration Manager configuration provide empty string for user name. MYORACLESUPPORT_USERNAME= #Provide the My Oracle Support Password MYORACLESUPPORT_PASSWORD=<SECURE VALUE> #Set this to true if you wish to decline the security updates. Setting this to true and providing empty string for My Oracle Support username will ignore the Oracle Configuration Manager configuration DECLINE_SECURITY_UPDATES=true #Set this to true if My Oracle Support Password is specified SECURITY_UPDATES_VIA_MYORACLESUPPORT=false #Provide the Proxy Host PROXY_HOST= #Provide the Proxy Port PROXY_PORT= #Provide the Proxy Username PROXY_USER= #Provide the Proxy Password PROXY_PWD=<SECURE VALUE> #Type String (URL format) Indicates the OCM Repeater URL which should be of the format [scheme[Http/Https]]://[repeater host]:[repeater port] COLLECTOR_SUPPORTHUB_URL= |
2、创建Loc文件 oraInst.loc
|
inventory_loc=/home/weblogic/oraInventory inst_group=weblogic |
3、保证所需要得目录weblogic用户要用读写权限
/ghca/bea文件用户weblogic必须要有读写权限
oraInst.loc,wls.rsp,fmw_12.1.3.0.0_wls.jar 文件用户weblogic必须要有读写权限
4、安装 wls.rsp,oraInst.loc必须指定绝对路径 java -jar fmw_12.1.3.0.0_wls.jar -silent -responseFile /home/weblogic/wls.rsp -invPtrLoc /home/weblogic/oraInst.loc
$ java -jar fmw_12.1.3.0.0_wls.jar -silent -responseFile /home/weblogic/wls.rsp -invPtrLoc /home/weblogic/oraInst.loc
启动程序日志文件为/tmp/OraInstall2016-12-07_11-28-48AM/launcher2016-12-07_11-28-48AM.log。
正在提取文件........
Java HotSpot(TM) Server VM warning: You have loaded library /tmp/orcl3700411247043593693.tmp/Disk1/install/linux/libjni.so which might have disabled stack guard. The VM will try to fix the stack guard now.
It's highly recommended that you fix the library with 'execstack -c <libfile>', or link it with '-z noexecstack'.
启动 Oracle Universal Installer
检查 CPU 速度是否大于 300 MHz。 实际为 2128.009 MHz 通过
检查交换空间: 必须大于 512 MB。 实际为 8388604 MB 通过
检查此平台是否需要 64 位 JVM。 实际为32 通过 (不需要 64 位)
检查临时空间: 必须大于 300 MB。 实际为 3559 MB 通过
准备从/tmp/OraInstall2016-12-07_11-28-48AM启动 Oracle Universal Installer
Java HotSpot(TM) Server VM warning: ignoring option MaxPermSize=512m; support was removed in 8.0 ---可忽略
日志:/tmp/OraInstall2016-12-07_11-28-48AM/install2016-12-07_11-28-48AM.log
版权所有 (c) 1996, 2014, Oracle 和/或其附属公司。保留所有权利。
正在读取响应文件...
开始检查: CertifiedVersions
预期的结果: enterprise-4,enterprise-5,enterprise-6,redhat-6,redhat-4,redhat-5,SuSE-11之一
实际结果: (未知操作系统版本)
检查完成。此次检查的总体结果为: 未通过 <<<< 可忽略
问题: 此 Oracle 软件未经当前操作系统认证。
建议案: 确保在正确的平台上安装软件。
警告: 检查:CertifiedVersions 失败。
开始检查: CheckJDKVersion
预期的结果: 1.7.0_15
实际结果: 1.8.0_111
检查完成。此次检查的总体结果为: 通过
CheckJDKVersion 检查: 成功。
已启用此会话的验证。
正在验证数据...
正在复制文件...
可以在以下位置找到本次安装会话的日志:
/tmp/OraInstall2016-12-07_11-28-48AM/install2016-12-07_11-28-48AM.log
-----------20%----------40%----------60%----------80%--------100%
Oracle Fusion Middleware 12c WebLogic Server 和 Coherence 12.1.3.0.0 的 安装 已成功完成。
日志已成功复制到/home/weblogic/oraInventory/logs。 -----打印此信息,说明weblogic安装成功了。
5、 创建domain域名
|
A、通过纯命令行安装 export MW_HOME="/u02/bea" export WL_HOME="/u02/bea/oracle_common" [root@WAAA-NM1 bin]# pwd /ghca/bea/wlserver/common/bin [root@WAAA-NM1 bin]# ./commEnv.sh [root@WAAA-NM1 bin]# ./wlst.sh Java HotSpot(TM) Server VM warning: ignoring option MaxPermSize=256m; support was removed in 8.0 Initializing WebLogic Scripting Tool (WLST) ... Jython scans all the jar files it can find at first startup. Depending on the system, this process may take a few minutes to complete, and WLST may not return a prompt right away. Welcome to WebLogic Server Administration Scripting Shell Type help() for help on available commands wls:/offline> readTemplate('/u02/bea/wlserver/common/templates/wls/wls.jar') wls:/offline/base_domain>cd('Servers/AdminServer') wls:/offline/base_domain/Server/AdminServer>set('ListenAddress','') wls:/offline/base_domain/Server/AdminServer>set('ListenPort', 7001) wls:/offline/base_domain/Server/AdminServer>cd('../..') wls:/offline/base_domain>cd('Security/base_domain/User/weblogic') wls:/offline/base_domain/Security/base_domain/User/weblogic>cmo.setPassword('weblogic123') wls:/offline/base_domain/Security/base_domain/User/weblogic>setOption('OverwriteDomain', 'true') wls:/offline/base_domain/Security/base_domain/User/weblogic>writeDomain('/u02/bea/user_projects/domains/base_domain') closeTemplate() exit() PS:最后一步等待时间稍微较长; |
|
B、通过参数文件执行安装 方式1:创建create_domains.py,添加内容: readTemplate('/home/wls/wlserver/common/templates/wls/wls.jar') closeTemplate() 执行安装 ./wlst.sh ./create_domains.py 方式2:创建文件/home/weblogic/create_domain.resp,添加内容: read template from "/u02/bea/wlserver/common/templates/wls/wls.jar"; set JavaHome "/usr/local/jdk1.8"; set ServerStartMode "dev"; find Server "AdminServer" as AdminServer; set AdminServer.ListenAddress ""; set AdminServer.ListenPort "7001"; set AdminServer.SSL.Enabled "true"; set AdminServer.SSL.ListenPort "7002"; //create a new user create User "weblogic2" as u2; set u2.password "weblogic123"; write domain to "/u02/bea/user_projects/domains/base_domain/"; // The domain name will be "demo-domain" close template;
|
9、启动
$cd /u02/bea/user_projects/domains/base_domain/bin
$./startWeblogic.sh
参考官网资料:
https://docs.oracle.com/middleware/1213/core/OUIRF/silent.htm#OUIRF337
参考博客:
http://chbinmile.blog.51cto.com/6085145/1880433
http://www.cnblogs.com/dingyingsi/p/5262255.html
-----------------------------------------------------------------------------
2016-08-10 16:10:24
所需软件:
JAVA环境部署文件:jdk-7u55-linux-x64.rpm
Weblogic安装文件:fmw_12.1.3.0.0_wls.jar
一、创建用户和组
创建用户组:groupadd web
创建用户:useradd -g web -m -d /opt/weblogic weblogic
修改密码:passwd weblogic
授权用户:chown -R weblogic:web /opt/weblogic/
useradd 主要参数:
-c:加上备注文字,备注文字保存在passwd的备注栏中。
-d:指定用户登入时的启始目录。
-D:变更预设值。
-e:指定账号的有效期限,缺省表示永久有效。
-f:指定在密码过期后多少天即关闭该账号。
-g:指定用户所属的起始群组。
-G:指定用户所属的附加群组。
-m:自动建立用户的登入目录。
-M:不要自动建立用户的登入目录。
-n:取消建立以用户名称为名的群组。
-r:建立系统账号。
-s:指定用户登入后所使用的shell。
-u:指定用户ID号。
二、配置JAVA环境
安装jdk:rpm -ivh jdk-7u55-linux-x64.rpm
在/etc/profile最后加入以下内容:
export JAVA_HOME=/usr/java/jdk1.7.0_55
export JRE_HOME=/usr/java/jdk1.7.0_55/jre
export CLASSPATH=$CLASSPATH:$JAVA_HOME/lib:$JAVA_HOME/jre/lib
export PATH=$JAVA_HOME/bin:$JRE_HOME/bin:$PATH
使之生效
source /etc/profile
验证JDK安装成功与否:
#java –version
三、安装weblogic
Slient Mode静默方式
首先看命令的格式:
java -jar wls_121200.jar -silent -responseFile file -invPtrLoc file
-response file:响应文件
-invPtrLoc file:初始化环境文件
文件详解:
1.创建 oraInst.loc 文件,内容如下
|
1
2
3
|
#Oracle Installer Location File Locationinst_group=web 组名称inventory_loc=/opt/weblogic/oraInventory 产品清单目录 |
注:在Linux服务器上,oraInst.loc文件通常位于/etc目录中

2.创建 wls.rsp 响应文件
su - weblogic
chmod 777 /opt/weblogic/fmw_12.1.3.0.0_wls.jar
wls.rsp这个文件你可以在图形界面安装时,点击保存生产该文件。本机使用的文件内容如下:
#weblogic安装过程路径配置
|
1
2
3
4
5
6
7
8
9
10
11
12
13
14
15
16
17
18
19
20
21
22
23
24
25
26
|
[ENGINE]#DO NOT CHANGE THIS.Response File Version=1.0.0.0.0[GENERIC]#The oracle home location. This can be an existing Oracle Home or a new Oracle HomeORACLE_HOME=/opt/weblogic/Oracle/Middleware#Set this variable value to the Installation Type selected. e.g. WebLogic Server, Coherence, Complete with Examples.INSTALL_TYPE=WebLogic Server#Provide the My Oracle Support Username. If you wish to ignore Oracle Configuration Manager configuration provide empty string for user name.MYORACLESUPPORT_USERNAME=#Provide the My Oracle Support PasswordMYORACLESUPPORT_PASSWORD=<SECURE VALUE>#Set this to true if you wish to decline the security updates. Setting this to true and providing empty string for My Oracle Support username will ignore the Oracle Configuration Manager configurationDECLINE_SECURITY_UPDATES=true#Set this to true if My Oracle Support Password is specifiedSECURITY_UPDATES_VIA_MYORACLESUPPORT=false#Provide the Proxy HostPROXY_HOST=#Provide the Proxy PortPROXY_PORT=#Provide the Proxy UsernamePROXY_USER=#Provide the Proxy PasswordPROXY_PWD=<SECURE VALUE>#Type String (URL format) Indicates the OCM Repeater URL which should be of the format [scheme[Http/Https]]://[repeater host]:[repeater port]COLLECTOR_SUPPORTHUB_URL= |
chmod 664 wls.rsp
3.配置文件创建后,就可以进行安装了:
响应文件必须指定全路径
[weblogic@test ~]$ java -jar fmw_12.1.3.0.0_wls.jar -silent -responseFile /opt/weblogic/wls.rsp -invPtrLoc /etc/oraInst.loc
|
1
2
3
4
5
6
7
8
9
10
11
12
13
14
15
16
17
18
19
20
21
22
23
24
25
26
27
28
29
|
启动程序日志文件为/tmp/OraInstall2016-08-10_10-59-01AM/launcher2016-08-10_10-59-01AM.log。正在提取文件.........................................启动 Oracle Universal Installer检查 CPU 速度是否大于 300 MHz。 实际为 1496.639 MHz 通过检查交换空间: 必须大于 512 MB。 实际为 2093048 MB 通过检查此平台是否需要 64 位 JVM。 实际为64 通过 (不需要 64 位)检查临时空间: 必须大于 300 MB。 实际为 69017 MB 通过准备从/tmp/OraInstall2016-08-10_10-59-01AM启动 Oracle Universal Installer日志:/tmp/OraInstall2016-08-10_10-59-01AM/install2016-08-10_10-59-01AM.log版权所有 (c) 1996, 2014, Oracle 和/或其附属公司。保留所有权利。正在读取响应文件...开始检查: CertifiedVersions预期的结果: enterprise-4,enterprise-5,enterprise-6,redhat-6,redhat-4,redhat-5,SuSE-11之一实际结果: enterprise-6检查完成。此次检查的总体结果为: 通过CertifiedVersions 检查: 成功。开始检查: CheckJDKVersion预期的结果: 1.7.0_15实际结果: 1.7.0_55检查完成。此次检查的总体结果为: 通过CheckJDKVersion 检查: 成功。已启用此会话的验证。正在验证数据...正在复制文件...可以在以下位置找到本次安装会话的日志: /tmp/OraInstall2016-08-10_10-59-01AM/install2016-08-10_10-59-01AM.log-----------20%----------40%----------60%----------80%--------100%Oracle Fusion Middleware 12c WebLogic Server 和 Coherence 12.1.3.0.0 的 安装 已成功完成。日志已成功复制到/opt/weblogic/oraInventory/logs。 |
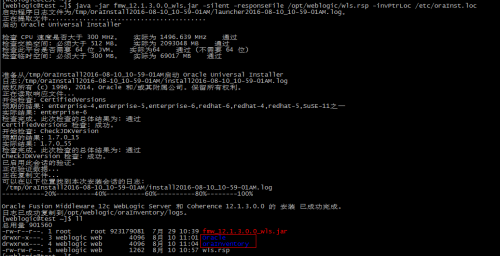
以上表示安装完成
4.接下来要创建域domain
4.1 创建存放路径
[weblogic@test ~]$ mkdir -p /opt/weblogic/Oracle/Middleware/user_projects/domains/base_domain/
4.2 创建参数文件
创建文件: create_domain.rsp
内容:
################################################################################
|
1
2
3
4
5
6
7
8
9
10
11
12
13
14
15
16
17
18
19
20
21
22
23
24
25
26
27
28
29
30
31
32
33
34
|
read template from "/opt/weblogic/Oracle/Middleware/wlserver/common/templates/wls/wls.jar";set JavaHome "/usr/java/jdk1.7.0_55"; set ServerStartMode "dev"; find Server "AdminServer" as AdminServer;set AdminServer.ListenAddress "";set AdminServer.ListenPort "8001";set AdminServer.SSL.Enabled "true";set AdminServer.SSL.ListenPort "8002";//We can directly create a new managed server.create Server "base" as BASE;set BASE.ListenAddress "";set BASE.ListenPort "8003";//set BASE.SSL.Enabled "true";//set BASE.SSL.ListenPort "8004″;//Create Machinecreate Machine "base" as Machinename;//use templates default weblogic userfind User "weblogic" as u1;set u1.password "weblogic123";//create a new usercreate User "weblogic2" as u2;set u2.password "weblogic123";write domain to "/opt/weblogic/Oracle/Middleware/user_projects/domains/base_domain/"; // The domain name will be "demo-domain"close template; |
################################################################################
4.3 静默创建域
cd /opt/weblogic/Oracle/Middleware/wlserver/common/bin
[weblogic@test ~]$ cd Oracle/Middleware/wlserver/common/bin
[weblogic@test bin]$ ./config.sh -mode=silent -silent_script=/opt/weblogic/create_domain.rsp -logfile=/opt/weblogic/create_domain.log
出现如下输出:
|
1
2
3
4
5
6
7
8
9
10
11
12
13
14
15
16
17
18
19
20
21
22
23
24
25
26
27
28
29
30
31
32
33
34
35
36
37
|
<< read template from "/opt/weblogic/Oracle/Middleware/wlserver/common/templates/wls/wls.jar">> succeed: read template from "/opt/weblogic/Oracle/Middleware/wlserver/common/templates/wls/wls.jar"<< set config option JavaHome to "/usr/java/jdk1.7.0_55">> succeed: set config option JavaHome to "/usr/java/jdk1.7.0_55"<< set config option ServerStartMode to "dev">> succeed: set config option ServerStartMode to "dev"<< find Server "AdminServer" as AdminServer>> succeed: find Server "AdminServer" as AdminServer<< set AdminServer attribute ListenAddress to "">> succeed: set AdminServer attribute ListenAddress to ""<< set AdminServer attribute ListenPort to "8001">> succeed: set AdminServer attribute ListenPort to "8001"<< set AdminServer attribute SSL!Enabled to "true">> succeed: set AdminServer attribute SSL!Enabled to "true"<< set AdminServer attribute SSL!ListenPort to "8002">> succeed: set AdminServer attribute SSL!ListenPort to "8002"<< create Server "base" as BASE>> succeed: create Server "base" as BASE<< set BASE attribute ListenAddress to "">> succeed: set BASE attribute ListenAddress to ""<< set BASE attribute ListenPort to "8003">> succeed: set BASE attribute ListenPort to "8003"<< create Machine "base" as Machinename>> succeed: create Machine "base" as Machinename<< find User "weblogic" as u1>> succeed: find User "weblogic" as u1<< set u1 attribute Password to "********">> succeed: set u1 attribute Password to "********"<< create User "weblogic2" as u2>> succeed: create User "weblogic2" as u2<< set u2 attribute Password to "********">> succeed: set u2 attribute Password to "********"<< write Domain to "/opt/weblogic/Oracle/Middleware/user_projects/domains/base_domain/"..........................................................................................>> succeed: write Domain to "/opt/weblogic/Oracle/Middleware/user_projects/domains/base_domain/"<< close template>> succeed: close template |
5、WebLogic的后台启动、停止运行的方法
进入目录:/opt/weblogic/Oracle/Middleware/user_projects/domains/base_domain/bin/
[root@test ~]# cd /opt/weblogic/Oracle/Middleware/user_projects/domains/base_domain/bin/
[root@test bin]# nohup ./startWebLogic.sh &
[root@test bin]# nohup ./startWebLogic.sh & 默认日志是在当前启动的目录生成nohup.out
若想自己指定日志名字,可以如下:
[root@test bin]# nohup ./startWebLogic.sh >> 你定义的文件名字 & {nohup ./startWebLogic.sh >日志文件名 &}
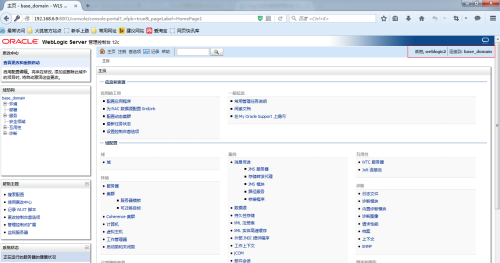
最后就可以访问 http://ip:8001/console 进入控制台了
用上面的建的用户登录
本文出自 “运维笔录 美玲” 博客,请务必保留此出处http://meiling.blog.51cto.com/6220221/1836572
-----------------------------------------------------------------------------------------------------------------------------
Linux 上安装 weblogic12C(静默安装)(一)
最近负责在linux上安装weblogic,客户说要安装最新的版本,版本号为 12.1.X(12.1.2,12.1.3)。开始以为和旧版安装一样,使用控制台的方式,下载bin文件,然后一步步在console执行下来就行了。万万没想到,从12C版本后,
bin文件不提供了,改成全系统通用的jar文件 (generic.jar)。试了半天原来那种安装方式不能用了,非得用图形界面安装。由于服务器是在其他地方,肯定不能跑到主机的地址那边。于是各种google、各种找材料,
最后终于找到一种静默方式的安装。大家看下文。
PS:经过公司一位大神的指导,可以通过远程图形界面的方式进行安装,即把图形界面直接显示在自己的电脑上,不需要跑到主机的地方。将在第二篇中进行介绍安装方式!
一、前期准备
1.新建用户组 web
1.[root@edwcube3 ~]#2.[root@edwcube3 ~]# groupadd web3.[root@edwcube3 ~]#2.新建用户weblogic 并修改用户密码
01.[root@edwcube3 ~]#02.[root@edwcube3 ~]# useradd -g web weblogic //添加用户,并用-g参数来制定 web用户组03.[root@edwcube3 ~]04.[root@edwcube3 ~]# passwd weblogic //passwd命令修改密码05.Changing pass<a href="http://www.it165.net/edu/ebg/" target="_blank" class="keylink">word</a> foruser weblogic.07.Retype new UNIX password:08.passwd: all authentication tokens updated successfully.09.[root@edwcube3 ~]#10.[root@edwcube3 ~]#3.如果没有安装jdk的话,还需要安装jdk 第一步:从官网下载压缩包 jdk-7-linux-i586.tar.gz http://download.oracle.com/otn-pub/java/jdk/7/jdk-7-linux-i586.tar.gz
1.[root@odstest jdk1.7]$ tar -zxv -f jdk-7u55-linux-i586.tar.gz -C ./jdk1.7第三步.移动文件/usr/local 注:具体位置可以根据用户习惯自己移动
1.[root@odstest /]# mv ./jdk1.7 /usr/local/jdk1.7第四步.配置环境变量 环境分量分为整个系统的,已经只针对当前用户设置的,我们这边只对weblogic用户设置 ~/.bashrc :仅对当前用户生效 在 ~/.bashrc 最后添加以下部分
1.JAVA_HOME=/usr/local/jdk1.72.export JRE_HOME=/usr/local/jdk1.7/jre3.export CLASSPATH=.:$JAVA_HOME/lib:$JRE_HOME/lib:$CLASSPATH4.export PATH=$JAVA_HOME/bin:$JRE_HOME/bin:$PATH保存,执行 source ~/.bashrc 。使修改生效 退出,重新登陆,查看是否生效
1.[weblogic@edwcube3 ~]$ java -version2.java version '1.7.0_40'3.Java(TM) SE Runtime Environment (build 1.7.0_40-b43)4.Java HotSpot(TM) Server VM (build 24.0-b56, mixed mode)5.[weblogic@edwcube3 ~]$6.[weblogic@edwcube3 ~]$jdk安装完毕~
二、开始安装
Slient Mode静默方式
首先看命令的格式:
1.java -jar wls_121200.jar -silent -responseFile file -invPtrLoc file-response file:响应文件 -invPtrLoc file:初始化环境文件 具体例子:
1.java -jar wls_121200.jar -silent -responseFile /home/exampleuser/response/wls.rsp -invPtrLoc /home/exampleuser/oraInst.loc文件详解: 1.创建 oraInst.loc 文件,内容如下
1.inventory_loc=/home/weblogic/oraInventory1 产品清单目录2.#用户的组名称,根据实际的修改3.inst_group=weblogic 组名称用来保存安装时的一些临时文件,和默认安装的组名称 如果原来安装过Oracle的产品那么这步可以省略,不需要指定oraInventory1 目录 命令能够简写如下:
1.java -jar wls_121200.jar -silent -responseFile /home/exampleuser/response/wls.rsp2.创建 wls.rsp 响应文件 这个文件你可以在图形界面安装时,点击保存生产该文件。本机使用的文件内容如下:
1.[ENGINE]2.#DO NOT CHANGE THIS.3.Response File Version=1.0.0.0.04.[GENERIC]5.#weblogic的安装路径,根据自己的需要修改6.ORACLE_HOME=/home/weblogic/Oracle/Middleware 7.#Set this variable value to the Installation Type selected. e.g. WebLogic Server, Coherence, Complete with Examples.8.INSTALL_TYPE=WebLogic Server我这边只选择了最基本的Weblogic Server组件,选择其他会稍有不同。 3.配置文件创建后,就可以进行安装了
1.[weblogic@localhost liaowh]$ java -jar wls_121200.jar -silent -response /home/weblogic/liaowh/wls12.rsp -invPtrLoc /home/weblogic/liaowh/oraInst.loc2.正在提取文件............3.Java HotSpot(TM) Server VM warning: You have loaded library /tmp/orcl305077197089615615.tmp/Disk1/install/linux/libjni.so which might have disabled stack guard. The VM will try to fix the stack guard now.4.It's highly recommended that you fix the library with 'execstack -c <libfile>', or link it with '-z noexecstack'.5.启动 Oracle Universal Installer等一会,出现
01.预期的结果: 1.702.实际结果: 1.7.0_4003.检查完成。此次检查的总体结果为: 通过04.CheckJDKVersion 检查: 成功。05.正在验证数据...06.正在复制文件...07.-----------20%----------40%----------60%----------80%--------100%08.WebLogic Server 12.1.2.0.0 的 installation 已成功完成。09.[weblogic@localhost liaowh]$就表示成功了。 4.接下来要创建域domain 首先执行setWLSEnv.sh 来配置环境变量
1.[weblogic@localhost bin]$ ./home/weblogic/Oracle/Middleware12/wlserver/server/bin/setWLSEnv.sh然后手动创建域存放的目录,博主在/home/weblogic/Oracle/Middleware/目录下新建
1.[weblogic@localhost Middleware12]$ cd user_projects/2.[weblogic@localhost user_projects]$ mkdir domains3.[weblogic@localhost user_projects]$ cd domains/4.[weblogic@localhost domains]$ mkdir hnDomain5.[weblogic@localhost domains]$ cd hnDomain/6.[weblogic@localhost hnDomain]$ pwd7./home/weblogic/Oracle/Middleware12/user_projects/domains/hnDomain8.[weblogic@localhost hnDomain]$进到域目录下,执行命令
1.[weblogic@localhost hnDomain]$ $JAVA_HOME/bin/java $JAVA_OPTIONS -Xmx1024m -XX:MaxPermSize=256m weblogic.Server来生成域下面的各种文件,包括管理服务器等的配置信息。 之后进入bin目录下,进行启动即可,最后就可以访问 http://ip:7001/console 进入控制台了。 打完收工!
WebLogic 12c Linux 命令行 静默安装的更多相关文章
- WebLogic 12c Linux 命令行 安装
最近负责在Linux上安装WebLogic Server 12c,客户说要安装最新的版本,版本号为 12.1.X(12.1.2,12.1.3).开始以为和旧版安装一样,使用控制台的方式,下载bin文件 ...
- 在Linux命令行模式安装VMware Tools
在Linux命令行模式安装VMware Tools 方法/步骤1: 首先启动CentOS 7,在VMware中点击上方“VM”,点击“Install VMware Tools...”(如已安装则显示“ ...
- WebLogic 12c 多节点Cluster静默安装
WebLogic集群架构 Weblogic角色 AdminServer: 172.16.65.130 NodeServer: 172.16.65.131.172.16.65.132 版本 weblog ...
- IIS命令行静默安装脚本-python
#coding=utf8 import platform from subprocess import Popen,PIPE,STDOUT import sys,os def run_cmd(cmd, ...
- Linux命令行模式下安装VMware Tools详细步骤
在Linux命令行模式安装VMware Tools 方法/步骤1: 首先启动CentOS 7,在VMware中点击上方"VM",点击"Install VMware Too ...
- Linux服务器命令行模式安装Matlab2014a
Linux服务器命令行模式安装Matlab2014a,有需要的朋友可以参考下. 0.下载安装包 下载Matlab2014a for Linux安装包的ISO镜像文件(感谢万能的度娘)以及破解包(下载地 ...
- Linux(CentOS 7)命令行模式安装VMware Tools 详解
本篇文章主要介绍了如何在Linux(CentOS 7)命令行模式安装VMware Tools,具有一定的参考价值,感兴趣的小伙伴们可以参考一下. 本例中为在Linux(以CentOS 7为例)安装VM ...
- 管理员技术(一):装机预备技能、安装一台RHEL7虚拟机、使用RHEL7图形桌面、Linux命令行基本操作
一.装机预备技能 问题: 本例要求安装一台可用的KVM服务器: 1> RHEL与CentOS系统有什么关联? 2> 第2块SCSI硬盘的第3个逻辑分区,Linux如何表 ...
- 【转载】基于Linux命令行KVM虚拟机的安装配置与基本使用
基于Linux命令行KVM虚拟机的安装配置与基本使用 https://alex0227.github.io/2018/06/06/%E5%9F%BA%E4%BA%8ELinux%E5%91%BD%E4 ...
随机推荐
- Centos7 系统更改apache默认网站目录(解决You don't have permission to access / on this server问题)
当我们在Centos7中配置好Apache时,发现apache默认解析目录是在 /var/www/html,也就是说当访问服务器 IP 或者本地 localhost 时, 默认定位到这个目录里的 in ...
- 初始Hibernate框架
首先我们需要先创建一个案例 构建一个Student 的实体类 private String name; private Integer age; private Integer id; 在SRC根目录 ...
- flask数据库连接池DBUtils
数据库连接池 为啥要使用数据库连接池 频繁的连接和断开数据库,消耗大,效率低 DBUtils可以创建多个线程连接数据库,且一直保持连接,不会断开 执行数据库操作时,由数据池分配线程,当数据池空时,可选 ...
- PJzhang:exiftool图片信息提取工具和短信接口调用工具TBomb
猫宁!!! 作者:Phil Harvey 这是图片信息提取工具的地址: https://sno.phy.queensu.ca/~phil/exiftool/ 网站隶属于Sudbury 中微子天文台,从 ...
- eNSP——利用单臂路由实现VLAN间路由
原理: 以太网中,通常会使用VLAN技术隔离二层广播域来减少广播的影响,并增强网络的安全性和可管理性.其缺点是同时也严格地隔离了不同VLAN之间的任何二层流量,使分属于不同VLAN的用户不能直接互相通 ...
- [TCP/IP] 滑动窗口
什么是滑动窗口? 滑动窗口机制是TCP协议的一种流量控制和防拥塞的机制. 滑动窗口的工作原理? 简单来讲,就是接收方和发送方分别保留一块缓冲区,作为接收和发送数据来使用,发送数据过程中,如果发送方发的 ...
- yum源 epel源 替换及安装
#!/bin/sh # 备份yum源 zip -r /etc/yum.repos.d/yum_resource_back_up.zip /etc/yum.repos.d/* # 替换yum源 wget ...
- sql数据库的基础语句
1, 创建数据库 create database database-name 2, 删除数据库 drop database dbname 3, 备份sql server 创建 备份数据的device ...
- SQLite进阶-14.子查询
目录 子查询 SELECT语句中的子查询 INSERT语句中的子查询 UPDATE语句中的子查询 DELETE语句中的子查询 子查询 子查询或内部查询或嵌套查询是在另一个SQLite查询内嵌入在WHE ...
- S02_CH03_EMIO实验Enter a post title
S02_CH03_EMIO实验 3.1 EMIO 和MIO的对比介绍 上次讲到MIO的使用,初步熟悉了EDK的使用,这次就来说说EMIO的使用.如你所见zynq的GPIO,分为两种,MIO(multi ...