
Python Selenium、PIL、pytesser 识别验证码
思路:
- 使用Selenium库把带有验证码的页面截取下来
- 利用验证码的xpath截取该页面的验证码
- 对验证码图片进行降噪、二值化、灰度化处理后再使用pytesser识别
- 使用固定的账户密码对比验证码正确或错误的关键字判断识别率
1. 截取验证码
def cutcode(url,brower,vcodeimgxpath):  #裁剪验证码

    picName = url.replace(url,"capture.png")   #改为.png后缀保存图片

    brower.get(url)

    brower.maximize_window()                     #放大

    brower.save_screenshot(picName)              #截取网页

    imgelement = brower.find_element_by_xpath(vcodeimgxpath)  # 通过xpath定位验证码

    location = imgelement.location  # 获取验证码的x,y轴

    size = imgelement.size  # 获取验证码的长宽

    rangle = (int(location['x']), \

              int(location['y']), \

              int(location['x'] + size['width']), \

              int(location['y'] + size['height']))  # 写成我们需要截取的位置坐标

    i = Image.open(os.getcwd()+r'\capture.png')  # 打开截图

    verifycodeimage = i.crop(rangle)  # 使用Image的crop函数,从截图中再次截取我们需要的区域

    verifycodeimage.save(os.getcwd()+r'\verifycodeimage.png')

    return brower
2. 对验证码图片进行降噪、二值化、灰度化处理并识别
def initTable(threshold=140):   #降噪,图片二值化

    table = []

    for i in range(256):

        if i < threshold:

            table.append(0)

        else:

            table.append(1)

    return table

def recode():

    image=Image.open(os.getcwd()+r'\verifycodeimage.png')

    image = image.convert('L')  #彩色图转换为灰度图

    binaryImage = image.point(initTable(), '')  #将灰度图二值化

    time.sleep(1)

    vcode=image_to_string(binaryImage) #使用image_to_string识别验证码

    vcode = vcode.strip()

    return vcode
3. 通过点击登录按钮返回的信息判断验证码是否识别正确
def login(vcode,brower,usernamexpath,passwordxpath,vcodexpath,submitxpath,username,password):

    brower.find_element_by_xpath(usernamexpath).send_keys(username)

    brower.find_element_by_xpath(passwordxpath).send_keys(password)

    # 对文本框输入验证码值

    brower.find_element_by_xpath(vcodexpath).send_keys(vcode)

    time.sleep(1)

    # 点击登录,sleep防止没输入就点击了登录

    brower.find_element_by_xpath(submitxpath).click()

    # 等待页面加载出来

    time.sleep(1)

    result = brower.page_source  #获取页面的html

    return result
4. 接收识别验证码需要的参数,循环识别验证码
def main():

    file_path = raw_input("param.txt path:")

    username = raw_input("username(default 'admin'):")

    password = raw_input("password(default '123456'):")

    codeerror = raw_input("vcode error key word in html(default '验证码错误'):")

    passerror = raw_input("vcode pass key word in html(default '密码错误'):")

    frequency = raw_input("How many time(default '100'):")

    vcodelen = raw_input("How many characters(default '4'):")

    remod = raw_input("choose remod(default:en+num,1:num,2:en):")

    starttime = datetime.datetime.now()

    txt = open(file_path)    #txt中需要的参数:url usernamexpath passwordxpath vcode_input_xpath vcode_image_xpath submit_xpath

    lines = txt.readlines()

    url = lines[0].split("=",1)[1]

    usernamexpath = lines[1].split("=",1)[1]

    passwordxpath = lines[2].split("=",1)[1]

    vcodexpath = lines[3].split("=",1)[1]

    vcodeimgxpath = lines[4].split("=",1)[1]

    submitxpath = lines[5].split("=",1)[1]

    brower = webdriver.PhantomJS(executable_path=r'D:\Python27\PY\phantomjs-2.1.1-windows\bin\phantomjs.exe') #打开phantomjs.exe

    if username == '':

        username = "admin"

    if password == '':

        password = ''

    if codeerror == '':

        codeerror = u"验证码错误"  #验证码错误时的关键字

    else:

        codeerror = codeerror.decode(sys.stdin.encoding)  #识别为Unicode自动转换

    if passerror == '':

        passerror = u"密码错误"  #验证码正确时的关键字

    else:

        passerror = passerror.decode(sys.stdin.encoding)  #识别为Unicode自动转换

    if vcodelen == '':

        vcodelen = 4

    else:

        vcodelen = int(vcodelen)

    if remod == '':

        remod = '^[0-9]+$'

    elif remod == '':

        remod = '^[A-Za-z]+$'

    else:

        remod = '^[A-Za-z0-9]+$'

    counterror = 0

    countture = 0

    if frequency == '':

        frequency = 100

    else:

        frequency = int(frequency)

    a = 0

    while a < frequency:

        brower = cutcode(url,brower,vcodeimgxpath)

        vcode = recode()

        if len(vcode) != vcodelen:  #识别到的验证码长度不为4直接重新循环

            continue

        if re.match(remod,vcode):   #判断识别到的验证码是否只有字母加数字

            result = login(vcode,brower,usernamexpath,passwordxpath,vcodexpath,submitxpath,username,password)

            if codeerror in result:

                print "[-]验证码错误"+vcode

                counterror += 1

            elif passerror in result:

                print "[+]验证码正确"+vcode

                countture += 1

            else:

                continue

        else:

            continue

        a += 1

    os.remove(os.getcwd()+r'\verifycodeimage.png')

    os.remove(os.getcwd()+r'\capture.png')

    brower.close()         #关闭浏览器

    #把数字转换为str再print

    rat = str('%.3f%%' % (countture/frequency*100))

    countture = bytes(countture)

    counterror = bytes(counterror)

    endtime = datetime.datetime.now()

    runtime = str((endtime-starttime).seconds/3600*60)

    print "[+]验证码正确次数:"+countture

    print "[-]验证码错误次数:"+counterror

    print "[+]识别率:"+rat

    print "运行时间:"+runtime+"min"

if __name__ == '__main__':

    main()
这种方法识别验证码的效率比较低,但是因为写这个代码要识别的网站的验证码url打开时空白、空白的!然后想到这种方法虽然是效率比较低,但是适用性还是较广的,毕竟可以模拟人为操作浏览器。
然后有个缺点就是识别全数字的验证码正确率奇低==因为处理完验证码图片后数字就会变得有缺失==
如果说运行的过程中xpath的value出现问题了,有可能是网页还没加载出来就已经被截图了(xpath直接在网页上右键检查元素,然后再那个html代码里右键复制xpath就好了)
param.txt的demo(=与路径中间不要有空格!!):
url =

username_xpath =//*[@id="txtUserName"]

password_xpath =//*[@id="txtPassword"]

vcode_input_xpath =//*[@id="txtValCode"]

vcode_image_xpath =//*[@id="imgVerify"]

submit_xpath =//*[@id="Button1"]
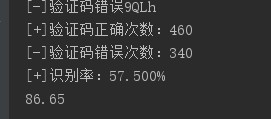
一开始写这个打算识别的目标站,只有57识别率==然后效率很低==毕竟不用自己写算法识别什么的。代码的排布什么的也挺烂的,不要介意啦==:
Python Selenium、PIL、pytesser 识别验证码的更多相关文章
- Python+Selenium+PIL+Tesseract真正自动识别验证码进行一键登录
Python 2.7 IDE Pycharm 5.0.3 Selenium:Selenium的介绍及使用,强烈推荐@ Eastmount的博客 PIL : Pillow-3.3.0-cp27-cp27 ...
- Python+selenium+pil+tesseract实现自动识别验证码
一.环境搭建准备: 1.Python下载,安装以及环境配置 2.IDE pycharm 工具下载,安装 3.ie浏览器 4.selenium 5.pil:pil第三方库的下载,win下安装whl文件, ...
- Python之selenium+pytesseract 实现识别验证码自动化登录脚本
今天写自己的爆破靶场WP时候,遇到有验证码的网站除了使用pkav的工具我们同样可以通过py强大的第三方库来实现识别验证码+后台登录爆破,这里做个笔记~~~ 0x01关于selenium seleniu ...
- python+selenium,实现带有验证码的自动化登录功能
python+selenium的环境准备,请自行安装完成,这里直接贴代码,方便做项目时直接使用. import time from selenium import webdriver from PIL ...
- Selenium+Tesseract-OCR智能识别验证码爬取网页数据
1.项目需求描述 通过订单号获取某系统内订单的详细数据,不需要账号密码的登录验证,但有图片验证码的动态识别,将获取到的数据存到数据库. 2.整体思路 1.通过Selenium技术,无窗口模式打开浏览器 ...
- python pytesseract——3步识别验证码的识别入门
验证码识别是个大工程,但入门开始只要3步.需要用到的库PIL.pytesserac,没有的话pip安装.还有一个是tesseract-ocr 下载地址:https://sourceforge.net/ ...
- Python利用PIL生成随机验证码图片
安装pillow: pip install pillow PIL中的Image等模块提供了创建图片,制作图片的功能,大致的步骤就是我们利用random生成6个随机字符串,然后利用PIL将字符串绘制城图 ...
- python 用 PIL 模块 画验证码
PIL 简单绘画 def get_code_img(request): from PIL import Image, ImageDraw, ImageFont import random def ra ...
- python识别验证码——PIL,pytesser,pytesseract的安装
1.使用Python识别验证码需要安装Python的图像处理模块(PIL.pytesser.pytesseract) (安装过程需要pip,在我的Python中已经安装pip了,pip的安装就不在赘述 ...
随机推荐
- 两个ESP8266一个作为服务器一个作为客户端实现互相通讯
两个ESP8266一个作为服务器一个作为客户端实现互相通讯
- Linux 下kafka集群搭建
主机的IP地址: 主机IP地址 zookeeper kafka10.19.85.149 myid=1 broker.id=110.19.15.103 myid=2 broker.id=210.19.1 ...
- 阶段5 3.微服务项目【学成在线】_day18 用户授权_14-细粒度授权-我的课程细粒度授权-需求分析
3.3 我的课程细粒度授权 3.3.1 需求分析 1.我的课程查询,细粒度授权过程如下: 1)获取当前登录的用户Id 2)得到用户所属教育机构的Id 3)查询该教学机构下的课程信息 最终实现了用户只允 ...
- Laravel 项目开发环境配置
1.首先安装Laravel 依赖管理包工具 Composer (前提是本地装好了PHP php -v) php -r "copy('https://install.phpcomposer. ...
- sublime Text3文件路径提示功能
1>启动sublime Text3编辑器: 2> 点开菜单“preferences”——“package control”: 3>在弹出的下拉框中选择“install package ...
- Java如何获取ResultSet结果中的每一列的数据类型
示例代码片段: ResultSet resultSet = statement.executeQuery(sql); ResultSetMetaData metaData = resultSet.ge ...
- 第五章 编码/加密——《跟我学Shiro》
转发地址:https://www.iteye.com/blog/jinnianshilongnian-2021439 目录贴:跟我学Shiro目录贴 在涉及到密码存储问题上,应该加密/生成密码摘要存储 ...
- iOS自定义遮盖
@interface TGCover : UIView+ (id)cover;+ (id)coverWithTarget:(id)target action:(SEL)action; - (void) ...
- 如何调试Maven软件的源代码
和调试maven插件方法一样 修改maven源代码 打包模块apache-maven,生成apache-maven-x.x.x-bin.tar.gz 解压上面的压缩包,生成目录apache-maven ...
- [IDS]CentOS6.6下搭建基于snort+barnyard2+base的入侵检测系统,超详细!!!
最详细的CentOS6.6下搭建基于snort+barnyard2+base的入侵检测系统免责声明一.如果因为使用本文档照成损失(系统崩溃.数据丢失等),作者不承担任何责任.二.本文档只是个人使用本文 ...