OpenFaaS实战之三:Java函数
欢迎访问我的GitHub
https://github.com/zq2599/blog_demos
内容:所有原创文章分类汇总及配套源码,涉及Java、Docker、Kubernetes、DevOPS等;
OpenFaaS实战系列文章链接
- 部署
- 函数入门
- Java函数
- 模板操作(template)
- 大话watchdog
- of-watchdog(为性能而生)
- java11模板解析
- OpenFaaS实战之八:自制模板(maven+jdk8)
- OpenFaaS实战之九:终篇,自制模板(springboot+maven+jdk8)
本篇概览
- 本文是《OpenFaaS实战》系列的第三篇,经过前文实战,咱们掌握了函数开发和部署的要领,作为一名Java程序员,当然迫切的希望用Java编写OpenFaaS函数,于是就有了本文;
- 本文开发一个Java函数,功能是解析请求body中的JSON字符串,再加上JVM进程ID、IP地址、当前时间一起拼成字符串,包装在JSON中返回;
- 平时写java代码会用到各种二方库,这里引入jackson的库,作为OpenFaaS添加依赖的参考;
源码下载
- 本篇实战中的源码可在GitHub下载到,地址和链接信息如下表所示(https://github.com/zq2599/blog_demos):
| 名称 | 链接 | 备注 |
|---|---|---|
| 项目主页 | https://github.com/zq2599/blog_demos | 该项目在GitHub上的主页 |
| git仓库地址(https) | https://github.com/zq2599/blog_demos.git | 该项目源码的仓库地址,https协议 |
| git仓库地址(ssh) | git@github.com:zq2599/blog_demos.git | 该项目源码的仓库地址,ssh协议 |
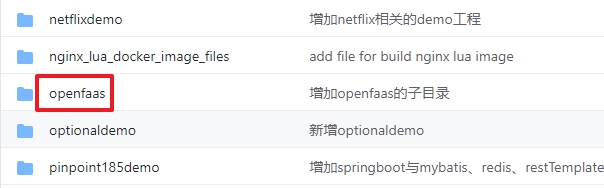
- 这个git项目中有多个文件夹,本章的应用在openfaas文件夹下,如下图红框所示:
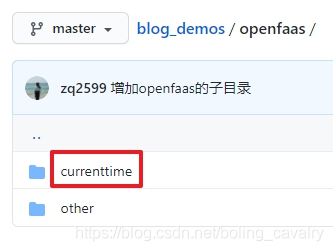
- openfaas里面有多个子文件夹,本篇的源码在currenttime中,如下图红框:
创建函数
- 执行以下命令,即可创建名为faas-currenttime的函数,此函数的镜像前缀是bolingcavalry,语言类型为java11:
faas-cli new faas-currenttime --lang java11 -p bolingcavalry
- 控制台响应如下:
[root@node1 20]# faas-cli new faas-currenttime --lang java11 -p bolingcavalry

2020/11/20 15:47:50 No templates found in current directory.

2020/11/20 15:47:50 Attempting to expand templates from https://github.com/openfaas/templates.git

2020/11/20 15:47:56 Fetched 12 template(s) : [csharp dockerfile go java11 java11-vert-x node node12 php7 python python3 python3-debian ruby] from https://github.com/openfaas/templates.git

Folder: faas-currenttime created.

  ___                   _____           ____

 / _ \ _ __   ___ _ __ |  ___|_ _  __ _/ ___|

| | | | '_ \ / _ \ '_ \| |_ / _` |/ _` \___ \

| |_| | |_) |  __/ | | |  _| (_| | (_| |___) |

 \___/| .__/ \___|_| |_|_|  \__,_|\__,_|____/

      |_|

Function created in folder: faas-currenttime

Stack file written: faas-currenttime.yml

Notes:

You have created a function using the java11 template which uses an LTS

version of the OpenJDK.
- 当前目录已经新增了文件faas-currenttime.yml和文件夹faas-currenttime
- 文件夹faas-currenttime的内容如下,可见是个gradle工程:
faas-currenttime

├── build.gradle

├── gradle

│   └── wrapper

│       ├── gradle-wrapper.jar

│       └── gradle-wrapper.properties

├── gradlew

├── gradlew.bat

├── settings.gradle

└── src

    ├── main

    │   └── java

    │       └── com

    │           └── openfaas

    │               └── function

    │                   └── Handler.java

    └── test

        └── java

            └── HandlerTest.java
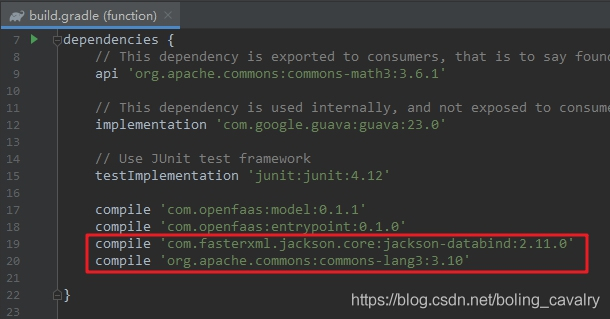
- 打开build.gradle文件,添加下图红框中的内容,即jackson和common库的依赖:
- 进入文件夹faas-currenttime/src/main/java/com/openfaas/function/,可见已创建了默认的业务功能类Handler.java,打开看看OpenFaaS给的默认代码啥样的,如下所示:
package com.openfaas.function;

import com.openfaas.model.IHandler;

import com.openfaas.model.IResponse;

import com.openfaas.model.IRequest;

import com.openfaas.model.Response;

public class Handler extends com.openfaas.model.AbstractHandler {

    public IResponse Handle(IRequest req) {

        Response res = new Response();

            res.setBody("Hello, world!");

            return res;

    }

}
- 把Handler.java的内容用以下代码替换掉,替换后的函数,其功能是取得请求参数,再把当前JVM的进程ID、IP地址、当前时间都拼接到一个字符串中返回,需要重点关注的有两点:将请求参数反序列化成Map实例,以及将Map序列化成JSON字符串返回:
package com.openfaas.function;

import com.fasterxml.jackson.core.type.TypeReference;

import com.fasterxml.jackson.databind.ObjectMapper;

import com.openfaas.model.IRequest;

import com.openfaas.model.IResponse;

import com.openfaas.model.Response;

import org.apache.commons.lang3.StringUtils;

import java.lang.management.ManagementFactory;

import java.net.Inet4Address;

import java.net.InetAddress;

import java.net.NetworkInterface;

import java.text.SimpleDateFormat;

import java.util.Date;

import java.util.Enumeration;

import java.util.HashMap;

import java.util.Map;

public class Handler extends com.openfaas.model.AbstractHandler {

    private static final String PARAM_USER_NAME = "name";

    private static final String RESPONSE_TEMPLETE = "Hello %s, response from [%s], PID [%s], %s";

    private ObjectMapper mapper = new ObjectMapper();

    /**

     * 获取本机IP地址

     * @return

     */

    public static String getIpAddress() {

        try {

            Enumeration<NetworkInterface> allNetInterfaces = NetworkInterface.getNetworkInterfaces();

            InetAddress ip = null;

            while (allNetInterfaces.hasMoreElements()) {

                NetworkInterface netInterface = (NetworkInterface) allNetInterfaces.nextElement();

                if (netInterface.isLoopback() || netInterface.isVirtual() || !netInterface.isUp()) {

                    continue;

                } else {

                    Enumeration<InetAddress> addresses = netInterface.getInetAddresses();

                    while (addresses.hasMoreElements()) {

                        ip = addresses.nextElement();

                        if (ip != null && ip instanceof Inet4Address) {

                            return ip.getHostAddress();

                        }

                    }

                }

            }

        } catch (Exception e) {

            System.err.println("IP地址获取失败" + e.toString());

        }

        return "";

    }

    /**

     * 返回当前进程ID

     * @return

     */

    private static String getPID() {

        return ManagementFactory

                .getRuntimeMXBean()

                .getName()

                .split("@")[0];

    }

    private String getUserName(IRequest req) {

        // 如果从请求body中取不到userName,就用

        String userName = null;

        try {

            Map<String, Object> mapFromStr = mapper.readValue(req.getBody(),

                    new TypeReference<Map<String, Object>>() {});

            if(null!=mapFromStr && mapFromStr.containsKey(PARAM_USER_NAME)) {

                userName = String.valueOf(mapFromStr.get(PARAM_USER_NAME));

            }

        } catch (Exception e) {

            e.printStackTrace();

        }

        // 如果从请求body中取不到userName,就给个默认值

        if(StringUtils.isBlank(userName)) {

            userName = "anonymous";

        }

        return userName;

    }

    public IResponse Handle(IRequest req) {

        String userName = getUserName(req);

        System.out.println("1. ---" + userName);

        // 返回信息带上当前JVM所在机器的IP、进程号、时间

        String message = String.format(RESPONSE_TEMPLETE,

                userName,

                getIpAddress(),

                getPID(),

                new SimpleDateFormat( "yyyy-MM-dd hh:mm:ss" ).format(new Date()));

        System.out.println("2. ---" + message);

        // 响应内容也是JSON格式,所以先存入map,然后再序列化

        Map<String, Object> rlt = new HashMap<>();

        rlt.put("success", true);

        rlt.put("message", message);

        String rltStr = null;

        try {

            rltStr = mapper.writeValueAsString(rlt);

        } catch (Exception e) {

            e.printStackTrace();

        }

        Response res = new Response();

        res.setContentType("application/json;charset=utf-8");

        res.setBody(rltStr);

	    return res;

    }

}
- 至此编码完成,接下来是制作镜像和部署;
部署
- 在faas-currenttime.yml所在目录执行以下命令,即可开始制作镜像,制作过程中会有gradle的编译过程,如果编译失败会中断镜像制作:
faas-cli build -f ./faas-currenttime.yml
- 镜像制作成功时,控制台输出类似如下信息:
Step 27/30 : ENV fprocess="java -XX:+UseContainerSupport com.openfaas.entrypoint.App"

---> Running in 0f50636cc747

Removing intermediate container 0f50636cc747

---> 54a5c9a193c8

Step 28/30 : EXPOSE 8080

---> Running in 3252f165af15

Removing intermediate container 3252f165af15

---> c05afc826ec5

Step 29/30 : HEALTHCHECK --interval=5s CMD [ -e /tmp/.lock ] || exit 1

---> Running in 4106410be0a2

Removing intermediate container 4106410be0a2

---> 6d95b73b5f33

Step 30/30 : CMD ["fwatchdog"]

---> Running in 1606dbcd7003

Removing intermediate container 1606dbcd7003

---> 99a519ab82fd

Successfully built 99a519ab82fd

Successfully tagged bolingcavalry/faas-currenttime:latest

Image: bolingcavalry/faas-currenttime:latest built.

[0] < Building faas-currenttime done in 34.94s.

[0] Worker done.

Total build time: 34.94s
- 将镜像推送到镜像仓库,以便Kubernetes可以下载到此镜像,我这里用的是hub.docker.com,因为我的ID是bolingcavalry,所执行以下命令即可推送成功:
docker push bolingcavalry/faas-currenttime:latest
- 执行以下命令部署函数到OpenFaaS:
faas-cli deploy -f faas-currenttime.yml
- 控制台响应如下,可见部署已经开始,并且给出了endpoint:
[root@node1 20]# faas-cli deploy -f faas-currenttime.yml

Deploying: faas-currenttime.

WARNING! Communication is not secure, please consider using HTTPS. Letsencrypt.org offers free SSL/TLS certificates.

Deployed. 202 Accepted.

URL: http://192.168.133.187:31112/function/faas-currenttime.openfaas-fn
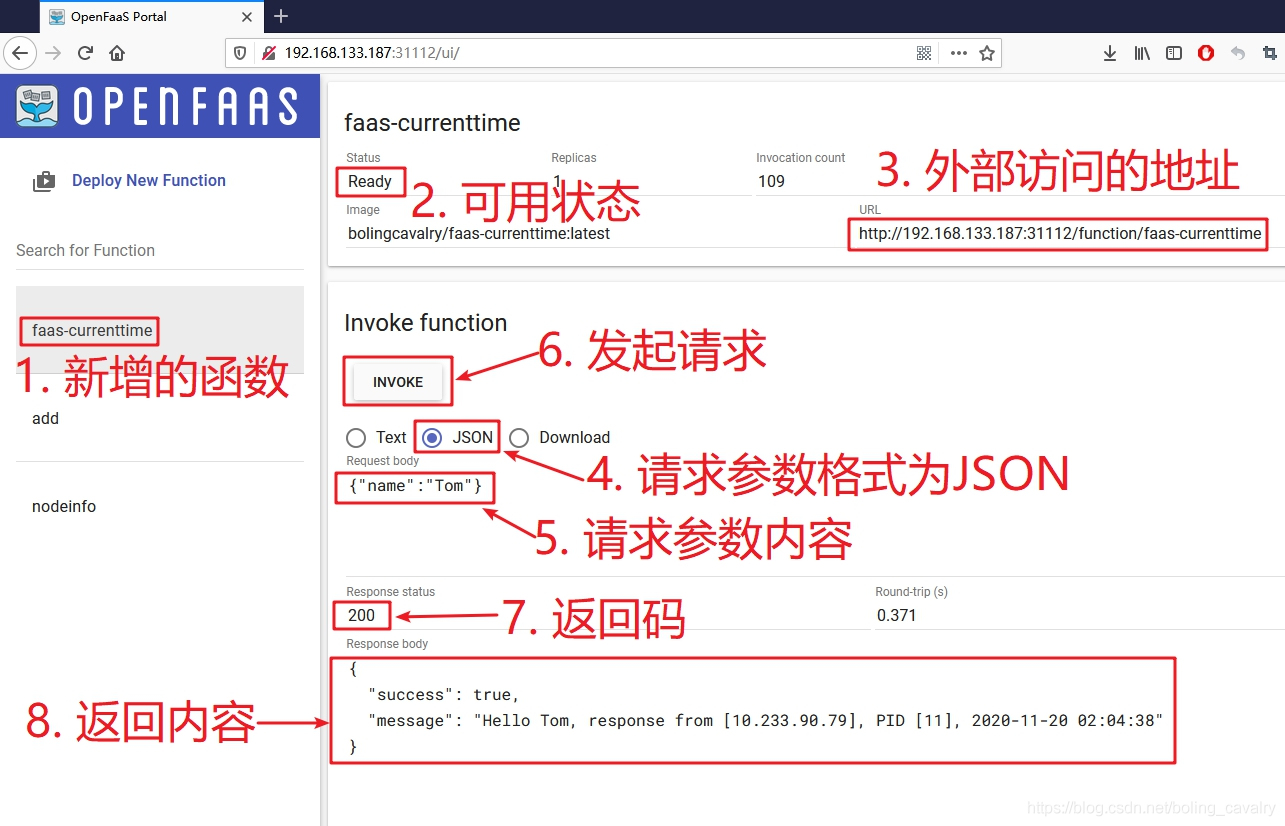
- 打开web端,在页面上可见新增的函数,验证操作如下图所示,可见入参的JSON内容可以被正常解析:
- 也可以在控制台用curl命令测试:
[root@node1 20]# curl \

> -H "Content-Type: application/json" \

> -X POST \

> --data '{"name":"Jerry}' \

> http://192.168.133.187:31112/function/faas-currenttime

{"success":true,"message":"Hello anonymous, response from [10.233.90.79], PID [11], 2020-11-20 02:14:46"}
- 执行命令faas-cli deploy -f faas-currenttime.yml开始部署,控制台已经接受了部署请求,并给出了函数的endpoint:
[root@node1 20]# faas-cli deploy -f faas-currenttime.yml

Deploying: faas-currenttime.

WARNING! Communication is not secure, please consider using HTTPS. Letsencrypt.org offers free SSL/TLS certificates.

Deployed. 202 Accepted.

URL: http://192.168.133.187:31112/function/faas-currenttime.openfaas-fn
清理
- 删除函数的命令如下,依旧是faas-currenttime.yml所在目录:
faas-cli remove -f faas-currenttime.yml
- 至此,最基本的Java函数的开发、部署、验证都已经完成,如果您也打算用Java开发OpenFaaS函数,希望本文能给您一些参考;
你不孤单,欣宸原创一路相伴
欢迎关注公众号:程序员欣宸
微信搜索「程序员欣宸」,我是欣宸,期待与您一同畅游Java世界...
https://github.com/zq2599/blog_demos
OpenFaaS实战之三:Java函数的更多相关文章
- OpenFaaS实战之四:模板操作(template)
欢迎访问我的GitHub https://github.com/zq2599/blog_demos 内容:所有原创文章分类汇总及配套源码,涉及Java.Docker.Kubernetes.DevOPS ...
- OpenFaaS实战之八:自制模板(maven+jdk8)
欢迎访问我的GitHub https://github.com/zq2599/blog_demos 内容:所有原创文章分类汇总及配套源码,涉及Java.Docker.Kubernetes.DevOPS ...
- OpenFaaS实战之五:大话watchdog
欢迎访问我的GitHub https://github.com/zq2599/blog_demos 内容:所有原创文章分类汇总及配套源码,涉及Java.Docker.Kubernetes.DevOPS ...
- OpenFaaS实战之二:函数入门
欢迎访问我的GitHub https://github.com/zq2599/blog_demos 内容:所有原创文章分类汇总及配套源码,涉及Java.Docker.Kubernetes.DevOPS ...
- [Java聊天室server]实战之三 接收循环
前言 学习不论什么一个稍有难度的技术,要对其有充分理性的分析,之后果断做出决定---->也就是人们常说的"多谋善断":本系列尽管涉及的是socket相关的知识.但学习之前,更 ...
- OpenFaaS实战之一:部署
欢迎访问我的GitHub https://github.com/zq2599/blog_demos 内容:所有原创文章分类汇总及配套源码,涉及Java.Docker.Kubernetes.DevOPS ...
- OpenFaaS实战之六:of-watchdog(为性能而生)
欢迎访问我的GitHub https://github.com/zq2599/blog_demos 内容:所有原创文章分类汇总及配套源码,涉及Java.Docker.Kubernetes.DevOPS ...
- OpenFaaS实战之七:java11模板解析
欢迎访问我的GitHub https://github.com/zq2599/blog_demos 内容:所有原创文章分类汇总及配套源码,涉及Java.Docker.Kubernetes.DevOPS ...
- OpenFaaS实战之九:终篇,自制模板(springboot+maven+jdk8)
欢迎访问我的GitHub https://github.com/zq2599/blog_demos 内容:所有原创文章分类汇总及配套源码,涉及Java.Docker.Kubernetes.DevOPS ...
随机推荐
- 【VBA】显示所有隐藏的名称管理器中的名称
Excel提示这个 代码: Sub DisplayNames() Dim Na As Name For Each Na In ThisWorkbook.Names Na.Visible = True ...
- windows 7系统安装与配置Tomcat服务器环境
windows 7系统安装与配置Tomcat服务器环境 学习了一个月的java基础,终于要迈向java web领域.学习java web开发就离不开服务器的支持,由于本人是菜鸟,只好求助度娘谷哥.在此 ...
- 一文带你了解 Redis 的发布与订阅的底层原理
01.前言 发布订阅系统在我们日常的工作中经常会使用到,这种场景大部分情况我们都是使用消息队列的,常用的消息队列有 Kafka,RocketMQ,RabbitMQ,每一种消息队列都有其特性,关于 Ka ...
- ES6、ES7的一些新特性
1.常见的就是let 和 const 命令 let 只在命令所在的代码块内有效 const声明一个只读的常量 2.变量的赋值 let [a, b, c] = [1, 2, 3]; 这样输出的话a=1, ...
- JavaScript与服务端进行数据交互的方式
XMLHttpRequest XHR是项古老的技术,不同的浏览器厂商对其实现方式不同,例如有些浏览器只支持onload事件处理器,有些只支持onreadystatechange事件处理器. 发送Get ...
- hive学习笔记之四:分区表
欢迎访问我的GitHub https://github.com/zq2599/blog_demos 内容:所有原创文章分类汇总及配套源码,涉及Java.Docker.Kubernetes.DevOPS ...
- ES6 数组的方法
数组的类 数组的类是Array 数组的定义 var arr=[元素] var arr=new Array(3) 数字3,代表有三个元素或者三个空位 如果数组定义采用 new 实例,类中跟的是一个数字 ...
- 正则表达式_爬取豆瓣电影排行Top250
前言: 利用简单的正则表达式,获取响应内容爬取数据. Part1 正则表达式(Regular Expression) 1.1 简介 正则表达式,又称规则表达式,它是一种文本模式,就是通过事先定义好的一 ...
- hdu 2159 二维完全背包
Problem Description 最近xhd正在玩一款叫做FATE的游戏,为了得到极品装备,xhd在不停的杀怪做任务.久而久之xhd开始对杀怪产生的厌恶感,但又不得不通过杀怪来升完这最后一级.现 ...
- 3shell命令替换
Shell 命令替换是指将命令的输出结果赋值给某个变量.比如,将使用ls命令查看到的某个目录中的内容保存到某个变量中,这就需要使用命令替换. Shell 中有两种方式可以完成命令替换,一种是反引号` ...