SPI应用 用SPI控制一个数字电位器
Controlling a Digital Potentiometer Using SPI
In this tutorial you will learn how to control the AD5206 digital potentiometer(数字电位计) using Serial Peripheral Interface (SPI). For an explanation of SPI see the SPI Library reference.
Digital potentiometers are useful when you need to vary the resistance in a circuit electronically rather than by hand. Example applications include LED dimming调光, audio signal conditioning and tone generation. In this example we will use a six channel digital potentiometer to control the brightness of six LEDs. The steps we will cover for implementing实施 SPI communication can be modified for use with most other SPI devices.
Hardware Required 硬件准备
- Arduino or Genuino board
- AD5206 Digital Potentiometer
- 6 LEDs
- 6 220 ohm resistors
- hook-up wires电子安装线
- breadboard
Introduction to the AD5206 Digital Potentiometer
Click for for the AD5206's datasheet.
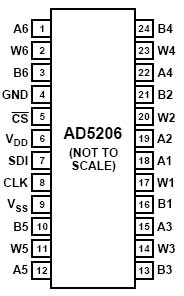
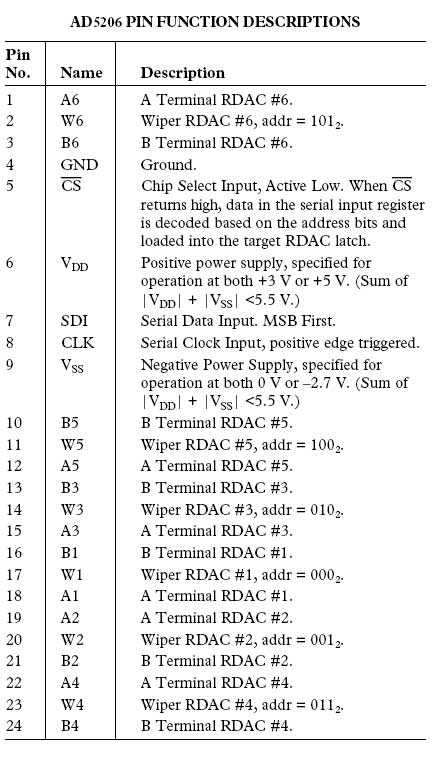
The AD5206 is a 6 channel digital potentiometer. (AD5206是8通道的数字电位器)。 This means it has six variable resistors (potentiometers) built in for individual electronic control. There are three pins on the chip for each of the six internal variable resistors, and they can be interfaced with just as you would use a mechanical potentiometer. The individual variable resistor pins are labeled Ax, Bx and Wx, ie. A1, B1 and W1. For example, in this tutorial we will be using each variable resistor as a voltage divider by pulling one side pin (pin B) high, pulling another side pin (pin A) low and taking the variable voltage output of the center pin (Wiper滑片). In this case, the AD5206 provides a maximum resistance of 10k ohm, delivered in 255 steps (255 being the max, 0 being the least).(可以得到最大电阻10K欧姆,最小0欧模,分为255步幅)
Circuit 电路图
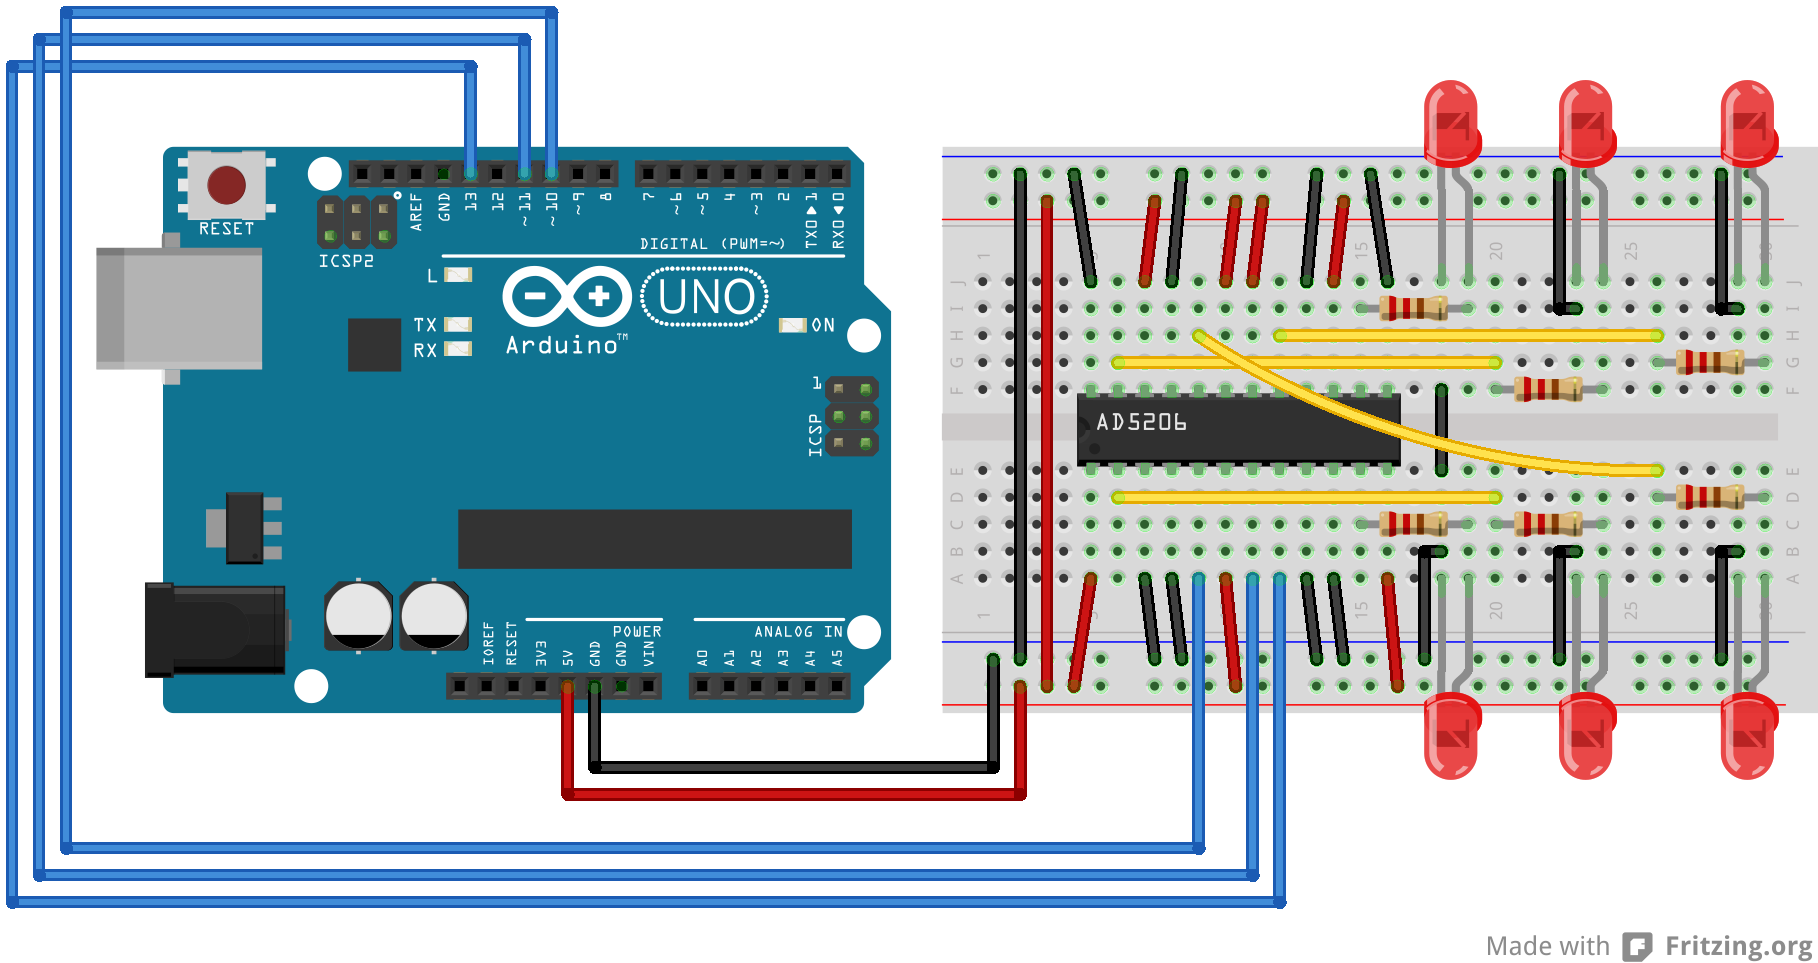
image developed using Fritzing. For more circuit examples, see the Fritzing project page
Schematic 原理图

  1 Code 代码

  2

  3 /*

  4

  5   Digital Pot Control 数字电位器的控制

  6

  7

  8

  9   This example controls an Analog Devices AD5206 digital potentiometer.

 10

 11   The AD5206 has 6 potentiometer channels. Each channel's pins are labeled

 12

 13   A - connect this to voltage

 14

 15   W - this is the pot's wiper, which changes when you set it

 16

 17   B - connect this to ground.

 18

 19 每隔通道有三个端,A,B,W,A接工作电压,W接滑动端,C接地

 20

 21  The AD5206 is SPI-compatible, and to command it, you send two bytes, one with the channel number (0 - 5) and one with the resistance value for the channel (0 - 255).

 22

 23

 24

 25  The circuit:

 26

 27   * All A pins of AD5206 connected to +5V

 28

 29   * All B pins of AD5206 connected to ground

 30

 31   * An LED and a 220-ohm resisor in series connected from each W pin to ground

 32

 33 每个W引脚的LED串220欧电阻

 34

 35   * CS - to digital pin 10  (SS pin)    片选引脚CS接到控制板的引脚10

 36

 37   * SDI - to digital pin 11 (MOSI pin)   SDI引脚接到控制板的引脚11

 38

 39   * CLK - to digital pin 13 (SCK pin)    CLK 引脚接到控制板的引脚13

 40

 41

 42

 43  created 10 Aug 2010

 44

 45  by Tom Igoe

 46

 47

 48  Thanks to Heather Dewey-Hagborg for the original tutorial, 2005

 49

 50

 51

 52 */

 53

 54

 55

 56 // inslude the SPI library:

 57

 58 #include <SPI.h>

 59

 60

 61

 62 // set pin 10 as the slave select for the digital pot:

 63

 64 const int slaveSelectPin = 10;  // 从选择引脚

 65

 66

 67

 68 void setup()

 69

 70 {

 71

 72   pinMode(slaveSelectPin, OUTPUT);   // set the slaveSelectPin as an output

 73

 74   SPI.begin();    // initialize SPI

 75

 76 }

 77

 78

 79

 80 void loop()

 81

 82 {

 83

 84   // go through the six channels of the digital pot:   循环数字电位器的六个通道

 85

 86   for (int channel = 0; channel < 6; channel++)

 87

 88 {

 89

 90     // change the resistance on this channel from min to max:   电阻从小到大

 91

 92 for (int level = 0; level < 255; level++)

 93

 94 {

 95

 96       digitalPotWrite(channel, level);

 97

 98       delay(10);

 99

100 }

101

102     delay(100);   // wait a second at the top

103

104     // change the resistance on this channel from max to min:  电阻从大到小

105

106 for (int level = 0; level < 255; level++)

107

108 {

109

110       digitalPotWrite(channel, 255 - level);

111

112       delay(10);

113

114 }

115

116 }

117

118 }

119

120

121

122 void digitalPotWrite(int address, int value)

123

124 {

125

126   // take the SS pin low to select the chip:    SS引脚置低选中该芯片

127

128   digitalWrite(slaveSelectPin, LOW);

129

130   //  send in the address and value via SPI:

131

132   SPI.transfer(address);  //传送地址

133

134   SPI.transfer(value);    //传送数值

135

136   // take the SS pin high to de-select the chip:  SS引脚置高释放该芯片

137

138   digitalWrite(slaveSelectPin, HIGH);

139

140 }
运行效果:从第1通道开始,每个通道的LED,从最暗到最亮,0.1秒后,再从最亮到最暗。
SPI应用 用SPI控制一个数字电位器的更多相关文章
- 求s=a+aa+aaa+aaaa+aa...a的值,其中a是一个数字。例如2+22+222+2222+22222(此时共有5个数相加),几个数相加有键盘控制。
package com.lw.HomeWork1;//包名 2 import java.util.Scanner; public class Demo18 { /** * @param args */ ...
- 求s=a+aa+aaa+aaaa+aa...a的值,其中a是一个数字。 例如2+22+222+2222+22222(此时共有5个数相加),几个数相加有键盘控制。
代码: package com.liron.p1; import java.io.IOException; import java.util.Scanner; /** * 求s=a+aa+aaa+aa ...
- Java初学者作业——编写Java程序,在控制台中输入一个数字,要求定义方法实现找出能够整除该数字的所有数字。
返回本章节 返回作业目录 需求说明: 编写Java程序,在控制台中输入一个数字,要求定义方法实现找出能够整除该数字的所有数字. 实现思路: 定义方法findNums(),用于实现查找所有能够整除指定数 ...
- python基础练习题(题目 求s=a+aa+aaa+aaaa+aa…a的值,其中a是一个数字。例如2+22+222+2222+22222(此时共有5个数相加),几个数相加由键盘控制)
day11 --------------------------------------------------------------- 实例018:复读机相加 题目 求s=a+aa+aaa+aaa ...
- windows 系统中打开一个数字证书所经历的过程
今天在使用Outlook express调试CSP程序时,发现数字证书总是加载不上(提示该数字证书已经被破坏),使用断点进去跟踪一下,发现在CSP程序中调用CPVerifySignature ...
- SPI接口扫盲 SPI定义/SPI时序(CPHA CPOL)
SPI接口扫盲 douqingl@gmail.com 为何要写这篇文档?百度上找出来的SPI接口中文描述都说的太过简略,没有一篇文档能够详尽的将SPI介绍清楚的.wikipedia英文版[注释 ...
- SPI通信协议(SPI总线)学习
1.什么是SPI? SPI是串行外设接口(Serial Peripheral Interface)的缩写.是 Motorola 公司推出的一 种同步串行接口技术,是一种高速的,全双工,同步的通信总线. ...
- Dubbo 扩展点加载机制:从 Java SPI 到 Dubbo SPI
SPI 全称为 Service Provider Interface,是一种服务发现机制.当程序运行调用接口时,会根据配置文件或默认规则信息加载对应的实现类.所以在程序中并没有直接指定使用接口的哪个实 ...
- 联盛德 HLK-W806 (四): 软件SPI和硬件SPI驱动ST7735液晶LCD
目录 联盛德 HLK-W806 (一): Ubuntu20.04下的开发环境配置, 编译和烧录说明 联盛德 HLK-W806 (二): Win10下的开发环境配置, 编译和烧录说明 联盛德 HLK-W ...
随机推荐
- php的负整数和正整数相加(负数以补码的形式存在内存,正数以原码的形式存在内存)
首先先理解原码,反码,补码 十进制为例 原码: 5的原码:00000101 反码:11111010 补码:补码在末尾加1即 11111011 (正数的补码就是其负数,即5的补码就是-5) 正数在 ...
- Labview学习之路(三)前面板数值控件
首先看一下前面板都有什么数值控件(我用的labview是17年的,其他版本可能会有不同) 我个人将他们分成了六个部分 第一部分 这个部分大家很好理解,数值输入数值输出,时间输入和时间输出,这里我们讲一 ...
- openssl1.0在mac下的编译安装(踩坑精华)
之前做了一次brew版本升级,然后用pip3安装的一个python命令就无法执行了(涉及到openssl库),执行就会报一个错误. ImportError: dlopen(/usr/local/Cel ...
- TDengine能比Hadoop快10倍?
之前对国产的时序大数据存储引擎 TDengine 感兴趣,因为号称比Hadoop快十倍,一直很好奇怎么实现的,所以最近抽空看了下白皮书和设计文档. 如果用一句话总结,就是 TDengine 是为特定的 ...
- 数据库系统第六章【关系数据理论】(B站视频)
目录 数据库系统第六章[关系数据理论](B站视频) 一.前言 二.规范化 函数依赖 三种分类 如何确定函数依赖? 平凡函数依赖vs非平凡函数依赖 完全函数依赖vs部分函数依赖 传递函数依赖 码 超码 ...
- IDEA 2020 集成 Activity插件
我按照教程打开settings-plugins,搜索actiBPM搜索不到, 于是我就去下载插件,然后再安装,具体步骤如下: 下载插件: 到http://plugins.jetbrains.com/, ...
- redis基础数据结构及编码方式
redis基础数据结构和编码方式 一.基础数据结构 1)简单动态字符串 2)双端链表 3)字典 4)跳跃表 5)整数集合 6)压缩列表 二.对象类型与编码 在redis的数据库中创建一个新的键值对时, ...
- Oracle中真正稳妥的求三甲的方法
坐地铁回家路上忽然想起,三甲排名可能为多个,只取三名岂不荒谬.不信请看下面数据: create table tb_score( id number(4,0) primary key, name nva ...
- ubuntu安装docker-ce 、docker-ce-cli、containerd.io
问题 ubuntu安装docker的时候特别慢,百度搜了一大堆都没讲到点子上,最后请教了大佬才知道是源的问题 安装 修改源 sudo gedit /etc/apt/sources.list 添加源 阿 ...
- LiteOS间歇计算技术:IOT终端真正感受“电量自由”
摘要:LiteOS间歇计算为什么能使物联网终端实现长续航? 物联网设备.场景复杂多样,小到智能穿戴的耳机,大到大型基建设备,更有我们陌生而又熟悉场景,例如深海探测.森林监控.野生动物跟踪等等能量采集场 ...