
Shiro SpringMVC 非maven HelloWorld
项目用到Shiro就从网上找一些案例看看吧,结果看了很多都是maven的,没有办法就自己弄了一个。废话不多说,原理自己找开始上菜。
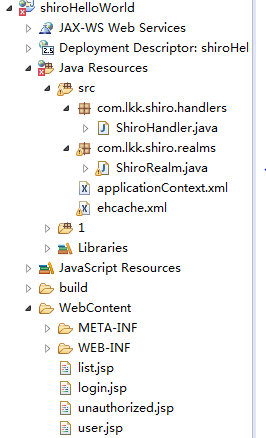
配置web.xml
<?xml version="1.0" encoding="UTF-8"?>

<web-app xmlns:xsi="http://www.w3.org/2001/XMLSchema-instance" xmlns="http://java.sun.com/xml/ns/javaee" xsi:schemaLocation="http://java.sun.com/xml/ns/javaee http://java.sun.com/xml/ns/javaee/web-app_2_5.xsd" id="WebApp_ID" version="2.5">

  <context-param>

    <param-name>contextConfigLocation</param-name>

    <param-value>classpath:applicationContext.xml</param-value>

  </context-param>

  <listener>

    <listener-class>org.springframework.web.context.ContextLoaderListener</listener-class>

  </listener>

  <servlet>

    <servlet-name>spring</servlet-name>

    <servlet-class>org.springframework.web.servlet.DispatcherServlet</servlet-class>

    <load-on-startup>1</load-on-startup>

  </servlet>

  <servlet-mapping>

    <servlet-name>spring</servlet-name>

    <url-pattern>/</url-pattern>

  </servlet-mapping>

  <filter>

    <filter-name>shiroFilter</filter-name>

    <filter-class>org.springframework.web.filter.DelegatingFilterProxy</filter-class>

    <init-param>

      <param-name>targetFilterLifecycle</param-name>

      <param-value>true</param-value>

    </init-param>

  </filter>

  <filter-mapping>

    <filter-name>shiroFilter</filter-name>

    <url-pattern>/*</url-pattern>

  </filter-mapping>

</web-app>
spring-servlet.xml与web.xml同目录
<?xml version="1.0" encoding="UTF-8"?>

<beans xmlns="http://www.springframework.org/schema/beans"

    xmlns:xsi="http://www.w3.org/2001/XMLSchema-instance"

    xmlns:mvc="http://www.springframework.org/schema/mvc"

    xmlns:context="http://www.springframework.org/schema/context"

    xsi:schemaLocation="http://www.springframework.org/schema/mvc http://www.springframework.org/schema/mvc/spring-mvc-4.0.xsd

        http://www.springframework.org/schema/beans http://www.springframework.org/schema/beans/spring-beans.xsd

        http://www.springframework.org/schema/context http://www.springframework.org/schema/context/spring-context-4.0.xsd">

    <context:component-scan base-package="com.lkk.shiro"></context:component-scan>

    <bean class="org.springframework.web.servlet.view.InternalResourceViewResolver">

        <property name="prefix" value="/"></property>

        <property name="suffix" value=".jsp"></property>

    </bean>

    <mvc:annotation-driven></mvc:annotation-driven>

    <mvc:default-servlet-handler/>

</beans>
ehcache.xml
<ehcache>

    <!-- Sets the path to the directory where cache .data files are created.

         If the path is a Java System Property it is replaced by

         its value in the running VM.

         The following properties are translated:

         user.home - User's home directory

         user.dir - User's current working directory

         java.io.tmpdir - Default temp file path -->

    <diskStore path="java.io.tmpdir"/>

    <cache name="authorizationCache"

           eternal="false"

           timeToIdleSeconds="3600"

           timeToLiveSeconds="0"

           overflowToDisk="false"

           statistics="true">

    </cache>

    <cache name="authenticationCache"

           eternal="false"

           timeToIdleSeconds="3600"

           timeToLiveSeconds="0"

           overflowToDisk="false"

           statistics="true">

    </cache>

    <cache name="shiro-activeSessionCache"

           eternal="false"

           timeToIdleSeconds="3600"

           timeToLiveSeconds="0"

           overflowToDisk="false"

           statistics="true">

    </cache>

    <!--Default Cache configuration. These will applied to caches programmatically created through

        the CacheManager.

        The following attributes are required for defaultCache:

        maxInMemory       - Sets the maximum number of objects that will be created in memory

        eternal           - Sets whether elements are eternal. If eternal,  timeouts are ignored and the element

                            is never expired.

        timeToIdleSeconds - Sets the time to idle for an element before it expires. Is only used

                            if the element is not eternal. Idle time is now - last accessed time

        timeToLiveSeconds - Sets the time to live for an element before it expires. Is only used

                            if the element is not eternal. TTL is now - creation time

        overflowToDisk    - Sets whether elements can overflow to disk when the in-memory cache

                            has reached the maxInMemory limit.

        -->

    <defaultCache

        maxElementsInMemory="10000"

        eternal="false"

        timeToIdleSeconds="120"

        timeToLiveSeconds="120"

        overflowToDisk="true"

        />

    <!--Predefined caches.  Add your cache configuration settings here.

        If you do not have a configuration for your cache a WARNING will be issued when the

        CacheManager starts

        The following attributes are required for defaultCache:

        name              - Sets the name of the cache. This is used to identify the cache. It must be unique.

        maxInMemory       - Sets the maximum number of objects that will be created in memory

        eternal           - Sets whether elements are eternal. If eternal,  timeouts are ignored and the element

                            is never expired.

        timeToIdleSeconds - Sets the time to idle for an element before it expires. Is only used

                            if the element is not eternal. Idle time is now - last accessed time

        timeToLiveSeconds - Sets the time to live for an element before it expires. Is only used

                            if the element is not eternal. TTL is now - creation time

        overflowToDisk    - Sets whether elements can overflow to disk when the in-memory cache

                            has reached the maxInMemory limit.

        -->

    <!-- Sample cache named sampleCache1

        This cache contains a maximum in memory of 10000 elements, and will expire

        an element if it is idle for more than 5 minutes and lives for more than

        10 minutes.

        If there are more than 10000 elements it will overflow to the

        disk cache, which in this configuration will go to wherever java.io.tmp is

        defined on your system. On a standard Linux system this will be /tmp"

        -->

    <cache name="sampleCache1"

        maxElementsInMemory="10000"

        eternal="false"

        timeToIdleSeconds="300"

        timeToLiveSeconds="600"

        overflowToDisk="true"

        />

    <!-- Sample cache named sampleCache2

        This cache contains 1000 elements. Elements will always be held in memory.

        They are not expired. -->

    <cache name="sampleCache2"

        maxElementsInMemory="1000"

        eternal="true"

        timeToIdleSeconds="0"

        timeToLiveSeconds="0"

        overflowToDisk="false"

        /> -->

    <!-- Place configuration for your caches following -->

</ehcache>
<ehcache>

    <!-- Sets the path to the directory where cache .data files are created.

         If the path is a Java System Property it is replaced by

         its value in the running VM.

         The following properties are translated:

         user.home - User's home directory

         user.dir - User's current working directory

         java.io.tmpdir - Default temp file path -->

    <diskStore path="java.io.tmpdir"/>

    <cache name="authorizationCache"

           eternal="false"

           timeToIdleSeconds="3600"

           timeToLiveSeconds="0"

           overflowToDisk="false"

           statistics="true">

    </cache>

    <cache name="authenticationCache"

           eternal="false"

           timeToIdleSeconds="3600"

           timeToLiveSeconds="0"

           overflowToDisk="false"

           statistics="true">

    </cache>

    <cache name="shiro-activeSessionCache"

           eternal="false"

           timeToIdleSeconds="3600"

           timeToLiveSeconds="0"

           overflowToDisk="false"

           statistics="true">

    </cache>

    <!--Default Cache configuration. These will applied to caches programmatically created through

        the CacheManager.

        The following attributes are required for defaultCache:

        maxInMemory       - Sets the maximum number of objects that will be created in memory

        eternal           - Sets whether elements are eternal. If eternal,  timeouts are ignored and the element

                            is never expired.

        timeToIdleSeconds - Sets the time to idle for an element before it expires. Is only used

                            if the element is not eternal. Idle time is now - last accessed time

        timeToLiveSeconds - Sets the time to live for an element before it expires. Is only used

                            if the element is not eternal. TTL is now - creation time

        overflowToDisk    - Sets whether elements can overflow to disk when the in-memory cache

                            has reached the maxInMemory limit.

        -->

    <defaultCache

        maxElementsInMemory="10000"

        eternal="false"

        timeToIdleSeconds="120"

        timeToLiveSeconds="120"

        overflowToDisk="true"

        />

    <!--Predefined caches.  Add your cache configuration settings here.

        If you do not have a configuration for your cache a WARNING will be issued when the

        CacheManager starts

        The following attributes are required for defaultCache:

        name              - Sets the name of the cache. This is used to identify the cache. It must be unique.

        maxInMemory       - Sets the maximum number of objects that will be created in memory

        eternal           - Sets whether elements are eternal. If eternal,  timeouts are ignored and the element

                            is never expired.

        timeToIdleSeconds - Sets the time to idle for an element before it expires. Is only used

                            if the element is not eternal. Idle time is now - last accessed time

        timeToLiveSeconds - Sets the time to live for an element before it expires. Is only used

                            if the element is not eternal. TTL is now - creation time

        overflowToDisk    - Sets whether elements can overflow to disk when the in-memory cache

                            has reached the maxInMemory limit.

        -->

    <!-- Sample cache named sampleCache1

        This cache contains a maximum in memory of 10000 elements, and will expire

        an element if it is idle for more than 5 minutes and lives for more than

        10 minutes.

        If there are more than 10000 elements it will overflow to the

        disk cache, which in this configuration will go to wherever java.io.tmp is

        defined on your system. On a standard Linux system this will be /tmp"

        -->

    <cache name="sampleCache1"

        maxElementsInMemory="10000"

        eternal="false"

        timeToIdleSeconds="300"

        timeToLiveSeconds="600"

        overflowToDisk="true"

        />

    <!-- Sample cache named sampleCache2

        This cache contains 1000 elements. Elements will always be held in memory.

        They are not expired. -->

    <cache name="sampleCache2"

        maxElementsInMemory="1000"

        eternal="true"

        timeToIdleSeconds="0"

        timeToLiveSeconds="0"

        overflowToDisk="false"

        /> -->

    <!-- Place configuration for your caches following -->

</ehcache>
applicationContext.xml
<?xml version="1.0" encoding="UTF-8"?>

<beans xmlns="http://www.springframework.org/schema/beans"

	xmlns:xsi="http://www.w3.org/2001/XMLSchema-instance"

	xsi:schemaLocation="http://www.springframework.org/schema/beans http://www.springframework.org/schema/beans/spring-beans.xsd">

    <!--

    1. 配置 SecurityManager!

    -->

    <bean id="securityManager" class="org.apache.shiro.web.mgt.DefaultWebSecurityManager">

        <property name="cacheManager" ref="cacheManager"/>

        <property name="realms">

    			<ref bean="jdbcRealm"/>

        </property>

    </bean>

    <!--

    2. 配置 CacheManager.

    2.1 需要加入 ehcache 的 jar 包及配置文件.

    -->

    <bean id="cacheManager" class="org.apache.shiro.cache.ehcache.EhCacheManager">

        <property name="cacheManagerConfigFile" value="classpath:ehcache.xml"/>

    </bean>

    <!--

    	3. 配置 Realm

    	3.1 直接配置实现了 org.apache.shiro.realm.Realm 接口的 bean

    -->

    <bean id="jdbcRealm" class="com.lkk.shiro.realms.ShiroRealm">
         <!- 加密算法会用到->

    </bean>

    <!--

    4. 配置 LifecycleBeanPostProcessor. 可以自定的来调用配置在 Spring IOC 容器中 shiro bean 的生命周期方法.

    -->

    <bean id="lifecycleBeanPostProcessor" class="org.apache.shiro.spring.LifecycleBeanPostProcessor"/>

    <!--

    5. 启用 IOC 容器中使用 shiro 的注解. 但必须在配置了 LifecycleBeanPostProcessor 之后才可以使用.

    -->

    <bean class="org.springframework.aop.framework.autoproxy.DefaultAdvisorAutoProxyCreator"

          depends-on="lifecycleBeanPostProcessor"/>

    <bean class="org.apache.shiro.spring.security.interceptor.AuthorizationAttributeSourceAdvisor">

        <property name="securityManager" ref="securityManager"/>

    </bean>

    <!--

    6. 配置 ShiroFilter.

    6.1 id 必须和 web.xml 文件中配置的 DelegatingFilterProxy 的 <filter-name> 一致.

                      若不一致, 则会抛出: NoSuchBeanDefinitionException. 因为 Shiro 会来 IOC 容器中查找和 <filter-name> 名字对应的 filter bean.

    -->

    <bean id="shiroFilter" class="org.apache.shiro.spring.web.ShiroFilterFactoryBean">

        <property name="securityManager" ref="securityManager"/>

        <property name="loginUrl" value="/login.jsp"/>

        <property name="successUrl" value="/list.jsp"/>

        <property name="unauthorizedUrl" value="/unauthorized.jsp"/>

        <!--

        	配置哪些页面需要受保护.

        	以及访问这些页面需要的权限.

        	1). anon 可以被匿名访问

        	2). authc 必须认证(即登录)后才可能访问的页面.

        	3). logout 登出.

        	4). roles 角色过滤器

        -->

        <property name="filterChainDefinitions">

            <value>

                /login.jsp = anon

                /shiro/login = anon

                /shiro/logout = logout

                # everything else requires authentication:

                /** = authc

            </value>

        </property>

    </bean>

</beans>
ShiroHandler.java
package com.lkk.shiro.handlers;

import org.apache.shiro.SecurityUtils;

import org.apache.shiro.authc.AuthenticationException;

import org.apache.shiro.authc.UsernamePasswordToken;

import org.apache.shiro.subject.Subject;

import org.springframework.stereotype.Controller;

import org.springframework.web.bind.annotation.RequestMapping;

import org.springframework.web.bind.annotation.RequestParam;

@Controller

@RequestMapping("/shiro")

public class ShiroHandler {

	@RequestMapping("/login")

	public String login(@RequestParam("username") String username,

			@RequestParam("password") String password){

		Subject currentUser = SecurityUtils.getSubject();

		if (!currentUser.isAuthenticated()) {

        	// 把用户名和密码封装为 UsernamePasswordToken 对象

            UsernamePasswordToken token = new UsernamePasswordToken(username, password);

            // rememberme

            token.setRememberMe(true);

            try {

            	System.out.println("1. " + token.hashCode());

            	// 执行登录.

                currentUser.login(token);

            }

            // ... catch more exceptions here (maybe custom ones specific to your application?

            // 所有认证时异常的父类.

            catch (AuthenticationException ae) {

                //unexpected condition?  error?

            	System.out.println("登录失败: " + ae.getMessage());

            }

        }

		return "redirect:/list.jsp";

		//return "list";

	}

}
ShiroRealm.java
package com.lkk.shiro.realms;

import org.apache.shiro.authc.AuthenticationException;

import org.apache.shiro.authc.AuthenticationInfo;

import org.apache.shiro.authc.AuthenticationToken;

import org.apache.shiro.authc.LockedAccountException;

import org.apache.shiro.authc.SimpleAuthenticationInfo;

import org.apache.shiro.authc.UnknownAccountException;

import org.apache.shiro.authc.UsernamePasswordToken;

import org.apache.shiro.authz.AuthorizationInfo;

import org.apache.shiro.realm.AuthorizingRealm;

import org.apache.shiro.realm.Realm;

import org.apache.shiro.subject.PrincipalCollection;

public class ShiroRealm extends AuthorizingRealm{

	@Override

	protected AuthorizationInfo doGetAuthorizationInfo(PrincipalCollection arg0) {

		// TODO Auto-generated method stub

		return null;

	}

	@Override

	protected AuthenticationInfo doGetAuthenticationInfo(

			AuthenticationToken token) throws AuthenticationException {

		// TODO Auto-generated method stub

System.out.println("[FirstRealm] doGetAuthenticationInfo");

		//1. 把 AuthenticationToken 转换为 UsernamePasswordToken

		UsernamePasswordToken upToken = (UsernamePasswordToken) token;

		//2. 从 UsernamePasswordToken 中来获取 username

		String username = upToken.getUsername();

		//3. 调用数据库的方法, 从数据库中查询 username 对应的用户记录

		System.out.println("从数据库中获取 username: " + username + " 所对应的用户信息.");

		//4. 若用户不存在, 则可以抛出 UnknownAccountException 异常

		if("unknown".equals(username)){

			throw new UnknownAccountException("用户不存在!");

		}

		//5. 根据用户信息的情况, 决定是否需要抛出其他的 AuthenticationException 异常.

		if("monster".equals(username)){

			throw new LockedAccountException("用户被锁定");

		}

		//6. 根据用户的情况, 来构建 AuthenticationInfo 对象并返回. 通常使用的实现类为: SimpleAuthenticationInfo

		//以下信息是从数据库中获取的.

		//1). principal: 认证的实体信息. 可以是 username, 也可以是数据表对应的用户的实体类对象.

		Object principal = username;

		//2). credentials: 密码.

		Object credentials ="123";

		//3). realmName: 当前 realm 对象的 name. 调用父类的 getName() 方法即可

		String realmName = getName();

		SimpleAuthenticationInfo info = null; //new SimpleAuthenticationInfo(principal, credentials, realmName);

		info = new SimpleAuthenticationInfo(principal, credentials,  realmName);

		return info;

	}

}
list.jsp
<%@ page language="java" contentType="text/html; charset=ISO-8859-1"

    pageEncoding="ISO-8859-1"%>

<!DOCTYPE html PUBLIC "-//W3C//DTD HTML 4.01 Transitional//EN" "http://www.w3.org/TR/html4/loose.dtd">

<html>

<head>

<meta http-equiv="Content-Type" content="text/html; charset=ISO-8859-1">

<title>Insert title here</title>

</head>

<body>

	<h4>hello world</h4>

	<a href="shiro/logout">注销</a>

</body>

</html>
login.jsp
<%@ page language="java" contentType="text/html; charset=ISO-8859-1"

    pageEncoding="ISO-8859-1"%>

<!DOCTYPE html PUBLIC "-//W3C//DTD HTML 4.01 Transitional//EN" "http://www.w3.org/TR/html4/loose.dtd">

<html>

<head>

<meta http-equiv="Content-Type" content="text/html; charset=ISO-8859-1">

<title>Insert title here</title>

</head>

<body>

	<h4>Login Page</h4>

	<form action="shiro/login" method="POST">

		username: <input type="text" name="username"/>

		<br><br>

		password: <input type="password" name="password"/>

		<br><br>

		<input type="submit" value="Submit"/>

	</form>

</body>

</html>
第二章加密的源码可以用这个包
http://pan.baidu.com/s/1bp0JRaB
Shiro SpringMVC 非maven HelloWorld的更多相关文章
- Eclipse下创建Spring MVC web程序--非maven版
首先, 安装eclipse和tomcat, 这里我下载的是tomcat9.0版本64位免安装的:地址https://tomcat.apache.org/download-90.cgi 免安装的如何启动 ...
- 使用IDEA创建一个SSM工程(非maven)
说在前面的话 直到现在从Eclipse向IDEA转的人越来越多,但是IDEA的项目创建让人摸不清头脑,因此这里我创建一个非maven的ssm工程,供大家练练手,进一步的了解IDEA在项目中的使用. 创 ...
- SSM Spring+SpringMVC+mybatis+maven+mysql环境搭建
SSM Spring+SpringMVC+mybatis+maven环境搭建 1.首先右键点击项目区空白处,选择new->other..在弹出框中输入maven,选择Maven Project. ...
- 将Myeclipse非maven项目,导入到IDEA
# 将Myeclipse非maven项目,导入到IDEA 1. 打开原项目,复制“.classpath”文件路径,在IDEA中打开项目时,选此文件路径 2. 进入项目转换界面,默认一步步完成 3. 导 ...
- IntelliJ IDEA使用心得之非Maven项目篇
今天和大家分享下非Maven项目在IDEA中的配置方法,由于非Maven项目的配置方法基本相同,所以此篇只对不同点进行说明. 1.声明依赖库 我们可以使用库的方式来添加项目依赖,这是一个非常好的实践. ...
- Maven– HelloWorld实例
Maven– HelloWorld实例 maven安装好后,可以通过HelloWorld项目来体验一下maven是如何构建项目的.Maven项目的核心是pom.xml(就像Ant的build.xml一 ...
- Spring+SpringMVC+MyBatis+Maven框架整合
本文记录了Spring+SpringMVC+MyBatis+Maven框架整合的记录,主要记录以下几点 一.Maven需要引入的jar包 二.Spring与SpringMVC的配置分离 三.Sprin ...
- 非maven项目 idea project structure
原文链接:https://www.cnblogs.com/jajian/p/8081640.html 最近接手非maven项目,需要熟悉idea的project structure,以解决出现的环境报 ...
- idea-----Intellij IDEA配置tomcat(非maven项目)
Intellij IDEA配置tomcat(非maven项目) 引用: https://blog.csdn.net/springlovejava/article/details/78570241 ID ...
随机推荐
- RobotFramework自动化测试框架-移动手机自动化测试Click Element At Coordinates关键字的使用
Click Element At Coordinates关键字通过一个具体的坐标点,来模拟点击一个Element,该关键字接收两个参数[ coordinate_X | coordinate_Y ]. ...
- 将 C# 枚举反序列化为 JSON 字符串 基础理论
该转换过程需要引用 Newtonsoft.JSON,这其中的转换过程还是蛮有意思的. 一.定义枚举 /// <summary> /// 托寄物品枚举 /// </summary> ...
- mac 通过brew安装php70 +php-fpm+ phalcon3.0.3
安装php7.0.15 brew install homebrew/php/php70 brew install homebrew/php/php70-mcrypt brew install home ...
- Anroid四大组件service之本地服务
服务是Android四大组件之一,与Activity一样,代表可执行程序.但Service不像Activity有可操作的用户界面,它是一直在后台运行.用通俗易懂点的话来说: 如果某个应用要在运行时向用 ...
- 阿里JAVA开发手册零度的思考理解(一)
转载请注明原创出处,谢谢! 缘由 阿里JAVA开发手册已经发表有很长时间了,值得认真研究思考推广 阿里官方的Java代码规范标准,这份开发手册不仅规范了一些开发细节,也提出了很多工程开发的哲学,值得好 ...
- 使用ftp软件上传下载php文件时换行丢失bug(全部变为一行)
文章来源:http://www.piaoyi.org/computer/ftp-php-r-n-bug.html 正 文: 在使用ftp软件上传下载php源文件时,我们偶尔会发现在本地windows下 ...
- 实验测试之------创建DBlink,查询远端的yang用户下的abcdedfa表,创建同义词
--测试环境,20远端,30本地: --准备1,20远端建立表的同义词,用户信息: 1.11 ---------------------------------------------------准备 ...
- json_encode()中文不转码
php使用json_encode()把数组转换为json的时候,总会把中文进行转码,转码后从json数据上我们无法看出其中的中文文字.php5.4以后,当json_encode()的第二个参数赋值为J ...
- expected single matching bean but found 2
org.springframework.beans.factory.UnsatisfiedDependencyException: Error creating bean with name 'acc ...
- 直方图均衡化C++实现
直方图均衡化在图像增强方面有着很重要的应用.一些拍摄得到的图片,我们从其直方图可以看出,它的分布是集中于某些灰度区间,这导致人在视觉上感觉这张图的对比度不高.所以,对于这类图像,我们可以通过直方图均衡 ...