
iOS-联系人应用(一)
环境:xcode6,iphone 4s simulator with iOS8.0
一、功能界面介绍
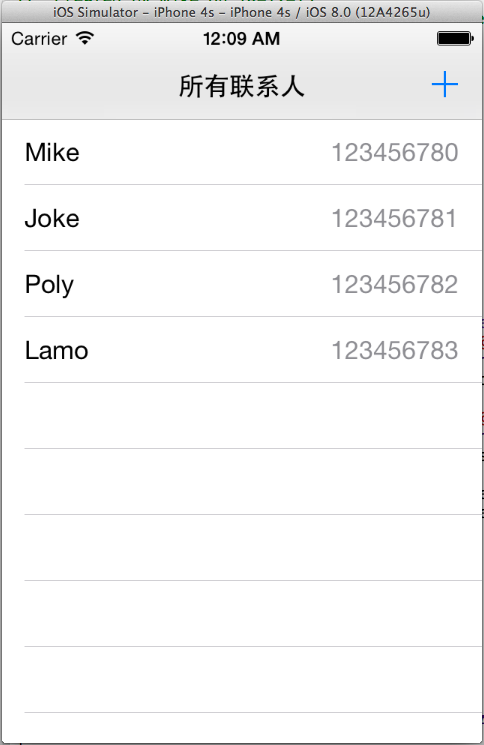
1.1 应用启动进入联系人列表页面,数据为模拟数据,来源与一个plist文件:
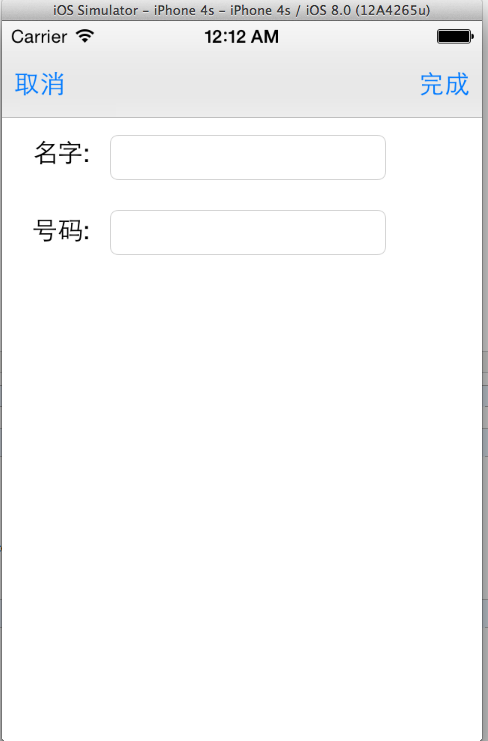
1.2 点击右上角当+按钮时,进入添加页面,页面跳转采用UINavigationController,该页面上左上角当取消按钮直接导航至起始页面,完成则添加数据至表格:
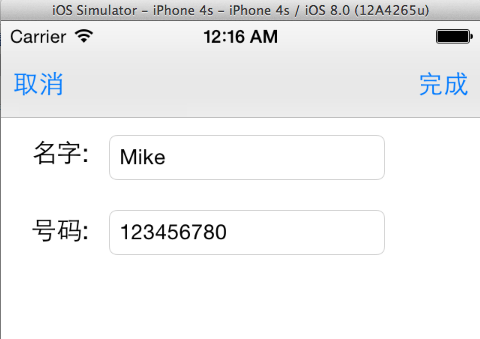
1.3 当点击一行时,把数据设置至添加页面,用户可编辑(后期可优化为点击一行进入详情页面,再详情页面点击编辑再进入编辑模式):
二、功能实现
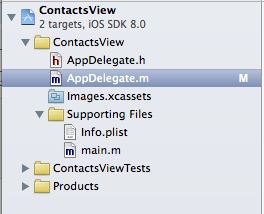
2.1 首先建立一个Empty Application,建立完成后生成文件如下:
1. 再新建一个主view,用于应用加载时显示:选择cocoa touch class,命名为RootViewController,父类为UIViewController,勾选also create xib file。
说明:可选择生产的xib,在右边面板属性的第一个选项取消use auto layout关闭自动调整,再选择第四个选项卡设置size属性配置显示尺寸。
2.往界面中拖入一个tableview,xy设置0,大小设置于屏幕大小一致,打开双屏模式(右上角工具栏第二个),按住ctrl, 选择刚才的tableview拖入
RootViewController.h文件中,使得控制器拥有该tableview以便于控制:
//

//  RootViewController.h

//  ContactsView

//

//  Created by Mike on 14-12-14.

//  Copyright (c) 2014年 Mike. All rights reserved.

//

#import <UIKit/UIKit.h>

@interface RootViewController : UIViewController

@property (weak, nonatomic) IBOutlet UITableView *tableView;

@end
类似方法创建一个用于用户添加和编辑的界面 PersonInputViewController
3. 修改AppDelegate.m,设置应用窗口根控制器为 UINavigationController:
//

//  AppDelegate.m

//  ContactsWithInput

//

//  Created by Mike on 14-12-13.

//  Copyright (c) 2014年 Mike. All rights reserved.

//

#import "AppDelegate.h"

#import "RootViewController.h"

@interface AppDelegate ()

@end

@implementation AppDelegate

- (BOOL)application:(UIApplication *)application didFinishLaunchingWithOptions:(NSDictionary *)launchOptions {

    self.window = [[UIWindow alloc] initWithFrame:[[UIScreen mainScreen] bounds]];

    RootViewController *rootController = [[RootViewController alloc] init];

    UINavigationController *navController = [[UINavigationController alloc] initWithRootViewController:rootController]; //设置rootviewcontroller为第一个控制器

    //set navigation style

    navController.navigationBar.backgroundColor = [UIColor grayColor];

    self.window.rootViewController = navController;

    [self.window makeKeyAndVisible];

    return YES;

}

......

@end
4. 修改RootViewController.m,实现tableview数据源protocol和用于编辑的delegate:
实现 - (NSInteger)tableView:(UITableView *)tableView numberOfRowsInSection:(NSInteger)section 用于告诉tableview总数据有多少航
实现 - (UITableViewCell*) tableView:(UITableView *)tableView cellForRowAtIndexPath:(NSIndexPath *)indexPath用户返回每行cell数据
//

//  RootViewController.m

//  ContactsWithInput

//

//  Created by Mike on 14-12-13.

//  Copyright (c) 2014年 Mike. All rights reserved.

//

#import "RootViewController.h"

#import "PersonInputViewController.h"

#import "Person.h"

#import "PersonService.h"

@interface RootViewController () <UITableViewDataSource, UITableViewDelegate, UIAlertViewDelegate>

{

    PersonService *_personService;

}

@end

@implementation RootViewController

- (void)viewDidLoad {

    [super viewDidLoad];

    UINavigationItem *navItem = self.navigationItem;

    //set navigation title

    navItem.title = @"所有联系人";

    _personService = [[PersonService alloc] init];

    //listen add btn

    UIBarButtonItem *addBtn = [[UIBarButtonItem alloc]

                               initWithBarButtonSystemItem:UIBarButtonSystemItemAdd target:self action:@selector(addPerson)];

    navItem.rightBarButtonItem = addBtn;

}

#pragma mark - 添加联系人

- (void)addPerson{

    //goto person input view

    PersonInputViewController *piController = [[PersonInputViewController alloc] init];

    piController.personService = _personService;

    piController.tableView = _tableView;

    [self.navigationController pushViewController:piController animated:YES];

}

- (NSInteger)tableView:(UITableView *)tableView numberOfRowsInSection:(NSInteger)section{

    return _personService.persons.count;

}

- (UITableViewCell*) tableView:(UITableView *)tableView cellForRowAtIndexPath:(NSIndexPath *)indexPath {

    static NSString *identifier = @"ID";

    UITableViewCell *cell = [tableView dequeueReusableCellWithIdentifier:identifier];

    if (cell == nil) {

        cell = [[UITableViewCell alloc] initWithStyle:UITableViewCellStyleValue1 reuseIdentifier:identifier];

    }

    Person *p = _personService.persons[indexPath.row];

    cell.textLabel.text = p.name;

    cell.detailTextLabel.text = p.phone;

    return cell;

}

#pragma mark - 点击行进入编辑模式(需要优化为先进入详情页面,再提供按钮编辑)

- (void)tableView:(UITableView *)tableView didSelectRowAtIndexPath:(NSIndexPath *)indexPath {

    Person *p = [_personService.persons objectAtIndex:indexPath.row];

    //goto person input view

    PersonInputViewController *piController = [[PersonInputViewController alloc] init];

    piController.personService = _personService;

    piController.tableView = _tableView;

    piController.person = p;

    [self.navigationController pushViewController:piController animated:YES];

}

#pragma make - 提交tableview编辑操作

- (void)tableView:(UITableView *)tableView commitEditingStyle:(UITableViewCellEditingStyle)editingStyle forRowAtIndexPath:(NSIndexPath *)indexPath {

    if(editingStyle != UITableViewCellEditingStyleDelete) {

        return;

    }

    int row = indexPath.row;

    Person *p = _personService.persons[row];

    NSString *msg = [NSString stringWithFormat:@"%@%@%@",@"确定要删除 \"", p.name, @"\" 吗?"];

    UIAlertView *alert = [[UIAlertView alloc] initWithTitle:@"删除联系人"

                                                    message:msg delegate:self cancelButtonTitle:@"删除" otherButtonTitles:@"取消", nil];

    alert.tag = row; // 记录所需要删除的行号

    [alert show];

}

#pragma mark - 根据删除提示执行操作

-(void)alertView:(UIAlertView *)alertView clickedButtonAtIndex:(NSInteger)buttonIndex {

    //tableview退出编辑模式

    _tableView.editing = NO;

    if(buttonIndex != ) {

        return ;

    }

    int row = alertView.tag;

    //删除源数据

    [_personService.persons removeObjectAtIndex:row];

    NSIndexPath *delIdx = [NSIndexPath indexPathForItem:row inSection:];

    [_tableView deleteRowsAtIndexPaths:@[delIdx] withRowAnimation:UITableViewRowAnimationTop];

}

@end
数据来源由一个PersonService管理,用于加载数据,定义如下:
//

//  PersonService.h

//  ContactsWithEdit

//

//  Created by Mike on 14-12-11.

//  Copyright (c) 2014年 Mike. All rights reserved.

//

#import <Foundation/Foundation.h>

#import <UIKit/UIKit.h>

@interface PersonService : NSObject

@property(atomic, strong) NSMutableArray *persons;

@end
//

//  PersonService.m

//  ContactsWithEdit

//

//  Created by Mike on 14-12-11.

//  Copyright (c) 2014年 Mike. All rights reserved.

//

#import "PersonService.h"

#import "Person.h"

@interface PersonService ()

{

}

@end

@implementation PersonService

-(id)init {

    self = [super init];

    if(self) {

        _persons = [NSMutableArray array];

        NSBundle *bundle = [NSBundle mainBundle];

        NSArray *perResource = [NSMutableArray arrayWithContentsOfFile:[bundle pathForResource:@"person" ofType:@"plist"]];

        for(NSDictionary *pDic in perResource) {

            Person *p = [Person personWithName:pDic[@"name"] phone:pDic[@"phone"]];

            [_persons addObject:p];

        }

    }

    return self;

}

@end
2.2 用户添加和编辑界面设计
1. 界面很简单,两个label和两个text input,如下图:
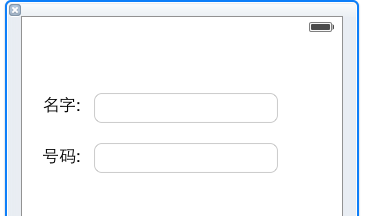
把这两个text input连线到 PersonInputViewController.h,由于添加或者编辑后需要刷新数据源和表格,所以需要personService、tableview和person:
//

//  PersonInputViewController.h

//  ContactsWithInput

//

//  Created by Mike on 14-12-13.

//  Copyright (c) 2014年 Mike. All rights reserved.

//

#import <UIKit/UIKit.h>

#import "PersonService.h"

#import "Person.h"

@interface PersonInputViewController : UIViewController

@property(nonatomic, strong)PersonService *personService;

@property (weak, nonatomic)UITableView *tableView; //refresh tableview after insert

@property(strong, nonatomic)Person *person; //obj for edit

@property (weak, nonatomic) IBOutlet UITextField *nameField; // 名字输入框

@property (weak, nonatomic) IBOutlet UITextField *phoneField; // 号码输入框

@end
PersonInputViewController 初始化时创建两个按钮《取消》和《完成》,并设置监听方法,分别设置在左边和右边。当person不为空的时候,代表进入编辑模式:
//

//  PersonInputViewController.m

//  ContactsWithInput

//

//  Created by Mike on 14-12-13.

//  Copyright (c) 2014年 Mike. All rights reserved.

//

#import "PersonInputViewController.h"

@interface PersonInputViewController ()

@end

@implementation PersonInputViewController

- (void)viewDidLoad {

    [super viewDidLoad];

    //set bar button

    UIBarButtonItem *cancelBtn = [[UIBarButtonItem alloc]

                                  initWithTitle:@"取消" style:UIBarButtonItemStylePlain target:self action:@selector(backRootView)];

    UIBarButtonItem *saveBtn = [[UIBarButtonItem alloc]

                                  initWithTitle:@"完成" style:UIBarButtonItemStylePlain target:self action:@selector(savePerson)];

    self.navigationItem.leftBarButtonItem = cancelBtn;

    self.navigationItem.rightBarButtonItem = saveBtn;

    //setter data for edit

    if(_person) {

        _nameField.text = _person.name;

        _phoneField.text = _person.phone;

    }

}

- (void)backRootView {

    [self.navigationController popViewControllerAnimated:YES]; //返回上一个view

}

- (void)savePerson {

    NSString *name = _nameField.text;

    NSString *phone = _phoneField.text;

    //remove white space

    name = [name stringByTrimmingCharactersInSet:[NSCharacterSet whitespaceCharacterSet]];

    phone = [phone stringByTrimmingCharactersInSet:[NSCharacterSet whitespaceCharacterSet]];

    if(![name isEqualToString:@""] || ![phone isEqualToString:@""]) {

        if(_person) { //edit

            _person.name = name;

            _person.phone = phone;

            //refresh tableview

            NSIndexPath *editIdx = [NSIndexPath indexPathForRow:[_personService.persons indexOfObject:_person] inSection:];

            [_tableView reloadRowsAtIndexPaths:@[editIdx] withRowAnimation:UITableViewRowAnimationMiddle];

        }else {

            Person *p = [Person personWithName:name phone:phone];

            [_personService.persons addObject:p];

            //refresh tableview

            NSIndexPath *addIdx = [NSIndexPath indexPathForRow:_personService.persons.count- inSection:];

            [_tableView insertRowsAtIndexPaths:@[addIdx] withRowAnimation:UITableViewRowAnimationRight];

        }

    }

    [self backRootView];

}

@end
最后是一个实体类Person的定义:
//

//  Person.h

//  ContactsWithEdit

//

//  Created by Mike on 14-12-10.

//  Copyright (c) 2014年 Mike. All rights reserved.

//

#import <Foundation/Foundation.h>

@interface Person : NSObject

+(Person*) personWithName:(NSString *)name phone:(NSString *) phone;

@property(nonatomic, strong) NSString* name;

@property(nonatomic, strong) NSString* phone;

@end
//

//  Person.m

//  ContactsWithEdit

//

//  Created by Mike on 14-12-10.

//  Copyright (c) 2014年 Mike. All rights reserved.

//

#import "Person.h"

@implementation Person

+(Person*) personWithName:(NSString *)name phone:(NSString *) phone

{

    Person *p = [[Person alloc] init];

    p.name = name;

    p.phone = phone;

    return p;

}

@end
工程下载地址:http://files.cnblogs.com/mikevictor07/ContactsWithInput.zip
iOS-联系人应用(一)的更多相关文章
- ios 8 联系人ABPeoplePickerNavigationController
一. ios 联系人ABPeoplePickerNavigationControllerDelegate方法,新添加下面两个联系人选中方法,适配iOS8需要实现 // Called after a p ...
- React Native之获取通讯录信息并实现类通讯录列表(ios android)
React Native之获取通讯录信息并实现类通讯录列表(ios android) 一,需求分析 1,获取通讯录信息,筛选出通讯录里有多少好友在使用某个应用. 2,获取通讯录信息,实现类通讯录,可拨 ...
- iOS访问通讯录开发-读取联系人信息
读取通信录中的联系人一般的过程是先查找联系人记录,然后再访问记录的属性,属性又可以分为单值属性和多值属性.通过下面例子介绍联系人的查询,以及单值属性和多值属性的访问,还有读取联系人中的图片数据. 本案 ...
- iOS 通讯录-获取联系人属性
内容均来自关东升老师的ios开发指南 上一篇写了联系人框架的一些必须知道的知识 如今写一下读取联系人数据相关操作 要读取通讯录数据库 须要 创建通讯录对象 查询获取数据(全部或者部分) 获取通讯录某一 ...
- iOS中获取本地通讯录联系人以及汉字首字母排序
iOS中获取手机通讯录中的联系人信息: /*** 加载本地联系人*/ - (void)loadLocalContacts { //新建一个通讯录类 ABAddressBookRef addressBo ...
- 越狱的 ios 如何 获取 读取 提取 手机上的 短信 通话记录 联系人 等信息
http://willson.sinaapp.com/2011/12/iphone 获取短信脚本.html Iphone获取短信脚本http://bbs.9ria.com/thread-209349 ...
- iOS 获得通讯录中联系人的所有属性--b
ABAddressBookRef addressBook = ABAddressBookCreate(); CFArrayRef results = ABAddressBookCopyArrayOfA ...
- iOS 修改通讯录联系人地址(address)崩溃原因分析
目前项目中需要对iOS系统通讯录进行读取,修改操作.在进行对地址修改的时候,出现了一个奇怪现象: ● 如果contact没有address字段(或者一个全新的contact),对它的address进行 ...
- iOS获取通讯录所有联系人信息
以下是2种方式: 第一种方法: GetAddressBook.h #import <Foundation/Foundation.h> @interface GetAddressBook : ...
- iOS精美过度动画、视频会议、朋友圈、联系人检索、自定义聊天界面等源码
iOS精选源码 iOS 精美过度动画源码 iOS简易聊天页面以及容联云IM自定义聊天页面的实现思路 自定义cell的列表视图实现:置顶.拖拽.多选.删除 SSSearcher仿微信搜索联系人,高亮搜索 ...
随机推荐
- 循环执行sql语句
DECLARE --声明变量 SQL_ALLTABLES LONG; SQL_INSERT LONG; TYPE THE_CURSOR_TYPE IS REF CURSOR; --定义引用游标的数据类 ...
- C++之const限定符
作者:tongqingliu 转载请注明出处: C++之const限定符 const初始化 const的特点: 用const加以限定的变量,无法改变. 由于const对象定义之后就无法改变,所以必须对 ...
- Oracle Database Transaction Isolation Levels 事务隔离级别
Overview of Oracle Database Transaction Isolation Levels Oracle 数据库提供如下事务隔离级别: 已提交读隔离级别 可串行化隔离级别 只读隔 ...
- top命令总结
top命令主要用来观察和收集运行在系统上的进程的一些有用信息.ps只是一个快照,是ps命令执行的那一瞬间的系统中进程的快照.top则可以用于持续观察. 第一步,在命令行键入top,回车进入top管理界 ...
- [Unity] A* pathfinding project integrated with influence map
简介 最近一阶段重温了一些关于游戏人工智能方面的书籍. 加强了对influence map的认知.想要亲自动手实现一下. 正如文章标题所示,这篇文章讲的是:如何将influence map的机制融入到 ...
- javascript封装的函数
/*获取一个指定长度随机数*/ csdn.random = function (len) { if (!len) len = 5; var r = Math.random().toString(); ...
- laydate时间插件更换皮肤
<script> ;!function(){ laydate.skin('molv'); laydate({ elem: '#demo' }) }();</script>
- php.ini配置文件中的session配置
session.save_path = "D:\phpEnv\cachefiles" 这里的路径就是可以自己定义的存放session文件信息的目录,默认是'\tmp'(根目录下的t ...
- 遇到报ClassNotFoundException: Didn't find class "...Activity" on path: DexPathList
有一个工程,本来运行是正常的,我想把它移植到另一台PC上,结果报: java.lang.RuntimeException: Unable to instantiate activity Compone ...
- java的logcat的简单使用
android.util.Log常用的方法有以下5个:Log.v() Log.d() Log.i() Log.w() 以及 Log.e() .根据首字母对应VERBOSE,DEBUG,INFO, WA ...