Python初学——窗口视窗Tkinter
此篇文章是跟着沫凡小哥的视频学习的,附上学习网址:https://morvanzhou.github.io/tutorials/python-basic/
什么是 tkinter 窗口
1.1 什么是 Tkinter
Python自带的可编辑的GUI界面,是一个图像窗口。
Tkinter是使用 python 进行窗口视窗设计的模块。简单的构造,多平台,多系统的兼容性, 能让它成为让你快速入门定制窗口文件的好助手。它在 python 窗口视窗模块中是一款简单型的。所以用来入门,熟悉窗口视窗的使用,非常有必要。
tkinter 的窗口部件
2.1 Label & Button 标签和按钮
窗口主体框架
每一个tkinter应用的主体框架都可以包含下面这部分,定义window窗口和window的一些属性,然后书写窗口内容,最后执行window.mainloop让窗口活起来。
import tkinter as tk

window = tk.Tk()

window.title('my window')

window.geometry('300x100')

# 这里是窗口的内容

window.mainloop()
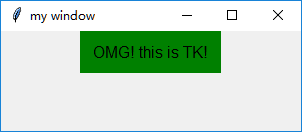
首先建立一个用来描述的标签tk.Label(注意对象的首字母一般是大写),示例代码如下所示:
l = tk.Label(window,

    text='OMG! this is TK!',    # 标签的文字

    bg='green',     # 背景颜色

    font=('Arial', 12),     # 字体和字体大小

    width=15, height=2)  # 标签长宽

l.pack()    # 固定窗口位置
运行结果如图所示:
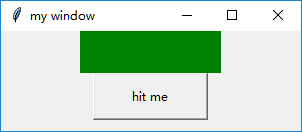
我们也可以通过变量的形式控制标签的显示,这时我们引入按钮 tk.Button 的概念,每点一次按钮,标签变化一次。 用以下内容替换上面的标签. 并把需要变化的文字存成变量 var:
var = tk.StringVar()    # 这时文字变量储存器

l = tk.Label(window,

    textvariable=var,   # 使用 textvariable 替换 text, 因为这个可以变化

    bg='green', font=('Arial', 12), width=15, height=2)

l.pack()
接着做按钮tk.Button:
b = tk.Button(window,

    text='hit me',      # 显示在按钮上的文字

    width=15, height=2,

    command=hit_me)     # 点击按钮式执行的命令

b.pack()    # 按钮位置
hit_me函数如下:
on_hit = False  # 默认初始状态为 False

def hit_me():

    global on_hit

    if on_hit == False:     # 从 False 状态变成 True 状态

        on_hit = True

        var.set('you hit me')   # 设置标签的文字为 'you hit me'

    else:       # 从 True 状态变成 False 状态

        on_hit = False

        var.set('') # 设置文字为空
运行结果如下所示:
没有点击动作时:
点击第一次:

点击第二次:
完整代码:
import tkinter as tk

window=tk.Tk()

window.title('my window')

window.geometry('300x100')

var=tk.StringVar()

l=tk.Label(window,textvariable=var,bg='green',font=('Arial',12),width=15,

           height=2)

l.pack()

on_hit=False

def hit_me():

    global on_hit

    if on_hit==False:

        on_hit=True

        var.set('you hit me')

    else:

        on_hit=False

        var.set('')

b=tk.Button(window,text='hit me',width=15,

            height=2,command=hit_me)

b.pack()

window.mainloop()
2.2 Entry & Text 输入, 文本框
在定义了窗口的基础上,首先定义一个Entry,代码如下所示:
e = tk.Entry(window,show=None)

e.pack()
注意这里的show,可以自定义显示你想要在Entry中显示的字符,例如像输入密码时,可令show=‘*’
本节实现的例子功能为,如下所示的一个窗口,从上至下分别为定义的Entry、Button、Button和Text。两个Button分别命名为insert point和insert end,获取Entry中输入的内容并且分别在光标位置、末尾插入,内容显示在Text中。
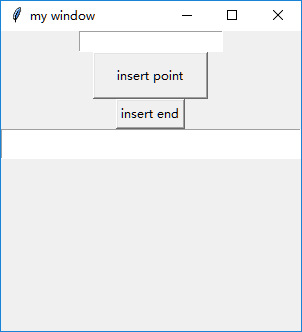
Button的定义如下所示:
b1 = tk.Button(window,text='insert point',width=15,

            height=2,command=insert_point)

b1.pack()

b2 = tk.Button(window,text='insert end',

               command=insert_end)
函数的定义如下所示:
def insert_point():

    var = e.get()

    t.insert('insert',var)

def insert_end():

    var = e.get()

    t.insert('end',var)
完整代码如下:
import tkinter as tk

window = tk.Tk()

window.title('my window')

window.geometry('300x300')

e = tk.Entry(window,show=None)

e.pack()

def insert_point():

    var = e.get()

    t.insert('insert',var)

def insert_end():

    var = e.get()

    t.insert('end',var)

b1 = tk.Button(window,text='insert point',width=15,

            height=2,command=insert_point)

b1.pack()

b2 = tk.Button(window,text='insert end',

               command=insert_end)

b2.pack()

t = tk.Text(window,height=2)

t.pack()

window.mainloop()
运行结果如下所示,首先在Entry中输入111111,点击按钮1,如下:

选择某一点作为插入位置,再在Entry中输入2,点击按钮1
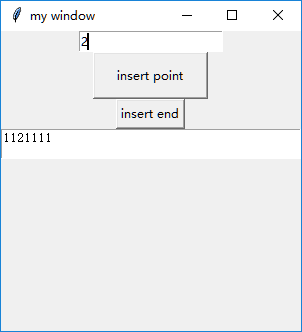
在Entry中输入3,点击按钮2

此外,insert还能实现具体位置的内容插入,例如将inser_end函数更改如下:
def insert_end():

    var = e.get()

    t.insert(2.2,var)
则insert_end实现在Text的2行2列出插入内容,运行结果如下所示:

2.3 Listbox 列表部件
本节例子实现功能为:如下所示,从上到下分别为Label、Button和Listbox,Button实现将Listbox中当前光标选中的内容显示在Label中。
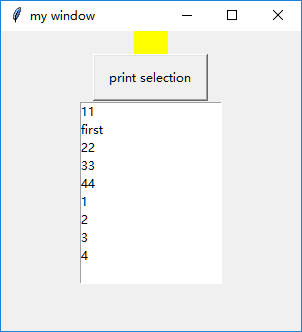
在定义好窗口的基础上首先定义Label,设置底色为黄色,并且要将文本内容定义为变量,代码如下:
var1=tk.StringVar()

l=tk.Label(window,bg='yellow',width=4,textvariable=var1)

l.pack()
接着定义Button,命名为‘print selection’,并定义command的函数,如下所示:
def print_selection():

    value=lb.get(lb.curselection())

    var1.set(value)

b1 = tk.Button(window, text='print selection', width=15,

              height=2, command=print_selection)

b1.pack()
最后定义Listbox,如下所示实现了Listbox中内容的设置、插入、删除等。
var2=tk.StringVar()

var2.set((11,22,33,44))

lb=tk.Listbox(window,listvariable=var2)

list_items=[1,2,3,4]

for item in list_items:

    lb.insert('end',item)

lb.insert(1,'first')

lb.insert(2,'second')

lb.delete(2)

lb.pack()
完整代码如下所示:
import tkinter as tk

window = tk.Tk()

window.title('my window')

window.geometry('300x300')

var1=tk.StringVar()

l=tk.Label(window,bg='yellow',width=4,textvariable=var1)

l.pack()

def print_selection():

    value=lb.get(lb.curselection())

    var1.set(value)

b1 = tk.Button(window, text='print selection', width=15,

              height=2, command=print_selection)

b1.pack()

var2=tk.StringVar()

var2.set((11,22,33,44))

lb=tk.Listbox(window,listvariable=var2)

list_items=[1,2,3,4]

for item in list_items:

    lb.insert('end',item)

lb.insert(1,'first')

lb.insert(2,'second')

lb.delete(2)

lb.pack()

window.mainloop()
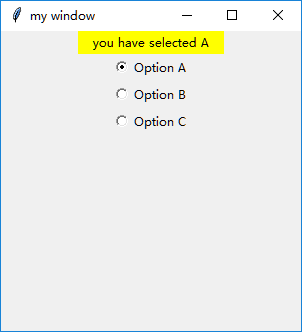
2.4 Radiobutton 选择按钮
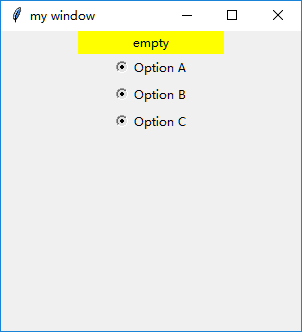
如图所示,Radiobutton即为上图中可选择的按钮,本节实现选中不同的Radiobutton时打印出相应的内容。
首先定义底色为黄色的Label,代码见完整代码。
接着要定义三个Radiobutton:
r1=tk.Radiobutton(window,text='Option A',

                  variable=var,value='A',

                  command=print_selection)

r1.pack()
Radiobutton放在window上,命名为‘Option A’,其中var=tk.StringVar(),接着令按钮的variable等于var,并且赋值为‘A’。
print_selection函数的定义如下:
def print_selection():

    l.config(text='you have selected '+var.get())
config能对所有的参数进行更改,在函数定义中选择text属性进行更改。
完整代码如下:
import tkinter as tk

window = tk.Tk()

window.title('my window')

window.geometry('300x300')

var=tk.StringVar()

l=tk.Label(window,bg='yellow',width=20,text='empty')

l.pack()

def print_selection():

    l.config(text='you have selected '+var.get())

r1=tk.Radiobutton(window,text='Option A',

                  variable=var,value='A',

                  command=print_selection)

r1.pack()

r2=tk.Radiobutton(window,text='Option B',

                  variable=var,value='B',

                  command=print_selection)

r2.pack()

r3=tk.Radiobutton(window,text='Option C',

                  variable=var,value='C',

                  command=print_selection)

r3.pack()

window.mainloop()
运行结果如下所示,当未选中时,Label内容显示为empty,当选中某一个Radiobutton时,则Label中显示相应的内容
2.5 Scale 尺度
可以被拉动的一个条,Scale返回的是一个数字。如下所示,当拉动时会在Label上显示具体的数字。

完整代码如下:
import tkinter as tk

window = tk.Tk()

window.title('my window')

window.geometry('300x300')

l=tk.Label(window,bg='yellow',width=20,text='empty')

l.pack()

def print_selection(v):

    l.config(text='you have selected '+v)

s=tk.Scale(window,label='try me',from_=5,to=11,orient=tk.HORIZONTAL,

           length=200,showvalue=0,tickinterval=3,resolution=0.01,command=print_selection)

s.pack()

window.mainloop()
定义Scale的属性时,名字为label,from to为取值范围,from_是为了区分python中的from,Scale还有横向和竖向属性,注意为tk.横向/竖向。length为显示的长度,不同于Label中的width,width的单位是字符,和length的单位是像素。showvalue即是否显示所选中的数字,取值为0时不显示,为1时显示。显示的标签单位长度为tickinterval,即显示出的数字的间隔,取值为3时,即显示5,8,11。resolution为要保留的小数个数。
在Scale中所定义的command功能是有默认传入值的,该传入值即为Scale标签当前标注的值。所以在定义print_selection函数时需要定义一个参数用于表示该传入值。
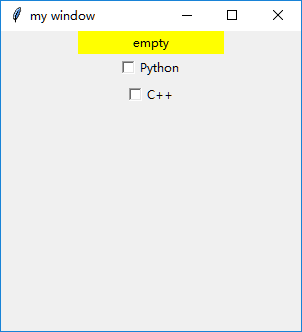
2.6 Checkbutton 勾选项
与Radiobutton类似,但是Radiobutton选中一个后其他默认为不选中,但是Checkbutton类似于多选,可以选中多个。
定义两个Checkbutton,如下所示:
var1=tk.IntVar()

var2=tk.IntVar()

c1=tk.Checkbutton(window,text='Python',variable=var1,onvalue=1,offvalue=0,

                  command=print_selection)

c2=tk.Checkbutton(window,text='C++',variable=var2,onvalue=1,offvalue=0,

                  command=print_selection)

c1.pack()

c2.pack()
首先定义两个变量var1和var2,为整型。
两个Checkbutton的variable分别等于var1和var,并且选中时value为1,即onvalue=1,未选中时offvalue=0.
command的print_selection定义如下,根据var1和var2的值来进行相应的操作。
def print_selection():

    if(var1.get()==1)&(var2.get()==0):

        l.config(text='I love only Python')

    elif(var1.get()==0)&(var2.get()==1):

        l.config(text='I love only C++')

    elif(var1.get()==0)&(var2.get()==0):

        l.config(text='I do not love either')

    else:

        l.config(text='I love both')
完整代码如下所示:
import tkinter as tk

window = tk.Tk()

window.title('my window')

window.geometry('300x300')

l=tk.Label(window,bg='yellow',width=20,text='empty')

l.pack()

def print_selection():

    if(var1.get()==1)&(var2.get()==0):

        l.config(text='I love only Python')

    elif(var1.get()==0)&(var2.get()==1):

        l.config(text='I love only C++')

    elif(var1.get()==0)&(var2.get()==0):

        l.config(text='I do not love either')

    else:

        l.config(text='I love both')

var1=tk.IntVar()

var2=tk.IntVar()

c1=tk.Checkbutton(window,text='Python',variable=var1,onvalue=1,offvalue=0,

                  command=print_selection)

c2=tk.Checkbutton(window,text='C++',variable=var2,onvalue=1,offvalue=0,

                  command=print_selection)

c1.pack()

c2.pack()

window.mainloop()
运行结果如下所示:
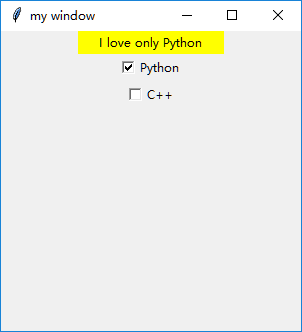
单独选中Python时:
单独选中C++时: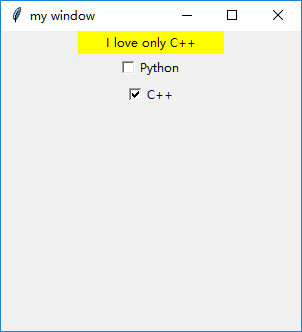
两个都选中: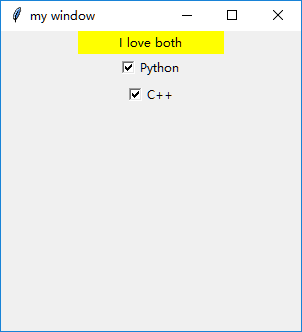
两个都不选: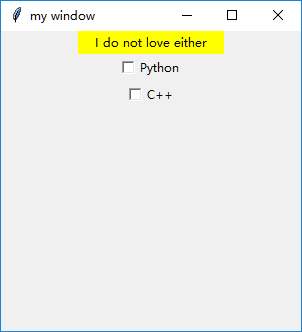
2.7 Canvas 画布
规定一片区域,可以放置图片、图形等等,并且可以把位置和形状进行改变。
import tkinter as tk

window = tk.Tk()

window.title('my window')

window.geometry('300x300')

canvas=tk.Canvas(window,bg='blue',height=150,width=200)

image_file=tk.PhotoImage(file='3.png')

image=canvas.create_image(10,10,anchor='nw',image=image_file)

x0,y0,x1,y1=90,90,120,120

line=canvas.create_line(x0,y0,x1,y1)

oval=canvas.create_oval(x0,y0,x1,y1,fill='yellow')

arc=canvas.create_arc(x0+30,y0+30,x1+30,y1+30,start=0,extent=180,fill='green')

rect=canvas.create_rectangle(100,30,100+20,30+20)

canvas.pack()

def moveit():

    canvas.move(rect,0,2)

b=tk.Button(window,text='move',command=moveit).pack()

window.mainloop()
首先定义一个Canvas。
放置一张图片,首先读取读片并存入到image_file中,接着Canvas通过create.image将图片放置到画布上。注意10,10为放置的坐标,anchor意为锚点,即锚定的位置,可选择的属性如下所示:

nw即为放置在左上角,图片最左上角的点放置的坐标应为所定义的10,10.
接着create.line从坐标为(90,90)到(120,120)绘制一条直线。
create.oval为绘制圆形,fill填充颜色。
create.arc为绘制扇形,start和extent表示该扇形从0°到180°。
create.rectangle为绘制一个正方形。
此外,定义了一个button,该按钮的作用是每点击一次,rect对象,即为所绘制的正方形下移两格,moveit函数中0表示x方向的位移为0,2为y方向上的位移变化尺度。结果如下所示。

单机move按钮,正方形的位置发生变化: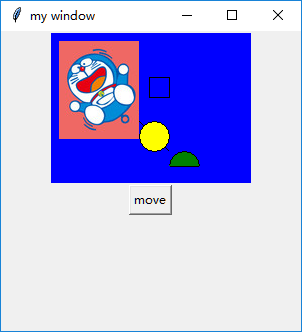
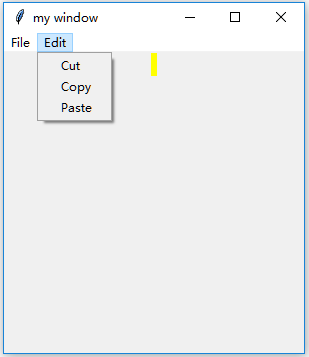
2.8 Menubar 菜单
菜单条,如下所示为本节将要完成的简单菜单条。

首先在窗口window上定义一个Menu
menubar=tk.Menu(window)
接着在menubar上创建File选项,首先同样定义一个Menu,此时的Menu是放置在menubar上的,并通过add_cascade(cascade:级联)放置在menubar上
filemenu=tk.Menu(menubar,tearoff=0)

menubar.add_cascade(label='File',menu=filemenu)
接着如上图所示,在File选项中,增加New、Open、Save,分隔线、以及Exit
filemenu.add_command(label='New',command=do_job)

filemenu.add_command(label='Open',command=do_job)

filemenu.add_command(label='Save',command=do_job)

filemenu.add_separator()

filemenu.add_command(label='Exit',command=window.quit)
同理,增加Edit选项,代码详见完整代码
接着,我们来创建File中的Submenu,如下图所示
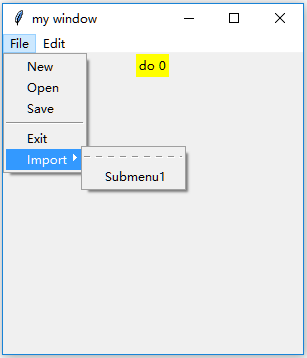
submenu=tk.Menu(filemenu)

filemenu.add_cascade(label='Import',menu=submenu,underline=0)

submenu.add_command(label='Submenu1',command=do_job)
在代码中,do_job做了一个简单的显示功能,如下所示:
counter=0

def do_job():

    global counter

    l.config(text='do '+str(counter))

    counter+=1
完整代码:
import tkinter as tk

window = tk.Tk()

window.title('my window')

window.geometry('300x300')

l=tk.Label(window,text='',bg='yellow')

l.pack()

counter=0

def do_job():

    global counter

    l.config(text='do '+str(counter))

    counter+=1

menubar=tk.Menu(window)

filemenu=tk.Menu(menubar,tearoff=0)

menubar.add_cascade(label='File',menu=filemenu)

filemenu.add_command(label='New',command=do_job)

filemenu.add_command(label='Open',command=do_job)

filemenu.add_command(label='Save',command=do_job)

filemenu.add_separator()

filemenu.add_command(label='Exit',command=window.quit)

editmenu=tk.Menu(menubar,tearoff=0)

menubar.add_cascade(label='Edit',menu=editmenu)

editmenu.add_command(label='Cut',command=do_job)

editmenu.add_command(label='Copy',command=do_job)

editmenu.add_command(label='Paste',command=do_job)

submenu=tk.Menu(filemenu)

filemenu.add_cascade(label='Import',menu=submenu,underline=0)

submenu.add_command(label='Submenu1',command=do_job)

window.config(menu=menubar)

window.mainloop()
2.9 Frame 框架
底层框架,可以在上面放各种小部件

import tkinter as tk

window = tk.Tk()

window.title('my window')

window.geometry('300x300')

tk.Label(window,text='on the window').pack()

frm=tk.Frame(window)

frm.pack()

frm_l=tk.Frame(frm,)

frm_r=tk.Frame(frm)

frm_l.pack(side='left')

frm_r.pack(side='right')

tk.Label(frm_l,text='on the frm_l1').pack()

tk.Label(frm_l,text='on the frm_l2').pack()

tk.Label(frm_r,text='on the frm_r1').pack()

window.mainloop()
首先定义一个主Frame,放在window上
接着定义了第二层的两个Frame,分别放在主Frame的左右侧
在左边的Frame上放置了两个标签,右边放了一个标签
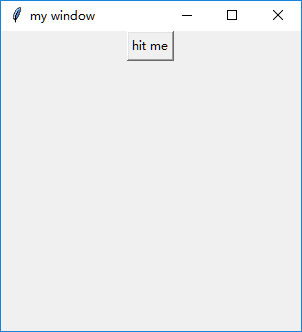
2.10 messagebox 弹窗
在window的基础上定义一个Button
tk.Button(window, text='hit me', command=hit_me).pack()
如图所示:
接着定义一个弹窗,在运行时出现错误
AttributeError: module 'tkinter' has no attribute 'messagebox'
试着加入import则可运行成功
from tkinter import messagebox
messagebox有多种功能,接下来将分别细述
(1)showinfo
tk.messagebox.showinfo(title='Hi', message='hahahaha')

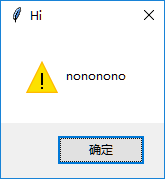
(2)showwarning
tk.messagebox.showwarning(title='Hi', message='nononono')
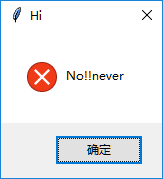
(3)showerror
tk.messagebox.showerror(title='Hi', message='No!! never')
(4)askquestion返回是字符串,即返回的是‘yes’或者‘no’,可通过print打印出来以更好的理解
print(tk.messagebox.askquestion(title='Hi', message='hahahaha')) # return 'yes' , 'no'

选择是打印出的值为‘yes’

根据return的值可进一步选择需要的操作
if return==‘yes’
(5)askyesno
返回的是True或者False
print(tk.messagebox.askyesno(title='Hi', message='hahahaha')) # return True, False
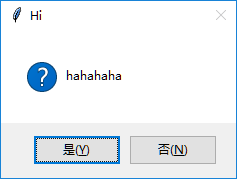
同样可根据返回的值来进一步操作。
(6)asktrycancel
print(tk.messagebox.asktrycancel(title='Hi', message='hahahaha')) # return True, False
但是不知道为什么运行时出现错误:AttributeError: module 'tkinter.messagebox' has no attribute 'asktrycancel'
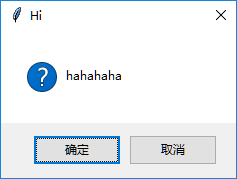
(7)askokcancel
print(tk.messagebox.askokcancel(title='Hi', message='hahahaha')) # return True, False
(8)askyesnocancel
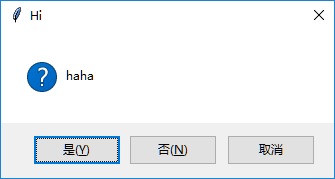
print(tk.messagebox.askyesnocancel(title="Hi", message="haha")) # return, True, False, None
完整代码:
import tkinter as tk

window = tk.Tk()

window.title('my window')

window.geometry('200x200')

def hit_me():

    #tk.messagebox.showinfo(title='Hi', message='hahahaha')

    #tk.messagebox.showwarning(title='Hi', message='nononono')

    #tk.messagebox.showerror(title='Hi', message='No!! never')

    #print(tk.messagebox.askquestion(title='Hi', message='hahahaha'))   # return 'yes' , 'no'

    #print(tk.messagebox.askyesno(title='Hi', message='hahahaha'))   # return True, False

    #print(tk.messagebox.asktrycancel(title='Hi', message='hahahaha'))   # return True, False

    #print(tk.messagebox.askokcancel(title='Hi', message='hahahaha'))   # return True, False

    print(tk.messagebox.askyesnocancel(title="Hi", message="haha"))     # return, True, False, None

tk.Button(window, text='hit me', command=hit_me).pack()

window.mainloop()
2.11 pack grid place 放置位置
(1)pack
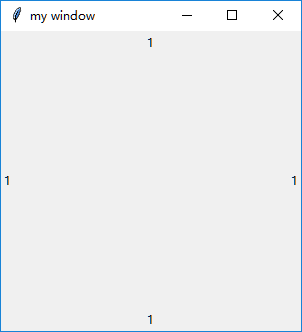
side属性来决定所放置的位置,共有top、bottom、left、right
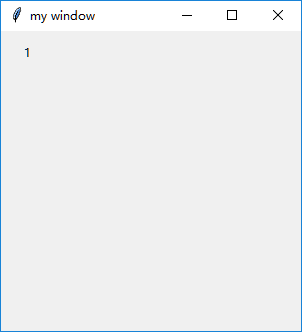
tk.Label(window,text='1').pack(side='top')
tk.Label(window,text='1').pack(side='bottom')
tk.Label(window,text='1').pack(side='left')t
tk.Label(window,text='1').pack(side='right')
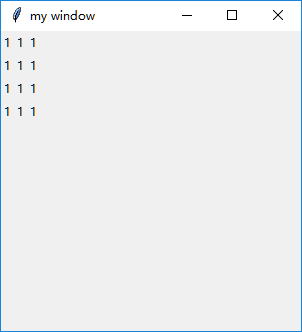
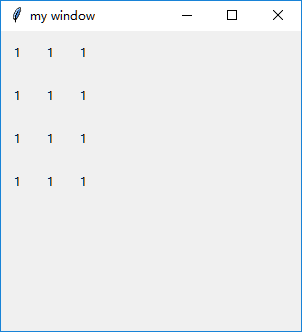
(2)grid
按照格点(方格的形式来放置)
for i in range(4):

    for j in range(3):

        tk.Label(window,text=1).grid(row=i,column=j,padx=10,pady=10)
无padx和pady时:
其中padx、pady用于填充显示,padx和pady用于设置框架的外部填充显示,ipadx和ipady用于设置框架的内部显示。
(3)place
能精确放置到某一坐标处
tk.Label(window,text=1).place(x=20,y=10,anchor='nw')
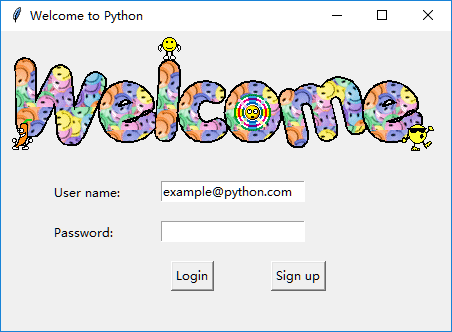
登录窗口例子
3.1 例子1 登录窗口
综合前面所学习的内容,设计如下窗口
代码如下所示:
import tkinter as tk

window = tk.Tk()

window.title('Welcome to Mofan Python')

window.geometry('450x300')

# welcome image

canvas = tk.Canvas(window, height=200, width=500)

image_file = tk.PhotoImage(file='welcome.gif')

image = canvas.create_image(0,0, anchor='nw', image=image_file)

canvas.pack(side='top')

# user information

tk.Label(window, text='User name: ').place(x=50, y= 150)

tk.Label(window, text='Password: ').place(x=50, y= 190)

var_usr_name = tk.StringVar()

var_usr_name.set('example@python.com')

entry_usr_name = tk.Entry(window, textvariable=var_usr_name)

entry_usr_name.place(x=160, y=150)

var_usr_pwd = tk.StringVar()

entry_usr_pwd = tk.Entry(window, textvariable=var_usr_pwd, show='*')

entry_usr_pwd.place(x=160, y=190)

def usr_login():

    pass

def usr_sign_up():

    pass

# login and sign up button

btn_login = tk.Button(window, text='Login', command=usr_login)

btn_login.place(x=170, y=230)

btn_sign_up = tk.Button(window, text='Sign up', command=usr_sign_up)

btn_sign_up.place(x=270, y=230)

window.mainloop()
3.2 例子1 登录窗口
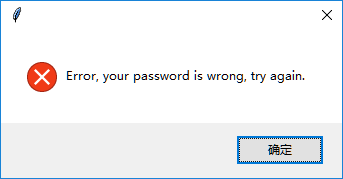
本节添加了Login的功能,代码如下:
def usr_login():

    usr_name = var_usr_name.get()

    usr_pwd = var_usr_pwd.get()

    try:

        with open('usrs_info.pickle', 'rb') as usr_file:

            usrs_info = pickle.load(usr_file)

    except FileNotFoundError:

        with open('usrs_info.pickle', 'wb') as usr_file:

            usrs_info = {'admin': 'admin'}

            pickle.dump(usrs_info, usr_file)

    if usr_name in usrs_info:

        if usr_pwd == usrs_info[usr_name]:

            tk.messagebox.showinfo(title='Welcome', message='How are you? ' + usr_name)

        else:

            tk.messagebox.showerror(message='Error, your password is wrong, try again.')

    else:

        is_sign_up = tk.messagebox.askyesno('Welcome',

                               'You have not sign up yet. Sign up today?')

        if is_sign_up:

            usr_sign_up()
首先以读二进制的方式打开并下载存储用户信息的文件,如果文件不存在,则建立该文件,并且加入了用户名为admin、密码为admin的用户。
如果用户名在用户信息文件中存在,密码输入正确时,会弹出欢迎窗口,否则则显示密码错误。
如果用户不存在,则弹出窗口询问是否要进行注册,并通过返回的True或是False的值进行注册操作。
运行结果如下所示:
输入密码错误时:
正确输入密码时: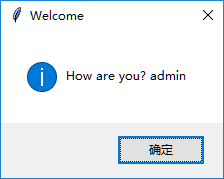
用户不存在时:
3.3 例子1 登录窗口
注册时将会弹出新窗口,如下所示:

首先定义一个新窗口
window_sign_up=tk.Toplevel(window)

window_sign_up.geometry('350x200')

window_sign_up.title('Sign up window')
定义User name、Password和Confirm password,以及三个Entry和一个Button
new_name = tk.StringVar()

new_name.set('example@python.com')

tk.Label(window_sign_up, text='User name: ').place(x=10, y= 10)

entry_new_name = tk.Entry(window_sign_up, textvariable=new_name)

entry_new_name.place(x=150, y=10)

new_pwd = tk.StringVar()

tk.Label(window_sign_up, text='Password: ').place(x=10, y=50)

entry_usr_pwd = tk.Entry(window_sign_up, textvariable=new_pwd, show='*')

entry_usr_pwd.place(x=150, y=50)

new_pwd_confirm = tk.StringVar()

tk.Label(window_sign_up, text='Confirm password: ').place(x=10, y= 90)

entry_usr_pwd_confirm = tk.Entry(window_sign_up, textvariable=new_pwd_confirm, show='*')

entry_usr_pwd_confirm.place(x=150, y=90)

btn_confirm_sign_up = tk.Button(window_sign_up, text='Sign up', command=sign_to_Mofan_Python)

btn_confirm_sign_up.place(x=150, y=130)
接着定义函数sign_to_Mofan_Python
 def sign_to_Mofan_Python():

        np = new_pwd.get()

        npf = new_pwd_confirm.get()

        nn = new_name.get()

        with open('usrs_info.pickle', 'rb') as usr_file:

            exist_usr_info = pickle.load(usr_file)

        if np != npf:

            tk.messagebox.showerror('Error', 'Password and confirm password must be the same!')

        elif nn in exist_usr_info:

            tk.messagebox.showerror('Error', 'The user has already signed up!')

        else:

            exist_usr_info[nn] = np

            with open('usrs_info.pickle', 'wb') as usr_file:

                pickle.dump(exist_usr_info, usr_file)

            tk.messagebox.showinfo('Welcome', 'You have successfully signed up!')

            window_sign_up.destroy()
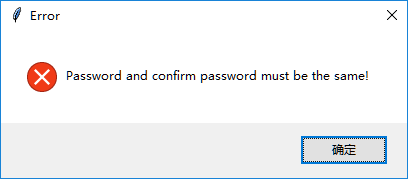
打开读取文件usrs_info,首先判断密码是否相等,如果不相等,则弹出窗口提示密码输入不一致
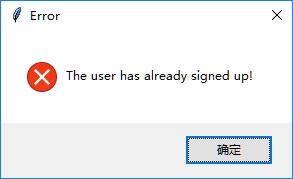
如果用户名存在,则弹出窗口提示用户名已经注册
注册合格的话,则将信息存放,pickle里面存放的是一个字典,exist_usr_info[nn] = np该句即为username:password,通过dump将新的注册信息传入到用户信息文件中。并弹出窗口提示注册成功
最后通过destory关闭注册窗口
完整代码如下:
def usr_sign_up():

    def sign_to_Mofan_Python():

        np = new_pwd.get()

        npf = new_pwd_confirm.get()

        nn = new_name.get()

        with open('usrs_info.pickle', 'rb') as usr_file:

            exist_usr_info = pickle.load(usr_file)

        if np != npf:

            tk.messagebox.showerror('Error', 'Password and confirm password must be the same!')

        elif nn in exist_usr_info:

            tk.messagebox.showerror('Error', 'The user has already signed up!')

        else:

            exist_usr_info[nn] = np

            with open('usrs_info.pickle', 'wb') as usr_file:

                pickle.dump(exist_usr_info, usr_file)

            tk.messagebox.showinfo('Welcome', 'You have successfully signed up!')

            window_sign_up.destroy()

    window_sign_up=tk.Toplevel(window)

    window_sign_up.geometry('350x200')

    window_sign_up.title('Sign up window')

    new_name = tk.StringVar()

    new_name.set('example@python.com')

    tk.Label(window_sign_up, text='User name: ').place(x=10, y=10)

    entry_new_name = tk.Entry(window_sign_up, textvariable=new_name)

    entry_new_name.place(x=150, y=10)

    new_pwd = tk.StringVar()

    tk.Label(window_sign_up, text='Password: ').place(x=10, y=50)

    entry_usr_pwd = tk.Entry(window_sign_up, textvariable=new_pwd, show='*')

    entry_usr_pwd.place(x=150, y=50)

    new_pwd_confirm = tk.StringVar()

    tk.Label(window_sign_up, text='Confirm password: ').place(x=10, y= 90)

    entry_usr_pwd_confirm = tk.Entry(window_sign_up, textvariable=new_pwd_confirm, show='*')

    entry_usr_pwd_confirm.place(x=150, y=90)

    btn_confirm_sign_up = tk.Button(window_sign_up, text='Sign up', command=sign_to_Mofan_Python)

    btn_confirm_sign_up.place(x=150, y=130)
运行结果如下所示:
当用户名已存在时:
当密码输入不一致时:
当注册成功时: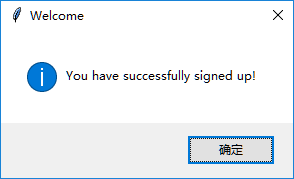
点击确定后注册窗口关闭
用注册的用户进行登录,弹出窗口: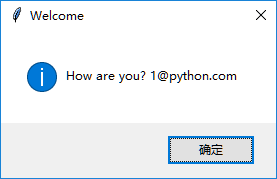
Python初学——窗口视窗Tkinter的更多相关文章
- Python GUI之tkinter窗口视窗教程大集合(看这篇就够了)
一.前言 由于本篇文章较长,所以下面给出内容目录方便跳转阅读,当然也可以用博客页面最右侧的文章目录导航栏进行跳转查阅. 一.前言 二.Tkinter 是什么 三.Tkinter 控件详细介绍 1. T ...
- Python GUI之tkinter窗口视窗教程大集合(看这篇就够了) JAVA日志的前世今生 .NET MVC采用SignalR更新在线用户数 C#多线程编程系列(五)- 使用任务并行库 C#多线程编程系列(三)- 线程同步 C#多线程编程系列(二)- 线程基础 C#多线程编程系列(一)- 简介
Python GUI之tkinter窗口视窗教程大集合(看这篇就够了) 一.前言 由于本篇文章较长,所以下面给出内容目录方便跳转阅读,当然也可以用博客页面最右侧的文章目录导航栏进行跳转查阅. 一.前言 ...
- 孤荷凌寒自学python第四十五天Python初学基础基本结束的下阶段预安装准备
孤荷凌寒自学python第四十五天Python初学基础基本结束的下阶段预安装准备 (完整学习过程屏幕记录视频地址在文末,手写笔记在文末) 今天本来应当继续学习Python的数据库操作,但根据过去我自 ...
- Python:GUI库tkinter(二)
学习自: Python GUI之tkinter窗口视窗教程大集合(看这篇就够了) - 洪卫 - 博客园 Tkinter简明教程 - 知乎 TkDocs_官方文档 一个Tkinter库较为全面的总结,很 ...
- Python图形用户界面-Tkinter
Tkinter是什么 python 特定的GUI界面,是一个图像的窗口,tkinter是python 自带的,可以编辑的GUI界面,我们可以用GUI 实现很多一个直观的功能,如何想开发一个计算器,如果 ...
- Python:GUI库tkinter(三)
这一章是对前两章的总结: Python:GUI库tkinter(一) Python:GUI库tkinter(二) 前两章是对控件的介绍,第一章可以知道各控件使用时的具体参数,第二章以具体的例子展示了每 ...
- Python:GUI库tkinter(一)
学习自: Python GUI 编程(Tkinter) | 菜鸟教程 TkDocs_官方文档 1.几个常用的Python GUI库 tkinter:Python的标准Tk GUI工具包的接口. wxP ...
- python学习笔记(Tkinter编程利用Treeview实现表格自动更新)
博主今天总结这段时间抽空写的一个GUI编程项目 功能是查看本地打印机队列,可选择指定队列重新打印 直接上图 UI设计包括3个区域左上方,右上方和下方列表区域 使用网格grid方法来分配位置 下面是界面 ...
- Python之窗口操作之find_window,set_foreground等
在自动化测试过程中,常常需要模拟按键的操作,比如像窗口发送一个按键,实现鼠标点击的功能,在上一篇文章中,我和大家讨论了python文件生成为不依赖与python库的exe文件的方式(需要了解的朋友戳这 ...
随机推荐
- arcgis for javascript 自定义infowindow
arcgis 自己的infowindow 太难看了,放在系统中与系统中的风格格格不入,在参考了网上的一些资料后,整理编写了适合自己系统的infowindow,与大家分享. 1.自定义展示效果 2.In ...
- Spring源码情操陶冶-AbstractApplicationContext#finishRefresh
承接前文Spring源码情操陶冶-AbstractApplicationContext#finishBeanFactoryInitialization 约定web.xml配置的contextClass ...
- post提交数据长度限制问题
最近做手机拍照照片上传时,由于图片较大,base64后字符串长度太长,所以提交失败. 修改Tomcat服务器的maxPostSize=0,解决完成! <Connector connectionT ...
- Linux 下实时查看日志
Linux 下实时查看日志 cat /var/log/*.log 如果日志在更新,如何实时查看 tail -f /var/log/messages 还可以使用 watch -d -n 1 cat /v ...
- 43. leetcode 459. Repeated Substring Pattern
459. Repeated Substring Pattern Given a non-empty string check if it can be constructed by taking a ...
- 31. leetcode 122. Best Time to Buy and Sell Stock II
122. Best Time to Buy and Sell Stock II Say you have an array for which the ith element is the price ...
- 新的表格展示利器 Bootstrap Table
1.bootstrap table简介及特征 Bootstrap Table是国人开发的一款基于 Bootstrap 的 jQuery 表格插件,通过简单的设置,就可以拥有强大的单选.多选.排序.分 ...
- javascript 用Activex方法调用数据库中的数据,只可用于IE
// JavaScript source code //创建数据库连接对象 var conn = new ActiveXObject("ADODB.Connection"); // ...
- Nodejs package.json文件介绍
每个npm的安装包里面都会包含一个package.json,通常这个文件会在包的根目录下. 这个文件很类似于.net项目中的.csproj+AssemblyInfo.cs+App.config文件,主 ...
- Cordova + idea 环境搭建
1.安装前期工作 1).安装Node.js http://nodejs.cn/download/ 里面内置了npm,可以用来安装 Cordova,把该路径添加到环境变量,这样就可以在 cmd 里面任何 ...