张高兴的 Xamarin.Forms 开发笔记:为 Android 与 iOS 引入 UWP 风格的汉堡菜单 ( MasterDetailPage )
所谓 UWP 样式的汉堡菜单,我曾在“张高兴的 UWP 开发笔记:汉堡菜单进阶”里说过,也就是使用 Segoe MDL2 Assets 字体作为左侧 Icon,并且左侧使用填充颜色的矩形用来表示 ListView 的选中。如下图
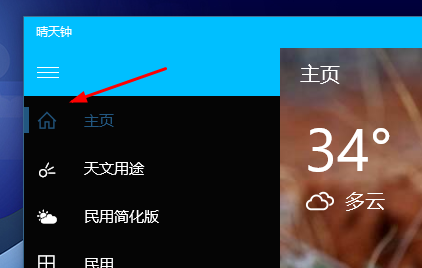
但怎样通过 Xamarin.Forms ,将这一样式的汉堡菜单带入到 Android 与 iOS 中呢?
一、大纲-细节模式简介
讲代码前首先来说说这种导航模式,官方称“大纲-细节模式”(MasterDetail)。左侧的汉堡菜单称为“大纲”(Master),右侧的页面称为“细节”(Detail)。Xamarin.Froms 为项目提供了若干种导航模式,“大纲-细节”为其中一种。
二、项目简介
效果图:
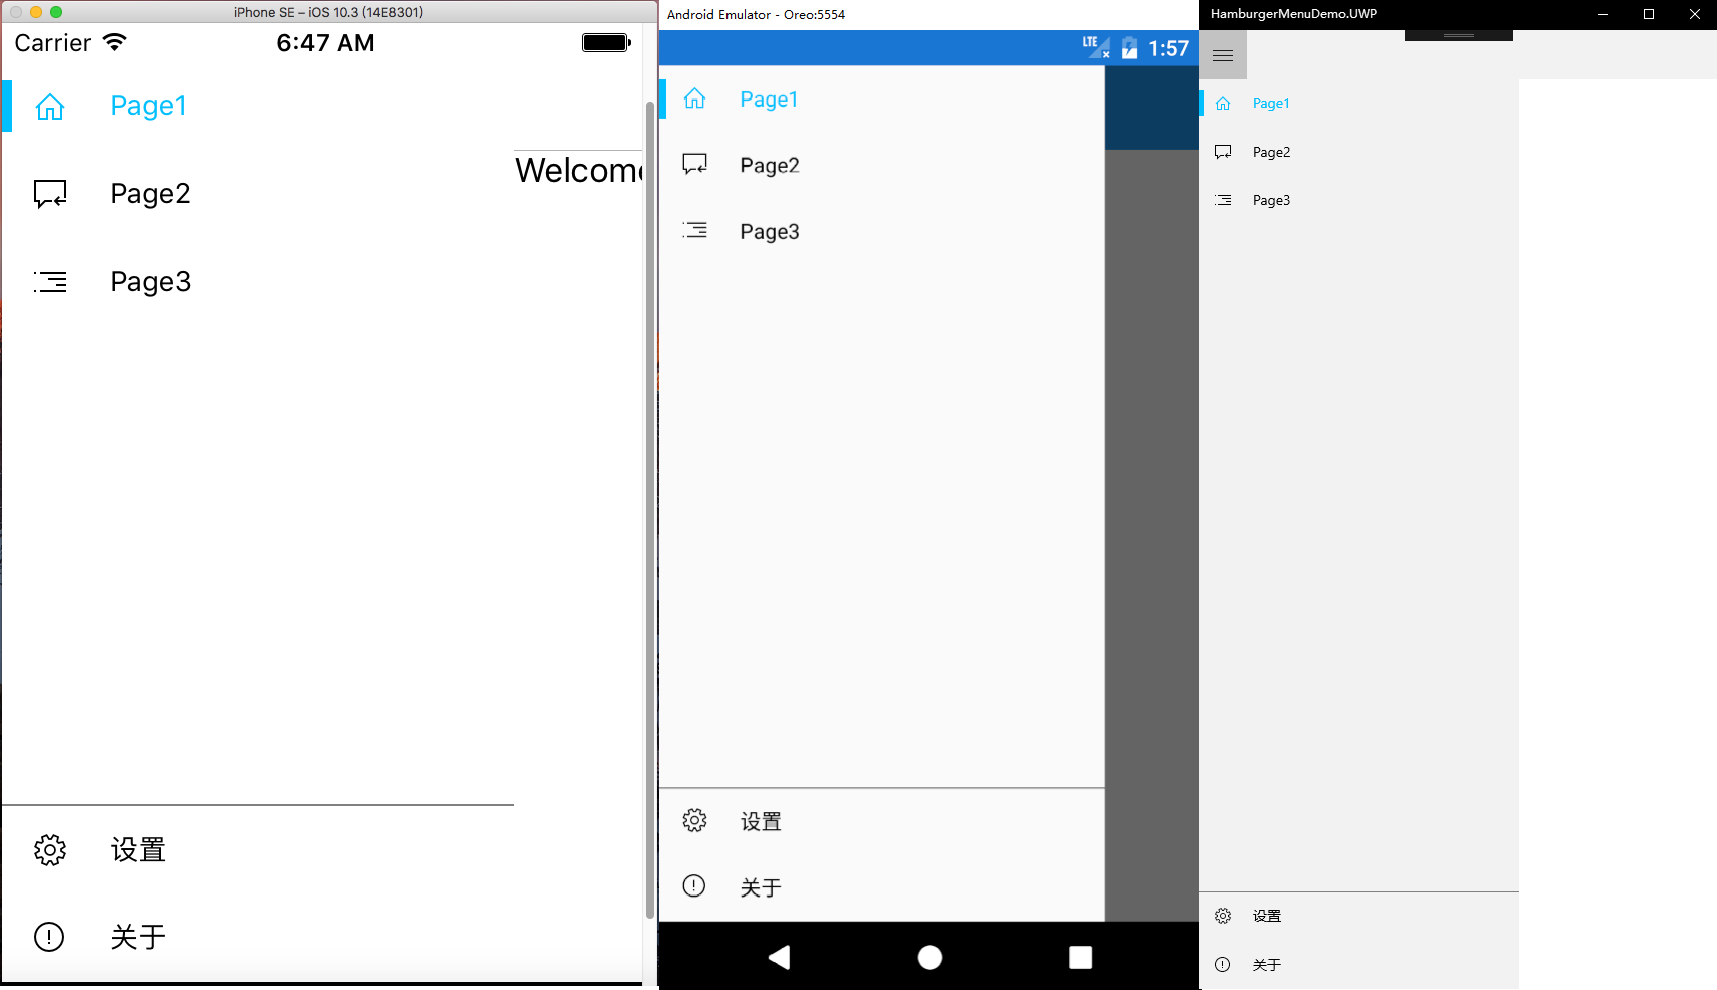
不多说废话,看代码实在些。
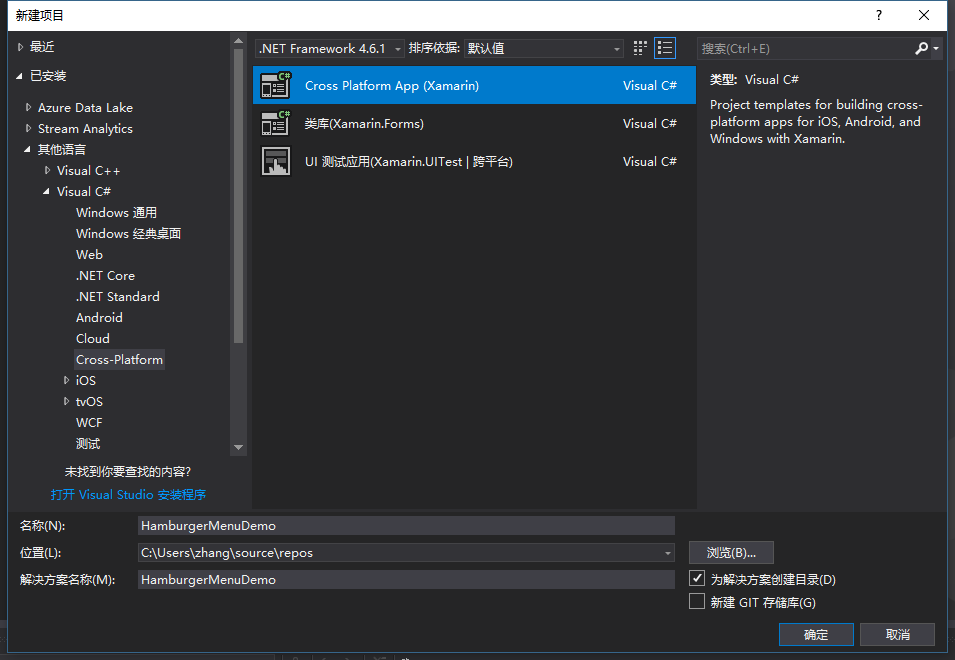
本示例是使用 Visual Studio 2017 创建的 Cross-Platform 项目,项目名为”HamburgerMenuDemo“,模板为空白项目。(GitHub:https://github.com/ZhangGaoxing/xamarin-forms-demo/tree/master/HamburgerMenuDemo)
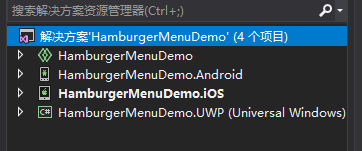
待项目创建完成后,解决方案共包含四个项目:共享代码项目、 Android 项目、 iOS 项目、 UWP 项目。共享代码项目为存放共享页面的地方,个人觉得和类库还是有点区别的。
三、共享代码项目 HamburgerMenuDemo
首先添加几个页面,根目录下添加一个 MasterPage.xaml 页面,用于”大纲视图“。添加一个 Views 文件夹,用于存放子页面,向其中添加3个界面:Page1、Page2、Page3。添加一个 MasterPageItem.cs 类。
1. MasterPageItem.cs
和 UWP 的汉堡菜单一样,首先要创建一个类,作为导航的项目,用来绑定 ListView 。名字叫 MasterPageItem.cs 。
里面的属性有页面的标题 Title,左侧的图标 Icon,图标的字体 FontFamily,目的页面 DestPage,还有左侧的矩形显示 Selected 与 颜色 Color。由于要实现双向绑定,还要实现接口 INotifyPropertyChanged。要注意的是,Color 类型为 Xamarin.Forms 中的。
代码如下
public class MasterPageItem : INotifyPropertyChanged

{

    // 字体路径,用于引入 Segoe MDL2 Assets 字体

    public string FontFamily { get; set; }

    // 字体图标转义

    public string Icon { get; set; }

    // 标题

    public string Title { get; set; }

    // 目的页

    public Type DestPage { get; set; }

    // 用于显示左侧填充矩形,双向绑定

    private bool selected = false;

    public bool Selected

    {

        get { return selected; }

        set

        {

            selected = value;

            this.OnPropertyChanged("Selected");

        }

    }

    // 选中颜色,双向绑定 ( using Xamarin.Forms )

    private Color color = new Color();

    public Color Color

    {

        get { return color; }

        set

        {

            color = value;

            this.OnPropertyChanged("Color");

        }

    }

    public event PropertyChangedEventHandler PropertyChanged;

    public void OnPropertyChanged(string propertyName)

    {

        PropertyChanged?.Invoke(this, new PropertyChangedEventArgs(propertyName));

    }

}
2. MasterPage.xaml
MasterPage 为”大纲“视图,即左侧显示 ListView 的页面。本项目的 MasterPage 分为两栏,分一级菜单与二级菜单,即置顶一个 ListView 与置底一个 ListView 。 ListView 的 ItemTemplate 与 UWP 稍有不同,左侧的填充矩形换成了 BoxView,二级菜单的上边线由 Border 换成了高度为1的 BoxView。代码如下
<ContentPage xmlns="http://xamarin.com/schemas/2014/forms"

             xmlns:x="http://schemas.microsoft.com/winfx/2009/xaml"

             x:Class="HamburgerMenuDemo.MasterPage"

             Icon="hamburger.png"

             Title=" ">

    <Grid>

        <Grid.RowDefinitions>

            <RowDefinition Height="*" />

            <RowDefinition Height="1" />

            <RowDefinition Height="Auto" />

        </Grid.RowDefinitions>

        <!--一级菜单-->

        <ListView x:Name="PrimaryListView" VerticalOptions="StartAndExpand" SeparatorVisibility="None">

            <ListView.ItemTemplate>

                <DataTemplate>

                    <ViewCell>

                        <Grid HeightRequest="48">

                            <Grid.ColumnDefinitions>

                                <ColumnDefinition Width="48"/>

                                <ColumnDefinition Width="*" />

                            </Grid.ColumnDefinitions>

                            <BoxView BackgroundColor="{Binding Color}" WidthRequest="5" HeightRequest="26" HorizontalOptions="Start" VerticalOptions="Center" IsVisible="{Binding Selected}" />

                            <Label Text="{Binding Icon}" FontFamily="{Binding FontFamily}" TextColor="{Binding Color}" FontSize="16" HorizontalOptions="Center" VerticalOptions="Center" />

                            <Label Grid.Column="1" Text="{Binding Title}" TextColor="{Binding Color}" FontSize="14" VerticalOptions="Center" />

                        </Grid>

                    </ViewCell>

                </DataTemplate>

            </ListView.ItemTemplate>

        </ListView>

        <!--BoxView 充当 Border-->

        <BoxView BackgroundColor="Gray" Grid.Row="1" HorizontalOptions="FillAndExpand" />

        <!--二级菜单-->

        <ListView x:Name="SecondaryListView" Grid.Row="2" VerticalOptions="End" SeparatorVisibility="None" Margin="0,-6,0,0">

            <ListView.ItemTemplate>

                <DataTemplate>

                    <ViewCell>

                        <Grid HeightRequest="48">

                            <Grid.ColumnDefinitions>

                                <ColumnDefinition Width="48"/>

                                <ColumnDefinition Width="*" />

                            </Grid.ColumnDefinitions>

                            <BoxView BackgroundColor="{Binding Color}" WidthRequest="5" HeightRequest="26" HorizontalOptions="Start" VerticalOptions="Center" IsVisible="{Binding Selected}" />

                            <Label x:Name="IconLabel" Text="{Binding Icon}" FontFamily="{Binding FontFamily}" TextColor="{Binding Color}" FontSize="16" HorizontalOptions="Center" VerticalOptions="Center" />

                            <Label Grid.Column="1" Text="{Binding Title}" TextColor="{Binding Color}" FontSize="14" VerticalOptions="Center" />

                        </Grid>

                    </ViewCell>

                </DataTemplate>

            </ListView.ItemTemplate>

        </ListView>

    </Grid>

</ContentPage>
MasterPage.xaml.cs 代码也需要讲下,不知是怎么回事,以上 Xaml 代码直接运行时两个菜单会显示不正常,只显示一个菜单,<RowDefinition Height="Auto" /> 在这个 ContentPage 里好像无效。因此我在后台代码设置了二级菜单的高度,也就是48 * secondaryItems.Count。两个 ListView 需要通过属性的方式,向 MainPage 传递控件。字体路径各个项目不同,需要单独设置,我后面会说。MasterPage.xaml.cs 代码如下
[XamlCompilation(XamlCompilationOptions.Compile)]

public partial class MasterPage : ContentPage

{

    // 向 MainPage 传递控件

    public ListView primaryListView { get { return PrimaryListView; } }

    public ListView secondaryListView { get { return SecondaryListView; } }

    public MasterPage()

    {

        InitializeComponent();

        // 设置不同平台的字体路径

        string fontFamily;

        switch (Device.RuntimePlatform)

        {

            case "Android":

                fontFamily = "segmdl2.ttf#Segoe MDL2 Assets";

                break;

            case "iOS":

                fontFamily = "Segoe MDL2 Assets";

                break;

            case "Windows":

                fontFamily = "/Assets/segmdl2.ttf#Segoe MDL2 Assets";

                break;

            case "WinPhone":

                fontFamily = "/Assets/segmdl2.ttf#Segoe MDL2 Assets";

                break;

            default:

                fontFamily = "segmdl2.ttf#Segoe MDL2 Assets";

                break;

        }

        // 列表项

        var primaryItems = new List<MasterPageItem>() {

                new MasterPageItem

                {

                    Title = "Page1",

                    FontFamily = fontFamily,

                    Icon = "\xE10F",

                    Color = Color.DeepSkyBlue,

                    Selected = true,

                    DestPage = typeof(Page1)

                },

                new MasterPageItem

                {

                    Title = "Page2",

                    FontFamily = fontFamily,

                    Icon = "\xE11F",

                    Color = Color.Black,

                    Selected = false,

                    DestPage = typeof(Page2)

                },

                new MasterPageItem

                {

                    Title = "Page3",

                    FontFamily = fontFamily,

                    Icon = "\xE12F",

                    Color = Color.Black,

                    Selected = false,

                    DestPage = typeof(Page2)

                }

            };

        var secondaryItems = new List<MasterPageItem>() {

                new MasterPageItem

                {

                    Title = "设置",

                    FontFamily = fontFamily,

                    Icon = "\xE713",

                    Color = Color.Black,

                    Selected = false,

                    DestPage = typeof(SettingPage)

                },

                new MasterPageItem

                {

                    Title = "关于",

                    FontFamily = fontFamily,

                    Icon = "\xE783",

                    Color = Color.Black,

                    Selected = false,

                    DestPage = typeof(AboutPage)

                }

            };

        // ListView 数据绑定

        PrimaryListView.ItemsSource = primaryItems;

        SecondaryListView.ItemsSource = secondaryItems;

        // 设置二级菜单高度

        SecondaryListView.HeightRequest =  * secondaryItems.Count;

    }

}
3. MainPage.xaml
下面来修改一下 MainPage.xaml 。MainPage.xaml 为应用的入口页面,可在 App.xaml.cs 中更改。将 MainPage 中的根元素替换为 MasterDetailPage 。注释很详细,不多说了
<MasterDetailPage xmlns="http://xamarin.com/schemas/2014/forms"

             xmlns:x="http://schemas.microsoft.com/winfx/2009/xaml"

             xmlns:local="clr-namespace:HamburgerMenuDemo"

             x:Class="HamburgerMenuDemo.MainPage"

             xmlns:views="clr-namespace:HamburgerMenuDemo.Views">

    <!--大纲视图-->

    <MasterDetailPage.Master>

        <!--引入 MasterPage 并给个名称,用于后台设置 MasterPage 传递过来的 ListView-->

        <local:MasterPage x:Name="masterPage" />

    </MasterDetailPage.Master>

    <!--细节视图-->

    <MasterDetailPage.Detail>

        <NavigationPage>

            <x:Arguments>

                <!--默认显示的页面-->

                <views:Page1 />

            </x:Arguments>

        </NavigationPage>

    </MasterDetailPage.Detail>

</MasterDetailPage>
同样的 MainPage.xaml.cs 中的代码也很简单,注释很详细
public MainPage()

{

    InitializeComponent();

    // ListView 点击事件

    masterPage.primaryListView.ItemSelected += MasterPageItemSelected;

    masterPage.secondaryListView.ItemSelected += MasterPageItemSelected;

    // 设置 Windows 平台的“大纲”显示模式为折叠

    if (Device.RuntimePlatform == Device.Windows)

    {

        MasterBehavior = MasterBehavior.Popover;

    }

}

private void MasterPageItemSelected(object sender, SelectedItemChangedEventArgs e)

{

    var item = e.SelectedItem as MasterPageItem;

    if (item != null)

    {

        // 遍历 ListView 数据源,将选中项矩形显示,字体颜色设置成未选中

        foreach (MasterPageItem mpi in masterPage.primaryListView.ItemsSource)

        {

            mpi.Selected = false;

            mpi.Color = Color.Black;

        }

        foreach (MasterPageItem mpi in masterPage.secondaryListView.ItemsSource)

        {

            mpi.Selected = false;

            mpi.Color = Color.Black;

        }

        // 设置选中项

        item.Selected = true;

        item.Color = Color.DeepSkyBlue;

        // 跳转

        Detail = new NavigationPage((Page)Activator.CreateInstance(item.DestPage));

        // 取消 ListView 默认选中样式

        masterPage.primaryListView.SelectedItem = null;

        masterPage.secondaryListView.SelectedItem = null;

        // 关闭“大纲”

        IsPresented = false;

    }

}
要注意的是 MasterPage.xaml 页面中的 Title 一定要给,要不然会报错,可以在后台 cs 文件中修改 Title 属性,也可以在 Xaml 根元素中修改 Title。Views 中的几个页面 Title 不给可以,但标题栏不会显示页面的 Title,不好看。
四、Android 项目 HamburgerMenuDemo.Android
1. 字体设置
将 segmdl2.ttf 字体文件直接放入 Assets 文件夹下即可
2. 修改 style.xml
”大纲“的默认效果是 DrawerLayout 覆盖状态栏的,不太美观,需要修改样式。在 style.xml 中添加
<item name="android:fitsSystemWindows">true</item>
同时,由于修改了样式,变成了状态栏覆盖 DrawerLayout ,需要给 MasterPage.xaml 中的根 Grid 赋值一个 Padding="0,25,0,-6",但 UWP 项目却不需要,这点我会在文末给出代码。
五、iOS 项目 HamburgerMenuDemo.iOS
1. 字体设置
弄了好久,Xamarin 太坑了,plist 的编辑器很不和谐。。。
(1)将 segmdl2.ttf 字体文件直接放入 Resources 文件夹
(2)更改 segmdl2.ttf 属性,复制到输出目录 =》 始终复制,生成操作 =》 BundleResource
(2)不要双击,右击 Info.plist ,查看代码,添加如下内容
<dict>

    <key>UIAppFonts</key>

    <array>

      <string>segmdl2.ttf</string>

    </array>

  </dict>
如果要添加其他的资源,可以自己新建一个 .plist 文件,新建的文件是正常显示资源列表的,添加完成后,复制代码到 Info.plist 即可。
2. Padding
和安卓一样,需要给 MasterPage.xaml 中的根 Grid 赋值一个 Padding="0,20,0,-6",我会在文末给出代码。
六、Padding 代码
在 MasterPage.xaml 添加如下代码
<!--安卓空出状态栏的宽度-->

<ContentPage.Resources>

    <ResourceDictionary>

        <OnPlatform x:Key="padding"

              x:TypeArguments="Thickness"

              iOS="0,20,0,-6"

              Android="0,25,0,-6"

              WinPhone="0" />

    </ResourceDictionary>

</ContentPage.Resources>
别忘了在 Grid 中引用资源
Padding="{StaticResource padding}"
MasterPage.xaml 最终代码
<ContentPage xmlns="http://xamarin.com/schemas/2014/forms"

             xmlns:x="http://schemas.microsoft.com/winfx/2009/xaml"

             x:Class="HamburgerMenuDemo.MasterPage"

             Icon="hamburger.png"

             Title=" ">

    <!--安卓空出状态栏的宽度-->

    <ContentPage.Resources>

        <ResourceDictionary>

            <OnPlatform x:Key="padding"

                  x:TypeArguments="Thickness"

                  iOS="0,20,0,0"

                  Android="0,20,0,0"

                  WinPhone="0" />

        </ResourceDictionary>

    </ContentPage.Resources>

    <Grid Padding="{StaticResource padding}">

        <Grid.RowDefinitions>

            <RowDefinition Height="*" />

            <RowDefinition Height="1" />

            <RowDefinition Height="Auto" />

        </Grid.RowDefinitions>

        <!--一级菜单-->

        <ListView x:Name="PrimaryListView" VerticalOptions="StartAndExpand" SeparatorVisibility="None">

            <ListView.ItemTemplate>

                <DataTemplate>

                    <ViewCell>

                        <Grid HeightRequest="48">

                            <Grid.ColumnDefinitions>

                                <ColumnDefinition Width="48"/>

                                <ColumnDefinition Width="*" />

                            </Grid.ColumnDefinitions>

                            <BoxView BackgroundColor="{Binding Color}" WidthRequest="5" HeightRequest="26" HorizontalOptions="Start" VerticalOptions="Center" IsVisible="{Binding Selected}" />

                            <Label Text="{Binding Icon}" FontFamily="{Binding FontFamily}" TextColor="{Binding Color}" FontSize="16" HorizontalOptions="Center" VerticalOptions="Center" />

                            <Label Grid.Column="1" Text="{Binding Title}" TextColor="{Binding Color}" FontSize="14" VerticalOptions="Center" />

                        </Grid>

                    </ViewCell>

                </DataTemplate>

            </ListView.ItemTemplate>

        </ListView>

        <!--BoxView 充当 Border-->

        <BoxView BackgroundColor="Gray" Grid.Row="1" HorizontalOptions="FillAndExpand" />

        <!--二级菜单-->

        <ListView x:Name="SecondaryListView" Grid.Row="2" VerticalOptions="End" SeparatorVisibility="None" Margin="0,-6,0,0">

            <ListView.ItemTemplate>

                <DataTemplate>

                    <ViewCell>

                        <Grid HeightRequest="48">

                            <Grid.ColumnDefinitions>

                                <ColumnDefinition Width="48"/>

                                <ColumnDefinition Width="*" />

                            </Grid.ColumnDefinitions>

                            <BoxView BackgroundColor="{Binding Color}" WidthRequest="5" HeightRequest="26" HorizontalOptions="Start" VerticalOptions="Center" IsVisible="{Binding Selected}" />

                            <Label x:Name="IconLabel" Text="{Binding Icon}" FontFamily="{Binding FontFamily}" TextColor="{Binding Color}" FontSize="16" HorizontalOptions="Center" VerticalOptions="Center" />

                            <Label Grid.Column="1" Text="{Binding Title}" TextColor="{Binding Color}" FontSize="14" VerticalOptions="Center" />

                        </Grid>

                    </ViewCell>

                </DataTemplate>

            </ListView.ItemTemplate>

        </ListView>

    </Grid>

</ContentPage>
张高兴的 Xamarin.Forms 开发笔记:为 Android 与 iOS 引入 UWP 风格的汉堡菜单 ( MasterDetailPage )的更多相关文章
- 张高兴的 Xamarin.Forms 开发笔记:Android 快捷方式 Shortcut 应用
一.Shortcut 简介 Shortcut 是 Android 7.1 (API Level 25) 的新特性,类似于苹果的 3D Touch ,但并不是压力感应,只是一种长按菜单.Shortcut ...
- 张高兴的 Xamarin.Forms 开发笔记:TapGestureRecognizer 的简单介绍与应用
最近很少写应用了,一直在忙关于 ASP.NET 的东西(哈欠...).抽点时间对 TapGestureRecognizer 做点总结. 一.简介 TapGestureRecognizer 就是对 Ta ...
- Xamarin.Forms读取并展示Android和iOS通讯录 - TerminalMACS客户端
Xamarin.Forms读取并展示Android和iOS通讯录 - TerminalMACS客户端 本文同步更新地址: https://dotnet9.com/11520.html https:// ...
- Xamarin.Forms 开发资源集合(复制)
复制:https://www.cnblogs.com/mschen/p/10199997.html 收集整理了下 Xamarin.Forms 的学习参考资料,分享给大家,稍后会不断补充: UI样式 S ...
- Xamarin.Forms 开发资源集合
收集整理了下 Xamarin.Forms 的学习参考资料,分享给大家,稍后会不断补充: UI样式 Snppts: Xamarin Forms UI Snippets. Prebuilt Templat ...
- 演练:使用Xamarin.Forms开发产品介绍性质的应用(VB版)
概述 Xamarin这个使用mono和.net core的跨平台开发框架这几年在不断发展.被微软收购后的Xamarin为个人开发者提供了免费版的Xamarin for Visual Studio,吸引 ...
- Xamarin.Forms开发APP
Xamarin.Forms+Prism(1)—— 开发准备 准备: 1.VS2017(推荐)或VS2015: 2.JDK 1.8以上: 3.Xamarin.Forms 最新版: 4.Prism 扩展, ...
- Xamarin.Forms 开发IOS、Android、UWP应用
C#语言特点,简单.快速.高效.本次我们通过C#以及Xaml来做移动开发. 1.开发工具visual studio 2015或visual studio 2017.当然visual studio 20 ...
- Xamarin.Forms学习系列之Android集成极光推送
一般App都会有消息推送的功能,如果是原生安卓或者IOS集成消息推送很容易,各大推送平台都有相关的Sample,但是关于Xamarin.Forms的消息推送集成的资料非常少,下面就说下Xamarin. ...
随机推荐
- Java基础语法<九> 接口与内部类
1 接口 interface implement 接口的所有方法自动地属于public.因此,在接口中声明方法时,不必提供关键字public. 接口可以包含多个方法,接口中可以定义常量.接口中的 ...
- Win Linux 双系统安装指南
双系统安装指南 环境说明 硬件:一块240G NVMe,一块240G SSD,一块2T的HDD. 系统:Linux Mint 18.2,Windows 10 Enterprise Version 17 ...
- .net ElasticSearch-Sql 扩展类
官方提供的是java sdk,并支持jdbc方式的查询结果输出;但是却没有.net sdk的支持. 开发 ElasticSearch-Sql 第三方开源项目的.net sdk,未来集成入bsf框架.( ...
- 20170711_map/reduce
js: map: var arr = [1,2,3,4,5]; var res = arr.map(function(x){ return x * x; }); //res 现在 = [1,4,9,1 ...
- CODE大全——机器学习
聚类 聚类任务 背景 在无监督学习(密度估计.异常检测等)中,训练样本的标记信息是未知的(即不人为指定),旨在发现数据之间的内在联系和规律,为进一步的数据分析提供基础. 此类学习任务中研究最多.应用最 ...
- 2.关于Apache Spark
关于Apache Spark 1 Why Apache Spark 2 关于Apache Spark 3 如何安装Apache Spark 4 Apache Spark的工作原理 5 spark弹性分 ...
- Java Web开发中Spring+MyBatis框架的简单搭建
这里使用的eclipse,首先创建一个动态web项目. 1.导入Spring IOC.AOP.DAO.dbcp.dbdrive.mybatis.jar . mybatis-spring.jar 本人 ...
- 读论文系列:Deep transfer learning person re-identification
读论文系列:Deep transfer learning person re-identification arxiv 2016 by Mengyue Geng, Yaowei Wang, Tao X ...
- 斜率优化dp
转载自http://www.cnblogs.com/ka200812/archive/2012/08/03/2621345.html 我们知道,有些DP方程可以转化成DP[i]=f[j]+x[i]的形 ...
- C#多线程之旅(7)——终止线程
先交代下背景,写<C#多线程之旅>这个系列文章主要是因为以下几个原因:1.多线程在C/S和B/S架构中用得是非常多的;2.而且多线程的使用是非常复杂的,如果没有用好,容易造成很多问题. ...