张高兴的 Xamarin.Forms 开发笔记:为 Android 与 iOS 引入 UWP 风格的汉堡菜单 ( MasterDetailPage )
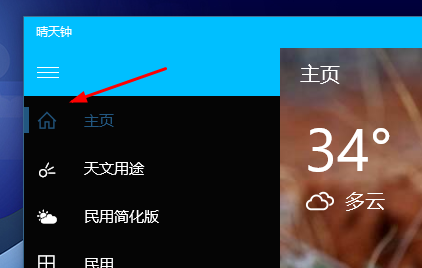
所谓 UWP 样式的汉堡菜单,我曾在“张高兴的 UWP 开发笔记:汉堡菜单进阶”里说过,也就是使用 Segoe MDL2 Assets 字体作为左侧 Icon,并且左侧使用填充颜色的矩形用来表示 ListView 的选中。如下图
但怎样通过 Xamarin.Forms ,将这一样式的汉堡菜单带入到 Android 与 iOS 中呢?
一、大纲-细节模式简介
讲代码前首先来说说这种导航模式,官方称“大纲-细节模式”(MasterDetail)。左侧的汉堡菜单称为“大纲”(Master),右侧的页面称为“细节”(Detail)。Xamarin.Froms 为项目提供了若干种导航模式,“大纲-细节”为其中一种。
二、项目简介
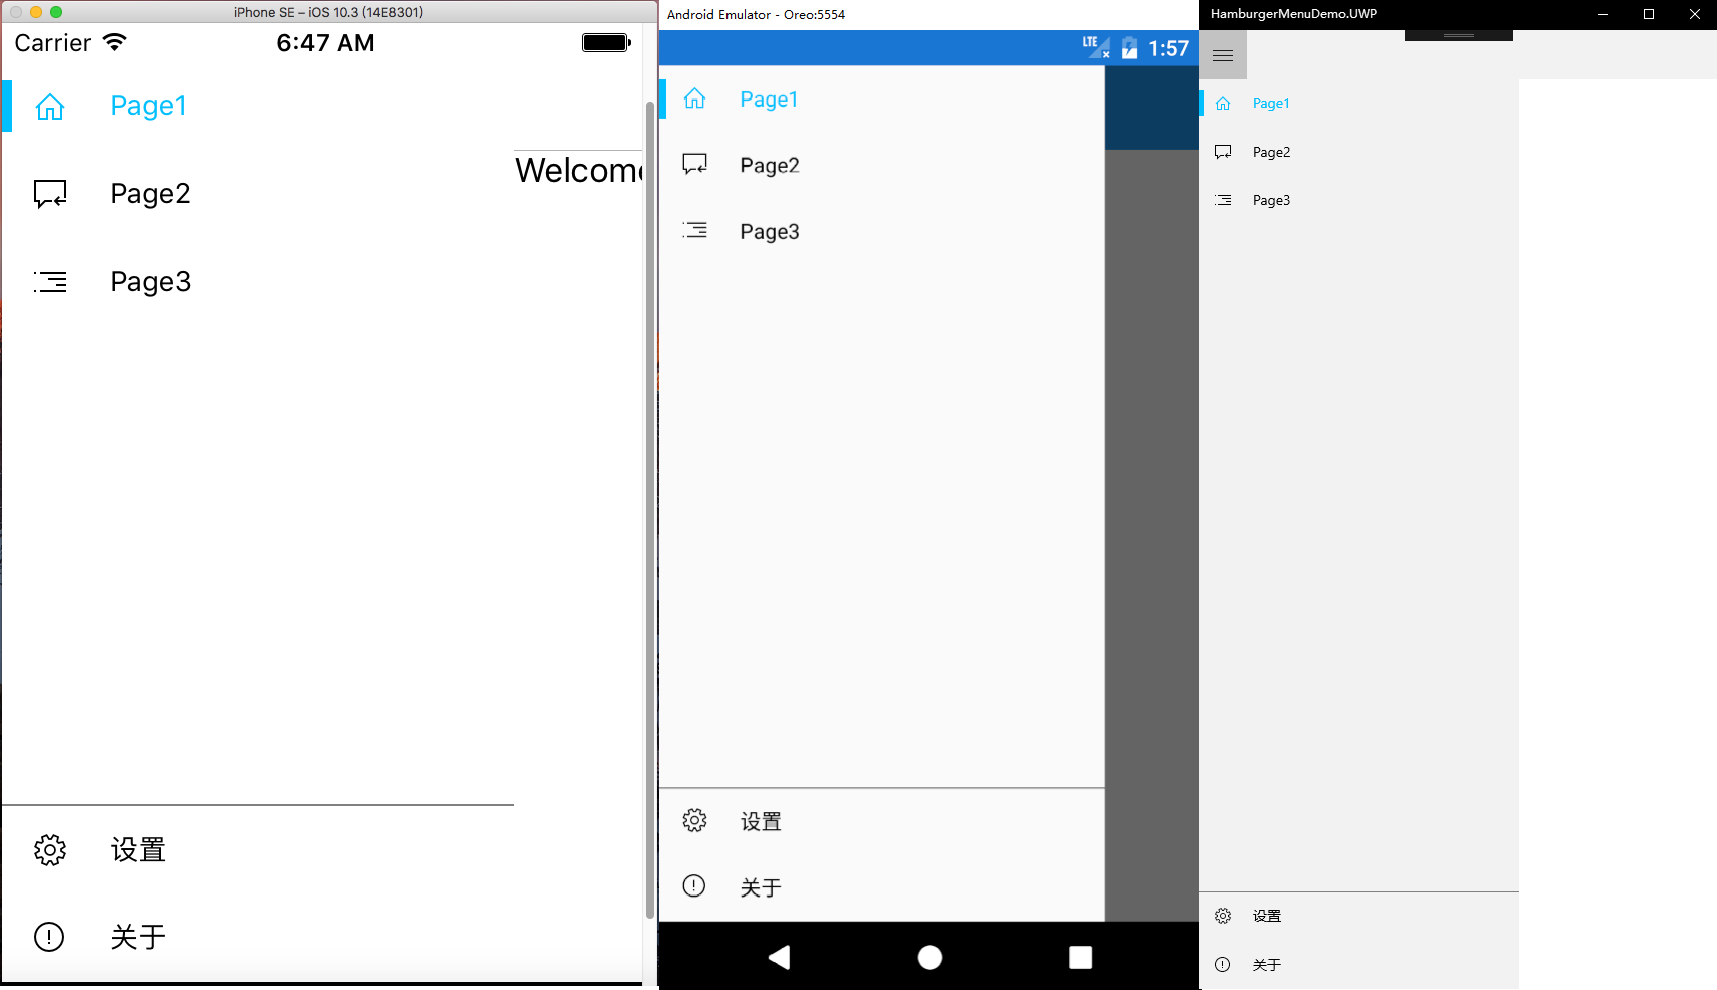
效果图:
不多说废话,看代码实在些。
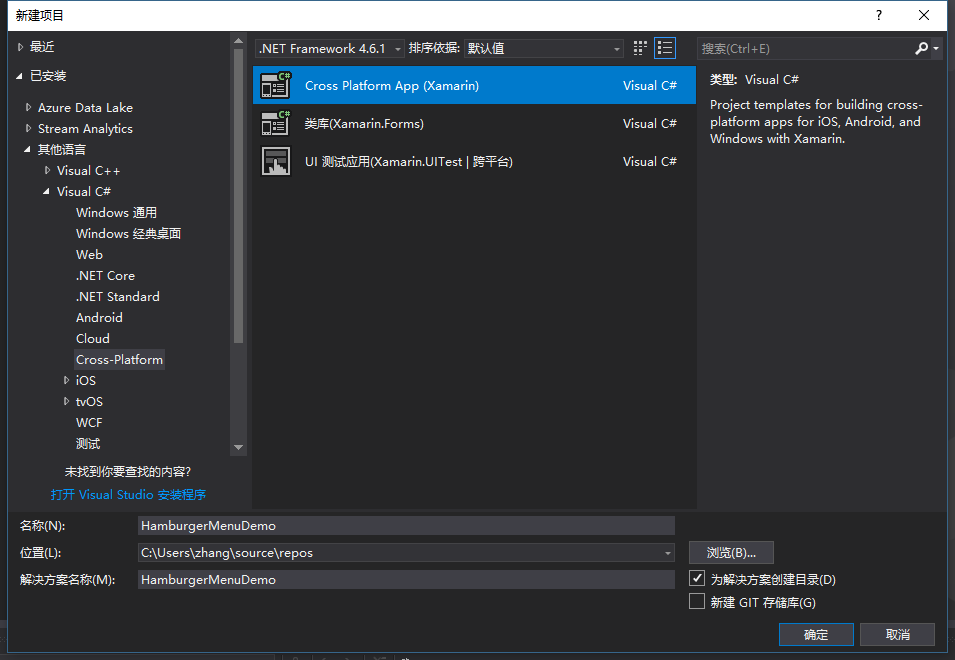
本示例是使用 Visual Studio 2017 创建的 Cross-Platform 项目,项目名为”HamburgerMenuDemo“,模板为空白项目。(GitHub:https://github.com/ZhangGaoxing/xamarin-forms-demo/tree/master/HamburgerMenuDemo)
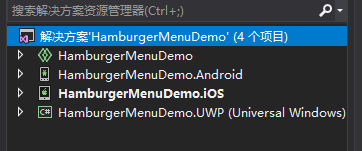
待项目创建完成后,解决方案共包含四个项目:共享代码项目、 Android 项目、 iOS 项目、 UWP 项目。共享代码项目为存放共享页面的地方,个人觉得和类库还是有点区别的。
三、共享代码项目 HamburgerMenuDemo
首先添加几个页面,根目录下添加一个 MasterPage.xaml 页面,用于”大纲视图“。添加一个 Views 文件夹,用于存放子页面,向其中添加3个界面:Page1、Page2、Page3。添加一个 MasterPageItem.cs 类。
1. MasterPageItem.cs
和 UWP 的汉堡菜单一样,首先要创建一个类,作为导航的项目,用来绑定 ListView 。名字叫 MasterPageItem.cs 。
里面的属性有页面的标题 Title,左侧的图标 Icon,图标的字体 FontFamily,目的页面 DestPage,还有左侧的矩形显示 Selected 与 颜色 Color。由于要实现双向绑定,还要实现接口 INotifyPropertyChanged。要注意的是,Color 类型为 Xamarin.Forms 中的。
代码如下
public class MasterPageItem : INotifyPropertyChanged

{

    // 字体路径,用于引入 Segoe MDL2 Assets 字体

    public string FontFamily { get; set; }

    // 字体图标转义

    public string Icon { get; set; }

    // 标题

    public string Title { get; set; }

    // 目的页

    public Type DestPage { get; set; }

    // 用于显示左侧填充矩形,双向绑定

    private bool selected = false;

    public bool Selected

    {

        get { return selected; }

        set

        {

            selected = value;

            this.OnPropertyChanged("Selected");

        }

    }

    // 选中颜色,双向绑定 ( using Xamarin.Forms )

    private Color color = new Color();

    public Color Color

    {

        get { return color; }

        set

        {

            color = value;

            this.OnPropertyChanged("Color");

        }

    }

    public event PropertyChangedEventHandler PropertyChanged;

    public void OnPropertyChanged(string propertyName)

    {

        PropertyChanged?.Invoke(this, new PropertyChangedEventArgs(propertyName));

    }

}
2. MasterPage.xaml
MasterPage 为”大纲“视图,即左侧显示 ListView 的页面。本项目的 MasterPage 分为两栏,分一级菜单与二级菜单,即置顶一个 ListView 与置底一个 ListView 。 ListView 的 ItemTemplate 与 UWP 稍有不同,左侧的填充矩形换成了 BoxView,二级菜单的上边线由 Border 换成了高度为1的 BoxView。代码如下
<ContentPage xmlns="http://xamarin.com/schemas/2014/forms"

             xmlns:x="http://schemas.microsoft.com/winfx/2009/xaml"

             x:Class="HamburgerMenuDemo.MasterPage"

             Icon="hamburger.png"

             Title=" ">

    <Grid>

        <Grid.RowDefinitions>

            <RowDefinition Height="*" />

            <RowDefinition Height="1" />

            <RowDefinition Height="Auto" />

        </Grid.RowDefinitions>

        <!--一级菜单-->

        <ListView x:Name="PrimaryListView" VerticalOptions="StartAndExpand" SeparatorVisibility="None">

            <ListView.ItemTemplate>

                <DataTemplate>

                    <ViewCell>

                        <Grid HeightRequest="48">

                            <Grid.ColumnDefinitions>

                                <ColumnDefinition Width="48"/>

                                <ColumnDefinition Width="*" />

                            </Grid.ColumnDefinitions>

                            <BoxView BackgroundColor="{Binding Color}" WidthRequest="5" HeightRequest="26" HorizontalOptions="Start" VerticalOptions="Center" IsVisible="{Binding Selected}" />

                            <Label Text="{Binding Icon}" FontFamily="{Binding FontFamily}" TextColor="{Binding Color}" FontSize="16" HorizontalOptions="Center" VerticalOptions="Center" />

                            <Label Grid.Column="1" Text="{Binding Title}" TextColor="{Binding Color}" FontSize="14" VerticalOptions="Center" />

                        </Grid>

                    </ViewCell>

                </DataTemplate>

            </ListView.ItemTemplate>

        </ListView>

        <!--BoxView 充当 Border-->

        <BoxView BackgroundColor="Gray" Grid.Row="1" HorizontalOptions="FillAndExpand" />

        <!--二级菜单-->

        <ListView x:Name="SecondaryListView" Grid.Row="2" VerticalOptions="End" SeparatorVisibility="None" Margin="0,-6,0,0">

            <ListView.ItemTemplate>

                <DataTemplate>

                    <ViewCell>

                        <Grid HeightRequest="48">

                            <Grid.ColumnDefinitions>

                                <ColumnDefinition Width="48"/>

                                <ColumnDefinition Width="*" />

                            </Grid.ColumnDefinitions>

                            <BoxView BackgroundColor="{Binding Color}" WidthRequest="5" HeightRequest="26" HorizontalOptions="Start" VerticalOptions="Center" IsVisible="{Binding Selected}" />

                            <Label x:Name="IconLabel" Text="{Binding Icon}" FontFamily="{Binding FontFamily}" TextColor="{Binding Color}" FontSize="16" HorizontalOptions="Center" VerticalOptions="Center" />

                            <Label Grid.Column="1" Text="{Binding Title}" TextColor="{Binding Color}" FontSize="14" VerticalOptions="Center" />

                        </Grid>

                    </ViewCell>

                </DataTemplate>

            </ListView.ItemTemplate>

        </ListView>

    </Grid>

</ContentPage>
MasterPage.xaml.cs 代码也需要讲下,不知是怎么回事,以上 Xaml 代码直接运行时两个菜单会显示不正常,只显示一个菜单,<RowDefinition Height="Auto" /> 在这个 ContentPage 里好像无效。因此我在后台代码设置了二级菜单的高度,也就是48 * secondaryItems.Count。两个 ListView 需要通过属性的方式,向 MainPage 传递控件。字体路径各个项目不同,需要单独设置,我后面会说。MasterPage.xaml.cs 代码如下
[XamlCompilation(XamlCompilationOptions.Compile)]

public partial class MasterPage : ContentPage

{

    // 向 MainPage 传递控件

    public ListView primaryListView { get { return PrimaryListView; } }

    public ListView secondaryListView { get { return SecondaryListView; } }

    public MasterPage()

    {

        InitializeComponent();

        // 设置不同平台的字体路径

        string fontFamily;

        switch (Device.RuntimePlatform)

        {

            case "Android":

                fontFamily = "segmdl2.ttf#Segoe MDL2 Assets";

                break;

            case "iOS":

                fontFamily = "Segoe MDL2 Assets";

                break;

            case "Windows":

                fontFamily = "/Assets/segmdl2.ttf#Segoe MDL2 Assets";

                break;

            case "WinPhone":

                fontFamily = "/Assets/segmdl2.ttf#Segoe MDL2 Assets";

                break;

            default:

                fontFamily = "segmdl2.ttf#Segoe MDL2 Assets";

                break;

        }

        // 列表项

        var primaryItems = new List<MasterPageItem>() {

                new MasterPageItem

                {

                    Title = "Page1",

                    FontFamily = fontFamily,

                    Icon = "\xE10F",

                    Color = Color.DeepSkyBlue,

                    Selected = true,

                    DestPage = typeof(Page1)

                },

                new MasterPageItem

                {

                    Title = "Page2",

                    FontFamily = fontFamily,

                    Icon = "\xE11F",

                    Color = Color.Black,

                    Selected = false,

                    DestPage = typeof(Page2)

                },

                new MasterPageItem

                {

                    Title = "Page3",

                    FontFamily = fontFamily,

                    Icon = "\xE12F",

                    Color = Color.Black,

                    Selected = false,

                    DestPage = typeof(Page2)

                }

            };

        var secondaryItems = new List<MasterPageItem>() {

                new MasterPageItem

                {

                    Title = "设置",

                    FontFamily = fontFamily,

                    Icon = "\xE713",

                    Color = Color.Black,

                    Selected = false,

                    DestPage = typeof(SettingPage)

                },

                new MasterPageItem

                {

                    Title = "关于",

                    FontFamily = fontFamily,

                    Icon = "\xE783",

                    Color = Color.Black,

                    Selected = false,

                    DestPage = typeof(AboutPage)

                }

            };

        // ListView 数据绑定

        PrimaryListView.ItemsSource = primaryItems;

        SecondaryListView.ItemsSource = secondaryItems;

        // 设置二级菜单高度

        SecondaryListView.HeightRequest =  * secondaryItems.Count;

    }

}
3. MainPage.xaml
下面来修改一下 MainPage.xaml 。MainPage.xaml 为应用的入口页面,可在 App.xaml.cs 中更改。将 MainPage 中的根元素替换为 MasterDetailPage 。注释很详细,不多说了
<MasterDetailPage xmlns="http://xamarin.com/schemas/2014/forms"

             xmlns:x="http://schemas.microsoft.com/winfx/2009/xaml"

             xmlns:local="clr-namespace:HamburgerMenuDemo"

             x:Class="HamburgerMenuDemo.MainPage"

             xmlns:views="clr-namespace:HamburgerMenuDemo.Views">

    <!--大纲视图-->

    <MasterDetailPage.Master>

        <!--引入 MasterPage 并给个名称,用于后台设置 MasterPage 传递过来的 ListView-->

        <local:MasterPage x:Name="masterPage" />

    </MasterDetailPage.Master>

    <!--细节视图-->

    <MasterDetailPage.Detail>

        <NavigationPage>

            <x:Arguments>

                <!--默认显示的页面-->

                <views:Page1 />

            </x:Arguments>

        </NavigationPage>

    </MasterDetailPage.Detail>

</MasterDetailPage>
同样的 MainPage.xaml.cs 中的代码也很简单,注释很详细
public MainPage()

{

    InitializeComponent();

    // ListView 点击事件

    masterPage.primaryListView.ItemSelected += MasterPageItemSelected;

    masterPage.secondaryListView.ItemSelected += MasterPageItemSelected;

    // 设置 Windows 平台的“大纲”显示模式为折叠

    if (Device.RuntimePlatform == Device.Windows)

    {

        MasterBehavior = MasterBehavior.Popover;

    }

}

private void MasterPageItemSelected(object sender, SelectedItemChangedEventArgs e)

{

    var item = e.SelectedItem as MasterPageItem;

    if (item != null)

    {

        // 遍历 ListView 数据源,将选中项矩形显示,字体颜色设置成未选中

        foreach (MasterPageItem mpi in masterPage.primaryListView.ItemsSource)

        {

            mpi.Selected = false;

            mpi.Color = Color.Black;

        }

        foreach (MasterPageItem mpi in masterPage.secondaryListView.ItemsSource)

        {

            mpi.Selected = false;

            mpi.Color = Color.Black;

        }

        // 设置选中项

        item.Selected = true;

        item.Color = Color.DeepSkyBlue;

        // 跳转

        Detail = new NavigationPage((Page)Activator.CreateInstance(item.DestPage));

        // 取消 ListView 默认选中样式

        masterPage.primaryListView.SelectedItem = null;

        masterPage.secondaryListView.SelectedItem = null;

        // 关闭“大纲”

        IsPresented = false;

    }

}
要注意的是 MasterPage.xaml 页面中的 Title 一定要给,要不然会报错,可以在后台 cs 文件中修改 Title 属性,也可以在 Xaml 根元素中修改 Title。Views 中的几个页面 Title 不给可以,但标题栏不会显示页面的 Title,不好看。
四、Android 项目 HamburgerMenuDemo.Android
1. 字体设置
将 segmdl2.ttf 字体文件直接放入 Assets 文件夹下即可
2. 修改 style.xml
”大纲“的默认效果是 DrawerLayout 覆盖状态栏的,不太美观,需要修改样式。在 style.xml 中添加
<item name="android:fitsSystemWindows">true</item>
同时,由于修改了样式,变成了状态栏覆盖 DrawerLayout ,需要给 MasterPage.xaml 中的根 Grid 赋值一个 Padding="0,25,0,-6",但 UWP 项目却不需要,这点我会在文末给出代码。
五、iOS 项目 HamburgerMenuDemo.iOS
1. 字体设置
弄了好久,Xamarin 太坑了,plist 的编辑器很不和谐。。。
(1)将 segmdl2.ttf 字体文件直接放入 Resources 文件夹
(2)更改 segmdl2.ttf 属性,复制到输出目录 =》 始终复制,生成操作 =》 BundleResource
(2)不要双击,右击 Info.plist ,查看代码,添加如下内容
<dict>

    <key>UIAppFonts</key>

    <array>

      <string>segmdl2.ttf</string>

    </array>

  </dict>
如果要添加其他的资源,可以自己新建一个 .plist 文件,新建的文件是正常显示资源列表的,添加完成后,复制代码到 Info.plist 即可。
2. Padding
和安卓一样,需要给 MasterPage.xaml 中的根 Grid 赋值一个 Padding="0,20,0,-6",我会在文末给出代码。
六、Padding 代码
在 MasterPage.xaml 添加如下代码
<!--安卓空出状态栏的宽度-->

<ContentPage.Resources>

    <ResourceDictionary>

        <OnPlatform x:Key="padding"

              x:TypeArguments="Thickness"

              iOS="0,20,0,-6"

              Android="0,25,0,-6"

              WinPhone="0" />

    </ResourceDictionary>

</ContentPage.Resources>
别忘了在 Grid 中引用资源
Padding="{StaticResource padding}"
MasterPage.xaml 最终代码
<ContentPage xmlns="http://xamarin.com/schemas/2014/forms"

             xmlns:x="http://schemas.microsoft.com/winfx/2009/xaml"

             x:Class="HamburgerMenuDemo.MasterPage"

             Icon="hamburger.png"

             Title=" ">

    <!--安卓空出状态栏的宽度-->

    <ContentPage.Resources>

        <ResourceDictionary>

            <OnPlatform x:Key="padding"

                  x:TypeArguments="Thickness"

                  iOS="0,20,0,0"

                  Android="0,20,0,0"

                  WinPhone="0" />

        </ResourceDictionary>

    </ContentPage.Resources>

    <Grid Padding="{StaticResource padding}">

        <Grid.RowDefinitions>

            <RowDefinition Height="*" />

            <RowDefinition Height="1" />

            <RowDefinition Height="Auto" />

        </Grid.RowDefinitions>

        <!--一级菜单-->

        <ListView x:Name="PrimaryListView" VerticalOptions="StartAndExpand" SeparatorVisibility="None">

            <ListView.ItemTemplate>

                <DataTemplate>

                    <ViewCell>

                        <Grid HeightRequest="48">

                            <Grid.ColumnDefinitions>

                                <ColumnDefinition Width="48"/>

                                <ColumnDefinition Width="*" />

                            </Grid.ColumnDefinitions>

                            <BoxView BackgroundColor="{Binding Color}" WidthRequest="5" HeightRequest="26" HorizontalOptions="Start" VerticalOptions="Center" IsVisible="{Binding Selected}" />

                            <Label Text="{Binding Icon}" FontFamily="{Binding FontFamily}" TextColor="{Binding Color}" FontSize="16" HorizontalOptions="Center" VerticalOptions="Center" />

                            <Label Grid.Column="1" Text="{Binding Title}" TextColor="{Binding Color}" FontSize="14" VerticalOptions="Center" />

                        </Grid>

                    </ViewCell>

                </DataTemplate>

            </ListView.ItemTemplate>

        </ListView>

        <!--BoxView 充当 Border-->

        <BoxView BackgroundColor="Gray" Grid.Row="1" HorizontalOptions="FillAndExpand" />

        <!--二级菜单-->

        <ListView x:Name="SecondaryListView" Grid.Row="2" VerticalOptions="End" SeparatorVisibility="None" Margin="0,-6,0,0">

            <ListView.ItemTemplate>

                <DataTemplate>

                    <ViewCell>

                        <Grid HeightRequest="48">

                            <Grid.ColumnDefinitions>

                                <ColumnDefinition Width="48"/>

                                <ColumnDefinition Width="*" />

                            </Grid.ColumnDefinitions>

                            <BoxView BackgroundColor="{Binding Color}" WidthRequest="5" HeightRequest="26" HorizontalOptions="Start" VerticalOptions="Center" IsVisible="{Binding Selected}" />

                            <Label x:Name="IconLabel" Text="{Binding Icon}" FontFamily="{Binding FontFamily}" TextColor="{Binding Color}" FontSize="16" HorizontalOptions="Center" VerticalOptions="Center" />

                            <Label Grid.Column="1" Text="{Binding Title}" TextColor="{Binding Color}" FontSize="14" VerticalOptions="Center" />

                        </Grid>

                    </ViewCell>

                </DataTemplate>

            </ListView.ItemTemplate>

        </ListView>

    </Grid>

</ContentPage>
张高兴的 Xamarin.Forms 开发笔记:为 Android 与 iOS 引入 UWP 风格的汉堡菜单 ( MasterDetailPage )的更多相关文章
- 张高兴的 Xamarin.Forms 开发笔记:Android 快捷方式 Shortcut 应用
一.Shortcut 简介 Shortcut 是 Android 7.1 (API Level 25) 的新特性,类似于苹果的 3D Touch ,但并不是压力感应,只是一种长按菜单.Shortcut ...
- 张高兴的 Xamarin.Forms 开发笔记:TapGestureRecognizer 的简单介绍与应用
最近很少写应用了,一直在忙关于 ASP.NET 的东西(哈欠...).抽点时间对 TapGestureRecognizer 做点总结. 一.简介 TapGestureRecognizer 就是对 Ta ...
- Xamarin.Forms读取并展示Android和iOS通讯录 - TerminalMACS客户端
Xamarin.Forms读取并展示Android和iOS通讯录 - TerminalMACS客户端 本文同步更新地址: https://dotnet9.com/11520.html https:// ...
- Xamarin.Forms 开发资源集合(复制)
复制:https://www.cnblogs.com/mschen/p/10199997.html 收集整理了下 Xamarin.Forms 的学习参考资料,分享给大家,稍后会不断补充: UI样式 S ...
- Xamarin.Forms 开发资源集合
收集整理了下 Xamarin.Forms 的学习参考资料,分享给大家,稍后会不断补充: UI样式 Snppts: Xamarin Forms UI Snippets. Prebuilt Templat ...
- 演练:使用Xamarin.Forms开发产品介绍性质的应用(VB版)
概述 Xamarin这个使用mono和.net core的跨平台开发框架这几年在不断发展.被微软收购后的Xamarin为个人开发者提供了免费版的Xamarin for Visual Studio,吸引 ...
- Xamarin.Forms开发APP
Xamarin.Forms+Prism(1)—— 开发准备 准备: 1.VS2017(推荐)或VS2015: 2.JDK 1.8以上: 3.Xamarin.Forms 最新版: 4.Prism 扩展, ...
- Xamarin.Forms 开发IOS、Android、UWP应用
C#语言特点,简单.快速.高效.本次我们通过C#以及Xaml来做移动开发. 1.开发工具visual studio 2015或visual studio 2017.当然visual studio 20 ...
- Xamarin.Forms学习系列之Android集成极光推送
一般App都会有消息推送的功能,如果是原生安卓或者IOS集成消息推送很容易,各大推送平台都有相关的Sample,但是关于Xamarin.Forms的消息推送集成的资料非常少,下面就说下Xamarin. ...
随机推荐
- 大数据Python学习大纲
最近公司在写一个课程<大数据运维实训课>,分为4个部分,linux实训课.Python开发.hadoop基础知识和项目实战.这门课程主要针对刚从学校毕业的学生去应聘时不会像一个小白菜一样被 ...
- 树上差分 (瞎bb) [树上差分][LCA]
做noip2015的运输计划写了好久好久写不出来 QwQ 于是先来瞎bb一下树上差分 混积分 树上差分有2个常用的功能: (1)记录从点i到i的父亲这条路径走过几次 (2)将每条路径(s,t ...
- pb日志查看记录
因为日志的种类比较多,这里记录下来,方便查看! 1 pb下发日志查看 目前已经确定220-224 603都是这么查看的.手工下发的业务应该都是这么查看的,其实只要去确定步骤2中的序号,就可以直接进入步 ...
- (转)java提高篇(四)-----理解java的三大特性之多态
面向对象编程有三大特性:封装.继承.多态. 封装隐藏了类的内部实现机制,可以在不影响使用的情况下改变类的内部结构,同时也保护了数据.对外界而已它的内部细节是隐藏的,暴露给外界的只是它的访问方法. 继承 ...
- BZOJ-1491-社交网络
题目链接:https://vjudge.net/problem/HYSBZ-1491 题目大意:中文题目,题意见题目 题目分析:由于数据量很小,可以考虑进行Floyd算法. 第一次进行Floyd算法, ...
- Objectiv-c - UICollectionViewLayout自定义布局-瀑布流
最近刚写的一个简单的瀑布流. 整体思路可能不是很完善. 不过也算是实现效果了. 高手勿喷 思路: 自定义UICollectionViewLayout实际上就是需要返回每个item的fram就可以了. ...
- docker - 由于docker swarm子网与host机器网络冲突导致的container通信问题的解决方案
背景 近期,公司网络要迁移到新的网段,所以原来在服务器上面搭建的docker swarm需要重新构建... 拿到新的服务器地址看了一下,“10.xxx.xxx.xxx" ... 纳尼,这IP ...
- C# 代码规范和质量检查工具 StyleCop.Analyzers
简介 原来一直用 ReSharper 来进行代码质量检查,不过毕竟是收费的,所以想找个免费的可以推广给公司的同事也一起用.搜索了一下,找到了StyleCop,但是我在 VS 2015里安装 Style ...
- [BZOJ 2500] 幸福的道路
照例先贴题面(汪汪汪) 2500: 幸福的道路 Time Limit: 20 Sec Memory Limit: 256 MBSubmit: 368 Solved: 145[Submit][Sta ...
- python中数字类型与处理工具
python中的数字类型工具 python中为更高级的工作提供很多高级数字编程支持和对象,其中数字类型的完整工具包括: 1.整数与浮点型, 2.复数, 3.固定精度十进制数, 4.有理分数, 5.集合 ...