CSharpGL(28)得到高精度可定制字形贴图的极简方法
CSharpGL(28)得到高精度可定制字形贴图的极简方法
回顾
以前我用SharpFont实现了解析TTF文件从而获取字形贴图的功能,并最终实现了用OpenGL渲染文字。
使用SharpFont,美中不足的是:
SharpFont太大了,有上千行代码,且逻辑复杂难懂。
SharpFont画出的字形精度有限,虽然也很高,但是确实有限。用OpenGL渲染出来后会发现边缘不是特别清晰。
SharpFont对加粗、斜体、下划线、删除线如何支持,能否支持?完全不知道。
Graphics+Font
最近我在分析GLGUI(https://github.com/bitzhuwei/GLGUI)的代码时,惊喜地发现它给出了一个极其简单的方案,就是SizeF MeasureString(string text, Font font);和DrawString(string s, Font font, Brush brush, float x, float y);。
Graphics.MeasureString()能够得到任意字符串的Size。
Graphics.DrawString()能把任意字符串写到Bitmap上。
单个字形
首先我们要得到每个字形的Size。
由于MeasureString()返回的字形宽度大于字形实际宽度,所以需要缩减一下。
         /// <summary>

         /// Get glyph's size by graphics.MeasureString().

         /// Then shrink glyph's size.

         /// xoffset now means offset in a single glyph's bitmap.

         /// </summary>

         /// <param name="fontBitmap"></param>

         /// <param name="charSet"></param>

         /// <param name="singleCharWidth"></param>

         /// <param name="singleCharHeight"></param>

         private static void PrepareInitialGlyphDict(FontBitmap fontBitmap, string charSet, out int singleCharWidth, out int singleCharHeight)

         {

             // Get glyph's size by graphics.MeasureString().

             {

                 int maxWidth = , maxHeight = ;

                 float fontSize = fontBitmap.GlyphFont.Size;

                 using (var bitmap = new Bitmap(, , PixelFormat.Format24bppRgb))

                 {

                     using (Graphics graphics = Graphics.FromImage(bitmap))

                     {

                         foreach (char c in charSet)

                         {

                             SizeF size = graphics.MeasureString(c.ToString(), fontBitmap.GlyphFont);

                             var info = new GlyphInfo(, , (int)size.Width, (int)size.Height);

                             fontBitmap.GlyphInfoDictionary.Add(c, info);

                             if (maxWidth < (int)size.Width) { maxWidth = (int)size.Width; }

                             if (maxHeight < (int)size.Height) { maxHeight = (int)size.Height; }

                         }

                     }

                 }

                 singleCharWidth = maxWidth;

                 singleCharHeight = maxHeight;

             }

             // shrink glyph's size.

             // xoffset now means offset in a single glyph's bitmap.

             {

                 using (var bitmap = new Bitmap(singleCharWidth, singleCharHeight))

                 {

                     using (var graphics = Graphics.FromImage(bitmap))

                     {

                         Color clearColor = Color.FromArgb(, , , );

                         foreach (var item in fontBitmap.GlyphInfoDictionary)

                         {

                             if (item.Key == ' ' || item.Key == '\t' || item.Key == '\r' || item.Key == '\n') { continue; }

                             graphics.Clear(clearColor);

                             graphics.DrawString(item.Key.ToString(), fontBitmap.GlyphFont, Brushes.White, , );

                             BitmapData data = bitmap.LockBits(new Rectangle(, , bitmap.Width, bitmap.Height), ImageLockMode.ReadOnly, PixelFormat.Format24bppRgb);

                             RetargetGlyphRectangleInwards(data, item.Value);

                             bitmap.UnlockBits(data);

                         }

                     }

                 }

             }

         }

         /// <summary>

         /// Returns true if the given pixel is empty (i.e. black)

         /// </summary>

         /// <param name="bitmapData"></param>

         /// <param name="x"></param>

         /// <param name="y"></param>

         private static unsafe bool IsEmptyPixel(BitmapData bitmapData, int x, int y)

         {

             var addr = (byte*)(bitmapData.Scan0) + bitmapData.Stride * y + x * ;

             return (*addr ==  && *(addr + ) ==  && *(addr + ) == );

         }

         /// <summary>

         /// shrink glyph's width to fit in exactly.

         /// </summary>

         /// <param name="bitmapData"></param>

         /// <param name="glyph"></param>

         private static void RetargetGlyphRectangleInwards(BitmapData bitmapData, GlyphInfo glyph)

         {

             int startX, endX;

             {

                 bool done = false;

                 for (startX = glyph.xoffset; startX < bitmapData.Width; startX++)

                 {

                     for (int j = glyph.yoffset; j < glyph.yoffset + glyph.height; j++)

                     {

                         if (!IsEmptyPixel(bitmapData, startX, j))

                         {

                             done = true;

                             break;

                         }

                     }

                     if (done) { break; }

                 }

             }

             {

                 bool done = false;

                 for (endX = glyph.xoffset + glyph.width - ; endX >= ; endX--)

                 {

                     for (int j = glyph.yoffset; j < glyph.yoffset + glyph.height; j++)

                     {

                         if (!IsEmptyPixel(bitmapData, endX, j))

                         {

                             done = true;

                             break;

                         }

                     }

                     if (done) { break; }

                 }

             }

             if (endX < startX)

             {

                 //startX = endX = glyph.xoffset;

                 glyph.width = ;

             }

             else

             {

                 glyph.xoffset = startX;

                 glyph.width = endX - startX + ;

             }

         }
PrepareInitialGlyphDict
如下图所示,这是经过这一步后得到的字形信息:height、width和xoffset。这里xoffset暂时描述了单个字形的左边距,在最后,xoffset会描述字形左上角在整个贴图中的位置。

最后贴图的Size
由于在创建Bitmap对象时就得指定它的Size,所以这一步要先算出这个Size。
为了能够尽可能使用最小的贴图,我们按下图所示的方式依次排布所有字形。

如上图所示,每个黑框代表一个字形,尽量按正方形来排布,结束后就能得到所需的Size(width和height)
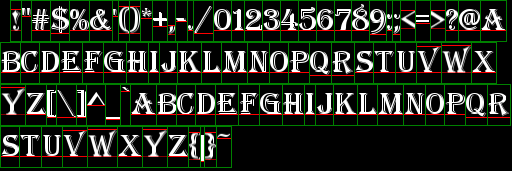
制作贴图
万事俱备,可以创建贴图了。
按照上一步的方式来排布各个字形,并且这次真的把字形贴上去。
         /// <summary>

         /// Print the final bitmap that contains all glyphs.

         /// And also setup glyph's xoffset, yoffset.

         /// </summary>

         /// <param name="fontBitmap"></param>

         /// <param name="singleCharWidth"></param>

         /// <param name="singleCharHeight"></param>

         /// <param name="width"></param>

         /// <param name="height"></param>

         private static void PrintBitmap(FontBitmap fontBitmap, int singleCharWidth, int singleCharHeight, int width, int height)

         {

             var bitmap = new Bitmap(width, height);

             using (var graphics = Graphics.FromImage(bitmap))

             {

                 using (var glyphBitmap = new Bitmap(singleCharWidth, singleCharHeight))

                 {

                     using (var glyphGraphics = Graphics.FromImage(glyphBitmap))

                     {

                         int currentX = leftMargin, currentY = ;

                         Color clearColor = Color.FromArgb(, , , );

                         foreach (KeyValuePair<char, GlyphInfo> item in fontBitmap.GlyphInfoDictionary)

                         {

                             glyphGraphics.Clear(clearColor);

                             glyphGraphics.DrawString(item.Key.ToString(), fontBitmap.GlyphFont,

                                 Brushes.White, , );

                             // move to new line if this line is full.

                             if (currentX + item.Value.width > width)

                             {

                                 currentX = leftMargin;

                                 currentY += singleCharHeight;

                             }

                             // draw the current glyph.

                             graphics.DrawImage(glyphBitmap,

                                 new Rectangle(currentX, currentY, item.Value.width, item.Value.height),

                                 item.Value.ToRectangle(),

                                 GraphicsUnit.Pixel);

                             // move line cursor to next(right) position.

                             item.Value.xoffset = currentX;

                             item.Value.yoffset = currentY;

                             // prepare for next glyph's position.

                             currentX += item.Value.width + glyphInterval;

                         }

                     }

                 }

             }

             fontBitmap.GlyphBitmap = bitmap;

         }
PrintBitmap
结果示意图如下。

Demo
为了便于debug和观看效果,我在CSharpGL.Demos里加了下面这个Demo。你可以指定任意字体,设置是否启用加粗、斜体、下划线、删除线等效果。

用OpenGL渲染文字时,边缘的效果也很令人满意了。


总结
由于使用了.NET自带的Graphics和Font类型,就完全去掉了SharpFont那上千行代码。CSharpGL.dll由此下降了200K。效果增强,体积下降,代码简化,各个方面都获得提升。
CSharpGL(28)得到高精度可定制字形贴图的极简方法的更多相关文章
- CSharpGL(41)改进获取字形贴图的方法
CSharpGL(41)改进获取字形贴图的方法 在(http://www.cnblogs.com/bitzhuwei/p/CSharpGL-28-simplest-way-to-creating-fo ...
- C#+OpenGL+FreeType显示3D文字(1) - 从TTF文件导出字形贴图
C#+OpenGL+FreeType显示3D文字(1) - 从TTF文件导出字形贴图 +BIT祝威+悄悄在此留下版了个权的信息说: 最近需要用OpenGL绘制文字,这是个很费时费力的事.一般的思路就是 ...
- iView定制主题报错问题的解决方法
按照iView官网来是这样的: 1. 在main.js当前目录下新建themes文件夹,里面新建一个叫blue.less的文件 2. 在mian.js里面引入blue.less文件 3. blue.l ...
- HighCharts 根据spline-plot-bands图,定制自己的图(区间里显示多个数据)
公司项目里有这样一个需求,根据数据绘图,但是数据很多,不可能每个点每个点的去画,这样显示的数据太密集非常的难看(更显得技术不专业),如图: 所以我和项目经理商量如何显示这个图形,按照他的意思是,按照范 ...
- BIT祝威博客汇总(Blog Index)
+BIT祝威+悄悄在此留下版了个权的信息说: 关于硬件(Hardware) <穿越计算机的迷雾>笔记 继电器是如何成为CPU的(1) 继电器是如何成为CPU的(2) 关于操作系统(Oper ...
- ASP.NET Core应用的错误处理[3]:ExceptionHandlerMiddleware中间件如何呈现“定制化错误页面”
DeveloperExceptionPageMiddleware中间件利用呈现出来的错误页面实现抛出异常和当前请求的详细信息以辅助开发人员更好地进行纠错诊断工作,而ExceptionHandlerMi ...
- CSharpGL(26)在opengl中实现控件布局/渲染文字
CSharpGL(26)在opengl中实现控件布局/渲染文字 效果图 如图所示,可以将文字.坐标轴固定在窗口的一角. 下载 CSharpGL已在GitHub开源,欢迎对OpenGL有兴趣的同学加入( ...
- CSharpGL(0)一个易学易用的C#版OpenGL
+BIT祝威+悄悄在此留下版了个权的信说: CSharpGL(0)一个易学易用的C#版OpenGL CSharpGL是我受到SharpGL的启发,在整理了SharpGL,GLM,SharpFont等开 ...
- ExceptionHandlerMiddleware中间件如何呈现“定制化错误页面”
ExceptionHandlerMiddleware中间件如何呈现“定制化错误页面” DeveloperExceptionPageMiddleware中间件利用呈现出来的错误页面实现抛出异常和当前请求 ...
随机推荐
- .Net多线程编程—System.Threading.Tasks.Parallel
System.Threading.Tasks.Parallel类提供了Parallel.Invoke,Parallel.For,Parallel.ForEach这三个静态方法. 1 Parallel. ...
- 【.net 深呼吸】程序集的热更新
当一个程序集被加载使用的时候,出于数据的完整性和安全性考虑,程序集文件(在99.9998%的情况下是.dll文件)会被锁定,如果此时你想更新程序集(实际上是替换dll文件),是不可以操作的,这时你得把 ...
- 前端学HTTP之Web主机托管
前面的话 对内容资源的存储.协调以及管理的职责统称为Web主机托管.主机托管是Web服务器的主要功能之一.保存并提供内容,记录对内容的访问以及管理内容都离不开服务器.如果不想自行管理服务器所需的软硬件 ...
- tomcat开发远程调试端口以及利用eclipse进行远程调试
一.tomcat开发远程调试端口 方法1 WIN系统 在catalina.bat里: SET CATALINA_OPTS=-server -Xdebug -Xnoagent -Djava.compi ...
- 从啥也不会到可以胜任最基本的JavaWeb工作,推荐给新人的学习路线(二)
在上一节中,主要阐述了JavaScript方面的学习路线.先列举一下我朋友的经历,他去过培训机构,说是4个月后月薪过万,虽然他现在还未达到这个指标. 培训机构一般的套路是这样:先教JavaSE,什么都 ...
- 【uwp】浅谈China Daily 中划词翻译的实现
学习uwp开发也有一段时间了,最近上架了一个小应用(China Daily),现在准备将开发中所学到的一些东西拿出来跟大家分享交流一下. 先给出应用的下载链接:China Daily , 感兴趣的童鞋 ...
- web 前端(轮番插件)
<!DOCTYPE html> <html lang="zh-cn"> <head> <meta charset="UTF-8& ...
- 在 Windows7 上按照 MySQL5.7
在 Windows7 上按照 MySQL5.7 1.从官网下载最新版本的 MySQL,这里下载的是 mysql-5.7.17-win32: 2.将下载的 mysql-5.7.17-win32.zip ...
- Atitit 软件工程概览attilax总结
Atitit 软件工程概览attilax总结 1.1. .2 软件工程的发展 进一步地,结合人类发展史和计算机世界演化史来考察软件工程的发展史. 表2 软件工程过程模型 表2将软件工程的主要过程模型做 ...
- java的poi技术读取Excel数据到MySQL
这篇blog是介绍java中的poi技术读取Excel数据,然后保存到MySQL数据中. 你也可以在 : java的poi技术读取和导入Excel了解到写入Excel的方法信息 使用JXL技术可以在 ...