springboot 集成完整的swagger2
springboot 在集成swagger中会不会遇到各种问题:
1、swagger 进行接口鉴权(比如设置header的token,接口进行拦截处理)。
2、swagger 进行实体属性解析(pojo类的属性注解无法解析)。
3、swagger 进行响应码统一(code状态吗标识、200响应成功,响应体解析)。
4、swagger 设置接口共用参数(统一每个接口都存在的参数)。
以下是解决问题配置信息
一、引入依赖包
使用之前请更新或直接引用该版本依赖包
更新版本地址:接口依赖jar https://mvnrepository.com/artifact/io.springfox/springfox-swagger2
ui 依赖jar https://mvnrepository.com/artifact/io.springfox/springfox-swagger-ui
<dependency>

    <groupId>io.springfox</groupId>

    <artifactId>springfox-swagger2</artifactId>

    <version>2.9.2</version>

</dependency>

<dependency>

    <groupId>io.springfox</groupId>

    <artifactId>springfox-swagger-ui</artifactId>

    <version>2.9.2</version>

</dependency>
二、创建swagger 配置类
1、全局参数

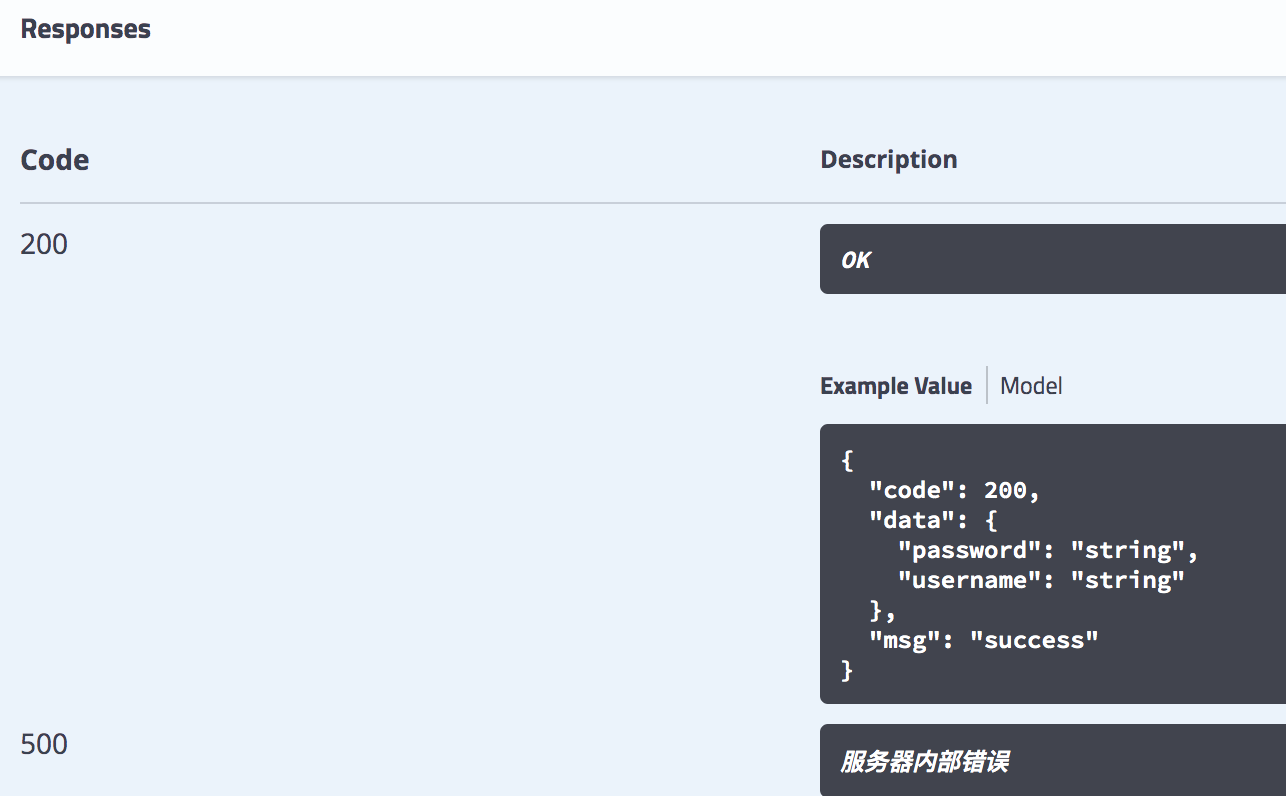
2、全局响应参数,每个接口都存在响应值,方便沟通
3、设置安全认证
点击 authorize 按钮输入验证信息,则每次调试接口都会传响应的信息

废话少说!上配置代码
package com.example.config.swagger; import org.springframework.context.annotation.Bean;
import org.springframework.context.annotation.Configuration;
import org.springframework.context.annotation.Profile;
import org.springframework.web.bind.annotation.RequestMethod;
import springfox.documentation.builders.*;
import springfox.documentation.schema.ModelRef;
import springfox.documentation.service.*;
import springfox.documentation.spi.DocumentationType;
import springfox.documentation.spring.web.plugins.Docket;
import springfox.documentation.swagger2.annotations.EnableSwagger2; import java.util.ArrayList;
import java.util.List; /**
*
* @author niunafei
*
* @Profile 注解 标识加载在dev和test文件使用
*/
@Configuration
@EnableSwagger2
//@Profile({"dev", "test"})
public class SwaggerConfig { @Bean
public Docket createRestApi() {
return new Docket(DocumentationType.SWAGGER_2).groupName("spring-test-interface")
//加载配置信息
.apiInfo(apiInfo())
//设置全局参数
.globalOperationParameters(globalParamBuilder())
//设置全局响应参数
.globalResponseMessage(RequestMethod.GET,responseBuilder())
.globalResponseMessage(RequestMethod.POST,responseBuilder())
.globalResponseMessage(RequestMethod.PUT,responseBuilder())
.globalResponseMessage(RequestMethod.DELETE,responseBuilder())
.select()
//加载swagger 扫描包
.apis(RequestHandlerSelectors.basePackage("com.example"))
.paths(PathSelectors.any()).build()
//设置安全认证
.securitySchemes(security()); } /**
* 获取swagger创建初始化信息
* @return
*/
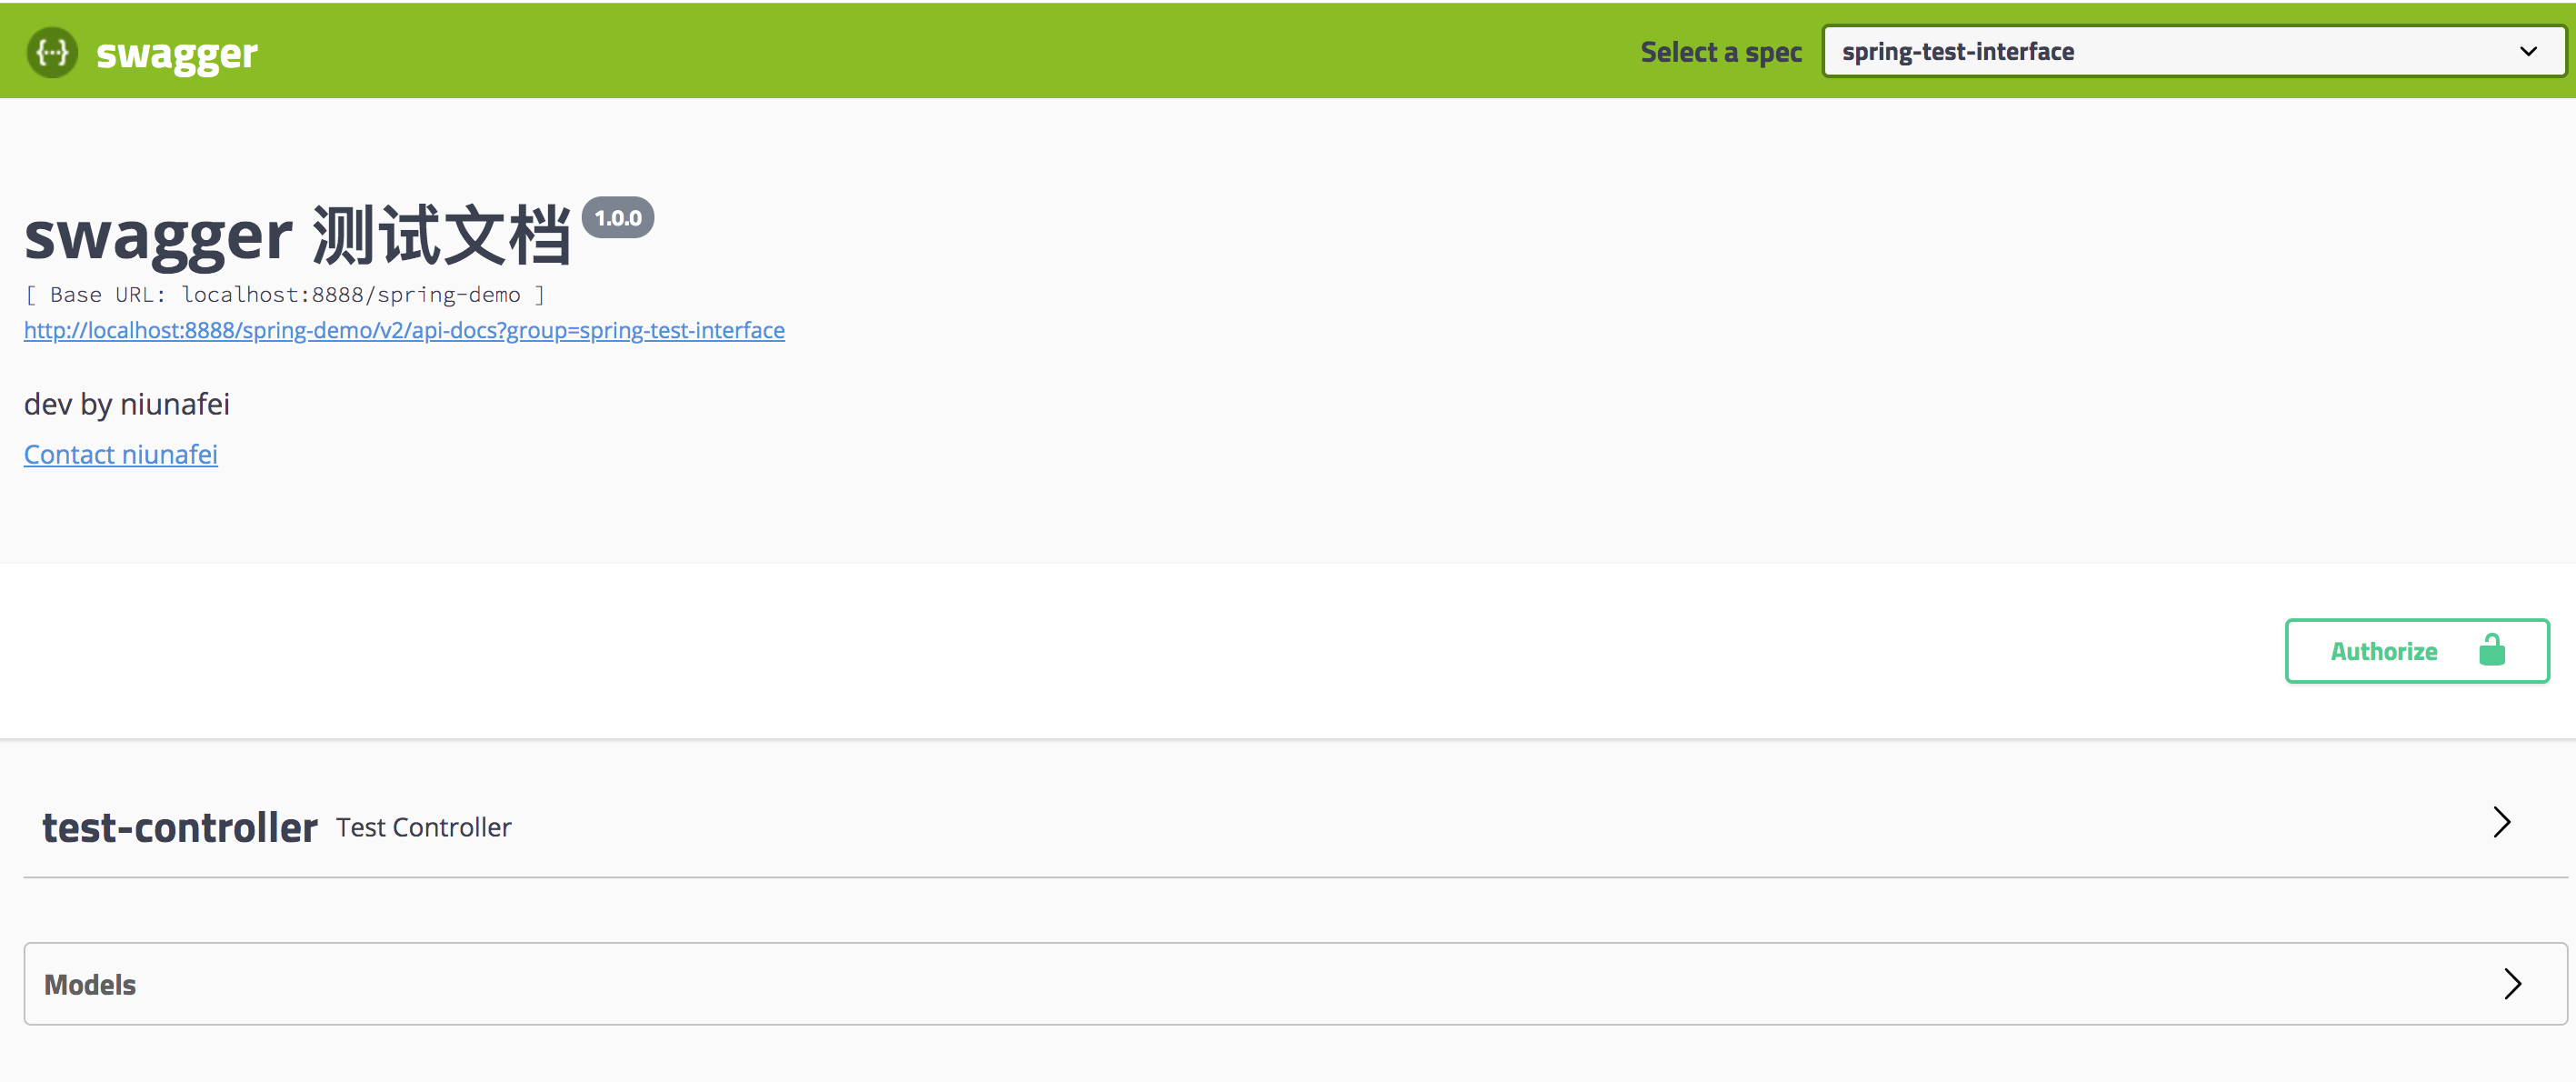
private ApiInfo apiInfo() {
Contact contact = new Contact("niunafei", "", "niunafei0315@163.com");
return new ApiInfoBuilder().title("swagger 测试文档").description("dev by niunafei").contact(contact)
.version("1.0.0").build();
} /**
* 安全认证参数
* @return
*/
private List<ApiKey> security() {
List<ApiKey> list=new ArrayList<>();
list.add(new ApiKey("token", "token", "header"));
return list;
} /**
* 构建全局参数列表
* @return
*/
private List<Parameter> globalParamBuilder(){
List<Parameter> pars = new ArrayList<>();
pars.add(parameterBuilder("token","令牌","string","header",false).build());
return pars;
} /**
* 创建参数
* @return
*/
private ParameterBuilder parameterBuilder(String name,String desc,String type ,String parameterType,boolean required) {
ParameterBuilder tokenPar = new ParameterBuilder();
tokenPar.name(name).description(desc).modelRef(new ModelRef(type)).parameterType(parameterType).required(required).build();
return tokenPar;
} /**
* 创建全局响应值
* @return
*/
private List<ResponseMessage> responseBuilder() {
List<ResponseMessage> responseMessageList = new ArrayList<>();
responseMessageList.add(new ResponseMessageBuilder().code(200).message("响应成功").build());
responseMessageList.add(new ResponseMessageBuilder().code(500).message("服务器内部错误").build());
return responseMessageList;
} }
以上代码中 @Profile({"dev", "test"})注解是在开发环境和测试环境的时候加载该类,线上生产环境为安全不建议创建swagger的bean
三、引入配置文件,并且配置好扫描类,但是仍然不能访问swagger 页面,这时候请考虑springboot的mvc指定访问路径
addResourceHandlers 方法中已经指定swagger-ui访问页的路径
同时该配置中处理了mvc 跨域的问题
addCorsMappings 方法中是在拦截 addInterceptors 方法执行后进行的跨域设置
corsFilter可以解决所有跨域问题
package com.example.config.mvc;

//import com.example.config.interceptor.LoginInterceptor;

import org.springframework.beans.factory.annotation.Autowired;

import org.springframework.context.annotation.Bean;

import org.springframework.context.annotation.Configuration;

import org.springframework.web.cors.CorsConfiguration;

import org.springframework.web.cors.UrlBasedCorsConfigurationSource;

import org.springframework.web.filter.CorsFilter;

import org.springframework.web.servlet.config.annotation.CorsRegistry;

import org.springframework.web.servlet.config.annotation.InterceptorRegistry;

import org.springframework.web.servlet.config.annotation.ResourceHandlerRegistry;

import org.springframework.web.servlet.config.annotation.WebMvcConfigurationSupport;

/**

 * @author niunafei

 * @function

 * @email niunafei0315@163.com

 * @date 2019/6/28  下午12:28

 */

@Configuration

public class WebMvcConfigurerAdapter extends WebMvcConfigurationSupport {

//    @Autowired

//    private LoginInterceptor loginInterceptor;

    @Override

    public void addInterceptors(InterceptorRegistry registry) {

        // 添加拦截接口请求处理,

//        registry.addInterceptor(loginInterceptor).addPathPatterns("/api/**");

    }

    @Override

    protected void addResourceHandlers(ResourceHandlerRegistry registry) {

        //定向swagger 位置

        registry.addResourceHandler("/**").addResourceLocations("classpath:/static/");

        registry.addResourceHandler("swagger-ui.html").addResourceLocations("classpath:/META-INF/resources/");

        registry.addResourceHandler("/webjars/**").addResourceLocations("classpath:/META-INF/resources/webjars/");

    }

    /**

     * 拦截后的跨域解决

     *

     * @param registry

     */

    @Override

    public void addCorsMappings(CorsRegistry registry) {

        registry.addMapping("/**").allowCredentials(true).allowedHeaders("*").allowedOrigins("*").allowedMethods("GET",

                "POST", "PUT", "OPTIONS");

    }

    /**

     * 处理拦截前处理检测 授权跨域问题

     *

     * @return

     */

    @Bean

    public CorsFilter corsFilter() {

        UrlBasedCorsConfigurationSource source = new UrlBasedCorsConfigurationSource();

        source.registerCorsConfiguration("/**", corsConfig());

        return new CorsFilter(source);

    }

    /**

     * @return

     */

    private CorsConfiguration corsConfig() {

        CorsConfiguration corsConfiguration = new CorsConfiguration();

        // 请求常用的三种配置,*代表允许所有,当时你也可以自定义属性(比如header只能带什么,只能是post方式等等)

        corsConfiguration.addAllowedOrigin("*");

        corsConfiguration.addAllowedHeader("*");

        corsConfiguration.addAllowedMethod("*");

        corsConfiguration.setAllowCredentials(true);

        corsConfiguration.setMaxAge(3600L);

        return corsConfiguration;

    }

}
四、swagger 返回扫描的问题
接口层请使用泛型返回,个人定义的统一返回类
ApiModel是生成swagger时扫描的实体注解
ApiModelProperty 是属性注解
ApiHttpCode 是一个响应值的枚举类
package com.example.config.response;

import io.swagger.annotations.ApiModel;

import io.swagger.annotations.ApiModelProperty;

/**

 * @author niunafei

 * @function

 * @email niunafei0315@163.com

 * @date 2019/6/28  下午2:00

 */

@ApiModel()

public class ApiResult<T> {

    private static final Object RESULT_OBJECT=new Object();

    @ApiModelProperty(value = "编码", name = "code", dataType = "int", example = "200")

    private Integer code;

    @ApiModelProperty(value = "提示", name = "msg", dataType = "string", example = "success")

    private String msg;

    @ApiModelProperty(value = "内容", name = "data", dataType = "t")

    private T data;

    public ApiResult() {

    }

    public ApiResult(ApiHttpCode code, T data) {

        this.code = code.getCode();

        this.msg = code.getDesc();

        this.data = data;

    }

    public ApiResult(Integer code, String msg, T data) {

        this.code = code;

        this.msg = msg;

        this.data = data;

    }

    public static ApiResult<Object> ok() {

        return ApiResult.ok(ApiHttpCode.SUCCESS, RESULT_OBJECT);

    }

    public static <T> ApiResult<T> ok(T data) {

        return ApiResult.ok(ApiHttpCode.SUCCESS, data);

    }

    public static <T> ApiResult<T> ok(ApiHttpCode code, T data) {

        return ApiResult.ok(code.getCode(), code.getDesc(), data);

    }

    public static <T> ApiResult<T> ok(Integer code, String msg, T data) {

        return new ApiResult(code, msg, data);

    }

    public static ApiResult<Object> error() {

        return ApiResult.error(ApiHttpCode.ERROR, new Object());

    }

    public static <T> ApiResult<T> error(T data) {

        return ApiResult.error(ApiHttpCode.ERROR, data);

    }

    public static <T> ApiResult<T> error(ApiHttpCode code) {

        return ApiResult.error(code.getCode(),code.getDesc(),null);

    }

    public static <T> ApiResult<T> error(ApiHttpCode code, T data) {

        return ApiResult.error(code.getCode(), code.getDesc(), data);

    }

    public static <T> ApiResult<T> error(Integer code, String msg) {

        return ApiResult.error(code, msg, null);

    }

    public static <T> ApiResult<T> error(Integer code, String msg, T data) {

        return new ApiResult(code, msg, data);

    }

    public Integer getCode() {

        return code;

    }

    public String getMsg() {

        return msg;

    }

    public T getData() {

        return data;

    }

}
ApiHttpCode枚举类
package com.example.config.response;

/**

 * @author niunafei

 * @function

 * @email niunafei0315@163.com

 * @date 2019/6/28  下午2:02

 */

public enum ApiHttpCode {

    /**

     * 响应成功

     */

    SUCCESS(200, "OK"),

    /**

     * 服务器异常

     */

    ERROR(500, "ERROR"),

    /**

     * 未授权访问

     */

    UNAUTHORIZED(401, "访问未授权");

    private int code;

    private String desc;

    ApiHttpCode(int code, String desc) {

        this.code = code;

        this.desc = desc;

    }

    public int getCode() {

        return code;

    }

    public String getDesc() {

        return desc;

    }

    public static ApiHttpCode valueOf(int value) {

        for (ApiHttpCode role : ApiHttpCode.values()) {

            if (role.code == value) {

                return role;

            }

        }

        return null;

    }

}
五、接口层引用
@Api注解添加
接口方法上添加@ApiOperation 才可以生成文档
@ApiImplicitParams 用来定义接口参数,并指定描述的,
@ApiResponses 用来定义添加额外的响应值,与配置类中的全局响应功能一致。

访问接口页面 http://localhost:8888/spring-demo/swagger-ui.html
访问格式:http://IP地址或域名:端口/应用名称/swagger-ui.html
无关后话,与swagger 无关:授权检测的创建继承HandlerInterceptorAdapter 方法
package com.example.config.interceptor;

import org.springframework.stereotype.Component;

import org.springframework.web.servlet.ModelAndView;

import org.springframework.web.servlet.handler.HandlerInterceptorAdapter;

import javax.servlet.http.HttpServletRequest;

import javax.servlet.http.HttpServletResponse;

/**

 * @author niunafei

 * @function

 * @email niunafei0315@163.com

 * @date 2019/6/28  下午12:31

 */

@Component

public class LoginInterceptor extends HandlerInterceptorAdapter {

    @Override

    public boolean preHandle(HttpServletRequest request, HttpServletResponse response, Object handler) throws Exception {

        //未开启权限检测 跳过

        return true;

    }

    @Override

    public void postHandle(HttpServletRequest httpServletRequest, HttpServletResponse httpServletResponse, Object

            o, ModelAndView modelAndView) throws Exception {

    }

    @Override

    public void afterCompletion(HttpServletRequest httpServletRequest, HttpServletResponse

            httpServletResponse, Object o, Exception e) throws Exception {

    }

}
token出现验证异常 https://www.cnblogs.com/fengli9998/p/7852685.html
springboot 集成完整的swagger2的更多相关文章
- SpringBoot | 第十章:Swagger2的集成和使用
前言 前一章节介绍了mybatisPlus的集成和简单使用,本章节开始接着上一章节的用户表,进行Swagger2的集成.现在都奉行前后端分离开发和微服务大行其道,分微服务及前后端分离后,前后端开发的沟 ...
- Springboot集成swagger2生成接口文档
[转载请注明]: 原文出处:https://www.cnblogs.com/jstarseven/p/11509884.html 作者:jstarseven 码字挺辛苦的..... 一 ...
- SpringBoot 集成Swagger2自动生成文档和导出成静态文件
目录 1. 简介 2. 集成Swagger2 2.1 导入Swagger库 2.2 配置Swagger基本信息 2.3 使用Swagger注解 2.4 文档效果图 3. 常用注解介绍 4. Swagg ...
- SpringBoot集成Swagger2实现Restful(类型转换错误解决办法)
1.pom.xml增加依赖包 <dependency> <groupId>io.springfox</groupId> <artifactId>spri ...
- springboot集成swagger2构建RESTful API文档
在开发过程中,有时候我们需要不停的测试接口,自测,或者交由测试测试接口,我们需要构建一个文档,都是单独写,太麻烦了,现在使用springboot集成swagger2来构建RESTful API文档,可 ...
- SpringBoot集成Swagger2 以及汉化 快速教程
(一) Swagger介绍 Swagger 是一款RESTFUL接口的文档在线自动生成+功能测试功能软件 (二)为什么使用Swagger 在现在的开发过程中还有很大一部分公司都是以口口相传的方式来进行 ...
- SpringBoot集成Swagger2在线文档
目录 SpringBoot集成Swagger2在线文档 前言 集成SpringBoot 登录接口文档示例 代码 效果 注解说明 总结 SpringBoot集成Swagger2在线文档 前言 不得不说, ...
- springboot 集成swagger2.x 后静态资源报404
package com.bgs360.configuration; import org.springframework.context.EnvironmentAware; import org.sp ...
- springboot集成mybatis(逆向工程),热部署以及整合Swagger2
本文是作者原创,版权归作者所有.若要转载,请注明出处. springboot集成mybatis和mybatis-generator插件 1.新建Springboot项目(略) 2.导入相关依赖 < ...
随机推荐
- Linux性能测试 strace命令
1 功能说明 strace 命令是一种强大的工具 , 能够显示任何由用户空间程式发出的系统调用 . strace 显示这些调用的参数并返回符号形式的值 . strace 从内核接收信息 , ...
- WPF绘制自定义窗口
原文:WPF绘制自定义窗口 WPF是制作界面的一大利器,下面就用WPF模拟一下360的软件管理界面,360软件管理界面如下: 界面不难,主要有如下几个要素: 窗体的圆角 自定义标题栏及按钮 自定义状态 ...
- uml系列(七)——互动图
互动图uml描述如何对象的描述在系统交互动作 . 废话不多说,还是来张图: 概念 交互图,主要描写叙述的是系统中的一组对象的消息的传递的.为对象间的交互定义了一个可视的表示方法. 构 ...
- Haroopad 安装到 Mac OSX
打开Terminal 控制台 粘贴运行代码安装换cask: ruby -e "$(curl -fsSL https://raw.githubusercontent.com/Homebrew/ ...
- 从零开始学习 asp.net core 2.1 web api 后端api基础框架(二)-创建项目
原文:从零开始学习 asp.net core 2.1 web api 后端api基础框架(二)-创建项目 版权声明:本文为博主原创文章,未经博主允许不得转载. https://blog.csdn.ne ...
- Android正在使用Handler实现消息分发机制(零)
演讲前,AsyncTask文章.我们在最后谈到.AsyncTask它是利用Handler异步消息处理机制,操作结果.使用Message回到主线程,从而执行UI更新线程. 而在我们的日常开发工作,Han ...
- 搭建本地yum源和局域网yum源
搭建本地yum源和局域网yum源 由于很多客户环境是专网,不允许连网,无法使用网上的各种yum源,来回拷贝rpm包安装麻烦,还得解决依赖问题.所以想着搭建个本地/局域网YUM源,方便安装软件. 1 ...
- XF堆栈布局
<?xml version="1.0" encoding="utf-8" ?> <ContentPage xmlns="http:/ ...
- Install Oracle 12c R2 on CentOS 7 silently
准备工作 VMware 虚拟机 CentOS 7 17.08 系统安装包镜像 Oracle 12c R2 软件安装包 配置 yum 库并安装如下包 binutils-2.23.52.0.1-12.el ...
- ubuntu下建立golang的build脚本
在不在os中设置gopath,goroot的情况下 建立build.sh文件,文件内容如下: export GOARCH="386"export GOBIN="/home ...