
springboot集成mybatis(逆向工程),热部署以及整合Swagger2
本文是作者原创,版权归作者所有.若要转载,请注明出处.
springboot集成mybatis和mybatis-generator插件
1.新建Springboot项目(略)
2.导入相关依赖
<!--spring-boot-->

    <parent>

        <groupId>org.springframework.boot</groupId>

        <artifactId>spring-boot-starter-parent</artifactId>

        <version>2.1.6.RELEASE</version>

    </parent>

    <properties>

        <project.build.sourceEncoding>UTF-8</project.build.sourceEncoding>

        <project.reporting.outputEncoding>UTF8</project.reporting.outputEncoding>

        <java.version>1.8</java.version>

    </properties>

    <dependencies>

        <!--web-->

        <dependency>

            <groupId>org.springframework.boot</groupId>

            <artifactId>spring-boot-starter-web</artifactId>

        </dependency>

        <!--test-->

        <dependency>

            <groupId>org.springframework.boot</groupId>

            <artifactId>spring-boot-starter-test</artifactId>

            <scope>test</scope>

        </dependency>

        <!--mybatis-->

        <dependency>

            <groupId>org.mybatis.spring.boot</groupId>

            <artifactId>mybatis-spring-boot-starter</artifactId>

            <version>2.1.1</version>

        </dependency>

        <!--mybatis逆向工程-->

        <dependency>

            <groupId>org.mybatis.generator</groupId>

            <artifactId>mybatis-generator-core</artifactId>

            <version>1.3.7</version>

        </dependency>

        <!--mysql-->

        <dependency>

            <groupId>mysql</groupId>

            <artifactId>mysql-connector-java</artifactId>

        </dependency>

        <!--Druid 数据源-->

        <dependency>

            <groupId>com.alibaba</groupId>

            <artifactId>druid</artifactId>

            <version>1.1.21</version>

        </dependency>

        <!--devtools热部署-->

        <dependency>

            <groupId>org.springframework.boot</groupId>

            <artifactId>spring-boot-devtools</artifactId>

            <optional>true</optional>

            <scope>true</scope>

        </dependency>

        <!-- swagger -->

        <dependency>

            <groupId>io.springfox</groupId>

            <artifactId>springfox-swagger2</artifactId>

            <version>2.9.2</version>

        </dependency>

        <!-- swagger-ui -->

        <dependency>

            <groupId>io.springfox</groupId>

            <artifactId>springfox-swagger-ui</artifactId>

            <version>2.9.2</version>

        </dependency>

    </dependencies>

    <build>

        <plugins>

            <!--maven插件-->

            <plugin>

                <groupId>org.springframework.boot</groupId>

                <artifactId>spring-boot-maven-plugin</artifactId>

            </plugin>

            <!--mybatis逆向工程-->

            <plugin>

                <groupId>org.mybatis.generator</groupId>

                <artifactId>mybatis-generator-maven-plugin</artifactId>

                <version>1.3.7</version>

                <configuration>

                    <configurationFile>src/main/resources/generatorConfig.xml</configurationFile>

                    <verbose>true</verbose>

                    <overwrite>true</overwrite>

                </configuration>

            </plugin>

        </plugins>

        <!--加载xml等文件为资源文件-->

        <resources>

            <resource>

                <directory>src/main/resources</directory>

            </resource>

            <resource>

                <directory>src/main/java</directory>

                <includes>

                    <include>**/*.xml</include>

                    <include>**/*.properties</include>

                    <include>**/*.tld</include>

                </includes>

                <filtering>false</filtering>

            </resource>

        </resources>

    </build>
3. 修改application.yml配置文件
server:

  port: 5000 #端口号

  servlet:

    context-path: /pdzx #项目路径

spring:

  datasource:

    driver-class-name: com.mysql.cj.jdbc.Driver

    url: jdbc:mysql://10.3.11.69:3306/pdzx?characterEncoding=utf8&useSSL=false&allowMultiQueries=true&serverTimezone=GMT%2B8

    username: pdzx_pro

    password: cde35TGB3910

  jackson:

    #格式化日期

    date-format:  yyyy-MM-dd HH:mm:ss

    #时区配置

    time-zone: Asia/Shanghai

  devtools:

      restart:

        enabled: true  #设置开启热部署

        additional-paths: src/main/java #重启资源目录

mybatis:

  type-aliases-package: com.pdzx.po #别名

  mapper-locations: classpath:com/pdzx/mapper/*.xml  #mybatis的sql文件xml路径配置
3. 新建包名,如下图

4. 自动生成代码文件generatorConfig.xml配置
<?xml version="1.0" encoding="UTF-8"?>

<!DOCTYPE generatorConfiguration

        PUBLIC "-//mybatis.org//DTD MyBatis Generator Configuration 1.0//EN"

        "http://mybatis.org/dtd/mybatis-generator-config_1_0.dtd">

<!-- 配置生成器 -->

<generatorConfiguration>

    <!-- 可以用于加载配置项或者配置文件

    resource:配置资源加载地址,使用resource,从classpath开始找,比如com/myproject/generatorConfig.properties

    url:配置资源加载地质,使用URL的方式,比如file:///C:/myfolder/generatorConfig.properties.

    注意,两个属性只能选址一个

     -->

    <!--导入属性配置-->

    <properties resource="datasource.properties"/>

    <!--指定特定数据库的jdbc驱动jar包的位置-->

    <!-- 暂时不清楚怎么指定相对路径,只能指定maven仓库中的jar包 -->

    <!--<classPathEntry location="D:/repository/mysql/mysql-connector-java/5.1.28/mysql-connector-java-5.1.28.jar"/>-->

    <classPathEntry location="D:/repository/mysql/mysql-connector-java/8.0.16/mysql-connector-java-8.0.16.jar"/>

    <!--

    context:生成一组对象的环境

    id:必选,上下文id,用于在生成错误时提示

    targetRuntime:

        1,MyBatis3:默认的值,生成基于MyBatis3.x以上版本的内容,包括XXXBySample;

        2,MyBatis3Simple:类似MyBatis3,只是不生成XXXBySample;

-->

    <context id="default" targetRuntime="MyBatis3">

        <!--生成的bean是没有tostring方法的,所以如果要想生成tostring方法的话,需要在generatorConfig.xml中加上如下配置-->

        <plugin type="org.mybatis.generator.plugins.ToStringPlugin"></plugin>

        <!-- 去除生成文件的注释 -->

        <commentGenerator>

            <property name="suppressDate" value="true"/>

            <property name="suppressAllComments" value="true"/>

            <property name="javaFileEncoding" value="UTF-8"/>

        </commentGenerator>

        <!--jdbc的数据库连接,直接写死也可以 -->

        <jdbcConnection

                driverClass="${jdbc.driverClass}"

                connectionURL="${jdbc.url}"

                userId="${jdbc.username}"

                password="${jdbc.password}">

        </jdbcConnection>

        <!-- 是否使用bigDecimal, false可自动转化以下类型(Long, Integer, Short, etc.) -->

        <javaTypeResolver>

            <property name="forceBigDecimals" value="false"/>

        </javaTypeResolver>

        <!-- Model模型生成器,用来生成数据库对应的实体类

            targetPackage     指定生成的model生成所在的包名

            targetProject     指定在该项目下所在的路径

        -->

        <javaModelGenerator targetPackage="com.pdzx.entity" targetProject="src/main/java">

            <!-- 是否允许子包,eg:fase路径com.pdzx.entity, true:com.pdzx.entity..[schemaName] -->

            <property name="enableSubPackages" value="false"/>

            <!-- 是否对model添加 构造函数 -->

            <property name="constructorBased" value="false"/>

            <!-- 建立的Model对象是否 不可改变  即生成的Model对象不会有 setter方法,只有构造方法 -->

            <property name="immutable" value="false"/>

            <!-- 设置是否在getter方法中,对String类型字段调用trim()方法 -->

            <property name="trimStrings" value="false"/>

        </javaModelGenerator>

        <!--mapper映射文件生成所在的目录 为每一个数据库的表生成对应的SqlMap文件,就是用xml写SQL的方式 -->

        <sqlMapGenerator targetPackage="com.pdzx.mapper" targetProject="src/main/java">

            <property name="enableSubPackages" value="false"/>

        </sqlMapGenerator>

        <!-- 生成易于使用的针对Model对象和XML配置文件 的代码,即dao层接口文件

                type="ANNOTATEDMAPPER",生成Java Model 和基于注解的Mapper对象

                type="MIXEDMAPPER",生成基于注解的Java Model 和相应的Mapper对象

                type="XMLMAPPER",生成SQLMap XML文件和独立的Mapper接口

        -->

        <!-- targetPackage:mapper接口dao生成的位置 -->

        <javaClientGenerator type="XMLMAPPER" targetPackage="com.pdzx.dao" targetProject="src/main/java">

            <!-- enableSubPackages:是否让schema作为包的后缀 -->

            <property name="enableSubPackages" value="false" />

        </javaClientGenerator>

        <!--

        tableName为对应的数据库表

         domainObjectName是要生成的实体类

          enable*ByExample是否生成 example类   -->

        <table tableName="b_video_info"

               domainObjectName="VideoInfo"

               enableCountByExample="false"

               enableUpdateByExample="false"

               enableDeleteByExample="false"

               enableSelectByExample="false"

               selectByExampleQueryId="false">

            <!-- 上面的属性都可以使用子标签形式表示 -->

            <!-- 是否使用真实字段名,设置为false将自动驼峰转换 -->

            <property name="useActualColumnNames" value="false" />

        </table>

    </context>

</generatorConfiguration>
5. 引用的数据库配置文件datasource.properties
jdbc.driverClass=com.mysql.cj.jdbc.Driver

jdbc.url=jdbc:mysql://10.3.11.69:3306/pdzx?characterEncoding=utf8&useSSL=false&allowMultiQueries=true&nullCatalogMeansCurrent=true

jdbc.username=pdzx_pro

jdbc.password=cde35TGB3910
注意:如果mysql的驱动版本较高,mybatis自动生成代码可能只有insert()和insertSelective()
解决方案:在jdbc url后增加nullCatalogMeansCurrent=true即可
6.在idea中执行maven插件,如下
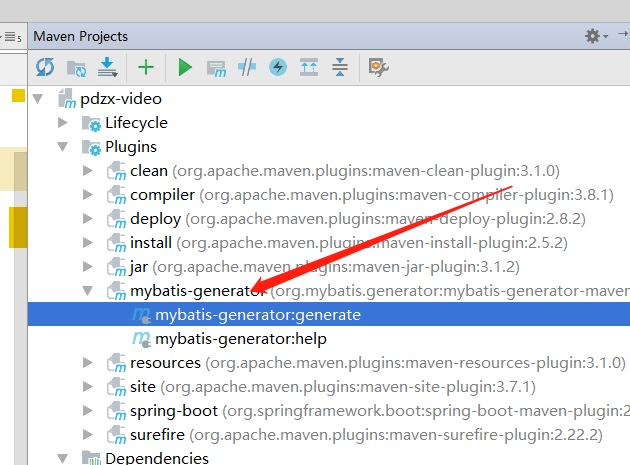
生成的逻辑代码和自己写的文件如下
dao层
@Repository

public interface VideoInfoMapper {

    int deleteByPrimaryKey(Integer id);

    int insert(VideoInfo record);

    int insertSelective(VideoInfo record);

    VideoInfo selectByPrimaryKey(Integer id);

    int updateByPrimaryKeySelective(VideoInfo record);

    int updateByPrimaryKey(VideoInfo record);

}
service层
public interface VideoInfoService {

    VideoInfo selectByPrimaryKey(Integer id);

}
实现类
@Service

public class VideoInfoServiceImpl implements VideoInfoService {

    @Autowired

    private VideoInfoMapper videoInfoMapper;

    @Override

    public VideoInfo selectByPrimaryKey(Integer id) {

        return videoInfoMapper.selectByPrimaryKey(id);

    }

}
controller层
@RequestMapping("video")

@RestController

public class VideoInfoController {

    @Autowired

    private VideoInfoService videoInfoService;

    @GetMapping("/selectByPrimaryKey")

    public VideoInfo selectByPrimaryKey(Integer id){

        return videoInfoService.selectByPrimaryKey(id);

    }

    @GetMapping("/hello")

    public String hello(){

        return "hello springboot-mybatis-xml";

    }

    @GetMapping("/hi")

    public String hi(){

        return "hi springboot-mybatis-xml";

    }

}
7.生成文件后在启动类中添加注解@MapperScan
@MapperScan("com.pdzx.dao")

@SpringBootApplication

public class VideoApplication {

    public static void main(String[] args) {

        SpringApplication.run(VideoApplication.class);

    }

}
8.访问以下路径,测试
http://localhost:5000/pdzx/video/selectByPrimaryKey?id=83
看结果
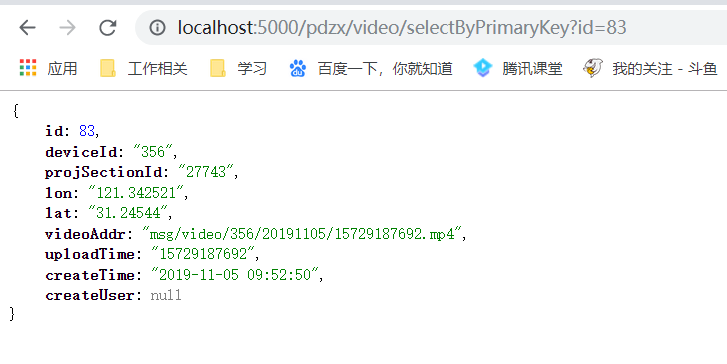
至此,springboot集成mybatis和mybatis-generator插件成功
springboot集成热部署
1.注意依赖
<!--devtools热部署-->

        <dependency>

            <groupId>org.springframework.boot</groupId>

            <artifactId>spring-boot-devtools</artifactId>

            <optional>true</optional>

            <scope>true</scope>

        </dependency>
2.注意配置
spring:

  devtools:

      restart:

        enabled: true  #设置开启热部署

        additional-paths: src/main/java #重启资源目录
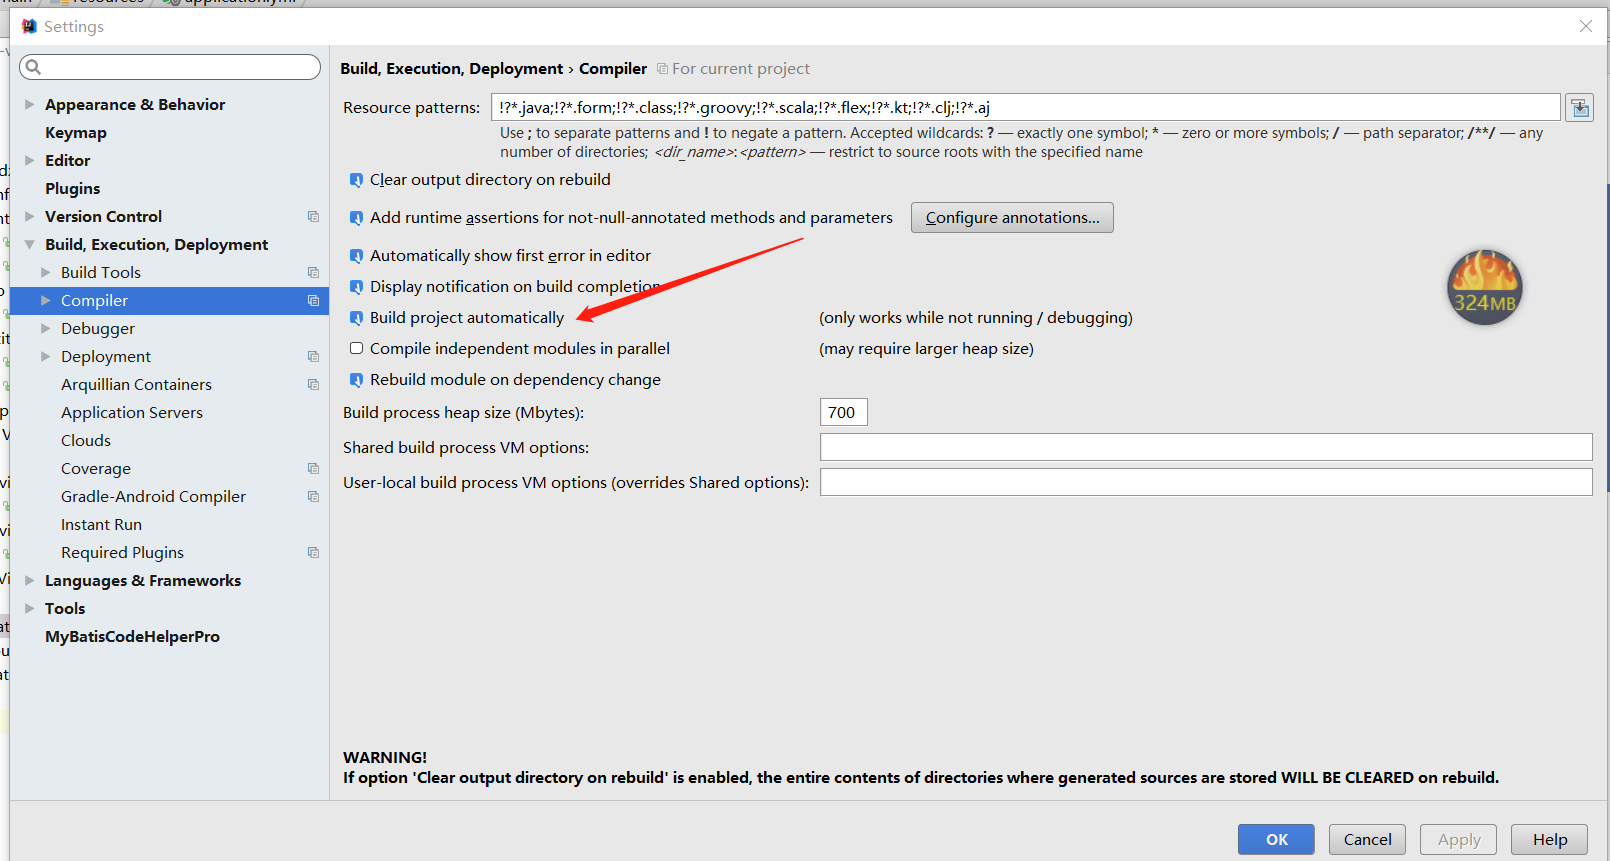
3.设置IDEA的自动编译:,如图
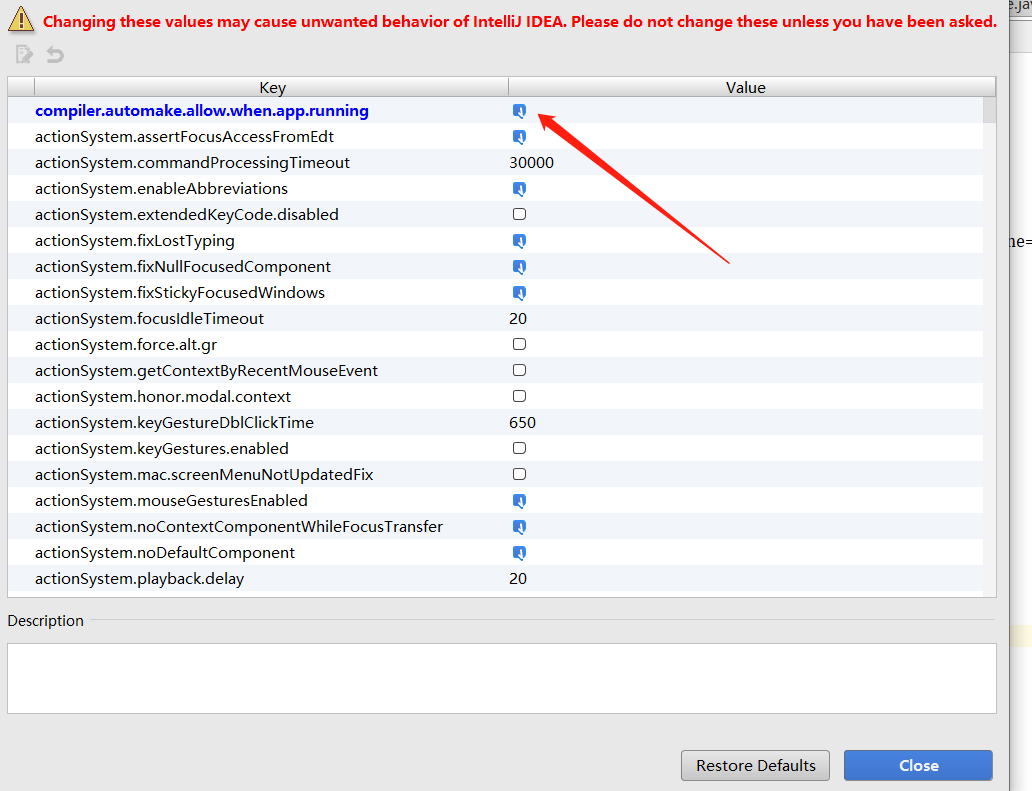
4.安装ctrl + shift + alt + /,选择Registry,勾上 Compiler autoMake allow when app running,如图
5.重启idea即可生效
SpringBoot整合Swagger2
1.两个Swagger2相关的依赖
     <!-- swagger -->

        <dependency>

            <groupId>io.springfox</groupId>

            <artifactId>springfox-swagger2</artifactId>

            <version>2.9.2</version>

        </dependency>

        <!-- swagger-ui -->

        <dependency>

            <groupId>io.springfox</groupId>

            <artifactId>springfox-swagger-ui</artifactId>

            <version>2.9.2</version>

        </dependency>
2.Swagger2配置
package com.pdzx.config;

import springfox.documentation.service.Contact;

import org.springframework.context.annotation.Bean;

import org.springframework.context.annotation.Configuration;

import springfox.documentation.builders.ApiInfoBuilder;

import springfox.documentation.builders.PathSelectors;

import springfox.documentation.builders.RequestHandlerSelectors;

import springfox.documentation.spi.DocumentationType;

import springfox.documentation.spring.web.plugins.Docket;

import springfox.documentation.swagger2.annotations.EnableSwagger2;

/**

 * Created by bianxh on 2019/1/21.

 */

@Configuration

@EnableSwagger2//启用Swagger2

public class SwaggerApp {

    //http://localhost:5000/pdzx/swagger-ui.html   项目路径/swagger-ui.html

    @Bean

    public Docket createRestApi() {

        return new Docket(DocumentationType.SWAGGER_2)

                .pathMapping("/")//配置映射路径和要扫描的接口的位置

                .select()

                .apis(RequestHandlerSelectors.basePackage("com.pdzx.controller"))//配置要扫描的接口的位置

                .paths(PathSelectors.any())

                .build().apiInfo(new ApiInfoBuilder()//配置一下Swagger2文档网站的信息

                        .title("SpringBoot整合Swagger")//网站的title

                        .description("本站是平大客户端的接口文档信息")//网站的描述

                        .version("9.0")//接口版本

                        .contact(new Contact("平大开发部","http://www.shpingda.com/","xxx@gmail.com"))//联系人的信息

                        .license("The Apache License")//使用的协议

                        .licenseUrl("http://www.baidu.com")//

                        .build());

    }

}
3.创建接口
@RestController

@Api(tags = "用户管理相关接口")//可以用来标记当前Controller的功能

@RequestMapping("/user")

public class UserController {

    @PostMapping("/addUser")

    @ApiOperation("添加用户的接口")//用来标记一个方法的作用

    @ApiImplicitParams(//如果有多个参数,多个@ApiImplicitParam注解需要放在一个@ApiImplicitParams注解中

            {

                //用来描述一个参数,可以配置参数的中文含义,也可以给参数设置默认值,这样在接口测试的时候可以避免手动输入

            @ApiImplicitParam(name = "username", value = "用户名", defaultValue = "李四"),

            //假如开发者需要指定一个参数必填,@RequestParam(required = true)注解不能省略

            @ApiImplicitParam(name = "address", value = "用户地址", defaultValue = "深圳", required = true)

            }

    )

    public User addUser(@RequestParam( "username") String username, @RequestParam( "address") String address) {

        User user = new User();

        user.setUsername(username);

        user.setAddress(address);

        return user;

    }

    @GetMapping("/getUserById")

    @ApiOperation("根据id查询用户的接口")

    @ApiImplicitParam(name = "id", value = "用户id", defaultValue = "99", required = true)

    public User getUserById(@RequestParam( "id")  Integer id) {

        User user = new User();

        user.setId(id);

        return user;

    }

    @PutMapping("/updateUserById")

    @ApiOperation("根据id更新用户的接口")//如果参数是一个对象(例如上文的更新接口),对于参数的描述也可以放在实体类中

    public User updateUserById(@RequestBody User user) {

        return user;

    }

}
user
@ApiModel

public class User {

    @ApiModelProperty(value = "用户id")

    private Integer id;

    @ApiModelProperty(value = "用户名")

    private String username;

    @ApiModelProperty(value = "用户地址")

    private String address;

    public Integer getId() {

        return id;

    }

    public void setId(Integer id) {

        this.id = id;

    }

    public String getUsername() {

        return username;

    }

    public void setUsername(String username) {

        this.username = username;

    }

    public String getAddress() {

        return address;

    }

    public void setAddress(String address) {

        this.address = address;

    }

}
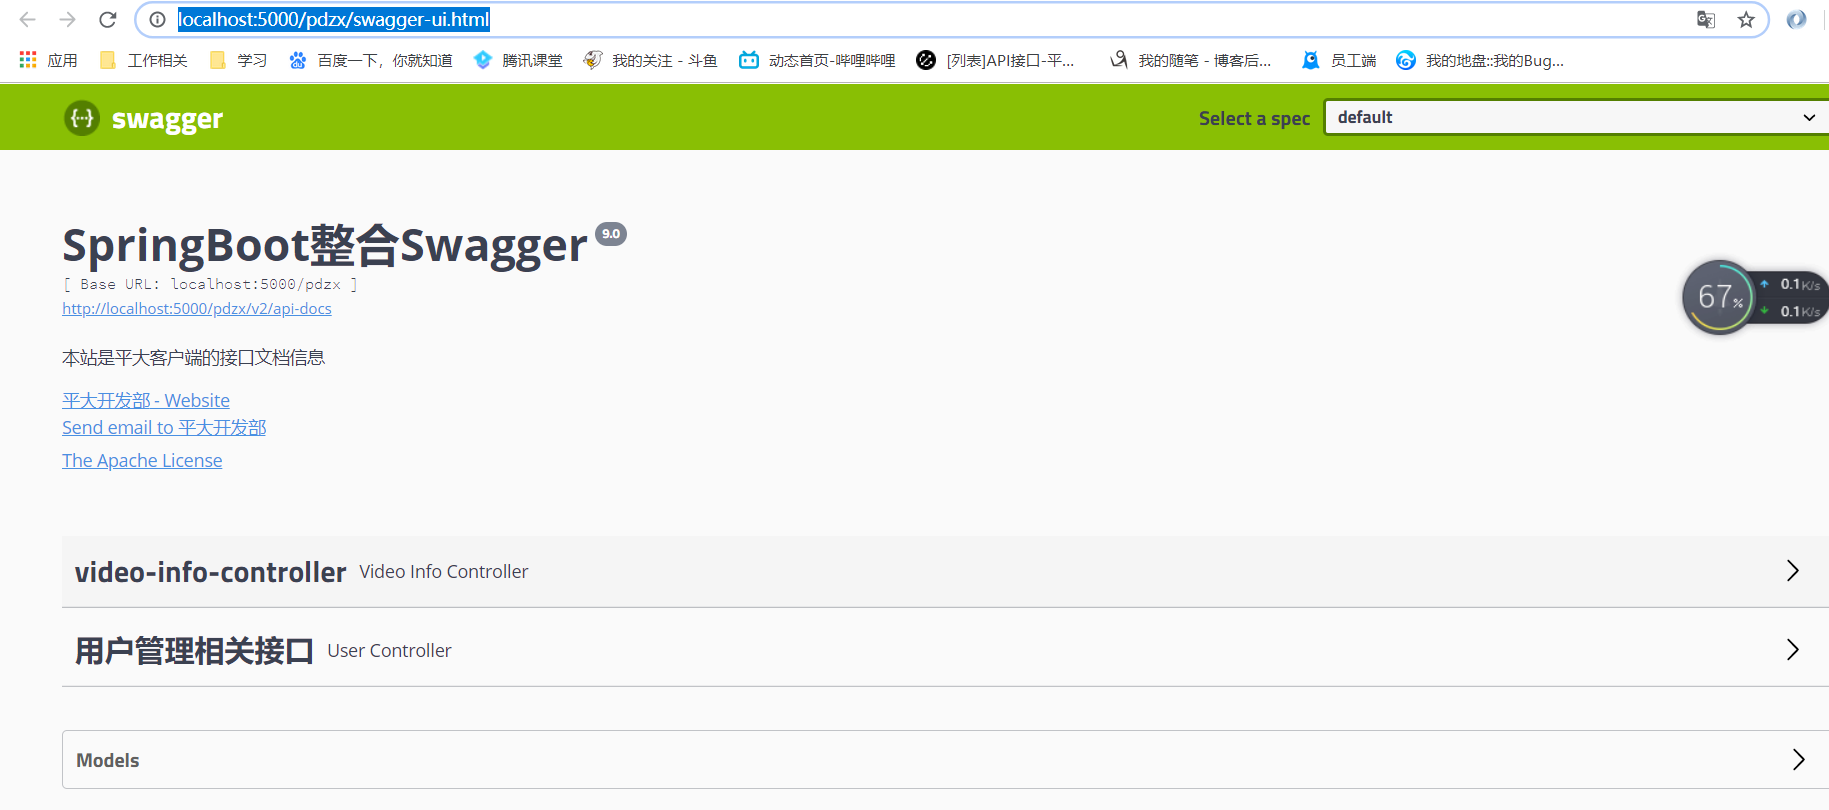
4.访问一下路径(项目路径/swagger-ui.html)
看结果
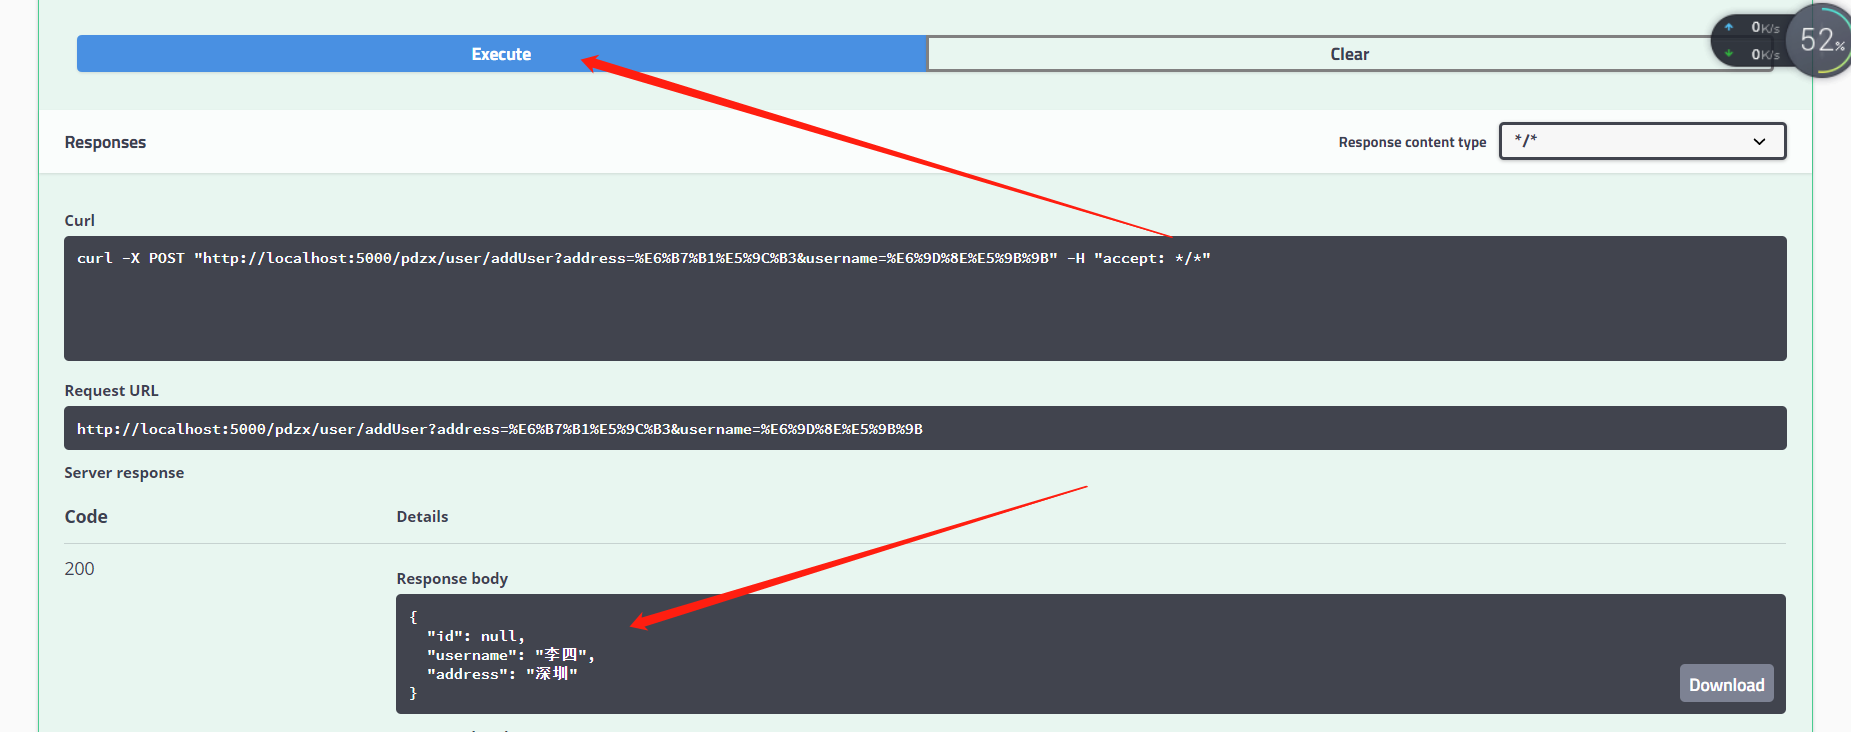
5.测试,点击Execute按钮,表示发送请求进行测试。测试结果会展示在下面的Response中
springboot集成mybatis(逆向工程),热部署以及整合Swagger2的更多相关文章
- SpringBoot Mybatis整合(注解版),SpringBoot集成Mybatis(注解版)
SpringBoot Mybatis整合(注解版),SpringBoot集成Mybatis(注解版) ================================ ©Copyright 蕃薯耀 2 ...
- SpringBoot集成MyBatis小记
SpringBoot集成MyBatis小记 参考MyBatis官网 1. 添加maven依赖 添加到pom.xml <dependency> <groupId>org.myba ...
- SpringBoot开发 - 什么是热部署和热加载?devtool的原理是什么?
在SpringBoot开发调试中,如果我每行代码的修改都需要重启启动再调试,可能比较费时间:SpringBoot团队针对此问题提供了spring-boot-devtools(简称devtools)插件 ...
- springboot集成mybatis(二)
上篇文章<springboot集成mybatis(一)>介绍了SpringBoot集成MyBatis注解版.本文还是使用上篇中的案例,咱们换个姿势来一遍^_^ 二.MyBatis配置版(X ...
- springboot集成mybatis(一)
MyBatis简介 MyBatis本是apache的一个开源项目iBatis, 2010年这个项目由apache software foundation迁移到了google code,并且改名为MyB ...
- SpringBoot 集成Mybatis 连接Mysql数据库
记录SpringBoot 集成Mybatis 连接数据库 防止后面忘记 1.添加Mybatis和Mysql依赖 <dependency> <groupId>org.mybati ...
- SpringBoot集成Mybatis并具有分页功能PageHelper
SpringBoot集成Mybatis并具有分页功能PageHelper 环境:IDEA编译工具 第一步:生成测试的数据库表和数据 SET FOREIGN_KEY_CHECKS=0; ...
- Springboot集成mybatis(mysql),mail,mongodb,cassandra,scheduler,redis,kafka,shiro,websocket
https://blog.csdn.net/a123demi/article/details/78234023 : Springboot集成mybatis(mysql),mail,mongodb,c ...
- BindingException: Invalid bound statement (not found)问题排查:SpringBoot集成Mybatis重点分析
重构代码,方法抛出异常:BindingException: Invalid bound statement (not found) 提示信息很明显:mybatis没有提供某方法 先不解释问题原因和排查 ...
随机推荐
- 分布式项目配置工程,在项目间互通要先在linux下开启zookeeper
一.编写配置文件 <?xml version="1.0" encoding="UTF-8"?><beans xmlns="http: ...
- Docker学习笔记(二):端口映射与容器互联
端口映射 使用docker run时,可以指定-P(大写)与-p(小写)参数映射端口. docker run -P -P(大写)会随机映射一个端口到容器的内部端口 -> [feifei@ffma ...
- 类型信息(反射,RTTI)
类型信息 1.java如何在运行时识别对象和类的信息 "传统的"RTTI run-time type identification ,假设我们在编译时已经知道了所有类型,在编译的时 ...
- webpack指南(三)缓存
缓存 把 /dist 目录中的内容部署到服务器上,客户端(通常是浏览器)就能够访问网站此服务器的网站及其资源.而通过网络获取资源是比较耗时的,这就是为什么浏览器要使用缓存这种技术.可以通过命中缓存,以 ...
- 曹工谈Spring Boot:Spring boot中怎么进行外部化配置,一不留神摔一跤;一路debug,原来是我太年轻了
spring boot中怎么进行外部化配置,一不留神摔一跤:一路debug,原来是我太年轻了 背景 我们公司这边,目前都是spring boot项目,没有引入spring cloud config,也 ...
- ASHRAE KAGGLE大能源预测(前三名方案总结+相关知识点讲解+python实现)
@ 目录 1 概述 2 处理思想学习 2.1 移除异常值 2.2 缺失值 2.3 目标函数 2.4 特征工程 2.4.1 Savitzky-Golay filter 2.4.2 Bayesian ta ...
- day08文件的操作(0221)
#1.文件操作之追加数据01:f = open("yesterday01",'a+U',encoding="utf-8")#a= append,追加之意,w则为 ...
- Request.params,Request.form,Request.querystring区别(转)
自己总结:---大致意思是: 1.传参的方式分为:get方式传参,post方式传参,request.cookies和request.servervariables 2.这几种获取参数方式获取的都是一个 ...
- MySQL(5)— 常用函数
五.MySQL常用函数 可参考[官网文档]https://dev.mysql.com/doc/refman/8.0/en/ 5-1.基本函数 数学运算: -- 数学运算 SELECT ABS(-8) ...
- MySQL(3)— 数据管理
三.MySQL数据管理(DML) 3-1.外键(了解即可) ALTER TABLE `aa表名` ADD CONSTRAINT `约束名` FOREIGN KEY (字段名) REFERENCES ` ...