|
[root@server30 ~]# systemctl enable nfs-server.service
//开启下次系统重启自动加载
ln -s '/usr/lib/systemd/system/nfs-server.service' '/etc/systemd/system/nfs.target.wants/nfs-server.service'
[root@server30 ~]# systemctl restart nfs-server.service
[root@server30 ~]# systemctl status nfs
nfs-server.service - NFS Server
Loaded: loaded (/usr/lib/systemd/system/nfs-server.service; enabled)
Active: 的权限
|
[root@server30 ~]# chmod 777 /public
[root@server30 ~]# ls -ld /public
drwxrwxrwx. 2 root root 23 May 18 14:12 /public
|
接下来客户端挂载验证
|
[root@desktop30 ~]# mount -t nfs 172.16.30.130:/public /public/
[root@desktop30 ~]# df
Filesystem 1K-blocks Used Available Use% Mounted on
/dev/mapper/rhel-root 5109760 3021512 2088248 60% /
devtmpfs 496096 0 496096 0% /dev
tmpfs 505404 80 505324 1% /dev/shm
tmpfs 505404 7168 498236 2% /run
tmpfs 505404 0 505404 0% /sys/fs/cgroup
/dev/sda1 201388 106036 95352 53% /boot
172.16.30.130:/public 5109760 3021824 2087936 60% /public
[root@desktop30 ~]# cd /public/
[root@desktop30 public]# ls
freeit.txt
[root@desktop30 public]# touch gyh.txt
[root@desktop30 public]# ls
freeit.txt gyh.txt
//创建成功,此时具有写权限。
|
4.4.用户访问权限
同为文件共享服务,NFS对访问用户的控制没有Samba的功能强大,但是基本也可满足日常工作对NFS的需要。NFS中,与访问用户的控制相关的参数主要有:root_squash、no_root_squash、all_squash、anonuid、anongid。下面看几个例子(本部分实验仍然用上部分的实验环境):
例1:查看客户端登录时服务器缺省映射为那个用户
|
[root@desktop30 public]# ll
total 0
-rw-r--r--. 1 root root 0 May 18 14:12 freeit.txt
-rw-r--r--. 1 nfsnobody nfsnobody 0 May 18 16:12 gyh.txt
|
如上:【可写共享目录】实验中创建的文件gyh.txt默认的用户和组为nfsnobody。此为缺省参数all_squash的作用,也就是说,不管客户端以什么身份登录到自己的系统,缺省都映射为nfsnobody。
例2:no_root_squash参数:客户端以本地root身份登录服务器时,也拥有root用户权限
|
[root@server30 ~]# vim /etc/exports
/public 172.16.30.30/24(rw,no_root_squash,sync)
~
[root@server30 ~]# systemctl restart nfs-server.service
|
如上,客户端以本地root用户登录时,服务器在此参数的作用下把其映射为服务器端的root用户。
例3:anonuid&anongid参数:不论客户端以什么身份登录,缺省都映射为指定用户的UID和指定组的GID。
|
-------------------------------------------------服务器端设置----------------------------------------------
[root@server30 ~]# id user1
uid=1001(user1) gid=1001(user1) groups=1001(user1)
[root@server30 ~]# vim /etc/exports
/public 172.16.30.30/24(rw,anonuid=1001,anongid=1001,sync)
[root@server30 ~]# systemctl restart nfs-server.service
-------------------------------------------------客户端验证------------------------------------------------
[root@desktop30 public]# touch 456.txt
[root@desktop30 public]# ll
total 0
-rw-r--r--. 1 root root 0 May 18 17:08 123.txt
-rw-r--r--. 1 1001 1001 0 May 18 17:17 456.txt
-rw-r--r--. 1 root root 0 May 18 14:12 freeit.txt
-rw-r--r--. 1 nfsnobody nfsnobody 0 May 18 16:12 gyh.txt
|
4.5.NFS的kerberos验证
本部分以题目的形式来实验。
题目:
第一部分:主要为server端配置
在Server30上配置NFS,以读写的方式共享/protected,能被example.com内用户访问;
访问/protected需要通过kerberos安全加密,可以使用此链接密钥:http://ldap.example.com/pub/server30.keytea;
目录/protected应该包含名为project拥有人为guest2001的子目录且用户guest2001能以读写方式访问/protected/project;
第一部分:server端的配置
主配置文件添加共享资源
|
[root@server30 ~]# vim /etc/exports
/public 172.16.30.30/24(rw,anonuid=1001,anongid=1001)
/protected 172.16.30.0/24(rw,sec=krb5p)
~
[root@server30 ~]# mkdir /protected
//创建共享目录
|
配置kerberos验证,需要添加服务器到ldap域中,使用kerberos服务器验证。kerberos验证也需要安装几个工具,然后做添加到LDAP的操作。如下:
|
[root@server30 ~]# yum -y install authconfig* sssd* krb5*
Loaded plugins: langpacks, product-id, subscription-manager
This system is not registered to Red Hat Subscription Management. You can use subscription-manager to register.
base | 4.1 kB 00:00
(1/2): base/group_gz | 134 kB 00:00
(2/2): base/primary_db | 3.4 MB 00:00
Package authconfig-6.2.8-8.el7.x86_64 already installed and latest version
Package sssd-client-1.11.2-65.el7.x86_64 already installed and latest version
Package krb5-libs-1.11.3-49.el7.x86_64 already installed and latest version
Resolving Dependencies
[root@server30 ~]# authconfig-gtk
//此命令打开验证配置界面,如下:
|
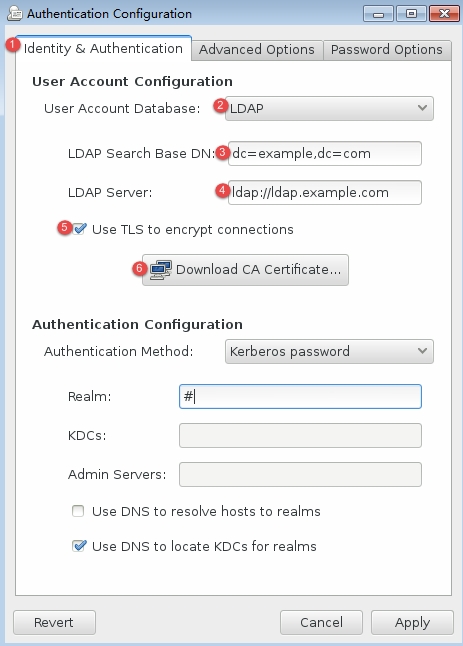
①选择[identity*authentication],进行身份验证配置
②选择【ldap】,加入到ldap域进行验证
③填写ldap的DN,
④填写ldap的路径,要以ldap开头,//后面为ldap服务器的主机名
⑤此处要勾选
⑥点击此处,弹出如下界面,填写证书的密钥链接,下载证书
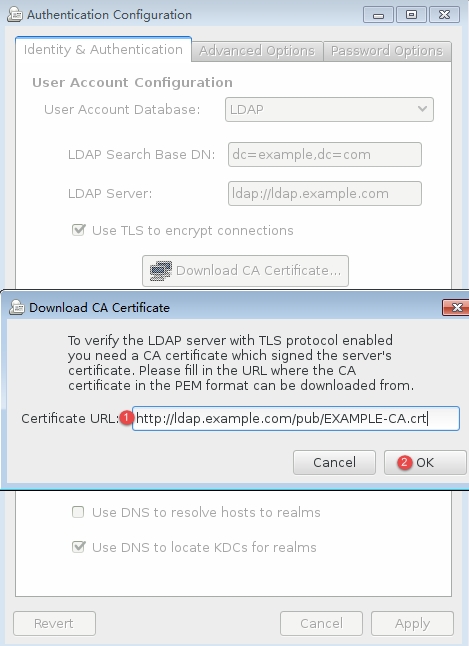
①填写链接:http://ldap.example.com/pub/EXAMPLE-CA.crt
②点击【ok】完成证书链设置
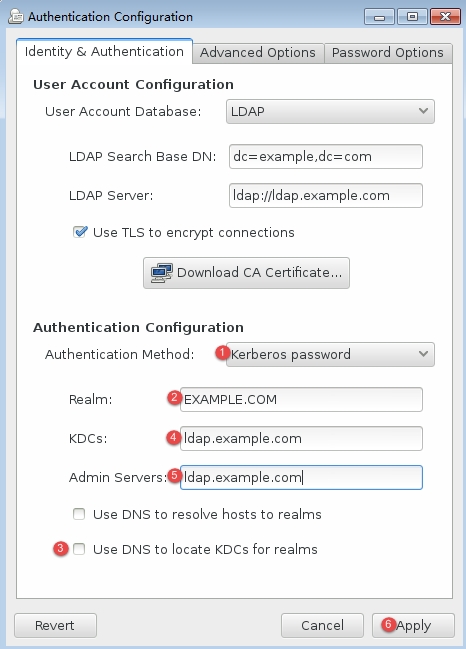
①根据题目要求,这里要选择kerberos验证方式
②填写认证服务的kerberos Realm(域)
③此处的勾选要去掉,否则不能进行下一步操作
④填写认证服务的kerberos KDC
⑤填写认证服务的kerberos Admin Server
⑥点击【Apply】完成认证配置
NFS的版本有许多,Redhat Linux7中的NFS使用版本为4.2,kerberos验证为其特有的验证方式,所以要指明NFS版本,在/etc/sysconfig/nfs配置文件中添加:
|
[root@server30 ~]# vim /etc/sysconfig/nfs
1 #
2 # Optinal options passed to rquotad
3 RPCRQUOTADOPTS=""
4 #
5 # Optional arguments passed to in-kernel lockd
6 #LOCKDARG=
7 # TCP port rpc.lockd should listen on.
8 #LOCKD_TCPPORT=32803
9 # UDP port rpc.lockd should listen on.
10 #LOCKD_UDPPORT=32769
11 #
12 # Optional arguments passed to rpc.nfsd. See rpc.nfsd(8)
13 RPCNFSDARGS="-V 4.2"
14 # Number of nfs server processes to be started.
15 # The default is 8.
16 RPCNFSDCOUNT=8
17 # Set V4 grace period in seconds
18 #NFSD_V4_GRACE=90
19 #
20 # Optional arguments passed to rpc.mountd. See rpc.mountd(8)
21 RPCMOUNTDOPTS=""
22 #
23 # Optional arguments passed to rpc.statd. See rpc.statd(8)
24 STATDARG=""
25 #
26 # Optional arguments passed to rpc.idmapd. See rpc.idmapd(8)
27 RPCIDMAPDARGS=""
28 #
29 # Optional arguments passed to rpc.gssd. See rpc.gssd(8)
30 RPCGSSDARGS=""
31 # Enable usage of gssproxy. See gssproxy-mech(8).
32 GSS_USE_PROXY="no"
33 #
34 # Optional arguments passed to rpc.svcgssd. See rpc.svcgssd(8)
35 RPCSVCGSSDARGS=""
36 #
37 # Optional arguments passed to blkmapd. See blkmapd(8)
38 BLKMAPDARGS=""
|
如上:只需在第13行添加-V 4.2即可。
Kerberos验证,需要服务器和客户端的时间上不能有太大的差距,所以,为了保证时间准确,还要指定NTP服务器,如下:
|
[root@server30 ~]# vim /etc/chrony.conf
1 # Use public servers from the pool.ntp.org project.
2 # Please consider joining the pool (http://www.pool.ntp.org/join.html).
3 #server 0.rhel.pool.ntp.org iburst
4 #server 1.rhel.pool.ntp.org iburst
5 #server 2.rhel.pool.ntp.org iburst
6 #server 3.rhel.pool.ntp.org iburst
7 server ldap.example.com iburst
……
[root@server30 ~]# systemctl restart chronyd.service
|
如上,将原有的第4、5、6行注释掉,然后添加第7行内容,指定NTP服务器。最后不要忘记重启chronyd.service服务。
下载用于kerberos验证的密钥
|
[root@server30 ~]# wget -O /etc/krb5.keytab http://ldap.example.com/pub/server30.keytab
--2015-05-18 18:31:57-- http://ldap.example.com/pub/server30.keytab
Resolving ldap.example.com (ldap.example.com)... 172.16.30.254
Connecting to ldap.example.com (ldap.example.com)|172.16.30.254|:80... connected.
HTTP request sent, awaiting response... 200 OK
Length: 3026 (3.0K)
Saving to: ‘/etc/krb5.keytab’
100%[======================================>] 3,026 --.-K/s in 0s
2015-05-18 18:31:57 (230 MB/s) - ‘/etc/krb5.keytab’ saved [3026/3026]
[root@server30 ~]# ls /etc/krb5.keytab
/etc/krb5.keytab
|
根据题目要求,在共享资源下创建project目录,并设置guest2001为其拥有者
|
[root@server30 ~]# mkdir /protected/project
[root@server30 ~]# id guest2001
uid=2001(guest2001) gid=2001(guest2001) groups=2001(guest2001)
[root@server30 ~]# chown guest2001 /protected/project/
[root@server30 ~]# ll /protected/
total 0
drwxr-xr-x. 2 guest2001 root 6 May 18 18:34 project
|
注:guest2001是加入ldap域后获取的用户,默认本地没有。
最后,对于服务的重启,不仅要重启nfs服务,同时也要重启nfs的另外两个用于安全验证的服务,如下:
|
[root@server30 ~]# systemctl enable nfs-server.service nfs-secure-server.service nfs-secure.service
ln -s '/usr/lib/systemd/system/nfs-secure-server.service' '/etc/systemd/system/nfs.target.wants/nfs-secure-server.service'
ln -s '/usr/lib/systemd/system/nfs-secure.service' '/etc/systemd/system/nfs.target.wants/nfs-secure.service'
[root@server30 ~]# systemctl restart nfs-server.service nfs-secure-server.service nfs-secure.service
[root@server30 ~]# systemctl status nfs-server.service nfs-secure-server.service nfs-secure.service
nfs-server.service - NFS Server
Loaded: loaded (/usr/lib/systemd/system/nfs-server.service; enabled)
Active: active (exited) since Mon 2015-05-18 18:43:23 CST; 14s ago
Process: 5695 ExecStopPost=/usr/sbin/exportfs -f (code=exited, status=0/SUCCESS)
Process: 5692 ExecStop=/usr/sbin/rpc.nfsd 0 (code=exited, status=0/SUCCESS)
Process: 5705 ExecStart=/usr/sbin/rpc.nfsd $RPCNFSDARGS $RPCNFSDCOUNT (code=exited, status=0/SUCCESS)
Process: 5703 ExecStartPre=/usr/sbin/exportfs -r (code=exited, status=0/SUCCESS)
Process: 5701 ExecStartPre=/usr/libexec/nfs-utils/scripts/nfs-server.preconfig (code=exited, status=0/SUCCESS)
Main PID: 5705 (code=exited, status=0/SUCCESS)
CGroup: /system.slice/nfs-server.service
May 18 18:43:23 server30.example.com systemd[1]: Starting NFS Server...
May 18 18:43:23 server30.example.com systemd[1]: Started NFS Server.
nfs-secure-server.service - Secure NFS Server
Loaded: loaded (/usr/lib/systemd/system/nfs-secure-server.service; enabled)
Active: active (running) since Mon 2015-05-18 18:43:23 CST; 14s ago
Process: 5723 ExecStart=/usr/sbin/rpc.svcgssd $RPCSVCGSSDARGS (code=exited, status=0/SUCCESS)
Main PID: 5725 (rpc.svcgssd)
CGroup: /system.slice/nfs-secure-server.service
└─5725 /usr/sbin/rpc.svcgssd
May 18 18:43:23 server30.example.com systemd[1]: Started Secure NFS Server.
nfs-secure.service - Secure NFS
Loaded: loaded (/usr/lib/systemd/system/nfs-secure.service; enabled)
Active: active (running) since Mon 2015-05-18 18:43:23 CST; 14s ago
Process: 5691 ExecStart=/usr/sbin/rpc.gssd $RPCGSSDARGS (code=exited, status=0/SUCCESS)
Main PID: 5693 (rpc.gssd)
CGroup: /system.slice/nfs-secure.service
└─5693 /usr/sbin/rpc.gssd
|
第二部分:客户端配置
创建本地挂载目录/mnt/nfssecure
|
[root@desktop30 ~]# mkdir /mnt/nfssecure
[root@desktop30 ~]# ls /mnt/
nfssecure
|
要进行安全的挂载,也就是使用kerberos验证,所以,客户端同样也要加入到ldap域中,方式与服务器端一样,需要安装三个工具并打开验证配置界面。此处不再赘述。略过。
然后指定NTP服务器,同步时间
|
[root@desktop30 ~]# vim /etc/chrony.conf
1 # Use public servers from the pool.ntp.org project.
2 # Please consider joining the pool (http://www.pool.ntp.org/join.html).
3 #server 0.rhel.pool.ntp.org iburst
4 #server 1.rhel.pool.ntp.org iburst
5 #server 2.rhel.pool.ntp.org iburst
6 #server 3.rhel.pool.ntp.org iburst
7 server ldap.example.com iburst
[root@desktop30 ~]# systemctl restart chronyd.service
|
下载密钥
|
[root@desktop30 ~]# wget -O /etc/krb5.keytab http://ldap.example.com/pub/desktop30.keytab
--2015-05-18 18:50:00-- http://ldap.example.com/pub/desktop30.keytab
Resolving ldap.example.com (ldap.example.com)... 172.16.30.254
Connecting to ldap.example.com (ldap.example.com)|172.16.30.254|:80... connected.
HTTP request sent, awaiting response... 200 OK
Length: 3026 (3.0K)
Saving to: ‘/etc/krb5.keytab’
100%[======================================>] 3,026 --.-K/s in 0s
2015-05-18 18:50:01 (263 MB/s) - ‘/etc/krb5.keytab’ saved [3026/3026]
[root@desktop30 ~]# ls /etc/krb5.keytab
/etc/krb5.keytab
|
同样,客户端也需要启动nfs的安全验证服务
|
[root@desktop30 ~]# systemctl enable nfs-secure.service nfs-secure-server.service
ln -s '/usr/lib/systemd/system/nfs-secure.service' '/etc/systemd/system/nfs.target.wants/nfs-secure.service'
ln -s '/usr/lib/systemd/system/nfs-secure-server.service' '/etc/systemd/system/nfs.target.wants/nfs-secure-server.service'
[root@desktop30 ~]# systemctl restart nfs-secure.service nfs-secure-server.service
|
自动挂载配置
|
[root@desktop30 ~]# vim /etc/fstab
#
# /etc/fstab
# Created by anaconda on Thu May 7 11:59:00 2015
#
# Accessible filesystems, by reference, are maintained under '/dev/disk'
# See man pages fstab(5), findfs(8), mount(8) and/or blkid(8) for more info
#
/dev/mapper/rhel-root / xfs defaults 1 1
UUID=bb4bc6a9-f7da-423d-a332-401d21d8d781 /boot xfs defaul
ts 1 2
/dev/mapper/rhel-swap swap swap defaults 0 0
172.16.30.130:/protected /mnt/nfssecure nfs defaults,v4.2,sec=krb5p
0 0
~
[root@desktop30 ~]# mount -a
mount.nfs: access denied by server while mounting 172.16.30.130:/protected
//挂载失败
|
为什么挂载失败呢?
因为共享资源那里给的是rw权限,但是共享资源本身目录/protected是没有w权限的,所以还要回服务器为共享资源目录本身添加权限
|
[root@server30 ~]# ll -d /protected/
drwxr-xr-x. 3 root root 20 May 18 18:34 /protected/
[root@server30 ~]# chmod 777 /protected/
[root@server30 ~]# ll -d /protected/
drwxrwxrwx. 3 root root 20 May 18 18:34 /protected/
|
客户端再次挂载
|
[root@desktop30 ~]# mount -a
[root@desktop30 ~]# df
Filesystem 1K-blocks Used Available Use% Mounted on
/dev/mapper/rhel-root 5109760 3111836 1997924 61% /
devtmpfs 496096 0 496096 0% /dev
tmpfs 505404 80 505324 1% /dev/shm
tmpfs 505404 7172 498232 2% /run
tmpfs 505404 0 505404 0% /sys/fs/cgroup
/dev/sda1 201388 106036 95352 53% /boot
172.16.30.130:/protected 5109760 3112064 1997696 61% /mnt/nfssecure
|
如上:挂载成功。
最后,验证用户guest2001是否能在/mnt/nfssecure/project下创建文件。
查看本地是否有此用户
|
[root@desktop30 ~]# id guest2001
uid=2001(guest2001) gid=2001(guest2001) groups=2001(guest2001)
|
因为客户端加入了ldap域,所以获取到LDAP的用户。
连接guest2001用户验证
|
[root@desktop30 ~]# ssh guest2001@localhost
The authenticity of host 'localhost (::1)' can't be established.
ECDSA key fingerprint is 36:09:b0:56:df:c7:b7:62:5d:66:ea:77:fa:34:64:f0.
Are you sure you want to continue connecting (yes/no)? yes
Warning: Permanently added 'localhost' (ECDSA) to the list of known hosts.
guest2001@localhost's password:
Could not chdir to home directory /rhome/guest2001: No such file or directory
mkdir: cannot create directory ‘/rhome’: Permission denied
-bash-4.2$ cd /mnt/nfssecure/project/
-bash-4.2$ touch abc
-bash-4.2$ ls
Abc
//创建成功,证明有写权限。
|
注:
本文出自 “我就是天使” 博客,请务必保留此出处http://380531251.blog.51cto.com/7297595/1659865
- [转]Ubuntu下配置NFS服务
[转]Ubuntu下配置NFS服务 http://blog.163.com/liu8821031%40126/blog/static/111782570200921021253516/ Table ...
- CentOS 6.5配置nfs服务
CentOS 6.5配置nfs服务 网络文件系统(Network File System,NFS),一种使用于分散式文件系统的协议,由升阳公司开发,于1984年向外公布.功能是通过网络让不同的机器.不 ...
- 配置NFS服务与tftp服务
在VMware在安装ubuntu的图解 链接:http://pan.baidu.com/s/1jIofvYu 密码:da72 图解里已经解压安装了VMware Tools,接下来必须要安装的就是NFS ...
- 如何在RHEL7上搭建Samba服务实现Windows与Linux之间的文件共享
如何在RHEL7上搭建Samba服务实现Windows与Linux之间的文件共享 实现环境:VMware workstations.RHEL7.0 第一步:配置网卡IP及yum软件仓库 命令:vim ...
- rhce 第十题 配置NFS服务
配置NFS服务 在system1配置NFS服务,要求如下: 以只读的方式共享目录/public,同时只能被group8.example.com域中的系统访问 以读写的方式共享目录/protected, ...
- CentOS7系列--3.1CentOS7中配置NFS服务
CentOS7配置NFS服务 1. 配置NFS服务器端 1.1. 安装nfs-utils软件 [root@server1 ~]# yum install -y nfs-utils Loaded plu ...
- (转)Centos7安装配置NFS服务和挂载
Centos7安装配置NFS服务和挂载 原文:https://www.u22e.com/601.html NFS简介 NFS(Network File System)即网络文件系统,是FreeBSD支 ...
- Linux 笔记 - 第二十一章 配置 NFS 服务
一.前言 NFS(Network File System,网络文件系统),主要功能是通过网络(一般是局域网)让不同的主机系统之间可以共享文件或目录.NFS 客户端(一般为应用服务器,例如web)可以通 ...
- RHEL5.8配置NFS服务
机器配置:4C+16GB 操作系统:RedHat Enterprise Linux 5.8 NFS基础 NFS(Network File System)是Linux系统之间使用最为广泛的文件共享协议, ...
随机推荐
- C# 利用itextsharp、Spire配合使用为pdf文档每页添加水印
下载类库: 直接下载 引入类库 功能实现 using iTextSharp.text.pdf; using Spire.Pdf; using Spire.Pdf.Graphics; using Sys ...
- PHP SimpleXMLElement::__toString SimpleXML 函数
定义和用法 SimpleXMLElement::__toString - 返回字符串内容 版本支持 PHP4 PHP5 PHP7 不支持 支持 支持 语法 SimpleXMLElement::__to ...
- 网络协议 2 - IP 地址和 MAC 地址
了解完网络协议,我们会发现,网络通信的五层模型里,有两个很重要的概念:IP 地址和 MAC 地址. 那么 IP 地址是怎么来的,又是怎么没的?MAC 地址与 IP 地址又有什么区别? 这回答上面问题前 ...
- Word List 1
前言 图片均来源网络 文章目录 前言 1.1 Super computer 1.2 Mainframe 1.3 Server 1.4 Desktop PC 1.5 Notebook or Laptop ...
- go语言设计模式之Strategy
package main import ( "flag" "fmt" "image" "image/color" &qu ...
- 二、ITK例子-jpg图像读写
一.ITK的读写工作原理 在ITK里面,我们需要设置读取图像的像素类型,图像类型. 然后设置读取指针,将读取参数传入. 同时设置写指针,也将写入文件参数传入. 为了实现读写动作,我们需要构造一个IO工 ...
- C++ 虚函数的说明
虚函数的几点说明: 1. 当一个成员函数定义为虚函数时,其派生类中的同名函数也自动为虚函数.无论其是否添加了 virtual 关键字. 为了能良好的阅读代码,请加上. 2. 父类的虚函数,就是为了让子 ...
- HTML连载52-网易注册界面之上部完成、中部初探
一.看一下注释即可,都是前面学到的知识,然后进行整合完成网页的制作,未完待续,这个网易界面跨度可大三天. <!DOCTYPE html> <html lang="en&qu ...
- 使用php开发,基于swoole扩展开发的工具 swoole-crontab 作业/任务调度
Swoole-Crontab(基于Swoole扩展) 1.概述 基于swoole的定时器程序,支持秒级处理. 异步多进程处理. 完全兼容crontab语法,且支持秒的配置,可使用数组规定好精确操作时间 ...
- 我说精通字符串,面试官竟然问我 Java 中的 String 有没有长度限制?
String 是 Java 中很重要的一个数据类型,除了基本数据类型以外,String 是被使用的最广泛的了,但是,关于 String,其实还是有很多东西容易被忽略的. 就如本文我们要讨论的问题:Ja ...
|
