Docker5-docker私库的搭建及常用方法-harbor-registry方式
一、简介
1、官方已经提供registry镜像为什么还需要用harbor
1)registry缺少镜像清理机制,可以push但是不能删除,耗费空间
2)registry缺乏相应的扩展机制
3)harbor特点:
- Cloud native registry:云本地环境 With support for both container images and Helm charts, Harbor serves as registry for cloud native environments like container runtimes and orchestration platforms.
- Role based access control:RBAC基于角色的权限控制 Users and repositories are organized via 'projects' and a user can have different permission for images or Helm charts under a project.
- Policy based replication: 基于策略的镜像复制 Images and charts can be replicated (synchronized) between multiple registry instances based on policies with multiple filters (repository, tag and label). Harbor automatically retries a replication if it encounters any errors. Great for load balancing, high availability, multi-datacenter, hybrid and multi-cloud scenarios.
- Vulnerability Scanning: 漏洞扫描 Harbor scans images regularly and warns users of vulnerabilities.
- LDAP/AD support: LDAP/AD支持 Harbor integrates with existing enterprise LDAP/AD for user authentication and management, and supports importing LDAP groups into Harbor and assigning proper project roles to them.
- OIDC support: 身份验证 Harbor leverages OpenID Connect (OIDC) to verify the identity of users authenticated by an external authorization server or identity provider. Single sign-on can be enabled to log into the Harbor portal.
- Image deletion & garbage collection: 镜像删除和垃圾清理 Images can be deleted and their space can be recycled.
- Notary: 镜像签名 Image authenticity can be ensured.
- Graphical user portal: 用户界面 User can easily browse, search repositories and manage projects.
- Auditing: 审计 All the operations to the repositories are tracked.
- RESTful API: RESTful api RESTful APIs for most administrative operations, easy to integrate with external systems. An embedded Swagger UI is available for exploring and testing the API.
- Easy deployment: 安装简单 Provide both an online and offline installer. In addition, a Helm Chart can be used to deploy Harbor on Kubernetes.
2、什么是harbor
VMware公司开源的企业级registry项目,基于docker registry开发的,harbor是一个用于存储和分发docker镜像的企业级registry服务器,通过添加需要的功能如安全性、身份认证、管理来扩展了源Docker Distribution,提升了镜像的传输效率,支持registry之间复制镜像,还提供了更高级的安全功能,比如:漏洞分析、用户管理、访问控制、活动审计等。该项目已经在github上获得超过了4600颗星。
官方网址:https://goharbor.io/
github安装指南:https://github.com/goharbor/harbor/blob/master/docs/installation_guide.md
下载:https://github.com/goharbor/harbor/releases
注意:这里直接使用offline版本即可
3、harbor图标

二、harbor架构原理
1、架构图

2、主要包含7个组件
Proxy:harbor的registry、UI、token server等组件都在反向代理后面,代理来自浏览器和Docker客户端的请求转发到各种后端服务
Registry:负责存储Docker镜像和处理docker推/拉命令,由于harbor需要强制执行对镜像的访问控制,因此registry将引导客户端使用令牌服务,以便于每个请i去提供有效的令牌
Core services:harbor的核心服务,主要提供以下服务:
UI:图形用户界面,可以帮助用户管理注册表的图形
Webhook:webhook是在注册表中配置的一种机制,因此可以将registry中的镜像状态更改填充到harbor的webhook端点。harbor使用webhook更新日志,启动复制和其他一些功能。
Token service:令牌服务负责更加项目用户的角色未每个docker push/pull命令发布令牌。如果从Docker客户端发送的请求中没有令牌,则registry将请求重定向到令牌服务。
Database:数据库存储,项目、用户、角色、复制策略和镜像的元数据。
Job services:用户镜像的复制,可以将本地镜像复制(同步)到其他harbor实例。
Log collector:负责在一个地方收集其他模块的日志。
redis:用于存储session。
3、实验架构图
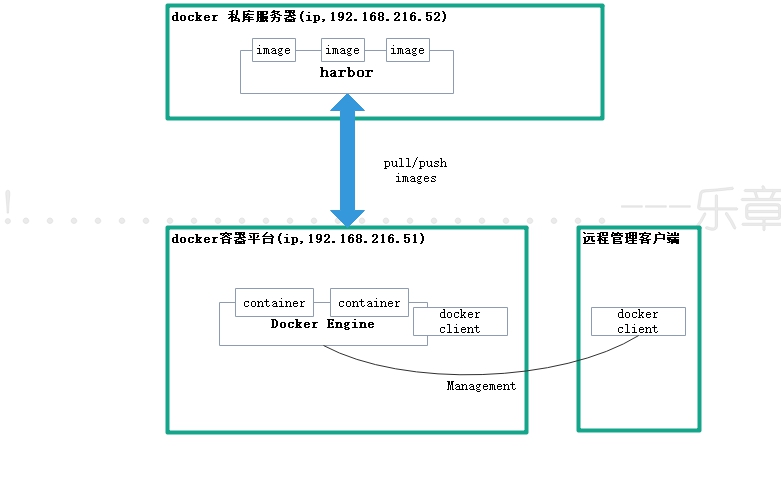
环境软件版本:docker engine 19.03.2
docker-compose version 1.18.0
CentOS Linux release 7.7.1908 (Core)
harbor.v1.9.1
三、harbor的安装
1、安装方法
可以有两种方式安装:online installer/offline installer
online installer :从docker hub下载安装,下载地址请见安装步骤章节
offline installer:无internet时,下载离线安装包安装
还可以使用helm chart 在kubernetes上部署
2、安装要求
1)Hardware
| Resource | Capacity | Description |
|---|---|---|
| CPU | minimal 2 CPU | 4 CPU is preferred |
| Mem | minimal 4GB | 8GB is preferred |
| Disk | minimal 40GB | 160GB is preferred |
2)Software
| Software | Version | Description |
|---|---|---|
| Docker engine | version 17.06.0-ce+ or higher | For installation instructions, please refer to: docker engine doc |
| Docker Compose | version 1.18.0 or higher | For installation instructions, please refer to: docker compose doc |
| Openssl | latest is preferred | Generate certificate and keys for Harbor |
3)Network ports
| Port | Protocol | Description |
|---|---|---|
| 443 | HTTPS | Harbor portal and core API will accept requests on this port for https protocol, this port can change in config file |
| 4443 | HTTPS | Connections to the Docker Content Trust service for Harbor, only needed when Notary is enabled, This port can change in config file |
| 80 | HTTP | Harbor portal and core API will accept requests on this port for http protocol |
3、官方安装步骤
The installation steps boil down to the following
Download the installer;
下载地址:https://github.com/goharbor/harbor/releases
Configure harbor.yml;
主要修改hostname主机名及hoarbor_admin_password初始密码
Run install.sh to install and start Harbor;
运行安装脚本
4、开始部署
1)、部署说明:harbor支持docker-compose和kubernetes的部署方式,默认是docker-compose单机部署
2)、安装docker步骤省略
请参考Docker4-docker私库的搭建及常用方法-docker-registry方式
systemctl start docker
systemctl enable docker
3)、下载安装包
创建自定义harbor目录:
mkdir /harbor
cd /harbor
把下载的包上传到此自定义的harbor目录
解压:
tar -zxvf harbor-offline-installer-v1.9.0.tgz
4)、修改harbor.yml
暂时必须修改的两个值:
hostname必须指定
初始密码自己改一个,这里改成harbor
默认的用户名/密码为admin / Harbor12345
[root@web2 harbor]# cat harbor.yml |grep hostname

# The IP address or hostname to access admin UI and registry service.

hostname: 192.168.216.52   #---标准域名或ip

# And when it enabled the hostname will no longer used

[root@web2 harbor]# cat harbor.yml |grep harbor_ad*

harbor_admin_password: harbor #---初始密码
5)安装docker-compose
[root@web2 harbor]# ll

total

-rw-r--r--  root root  Sep  : harbor.v1.9.1.tar.gz

-rw-r--r--  root root       Oct   : harbor.yml

-rwxr-xr-x  root root       Sep  : install.sh

-rw-r--r--  root root      Sep  : LICENSE

-rwxr-xr-x  root root       Sep  : prepare

[root@web2 harbor]# ./install.sh    #---先运行安装脚本,提示环境需要compose

[Step ]: checking installation environment ...

Note: docker version: 19.03.

?.Need to install docker-compose(1.18.+) by yourself first and run this script again. #---提示安装compose
安装compose
yum -y install python-pip

pip install --upgrade pip

pip install docker-compose

docker-compose version
[root@web2 harbor]# docker-compose version

docker-compose version 1.18.0, build 8dd22a9

docker-py version: 2.6.

CPython version: 3.6.

OpenSSL version: OpenSSL 1.0.2k-fips   Jan

[root@web2 harbor]#
6)运行安装脚本
./install.sh

[Step ]: checking installation environment ...

Note: docker version: 19.03.

Note: docker-compose version: 1.18.

[Step ]: loading Harbor images ...

b80136ee24a4: Loading layer [>                                                  ]  .4kB/.25MB

b80136ee24a4: Loading layer [====>                                              ]  .884MB/.25MB

b80136ee24a4: Loading layer [=========>                                         ]  .488MB/.25MB

b80136ee24a4: Loading layer [==============>                                    ]  .09MB/.25MB

b80136ee24a4: Loading layer [======================>                            ]  .14MB/.25MB

。。。。。。。。。。。。。。。。。。。。。。。。。。。。省略loading步骤。。。。。。。。。。。。。。。。。。。。
✔ ----Harbor has been installed and started successfully.----  #---安装成功

Now you should be able to visit the admin portal at http://192.168.216.52.

For more details, please visit https://github.com/goharbor/harbor .
到这里就安装完成了,此时有9个容器运行如下:
[root@web2 harbor]# docker ps

CONTAINER ID        IMAGE                                                    COMMAND                  CREATED             STATUS                    PORTS                       NAMES

e70ce2270a2b        goharbor/nginx-photon:v1.9.1                             "nginx -g 'daemon of??   30 minutes ago      Up 30 minutes (healthy)   0.0.0.0:80->8080/tcp        nginx

f8c165eb8f4e        goharbor/harbor-jobservice:v1.9.1                        "/harbor/harbor_jobs??   30 minutes ago      Up 30 minutes (healthy)                               harbor-jobservice

ba46b285ff14        goharbor/harbor-core:v1.9.1                              "/harbor/harbor_core"     minutes ago      Up  minutes (healthy)                               harbor-core

5179d37b0029        goharbor/harbor-db:v1.9.1                                "/docker-entrypoint.??   30 minutes ago      Up 30 minutes (healthy)   5432/tcp                    harbor-db

8d210e049b95        goharbor/harbor-portal:v1.9.1                            "nginx -g 'daemon of??   30 minutes ago      Up 30 minutes (healthy)   8080/tcp                    harbor-portal

9bb9ea0b891b        goharbor/harbor-registryctl:v1.9.1                       "/harbor/start.sh"        minutes ago      Up  minutes (healthy)                               registryctl

6af51f3478c5        goharbor/redis-photon:v1.9.1                             "redis-server /etc/r??   30 minutes ago      Up 30 minutes (healthy)   6379/tcp                    redis

93656b06f470        goharbor/registry-photon:v2.7.1-patch---v1.9.1   "/entrypoint.sh /etc??   30 minutes ago      Up 30 minutes (healthy)   5000/tcp                    registry

be49e0941ce4        goharbor/harbor-log:v1.9.1                               "/bin/sh -c /usr/loc??   30 minutes ago      Up 30 minutes (healthy)   127.0.0.1:1514->10514/tcp   harbor-log

[root@web2 harbor]#
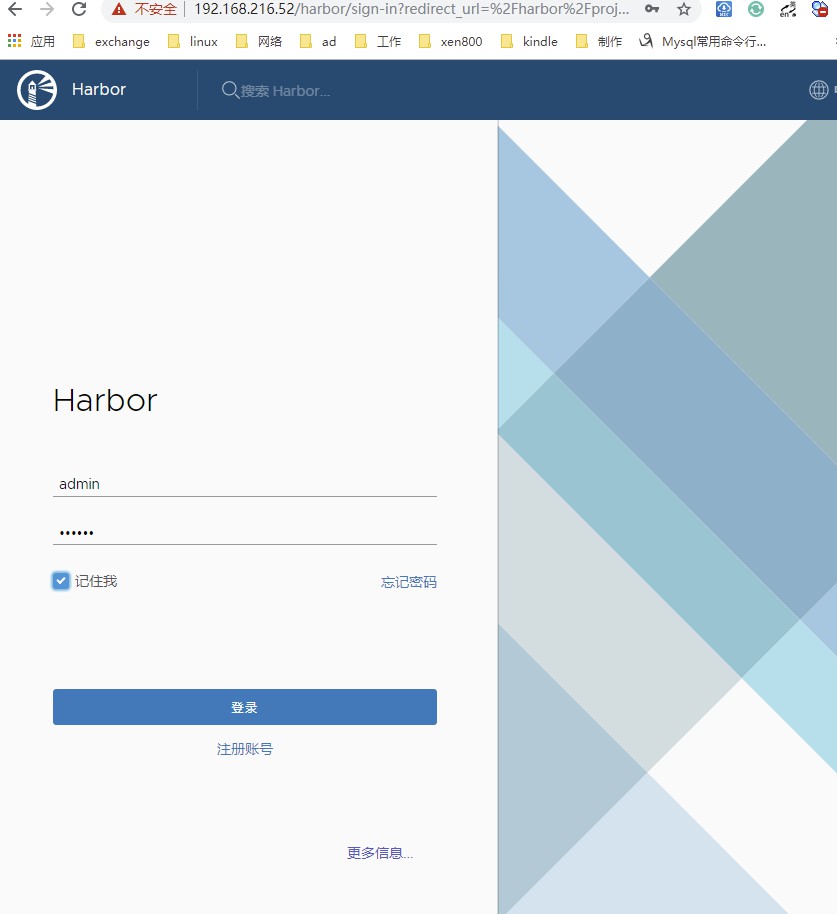
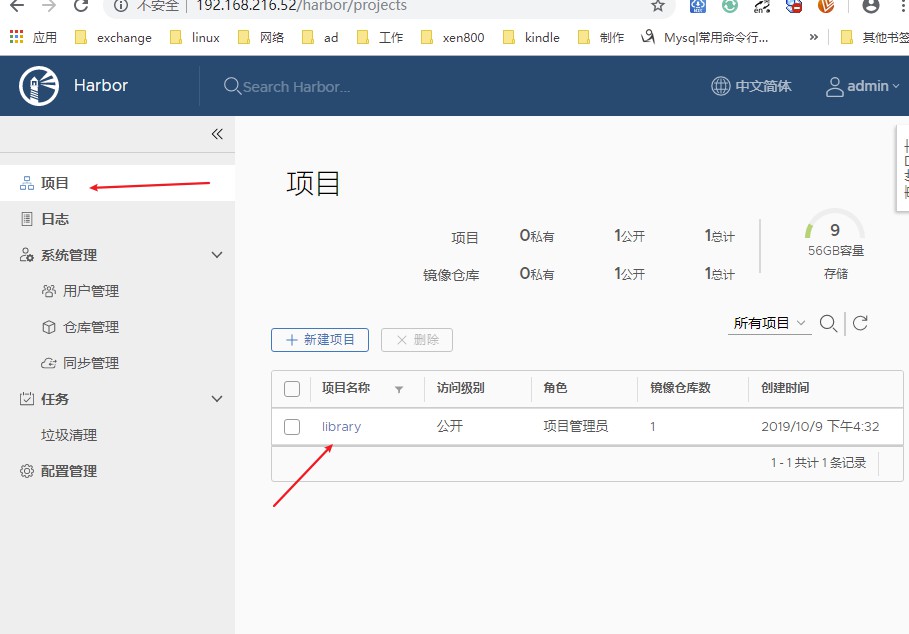
7)访问web界面

四、如何使用harbor-registry
1、客户端登陆,使用http协议需要修改不安全的注册来用允许http链接
注意:客户端在login之前需要添加 “--insecure-registry” 不安全的注册。 即通信使用 http 协
不修改登陆报错:
[root@web1 docker]# docker login 192.168.216.52

Authenticating with existing credentials...

Login did not succeed, error: Error response from daemon: Get https://192.168.216.52/v2/: dial tcp 192.168.216.52:443: connect: connection refused

Username (admin): admin^H^H^H

Password:

Error response from daemon: Get https://192.168.216.52/v2/: dial tcp 192.168.216.52:443: connect: connection refused
修改/etc/docker/daemon.json文件,如没有就创建一个:(修改的是客户端的)
[root@web1 docker]# pwd

/etc/docker

[root@web1 docker]# ll

total

-rw-r--r--  root root   Oct  : daemon.json.bak

-rw-------  root root  Jul  : key.json

[root@web1 docker]# mv daemon.json.bak daemon.json

[root@web1 docker]# cat daemon.json

{

"insecure-registries":["http://192.168.216.52"]

}

#---然后重启docker

[root@web1 docker]# systemctl daemon-reload&&systemctl restart docker
登陆:
docker login 192.168.216.52
注:这里其实是需要用户名密码的,就用之前修改harbor.yml里面默认密码admin/harbor,下面实例是因为已经登陆过所以没有提示密码
[root@web1 docker]# docker login 192.168.216.52

Authenticating with existing credentials...

WARNING! Your password will be stored unencrypted in /root/.docker/config.json.

Configure a credential helper to remove this warning. See

https://docs.docker.com/engine/reference/commandline/login/#credentials-store

Login Succeeded

[root@web1 docker]#
也可以直接加用户密码参数登陆
[root@web1 docker]# docker login -u admin  -p harbor 192.168.216.52

WARNING! Using --password via the CLI is insecure. Use --password-stdin.

WARNING! Your password will be stored unencrypted in /root/.docker/config.json.

Configure a credential helper to remove this warning. See

https://docs.docker.com/engine/reference/commandline/login/#credentials-store

Login Succeeded

[root@web1 docker]#
2、上传镜像
使用docker push 命令
docker push 192.168.216.52/library/zxg/centos_nginx:v1
1)打标签
[root@web1 docker]# docker images

REPOSITORY                TAG                 IMAGE ID            CREATED             SIZE

zxg/centos_nginx          v1                  7c6604cacec1         weeks ago         698MB

atlassian/jira-software   latest              c4b90dede4f3         weeks ago         624MB

zxg/my_nginx              v1                  b164f4c07c64         months ago        126MB

zxg/my_nginx              latest              f07837869dfc         months ago        126MB

nginx                     latest              e445ab08b2be         months ago        126MB

alpine                    latest              b7b28af77ffe         months ago        .58MB

centos                    latest              9f38484d220f         months ago        202MB

[root@web1 docker]# docker tag 7c6604cacec1  192.168.216.52/library/zxg/centos_nginx:v1
[root@web1 docker]# docker images
REPOSITORY TAG IMAGE ID CREATED SIZE
192.168.216.52/library/zxg/centos_nginx v1 7c6604cacec1 7 weeks ago 698MB
2)上传
[root@web1 docker]# docker push 192.168.216.52/library/zxg/centos_nginx:v1

The push refers to repository [192.168.216.52/library/zxg/centos_nginx]

7b4de0c97fbb: Pushed

d69483a6face: Pushed

v1: digest: sha256:2654d7a4fbab3b1be85ca177ac08ce9e13177f9ad45b827ca3ed1e1629050078 size:
3)检查是否成功

3、验证daemon.json格式
1)把刚才客户端的daemon.json文件发送到当前节点
[root@web1 docker]# scp daemon.json root@192.168.216.52:/etc/docker/

The authenticity of host '192.168.216.52 (192.168.216.52)' can't be established.

ECDSA key fingerprint is SHA256:kvAeuWOn6RFSXvl5qFIszQEx9gLizuZER+I4VJkpAso.

ECDSA key fingerprint is MD5:b7:ef:e0:3c:8f:::c2:5c:9a:2e:fc:4d:e2::.

Are you sure you want to continue connecting (yes/no)? yes

Warning: Permanently added '192.168.216.52' (ECDSA) to the list of known hosts.

root@192.168.216.52's password:

daemon.json                                                                           %        .4KB/s   :

[root@web1 docker]#
2)修改一下格式看看行不行
[root@web2 harbor]# cat /etc/docker/daemon.json

{

"insecure-registries":["192.168.216.52"]    ##之前的格式是["http://192.168.216.52"]

}

[root@web2 harbor]#
修改后,需要重启docker及compose
systemctl daemon-reload&&systemctl restart docker

docker-compose down -v

docker-compose up -d
3)login测试是否可以登陆
[root@web2 harbor]# docker login 192.168.216.52

Username: admin

Password:

WARNING! Your password will be stored unencrypted in /root/.docker/config.json.

Configure a credential helper to remove this warning. See

https://docs.docker.com/engine/reference/commandline/login/#credentials-store

Login Succeeded   #登陆正常看来不是格式问题,应该就是版本问题了,低版本应该是需要修改别的配置文件
4、下载镜像
docker pull 192.168.216.52/library/zxg/centos_nginx:v1
[root@web2 harbor]# docker pull 192.168.216.52/library/zxg/centos_nginx:v1

v1: Pulling from library/zxg/centos_nginx

8ba884070f61: Pull complete

75754525faad: Pull complete

Digest: sha256:2654d7a4fbab3b1be85ca177ac08ce9e13177f9ad45b827ca3ed1e1629050078

Status: Downloaded newer image for 192.168.216.52/library/zxg/centos_nginx:v1

192.168.216.52/library/zxg/centos_nginx:v1

[root@web2 harbor]# docker images

REPOSITORY                                TAG                             IMAGE ID            CREATED             SIZE

goharbor/chartmuseum-photon               v0.9.0-v1.9.1                   0aa7451af9b8         days ago         131MB

goharbor/harbor-migrator                  v1.9.1                          a83f1be1ec94         days ago         362MB

goharbor/redis-photon                     v1.9.1                          4d8d79a557df         days ago         110MB

goharbor/clair-photon                     v2.0.9-v1.9.1                   98b318ca3cb0         days ago         165MB

goharbor/notary-server-photon             v0.6.1-v1.9.1                   78dac4ed14d8         days ago         138MB

goharbor/notary-signer-photon             v0.6.1-v1.9.1                   5d9f413e14a8         days ago         135MB

goharbor/harbor-registryctl               v1.9.1                          f4b2b72cdf71         days ago         .6MB

goharbor/registry-photon                  v2.7.1-patch---v1.9.1   d460d658f383         days ago         .3MB

goharbor/nginx-photon                     v1.9.1                          0db1e12b9d30         days ago         .9MB

goharbor/harbor-log                       v1.9.1                          368dd79ef99f         days ago         .6MB

goharbor/harbor-jobservice                v1.9.1                          71d4a3eaff94         days ago         141MB

goharbor/harbor-core                      v1.9.1                          d105210d9924         days ago         155MB

goharbor/harbor-portal                    v1.9.1                          2dced1823043         days ago         .3MB

goharbor/harbor-db                        v1.9.1                          91784692a954         days ago         147MB

goharbor/prepare                          v1.9.1                          44775181c88d         days ago         148MB

192.168.216.51:/busybox               v1                              19485c79a9bb         weeks ago         .22MB

192.168.216.51:/busybox               v2                              19485c79a9bb         weeks ago         .22MB

192.168.216.52:/busybox               latest                          19485c79a9bb         weeks ago         .22MB

192.168.216.52:/busybox               v2                              19485c79a9bb         weeks ago         .22MB

busybox                                   v1                              19485c79a9bb         weeks ago         .22MB

busybox                                   v2                              19485c79a9bb         weeks ago         .22MB

192.168.216.52/library/zxg/centos_nginx   v1                              7c6604cacec1         weeks ago         698MB

[root@web2 harbor]#
五、其他设定
1、使用https访问配置harbor
请参考https://github.com/goharbor/harbor/blob/master/docs/configure_https.md
2、管理harbor的生命周期
1)停止
docker-compose stop
2)重新启动
docker-compose start
3)修改配置
停止harbor---》更新harbor.yml---》运行prepare脚本填充配置---》启动harbor
docker-compose down -v #---此命令关闭harbor同时保存镜像数据及harbor的数据库文件在文件系统上
vim harbor.yml
docker-compose up -d
4)删除harbor的数据库和图像数据(进行重新安装)
rm -r /data/database
rm -r /data/registry
3、安装notary(公正服务)
./install.sh --with-notry
必要设置:ui_url_protocol HTTPS
4、安装clair服务
./install.sh --with-clair
5、安装chart repository服务
./install.sh --with-chartmuseum
6、如果都安装必须使用同一个命令
./install.sh --with-notary --with-clair --with-chartmuseum
7、docker-compose命令帮助
https://docs.docker.com/compose/reference/
8、数据及日志文件
默认在/data/目录中,可以修改harbor.yml更改配置
9、外部数据库
目前harbor只支持postgreSQL数据库,使用外部数据库,需要取消注释external_database部分,然后首先应该创建harbor core,clair、notaryserver、notary signer这四个数据库
10、管理harbor用户配置命令行配置请见下面链接:
https://github.com/goharbor/harbor/blob/master/docs/configure_user_settings.md
总结流程:
安装docker---》安装docker-compose---》下载harbor-offline压缩包---》上传到linux---》解压harbor-offline-installer-v1.9.1-rc1.tgz---》编辑解压的harbor文件里的harbor.yml文件---》修改关键值(域名/初始密码)---》执行./install.sh脚本开始安装---》修改客户端的daemon.json文件,添加非信任授权---》客户端登陆执行docker pull/push命令。
转载请注明出处:https://www.cnblogs.com/zhangxingeng/p/11598708.html
Docker5-docker私库的搭建及常用方法-harbor-registry方式的更多相关文章
- Docker4-docker私库的搭建及常用方法-docker-registry方式
一.简单介绍 前面已经介绍,可以使用Docker Hub公共仓库,但是大多数情况企业都需要创建一个本地仓库供自己使用.这里介绍几种搭建私库的方法 私库的好处有几点 1.节约带宽 2.可以自己定制系统 ...
- docker私库harbor的搭建
1.文件下载 # wget https://storage.googleapis.com/harbor-releases/harbor-online-installer-v1.5.1.tgz 安装官网 ...
- ubuntu16搭建docker私库
测试环境如下: 一.docker的安装 安装方法请查看这里的 安装教程 二.设置普通用户 1. centos的设置方法 $ sudo gpasswd -a docker ${USER} 2. ubun ...
- docker私库Harbor部署(转载)
系统环境 centos7.3docker-ce docker version: 18.03.0docker-compose version: 1.21.0 Install Docker CE 安装依赖 ...
- Easypack容器系列之:Nexus 3:Docker私库
Nexus作为私库管理最为流行的工具之中的一个,用于包的管理和Docker镜像管理的私库管理场景中非经常常使用.Easypack利用最新版本号的oss版Nexus作为基础镜像用于提供相似服务. 本文将 ...
- Docker version 1.12.5建立registry私库
sudo docker run -d -p 5000:5000 -v /opt/data/registry:/var/lib/registry registry :前面的是宿主机的地址(/opt/da ...
- Maven 如何发布 jar 包到 Nexus 私库
Nexus2可以通过管理界面来上传jar包到私库中,而最新的Nexus3却找不到了上传界面,只能通过以下方式来发布到私库. 发布第三方jar包 这种情况是maven远程仓库没有,本地有的第三方jar包 ...
- Maven如何发布jar包到Nexus私库
Nexus2可以通过管理界面来上传jar包到私库中,而最新的Nexus3却找不到了上传界面,只能通过以下方式来发布到私库. 发布第三方jar包 这种情况是maven远程仓库没有,本地有的第三方jar包 ...
- Docker 容器中搭建 nexus npm私库
1,版本 dockers :1.13.1 :nexus 3 2,安装 docker pull liumiaocn/nexus 3,启动 项目 详细 Nexus UI 8081 private re ...
随机推荐
- 洛谷P1196[NOI2002]银河英雄传说-并查集扩展
银河英雄传说 题意:在并查集的基础上,还要求出同一集合的两个点的距离 这道题用并查集自己是知道的,但是竟然可以这么骚的操作. 下面转自大佬的查详细题解 初见这道题,首先想到的方法当然是直接模拟,模拟每 ...
- 江苏 徐州邀请赛 icpc B Array dp 滚动数组模板
题目 题目描述 JSZKC is the captain of the lala team. There are N girls in the lala team. And their height ...
- github 授权登录教程与如何设计第三方授权登录的用户表
需求:在网站上想评论一篇文章,而评论文章是要用户注册与登录的,那么怎么免去这麻烦的步骤呢?答案是通过第三方授权登录.本文讲解的就是 github 授权登录的教程. 效果体验地址:http://biao ...
- 获得本机IP和访问服务的端口号(Java)
1. //获取本机ip地址 InetAddress addr = InetAddress.getLocalHost(); String ip=addr.getHostAddress().toStrin ...
- Spotlight on Oracle注册码破解(亲测可用)
了解到该工具监控十分强大,该工具优点: 我就是为了监控一个Oracle数据库,查阅各种资料,真是费了十牛二虎之力,才破解完成.#_# 在客户端安装好了,连接监控的服务器,提示得要注册码,这外国的软件基 ...
- 将dos格式文件转换为unix格式
在windows下换行符是\r\n,表示回到行首并换到下一行 而unix系统中换行符是\n 这样就存在一个问题,在windows上的文档到了unix上可能就无法使用了 针对这个情况有几种解决办法: 1 ...
- [大数据学习研究] 4. Zookeeper-分布式服务的协同管理神器
本来这一节想写Hadoop的分布式高可用环境的搭建,写到一半,发现还是有必要先介绍一下ZooKeeper这个东西. ZooKeeper理念介绍 ZooKeeper是为分布式应用来提供协同服务的,而且Z ...
- CSS精灵图合成工具
链接:http://pan.baidu.com/s/1o7OUUVo 提取密码:rmnx
- C#加载前生成静态网页
using System;using System.Collections.Generic;using System.Linq;using System.Web;using System.Web.UI ...
- cocos 微信小游戏切后台卡住
1.cocos 安装目录下搜索以下代码并注掉opts["preserveDrawingBuffer"] = true;”2.CocosCreator\resources\engin ...