SpringBoot2.0 基础案例(17):自定义启动页,项目打包和指定运行环境
本文源码:GitHub·点这里 || GitEE·点这里
一、打包简介
springboot的打包方式有很多种。可以打war包,可以打jar包,可以使用jekins进行打包部署的。不推荐用war包,SpringBoot适合前后端分离,打成jar进行部署更加方便快捷。
二、自定义启动页
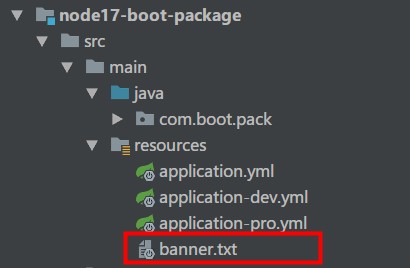
banner.txt内容
=======================

        No BUG

=======================
这样就替换了原先SpringBoot的启动样式。
三、打包配置
1、打包pom配置
<!-- 项目构建 -->

<build>

    <finalName>${project.artifactId}</finalName>

    <resources>

        <resource>

            <directory>src/main/resources</directory>

            <filtering>true</filtering>

        </resource>

    </resources>

    <plugins>

        <!-- SpringBoot插件:JDK编译插件 -->

        <plugin>

            <groupId>org.apache.maven.plugins</groupId>

            <artifactId>maven-compiler-plugin</artifactId>

            <version>2.3.2</version>

            <configuration>

                <source>1.8</source>

                <target>1.8</target>

            </configuration>

        </plugin>

        <!-- SpringBoot插件:打包 -->

        <plugin>

            <groupId>org.springframework.boot</groupId>

            <artifactId>spring-boot-maven-plugin</artifactId>

            <configuration>

                <jvmArguments>-Dfile.encoding=UTF-8</jvmArguments>

                <executable>true</executable>

            </configuration>

            <executions>

                <execution>

                    <goals>

                        <goal>repackage</goal>

                    </goals>

                </execution>

            </executions>

        </plugin>

        <!-- 跳过单元测试 -->

        <plugin>

            <groupId>org.apache.maven.plugins</groupId>

            <artifactId>maven-surefire-plugin</artifactId>

            <configuration>

                <skipTests>true</skipTests>

            </configuration>

        </plugin>

    </plugins>

</build>
2、多环境配置
1)application.yml配置
server:

  port: 8017

spring:

  application:

    name: node17-boot-package

  profiles:

    active: dev
2)application-dev.yml配置
project:

  sign: develop
3)application-pro.yml配置
project:

  sign: product
3、环境测试接口
package com.boot.pack.controller;

import org.springframework.beans.factory.annotation.Value;

import org.springframework.web.bind.annotation.RequestMapping;

import org.springframework.web.bind.annotation.RestController;

@RestController

public class PackController {

    @Value("${project.sign}")

    private String sign ;

    @RequestMapping("/getSign")

    public String getSign (){

        return sign ;

    }

}
四、打包执行
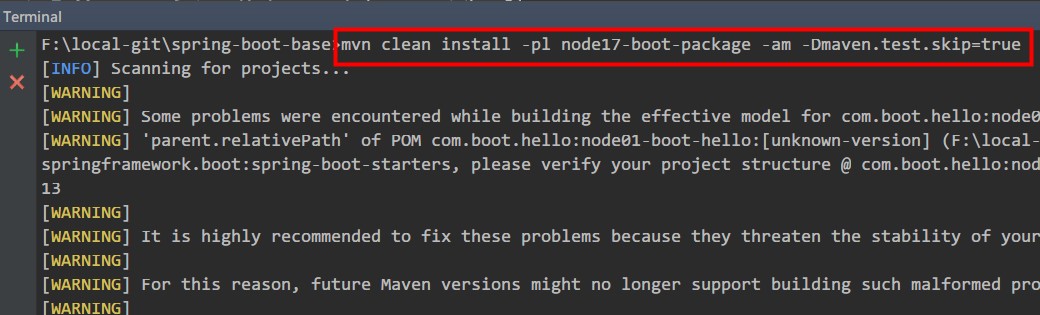
1、指定模块打包
mvn clean install -pl node17-boot-package -am -Dmaven.test.skip=true

生成Jar包:node17-boot-package.jar
2、运行Jar包
运行dev环境
java -jar node17-boot-package.jar --spring.profiles.active=dev
运行pro环境
java -jar node17-boot-package.jar --spring.profiles.active=pro
http://localhost:8017/getSign

dev环境打印:develop

pro环境打印:product
五、源代码地址
GitHub·地址

https://github.com/cicadasmile/spring-boot-base

GitEE·地址

https://gitee.com/cicadasmile/spring-boot-base

SpringBoot2.0 基础案例(17):自定义启动页,项目打包和指定运行环境的更多相关文章
- 十六:SpringBoot-自定义启动页,项目打包和指定运行环境
SpringBoot-自定义启动页,项目打包和指定运行环境 1.自定义启动页 2.打包配置 2.1 打包pom配置 2.2 多环境配置 3.环境测试接口 4.打包执行 4.1 指定模块打包 4.2 运 ...
- SpringBoot2.0 基础案例(12):基于转账案例,演示事务管理操作
本文源码 GitHub地址:知了一笑 https://github.com/cicadasmile/spring-boot-base 一.事务管理简介 1.事务基本概念 一组业务操作ABCD,要么全部 ...
- SpringBoot2.0 基础案例(13):基于Cache注解模式,管理Redis缓存
本文源码 GitHub地址:知了一笑 https://github.com/cicadasmile/spring-boot-base 一.Cache缓存简介 从Spring3开始定义Cache和Cac ...
- SpringBoot2.0 基础案例(03):配置系统全局异常映射处理
一.异常分类 这里的异常分类从系统处理异常的角度看,主要分类两类:业务异常和系统异常. 1.业务异常 业务异常主要是一些可预见性异常,处理业务异常,用来提示用户的操作,提高系统的可操作性. 常见的业务 ...
- SpringBoot2.0基础案例(01):环境搭建和RestFul风格接口
一.SpringBoot 框架的特点 1.SpringBoot2.0 特点 1)SpringBoot继承了Spring优秀的基因,上手难度小 2)简化配置,提供各种默认配置来简化项目配置 3)内嵌式容 ...
- SpringBoot2.0 基础案例(14):基于Yml配置方式,实现文件上传逻辑
本文源码 GitHub地址:知了一笑 https://github.com/cicadasmile/spring-boot-base 一.文件上传 文件上传是项目开发中一个很常用的功能,常见的如头像上 ...
- SpringBoot2.0 基础案例(09):集成JPA持久层框架,简化数据库操作
一.JAP框架简介 JPA(Java Persistence API)意即Java持久化API,是Sun官方在JDK5.0后提出的Java持久化规范.主要是为了简化持久层开发以及整合ORM技术,结束H ...
- SpringBoot2.0 基础案例(16):配置Actuator组件,实现系统监控
本文源码 GitHub地址:知了一笑 https://github.com/cicadasmile/spring-boot-base 一.Actuator简介 1.监控组件作用 在生产环境中,需要实时 ...
- SpringBoot2.0 基础案例(04):定时任务和异步任务的使用方式
一.定时任务 1.基本概念 按照指定时间执行的程序. 2.使用场景 数据分析 数据清理 系统服务监控 二.同步和异步 1.基本概念 同步调用 程序按照代码顺序依次执行,每一行程序都必须等待上一行程序执 ...
随机推荐
- pcntl_signal(): Error assigning signal
错误原因:SIGSTOP(19)和SIGKILL(6)两个信号不能使用,进程间通信换成其他信号量就好了.
- SOCKET CAN的理解
转载请注明出处:http://blog.csdn.net/Righthek 谢谢! CAN总线原理 由于Socket CAN涉及到CAN总线协议.套接字.Linux网络设备驱动等.因此,为了能够全面地 ...
- 【CV现状-3.2】纹理与材质
#磨染的初心--计算机视觉的现状 [这一系列文章是关于计算机视觉的反思,希望能引起一些人的共鸣.可以随意传播,随意喷.所涉及的内容过多,将按如下内容划分章节.已经完成的会逐渐加上链接.] 缘起 三维感 ...
- C#程序编写高质量代码改善的157个建议【10-12】[创建对象时需要考虑是否实现比较器、区别对待==和Equals]
前言 建议10.创建对象时需要考虑是否实现比较器 建议11.区别对待==和Equals 建议12.重写Equals时也要重写GetHashCode 建议10.创建对象时需要考虑是否实现比较器 有对象的 ...
- mysql数据库排坑过程
刚安装mysql后想通过navicat来连接mysql,发现报错 1251这个错误,不慌.这个很简单. 首先通过cmd进入mysql. 然后修改密码规则 ALTER USER 'root'@'loca ...
- Aery的UE4 C++游戏开发之旅(1)基础对象模型
目录 UObject Actor种类 AActor APawn(可操控单位) AController(控制器) AGameMode(游戏模式) AHUD(HUD) ... Component种类 UA ...
- jQuery插件 distpicker实现多次赋值
项目里需要实现省市区联动选择功能,使用了一个jQuery插件dispicker,记录一下使用过程中遇到的问题和解决办法. 需要要实现的功能就两个:打开modal框时设置地址,点击重置按钮时重置地址 原 ...
- Java基础语法02-流程控制-if-switch-for-while
流程控制语句 顺序结构 任何编程语言中最常见的程序结构就是顺序结构.顺序结构就是程序从上到下逐行地执行,中间没有任何判断和跳转. 分支结构 if(条件表达式){ 语句体;} 执行流程 首先判断条件表达 ...
- 使用 ASP.NET Core MVC 创建 Web API——响应数据的内容协商(七)
使用 ASP.NET Core MVC 创建 Web API 使用 ASP.NET Core MVC 创建 Web API(一) 使用 ASP.NET Core MVC 创建 Web API(二) 使 ...
- Eureka+SpringBoot2.X版本实现优雅停服
在客户端添加如下配置 pom依赖 actuator.jar包 <dependency> <groupId>org.springframework.cloud</group ...