React Native 系列(七)
前言
本系列是基于React Native版本号0.44.3写的。几乎所有的App都使用了ListView这种组件,这篇文章将学习RN中ListView的平铺样式和分组样式。
ListView平铺样式
ListView内部是通过ListViewDataSource这个对象显示数据的,因此使用ListView的时候需要创建一个ListViewDataSource对象。ListViewDataSource构造方法创建对象的时候可以选择性出入4个参数,描述怎么提取cell,怎么刷新cell这些参数都是函数,当产生对应事件的时候,会自动调用对应函数
构造函数可以接收以下四种参数(都是函数):

getRowData(dataBlob, sectionID, rowID); // 怎么获取行数据

getSectionHeaderData(dataBlob, sectionID); // 获取没组头数据

rowHasChanged(prevRowData, nextRowData); // 决定什么情况行数据才发生改变,当行数据发生改变,就会绘制下一行

sectionHeaderHasChanged(prevSectionData, nextSectionData); // 决定什么情况头部数据才会发生改变,当头部数据发生改变,就会绘制下一个组ListViewDataSource为ListView组件提供高性能的数据处理和访问。我们需要调用clone方法从原始输入数据中抽取数据来创建ListViewDataSource对象。要更新
datasource中的数据,请(每次都重新)调用cloneWithRows方法(如果用到了section,则对应cloneWithRowsAndSections方法)clone方法会自动提取新数据并进行逐行对比(使用rowHasChanged方法中的策略),这样ListView就知道哪些行需要重新渲染了。
平铺样式使用步骤
创建数据源
- 因为改变数据的时候需要刷新界面,因此可以利用
setState - 获取
ListViewDataSource使用ListView.DataSource ListViewDataSource构造方法:决定ListView怎么去处理数据,需要传入一个对象,这个对象有四个可选属性,都是方法。- 初始化
ListViewDataSource的时候,如果不需要修改提取数据的方式,只需要实现rowHasChanged,告诉什么时候刷新下一行 - 默认
ListViewDataSource有提取数据方式,可以使用默认提取方式。
// 构造

constructor(props) {

    super(props);

    // 初始状态

    var ds = new ListView.DataSource({rowHasChanged: (r1, r2) => r1 !== r2});

}- 因为改变数据的时候需要刷新界面,因此可以利用
给数据源设置数据
// 构造

constructor(props) {

    super(props);

    // 初始状态

    var ds = new ListView.DataSource({rowHasChanged: (r1, r2) => r1 !== r2});

    this.state = {

        dataSource: ds.cloneWithRows(['row1', 'row2'])

    }

}
实现数据源方法,确定cell
- 这个方法会自动传入四个参数(rowData, sectionID, rowID, highlightRow)
- rowData: 行数据
- sectionID: 当前行所在的组id
- rowID: 当前行所在的行id
- highlightRow: 高亮函数
render() {

    return (

        <ListView style={{marginTop: 20}}

                  dataSource={this.state.dataSource}

                  renderRow={this._renderRow.bind(this)}

        />

    );

}

_renderRow(rowData, sectionID, rowID, highlightRow){

    return (

        <View>

            <Text>{rowData}</Text>

        </View>

    );

}
ListView分割线
运行上面的代码,你会发现ListView没有分割线,我们可以添加分割线:
render() {

    return (

        <ListView style={{marginTop: 20}}

                  dataSource={this.state.dataSource}

                  renderRow={this._renderRow.bind(this)}

        renderSeparator={this._renderSeparator.bind(this)}

        />

    );

}

_renderSeparator(sectionID, rowID, adjacentRowHighlighted) {

    return (

        <View style={{height:1,backgroundColor:'black'}}>

        </View>

    )

}
ListView头部视图
_renderHeader(){

    return (

        <View style={[{height:30}, {backgroundColor:'red'},{justifyContent: 'center'}]}>

            <Text style={[{textAlign: 'center'}]}>头部视图</Text>

        </View>

    );

}
效果图: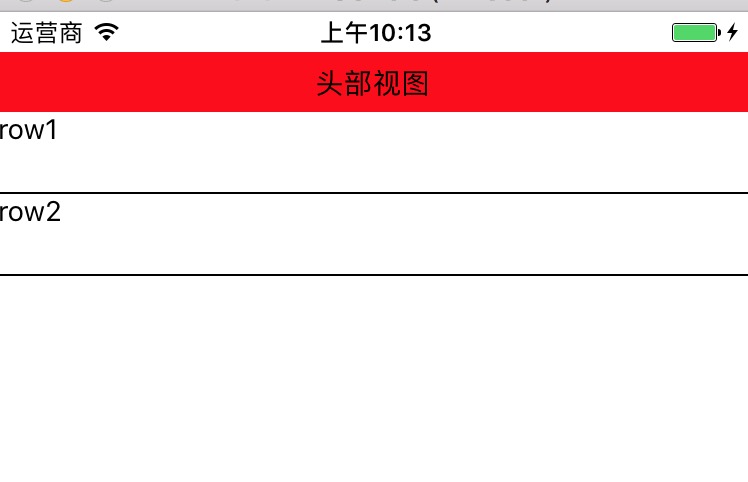
ListView尾部视图
_renderFooter(){

    return (

        <View style={[{height: 30}, {backgroundColor: 'red'}, {justifyContent:'center'}]}>

            <Text style={{textAlign: `center`}}>尾部视图</Text>

        </View>

    )

}
效果图: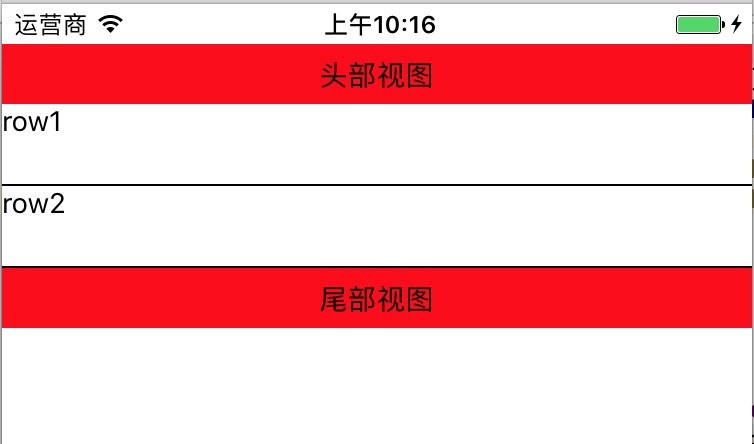
ListView点击cell高亮
_renderRow(rowData, sectionID, rowID, highlightRow){

    return (

        <TouchableOpacity onPress={()=>{

            AlertIOS.alert(rowID)

            highlightRow(sectionID, rowID)

        }}>

            <View style={{height: 40}}>

                <Text>{rowData}</Text>

            </View>

        </TouchableOpacity>

    );

}注意:需要导入TouchableOpacity和AlertIOS
ListView分组样式
有时候我们会遇到ListView分组样式,比如中国有多少个省,然后每个省又有多少个城市。
要想明白ListView是如何分组的,就需要知道ListView底层是如何获取组数据,行数据。
ListView分组原理
ListView默认支持3种格式的数据,只要按照这3种格式处理数据,就会自动获取数据,从而达到分组样式
默认的3种格式的数据:

// 格式一

[[row_0, row_1,...],[row_0, row_1,...],...]

// 格式二

{sectionID_0:{rowID_0, rowID_1, rowID_2, ...}, ...}

// 格式三

{sectionID_0:[rowID_0, rowID_1, ...], ...}
实现ListView分组样式步骤
创建数据源
var dataSource = new ListView.DataSource({

    rowHasChanged:(r1,r2)=>r1 !== r2,

    sectionHeaderHasChanged:(s1,s2)=>s1 !== s2

});
设置数据
- 不分组使用:
cloneWithRows() - 分组使用:
cloneWithRowsAndSections()
this.state = {

    dataSource: ds.cloneWithRowsAndSections(Data)

}- 不分组使用:
渲染
ListView
代码演练
这个例子我们使用了本地假数据,创建一个Data.json文件,它看起来是这样:
[

  ["section0-row0","section0-row1","section0-row2","section0-row3"],

  ["section1-row0","section1-row1","section1-row2","section1-row3"],

  ["section2-row0","section2-row1","section2-row2","section2-row3"],

  ["section3-row0","section3-row1","section3-row2","section3-row3"],

  ["section4-row0","section4-row1","section4-row2","section4-row3"],

  ["section5-row0","section5-row1","section5-row2","section5-row3"]

]我们在index.ios.js里面引用Data.json
var Data = require('./Data.json')然后就按照上述 实现ListView分组样式 步骤写:
var Data = require('./Data.json')

// 主组件

export default class RNDemoOne extends Component {

    // 构造

    constructor(props) {

        super(props);

        // 初始状态

        var ds = new ListView.DataSource({

            rowHasChanged: (r1, r2) => r1 !== r2,

            sectionHeaderHasChanged: (s1, s2) => s1 !== s2

        });

        this.state = {

            dataSource: ds.cloneWithRowsAndSections(Data)

        }

    }

    render() {

        return (

            <ListView style={{marginTop: 20}}

                dataSource={this.state.dataSource}

                renderRow={this._renderRow.bind(this)}

          renderSeparator={this._renderSeparator.bind(this)}          renderSectionHeader={this._renderSectionHeader.bind(this)}

            />

        );

    }

    _renderSectionHeader(sectionData, sectionID){

        return (

            <View style={[{height: 40}, {backgroundColor:'red'}]}>

                <View style={[{flex:1}, {justifyContent: 'center'}]}>

                    <Text style={{paddingLeft: 10}}>{sectionID}</Text>

                </View>

            </View>

        )

    }

    _renderRow(rowData, sectionID, rowID, highlightRow){

        return (

            <TouchableOpacity onPress={()=>{

                AlertIOS.alert(rowID)

                highlightRow(sectionID, rowID)

            }}>

                <View style={{height: 40}}>

                    <Text>{rowData}</Text>

                </View>

            </TouchableOpacity>

        );

    }

    _renderSeparator(sectionID, rowID, adjacentRowHighlighted) {

        return (

            <View style={{height:1,backgroundColor:'black'}}>

            </View>

        )

    }

}

const styles = StyleSheet.create({

    container: {

        flex: 1,

    },

});
致谢
如果发现有错误的地方,欢迎各位指出,谢谢!
React Native 系列(七)的更多相关文章
- React Native 系列(七) -- ListView
前言 本系列是基于React Native版本号0.44.3写的.几乎所有的App都使用了ListView这种组件,这篇文章将学习RN中ListView的平铺样式和分组样式. ListView平铺样式 ...
- 【REACT NATIVE 系列教程之十二】REACT NATIVE(JS/ES)与IOS(OBJECT-C)交互通信
http://blog.csdn.net/xiaominghimi/article/details/51586492 一用到跨平台的引擎必然要有引擎与各平台原生进行交互通信的需要.那么Himi先讲解R ...
- React Native 系列(一) -- JS入门知识
前言 本系列是基于React Native版本号0.44.3写的,最初学习React Native的时候,完全没有接触过React和JS,本文的目的是为了给那些JS和React小白提供一个快速入门,让 ...
- React Native 系列(二) -- React入门知识
前言 本系列是基于React Native版本号0.44.3写的,最初学习React Native的时候,完全没有接触过React和JS,本文的目的是为了给那些JS和React小白提供一个快速入门,让 ...
- React Native 系列(四) -- 布局
前言 本系列是基于React Native版本号0.44.3写的.RN支持CSS中的布局属性,因此可以使用CSS布局属性,这里就不详细地讲解了,这篇文章的重点主要是讲述一下RN中的Flex布局. CS ...
- React Native 系列(五) -- 组件间传值
前言 本系列是基于React Native版本号0.44.3写的.任何一款 App 都有界面之间数据传递的这个步骤的,那么在RN中,组件间是怎么传值的呢?这篇文章将介绍到顺传.逆传已经通过通知传值. ...
- React Native 系列(六) -- PropTypes
前言 本系列是基于React Native版本号0.44.3写的.在我们之前的通过props实现组件间传值的时候,大家有没有发现在父组件传递值过去,在子控件获取props的时候没有提示,那么如何能实现 ...
- React Native 系列(八) -- 导航
前言 本系列是基于React Native版本号0.44.3写的.我们都知道,一个App不可能只有一个不变的界面,而是通过多个界面间的跳转来呈现不同的内容.那么这篇文章将介绍RN中的导航. 导航 什么 ...
- React Native 系列(九) -- Tab标签组件
前言 本系列是基于React Native版本号0.44.3写的.很多的App都使用了Tab标签组件,例如QQ,微信等等,就是切换不同的选项,显示不同的内容.那么这篇文章将介绍RN中的Tab标签组件. ...
随机推荐
- 【BZOJ】4316: 小C的独立集 静态仙人掌
[题意]给定仙人掌图,求最大独立集(选择最大的点集使得点间无连边).n<=50000,m<=60000. [算法]DFS处理仙人掌图 [题解]参考:[BZOJ]1023: [SHOI200 ...
- javaScript语法和风格的检查工具
一.JSLint. JSHint. JSCS. ESLint 1.JSLint是由Douglas Crockford开发的,可能是最早的JavaScript Lint工具.JSLint定义了一组编码约 ...
- 大数据系列之kafka-java实现
Java源码GitBub地址: https://github.com/fzmeng/kafka-demo 关于kafka安装步骤可见文章 http://www.cnblogs.com/cnmeng ...
- Deep Learning基础--各个损失函数的总结与比较
损失函数(loss function)是用来估量你模型的预测值f(x)与真实值Y的不一致程度,它是一个非负实值函数,通常使用L(Y, f(x))来表示,损失函数越小,模型的鲁棒性就越好.损失函数是经验 ...
- myeclipse/eclipse安装反编译插件jadclipse
jad是一个使用比较广泛的Java反编译软件,jadClipse是jad在eclipse下的插件,下面像大家介绍下如何将jadclipse加入到myeclipse/eclipse中. 文件下载 (1) ...
- centos 6.5配置ftp服务器,亲测可用
设置开机启动 1 chkconfig vsftpd on 启动服务 1 /sbin/service vsftpd start 配置FTP用户组/用户以及相应权限 添加用户组 1 groupadd ft ...
- 以应用带动SDN发展(CDN峰会 工信部杨崑)(转)
以应用带动SDN发展(CDN峰会 工信部杨崑) SDNAP推荐:这是在亚太全媒体SDN峰会由工信部研究院秘书长杨崑做的关于SDN的一个演讲,本人认为主讲者通过对整 个信息服务体系的精简归纳总结,剥 ...
- 20180615 wdcp 域名解析问题
/usr/local/nginx_bak/conf/nginx.conf 这里有个nginx的配置,修改为nginx_bak
- nginx解析带中文的url重定向之后404问题
首先,有这样一个需求:一个系统的图片存储是放在upyun上的,现在有个客户需要本地化部署,所以需要将图片进行本地存储.为了兼容,图片存储的路径格式保持和在upyun上的存储路径一致.在upyun上的存 ...
- 【摘要】JavaScript 的性能优化:加载和执行
1.浏览器遇到js代码会暂停页面的下载和渲染,谁晓得js代码会不会把html给强奸(改变)了: 2.延迟脚本加载:defer 属性 <html> <head> <titl ...