React Native 系列(七) -- ListView
前言
本系列是基于React Native版本号0.44.3写的。几乎所有的App都使用了ListView这种组件,这篇文章将学习RN中ListView的平铺样式和分组样式。
ListView平铺样式
ListView内部是通过ListViewDataSource这个对象显示数据的,因此使用ListView的时候需要创建一个ListViewDataSource对象。ListViewDataSource构造方法创建对象的时候可以选择性出入4个参数,描述怎么提取cell,怎么刷新cell这些参数都是函数,当产生对应事件的时候,会自动调用对应函数
构造函数可以接收以下四种参数(都是函数):

getRowData(dataBlob, sectionID, rowID); // 怎么获取行数据

getSectionHeaderData(dataBlob, sectionID); // 获取没组头数据

rowHasChanged(prevRowData, nextRowData); // 决定什么情况行数据才发生改变,当行数据发生改变,就会绘制下一行

sectionHeaderHasChanged(prevSectionData, nextSectionData); // 决定什么情况头部数据才会发生改变,当头部数据发生改变,就会绘制下一个组
ListViewDataSource为ListView组件提供高性能的数据处理和访问。我们需要调用clone方法从原始输入数据中抽取数据来创建ListViewDataSource对象。要更新
datasource中的数据,请(每次都重新)调用cloneWithRows方法(如果用到了section,则对应cloneWithRowsAndSections方法)clone方法会自动提取新数据并进行逐行对比(使用rowHasChanged方法中的策略),这样ListView就知道哪些行需要重新渲染了。
平铺样式使用步骤
创建数据源
- 因为改变数据的时候需要刷新界面,因此可以利用
setState - 获取
ListViewDataSource使用ListView.DataSource ListViewDataSource构造方法:决定ListView怎么去处理数据,需要传入一个对象,这个对象有四个可选属性,都是方法。- 初始化
ListViewDataSource的时候,如果不需要修改提取数据的方式,只需要实现rowHasChanged,告诉什么时候刷新下一行 - 默认
ListViewDataSource有提取数据方式,可以使用默认提取方式。
// 构造

constructor(props) {

    super(props);

    // 初始状态

    var ds = new ListView.DataSource({rowHasChanged: (r1, r2) => r1 !== r2});

}
- 因为改变数据的时候需要刷新界面,因此可以利用
给数据源设置数据
// 构造

constructor(props) {

    super(props);

    // 初始状态

    var ds = new ListView.DataSource({rowHasChanged: (r1, r2) => r1 !== r2});

    this.state = {

        dataSource: ds.cloneWithRows(['row1', 'row2'])

    }

}
实现数据源方法,确定cell
- 这个方法会自动传入四个参数(rowData, sectionID, rowID, highlightRow)
- rowData: 行数据
- sectionID: 当前行所在的组id
- rowID: 当前行所在的行id
- highlightRow: 高亮函数
render() {

    return (

        <ListView style={{marginTop: 20}}

                  dataSource={this.state.dataSource}

                  renderRow={this._renderRow.bind(this)}

        />

    );

}

_renderRow(rowData, sectionID, rowID, highlightRow){

    return (

        <View>

            <Text>{rowData}</Text>

        </View>

    );

}
ListView分割线
运行上面的代码,你会发现ListView没有分割线,我们可以添加分割线:
render() {

    return (

        <ListView style={{marginTop: 20}}

                  dataSource={this.state.dataSource}

                  renderRow={this._renderRow.bind(this)}

        renderSeparator={this._renderSeparator.bind(this)}

        />

    );

}

_renderSeparator(sectionID, rowID, adjacentRowHighlighted) {

    return (

        <View style={{height:1,backgroundColor:'black'}}>

        </View>

    )

}
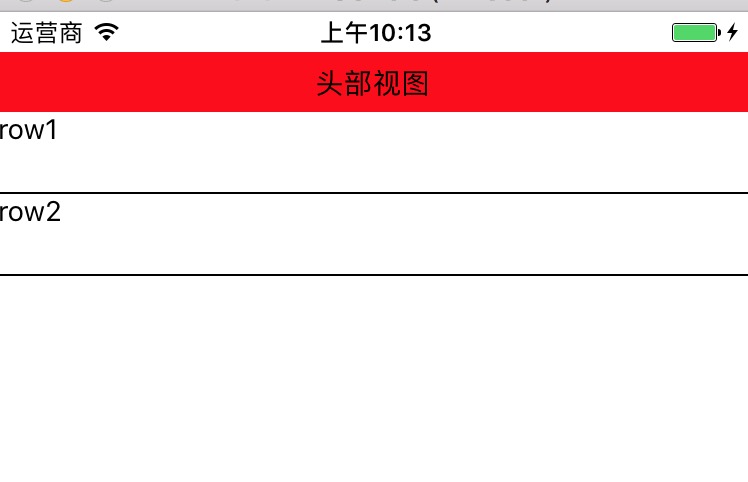
ListView头部视图
_renderHeader(){

    return (

        <View style={[{height:30}, {backgroundColor:'red'},{justifyContent: 'center'}]}>

            <Text style={[{textAlign: 'center'}]}>头部视图</Text>

        </View>

    );

}
效果图:
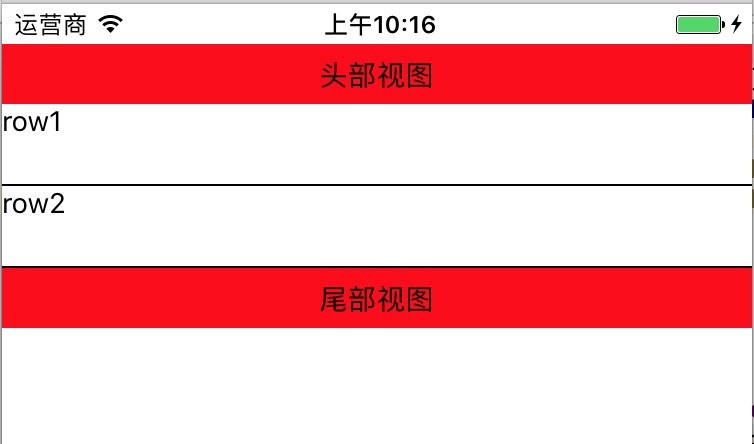
ListView尾部视图
_renderFooter(){

    return (

        <View style={[{height: 30}, {backgroundColor: 'red'}, {justifyContent:'center'}]}>

            <Text style={{textAlign: `center`}}>尾部视图</Text>

        </View>

    )

}
效果图:
ListView点击cell高亮
_renderRow(rowData, sectionID, rowID, highlightRow){

    return (

        <TouchableOpacity onPress={()=>{

            AlertIOS.alert(rowID)

            highlightRow(sectionID, rowID)

        }}>

            <View style={{height: 40}}>

                <Text>{rowData}</Text>

            </View>

        </TouchableOpacity>

    );

}
注意:需要导入TouchableOpacity和AlertIOS
ListView分组样式
有时候我们会遇到ListView分组样式,比如中国有多少个省,然后每个省又有多少个城市。
要想明白ListView是如何分组的,就需要知道ListView底层是如何获取组数据,行数据。
ListView分组原理
ListView默认支持3种格式的数据,只要按照这3种格式处理数据,就会自动获取数据,从而达到分组样式
默认的3种格式的数据:

// 格式一

[[row_0, row_1,...],[row_0, row_1,...],...]

// 格式二

{sectionID_0:{rowID_0, rowID_1, rowID_2, ...}, ...}

// 格式三

{sectionID_0:[rowID_0, rowID_1, ...], ...}
实现ListView分组样式步骤
创建数据源
var dataSource = new ListView.DataSource({

    rowHasChanged:(r1,r2)=>r1 !== r2,

    sectionHeaderHasChanged:(s1,s2)=>s1 !== s2

});
设置数据
- 不分组使用:
cloneWithRows() - 分组使用:
cloneWithRowsAndSections()
this.state = {

    dataSource: ds.cloneWithRowsAndSections(Data)

}
- 不分组使用:
渲染
ListView
代码演练
这个例子我们使用了本地假数据,创建一个Data.json文件,它看起来是这样:
[

  ["section0-row0","section0-row1","section0-row2","section0-row3"],

  ["section1-row0","section1-row1","section1-row2","section1-row3"],

  ["section2-row0","section2-row1","section2-row2","section2-row3"],

  ["section3-row0","section3-row1","section3-row2","section3-row3"],

  ["section4-row0","section4-row1","section4-row2","section4-row3"],

  ["section5-row0","section5-row1","section5-row2","section5-row3"]

]
我们在index.ios.js里面引用Data.json
var Data = require('./Data.json')
然后就按照上述 实现ListView分组样式 步骤写:
var Data = require('./Data.json')

// 主组件

export default class RNDemoOne extends Component {

    // 构造

    constructor(props) {

        super(props);

        // 初始状态

        var ds = new ListView.DataSource({

            rowHasChanged: (r1, r2) => r1 !== r2,

            sectionHeaderHasChanged: (s1, s2) => s1 !== s2

        });

        this.state = {

            dataSource: ds.cloneWithRowsAndSections(Data)

        }

    }

    render() {

        return (

            <ListView style={{marginTop: 20}}

                dataSource={this.state.dataSource}

                renderRow={this._renderRow.bind(this)}

          renderSeparator={this._renderSeparator.bind(this)}          renderSectionHeader={this._renderSectionHeader.bind(this)}

            />

        );

    }

    _renderSectionHeader(sectionData, sectionID){

        return (

            <View style={[{height: 40}, {backgroundColor:'red'}]}>

                <View style={[{flex:1}, {justifyContent: 'center'}]}>

                    <Text style={{paddingLeft: 10}}>{sectionID}</Text>

                </View>

            </View>

        )

    }

    _renderRow(rowData, sectionID, rowID, highlightRow){

        return (

            <TouchableOpacity onPress={()=>{

                AlertIOS.alert(rowID)

                highlightRow(sectionID, rowID)

            }}>

                <View style={{height: 40}}>

                    <Text>{rowData}</Text>

                </View>

            </TouchableOpacity>

        );

    }

    _renderSeparator(sectionID, rowID, adjacentRowHighlighted) {

        return (

            <View style={{height:1,backgroundColor:'black'}}>

            </View>

        )

    }

}

const styles = StyleSheet.create({

    container: {

        flex: 1,

    },

});
致谢
如果发现有错误的地方,欢迎各位指出,谢谢!
React Native 系列(七) -- ListView的更多相关文章
- React Native 系列(七)
前言 本系列是基于React Native版本号0.44.3写的.几乎所有的App都使用了ListView这种组件,这篇文章将学习RN中ListView的平铺样式和分组样式. ListView平铺样式 ...
- React Native的组件ListView
React Native的组件ListView类似于iOS中的UITableView和UICollectionView,也就是说React Native的组件ListView既可以实现UITableV ...
- 【REACT NATIVE 系列教程之十二】REACT NATIVE(JS/ES)与IOS(OBJECT-C)交互通信
http://blog.csdn.net/xiaominghimi/article/details/51586492 一用到跨平台的引擎必然要有引擎与各平台原生进行交互通信的需要.那么Himi先讲解R ...
- React Native 系列(一) -- JS入门知识
前言 本系列是基于React Native版本号0.44.3写的,最初学习React Native的时候,完全没有接触过React和JS,本文的目的是为了给那些JS和React小白提供一个快速入门,让 ...
- React Native 系列(二) -- React入门知识
前言 本系列是基于React Native版本号0.44.3写的,最初学习React Native的时候,完全没有接触过React和JS,本文的目的是为了给那些JS和React小白提供一个快速入门,让 ...
- React Native 系列(四) -- 布局
前言 本系列是基于React Native版本号0.44.3写的.RN支持CSS中的布局属性,因此可以使用CSS布局属性,这里就不详细地讲解了,这篇文章的重点主要是讲述一下RN中的Flex布局. CS ...
- React Native 系列(五) -- 组件间传值
前言 本系列是基于React Native版本号0.44.3写的.任何一款 App 都有界面之间数据传递的这个步骤的,那么在RN中,组件间是怎么传值的呢?这篇文章将介绍到顺传.逆传已经通过通知传值. ...
- React Native 系列(六) -- PropTypes
前言 本系列是基于React Native版本号0.44.3写的.在我们之前的通过props实现组件间传值的时候,大家有没有发现在父组件传递值过去,在子控件获取props的时候没有提示,那么如何能实现 ...
- React Native 系列(八) -- 导航
前言 本系列是基于React Native版本号0.44.3写的.我们都知道,一个App不可能只有一个不变的界面,而是通过多个界面间的跳转来呈现不同的内容.那么这篇文章将介绍RN中的导航. 导航 什么 ...
随机推荐
- Swift自增和自增运算
自增和自增运算 和 C 语言一样,Swift 也提供了方便对变量本身加1或减1的自增(++)和自减(--)的运算符.其操作对象可以是整形和浮点型. var i = ++i // 现在 i = 1 ...
- jquery中div悬浮嵌套按钮效果
<div class="btn_sure_cai" style="margin-left: 0px;" onmouseover="show_hi ...
- 一张图告诉你 canvas 中的 miterLimit 代表着什么
一图胜千言, 图中有一条路径path, 沿着路径描了一条宽度为 width 的边, miterLimit 代表的是, 比例 ab/ac, 其中ac的长度为 1/2 width 来看 mdn 上的描述, ...
- jQuery怎样判断按钮是否被选中
方法一: if ($("#checkbox-id")get(0).checked) { // do something } 方法二: if($('#checkbox-id' ...
- 遇到android.os等系统sdk包没有自动导入的情况
采取手动导入,build path,然后add external jar,找到sdk的安装目录,导入android 的jar包即可
- JUnit【1】断言用法之assertEquals/True/False/ArrayEquals
前段时间去亚信面试,被问到写一个冒泡排序,心想这多新鲜,刷刷几下写好.面试官突然问,你怎么对这个程序进行单元测试? 单元测试?! 懵圈... 单元测试 代码是为了什么, ...
- ecshop中smarty比较操作符(eq,ne,neq)含义
eq相等, ne.neq不相等, gt大于, lt小于, gte.ge大于等于, lte.le 小于等于, not非, mod求模. is [not] div by是否能被某数整除, is [not ...
- HDOJ 1260 DP
Tickets Time Limit: 2000/1000 MS (Java/Others) Memory Limit: 65536/32768 K (Java/Others)Total Sub ...
- 对象序列化 输入输出流概念 InputOutStream OutputStream
序列化:内存到文件 他是输出流 ObjectOutputStream 需要强制类型转换 必须实现seriazable接口 反序列化:文件到内存 输入流 O ...
- POJ 3398 Perfect Service(树型动态规划,最小支配集)
POJ 3398 Perfect Service(树型动态规划,最小支配集) Description A network is composed of N computers connected by ...